Page 217 of 394

Black plate (217,1)
Normal insertion
1. Press the load button (
).
2. When“IN”is displayed, insert the CD.
Inserting CDs into desired tray number
1. Press and hold the load button (
)
for about 2 seconds until a beep sound
is heard.
2. Press the channel preset button for the
desired tray number while“WAIT”is
displayed.
3. When“IN”is displayed, insert the CD.
NOTE
The CD cannot be inserted to the desired tray
number if the number is already occupied.
Multiple insertion
1. Press and hold the load button (
)
for about 2 seconds until a beep sound
is heard.
2. When“IN”is displayed, insert the CD.
3. When“IN”is displayed again, insert
the next CD.
NOTE
The first-inserted CD will be played
automatically when:
lNo other CD is inserted within 15 seconds
after“IN”is displayed.
lThe CD trays are full.
Displaying the CD-inserted tray
number
When you want to know the number for a
CD-inserted tray, press the display button
(
). The tray number will be displayed
for 5 seconds.
Ejecting the CD
Normal ejection
1. Press the CD eject button (
). The
disc number and“DISC OUT”will be
displayed.
2. Pull out the CD.
NOTE
When the CD is ejected during play, the next
CD will be played automatically.
Ejecting CDs from desired tray number
1. Press and hold the CD eject button (
)
for about 2 seconds until a beep sound
is heard.
The“DISC OUT”display flashes.
2. Press the channel preset button for the
desired CD number for less than 5
seconds after the beep sound is heard.
3. Pull out the CD.
Multiple ejection
1. Press and hold the CD eject button (
)
for about 2 seconds until a beep sound
is heard.
The“DISC OUT”display flashes.
2. Press the CD eject button (
) again
for less than 5 seconds after the beep
sound is heard.
NOTE
If the button is not pressed and about 5
seconds have elapsed while“DISC OUT”is
flashing, CDs are automatically ejected.
3. Pull out the CD, then the next CD will
be ejected.
Interior Comfort
Audio System
6-39
Mazda3_8X41-EA-07F_Edition1 Page217
Wednesday, April 25 2007 1:6 PM
Form No.8X41-EA-07F
Page 218 of 394

Black plate (218,1)
NOTElCDs will be ejected starting with the one
with the lowest number.
lAll CDs in the tray will be ejected
continuously.
lCDs can be ejected when the ignition
switch is off. Press and hold the CD eject
button (
) for about 2 seconds and all
CDs will eject.
Playback
Press the CD play button (
) to start
play when a CD is in the unit.
If a CD is not in the unit when the CD
play button (
) is pressed,“NO DISC”
will flash on and off.
Fast-forward/Reverse
Press and hold the fast-forward button
(
) to advance through a track at high
speed.
Press and hold the reverse button (
)
to reverse through a track at high speed.
Track search
Press the track up button (
) once to skip
forward to the beginning of the next track.
Press the track down button (
)onceto
skip back to the beginning of the current
track.
Disc search
During music CD playback
To change the disc, press the DISC button
(
or) during playback.
During MP3 CD playback
To change the disc, press the DISC button
(
or) for 1.5 seconds or
more during playback.
Folder search (during MP3 CD
playback)
To change to the previous folder, press the
folder down button (
) for less than
1.5 seconds, or press the folder up button
(
) for less than 1.5 seconds to
advance to the next folder.
Music scan
This feature helps to find a program by
playing about the first 10 seconds of each
track.
Press the scan button (
) during
playback to start the scan play operation
(the track number will flash).
Press the scan button (
) again to
cancel scan playback.
NOTE
If the unit is left in scan, normal playback will
resume where scan was selected.
Repeat playback
During music CD playback
1. Press the repeat button (
) during
playback to play the current track
repeatedly.“RPT”is displayed.
2. Press the button again to cancel the
repeat playback.
During MP3 CD playback
(Track repeat)
1. Press the repeat button (
) during
playback to play the current track
repeatedly.“RPT”is displayed.
2. To cancel the repeat playback, press the
button again after 3 seconds.
6-40
Interior Comfort
Audio System
Mazda3_8X41-EA-07F_Edition1 Page218
Wednesday, April 25 2007 1:6 PM
Form No.8X41-EA-07F
Page 219 of 394

Black plate (219,1)
(Folder repeat)
1. Press the repeat button (
) during
playback, and then press the button
again within 3 seconds to play the
tracks in the current folder repeatedly.
“RPT”is displayed.
2. Press the button again to cancel the
repeat playback.
Random playback
Tracks are randomly selected and played.
During music CD playback
1. Press the random button (
) during
playback to play the tracks in the CD
randomly.“RDM”is displayed.
2. Press the button again to cancel the
random playback.
During MP3 CD playback
(Folder random)
1. Press the random button (
) during
playback to play the tracks in the folder
randomly.“RDM”is displayed.
2. To cancel the random playback, press
the button again after 3 seconds.
(CD random)
1. Press the random button (
) during
playback, and then press the button
again within 3 seconds to play the
tracks on the CD randomly.“RDM”is
displayed.
2. Press the button again to cancel the
random playback.
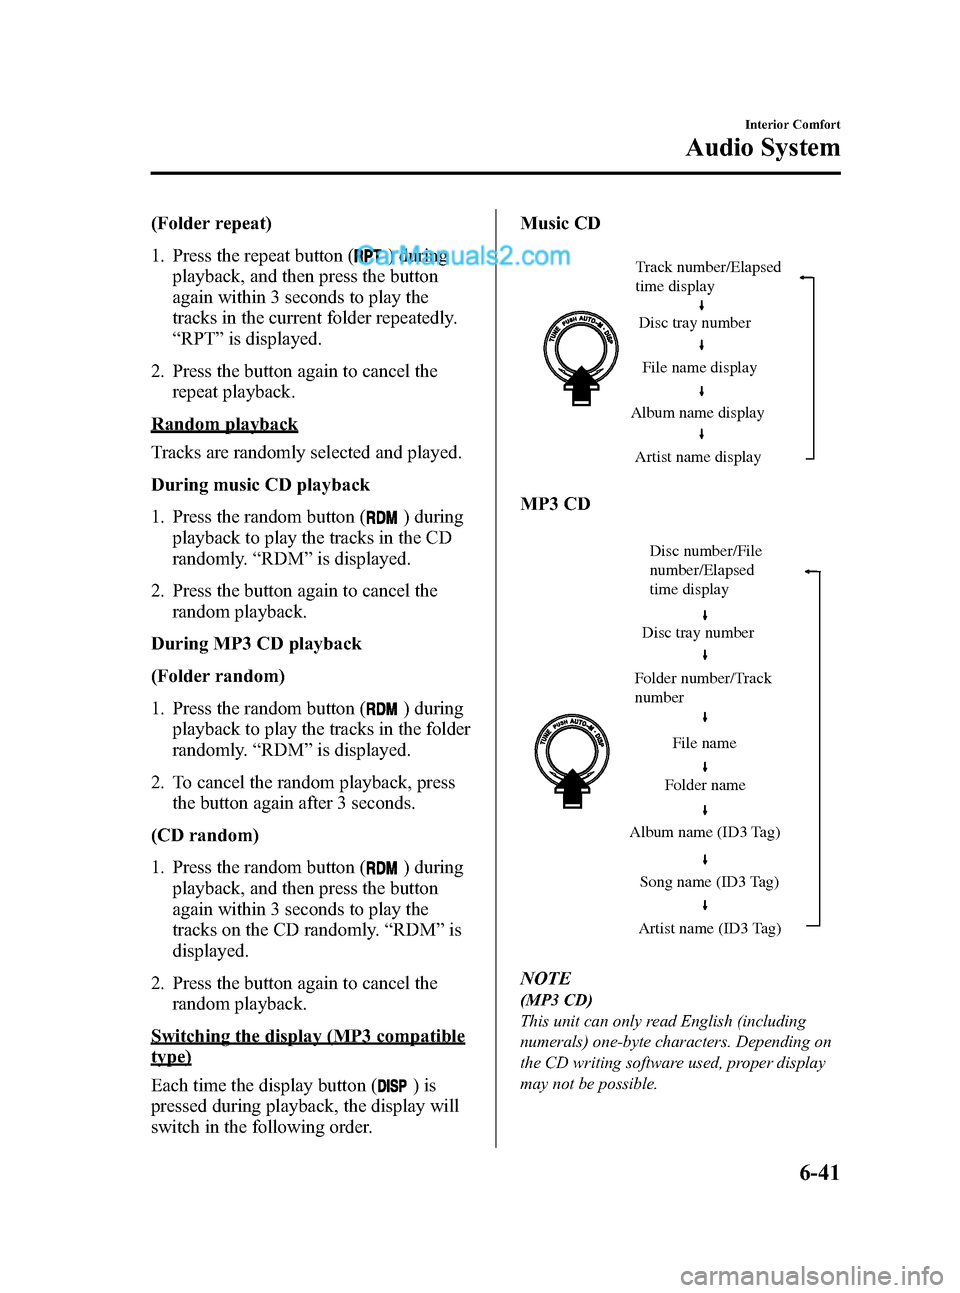
Switching the display (MP3 compatible
type)
Each time the display button (
)is
pressed during playback, the display will
switch in the following order.Music CD
Track number/Elapsed
time display
Disc tray number
File name display
Album name display
Artist name display
MP3 CD
Folder number/Track
numberDisc number/File
number/Elapsed
time display
Disc tray number
File name
Folder name
Album name (ID3 Tag)
Song name (ID3 Tag)
Artist name (ID3 Tag)
NOTE
(MP3 CD)
This unit can only read English (including
numerals) one-byte characters. Depending on
the CD writing software used, proper display
may not be possible.
Interior Comfort
Audio System
6-41
Mazda3_8X41-EA-07F_Edition1 Page219
Wednesday, April 25 2007 1:6 PM
Form No.8X41-EA-07F
Page 220 of 394

Black plate (220,1)
Display scroll (MP3 compatible type)
Only 12 characters can be displayed at
one time. To display the rest of the
characters of a long title, turn the display
feed dial (
) to the right. Hidden
titles can be scrolled into the display one
character at a time.
NOTE
The displayable number of characters is
limited. If the number of characters, including
the file extension (.mp3), exceeds 32
characters, it may not be fully displayed.
Message display
If“CHECK CD”is displayed, it means
that there is some CD malfunction. Check
the CD for damage, dirt, or smudges, and
then properly reinsert. If the message
appears again, take the unit to an
Authorized Mazda Dealer for service.
qOperating the Auxiliary jack
You can connect portable audio units or
similar products on the market to the
auxiliary jack to listen to music or audio
over the vehicle's speakers, refer to
Auxiliary Input (page 6-46).
6-42
Interior Comfort
Audio System
Mazda3_8X41-EA-07F_Edition1 Page220
Wednesday, April 25 2007 1:6 PM
Form No.8X41-EA-07F
Page 221 of 394
Black plate (221,1)
qError Indications
If you see an error indication on the display, find the cause in the chart. If you cannot clear
the error indication, take the vehicle to an Authorized Mazda Dealer.
Indication Cause Solution
CHECK CDCD is inserted upside downInsert the CD properly. If the error indication
does not disappear, consult an Authorized Mazda
Dealer
CD is defectiveInsert another CD properly. If the error indication
does not disappear, consult an Authorized Mazda
Dealer
Interior Comfort
Audio System
6-43
Mazda3_8X41-EA-07F_Edition1 Page221
Wednesday, April 25 2007 1:6 PM
Form No.8X41-EA-07F
Page 222 of 394

Black plate (222,1)
Audio Control Switch
Operation (Steering Wheel)
í
When the audio unit is turned on,
operation of the audio unit from the
steering wheel is possible.
NOTE
Because the audio unit will be turned off under
the following conditions, the switches will be
inoperable.
lWhen the ignition switch is turned to the
LOCK position.
lWhen the power button on the audio unit is
pressed and the audio unit is turned off.
lWhen a cassette tape/CD being played is
ejected. (For the In-dash CD changer, when
all CDs are ejected.)
NOTE
Mazda has installed this system to prevent
distraction while driving the vehicle and using
audio controls on the dashboard.
Always make safe driving your first priority.
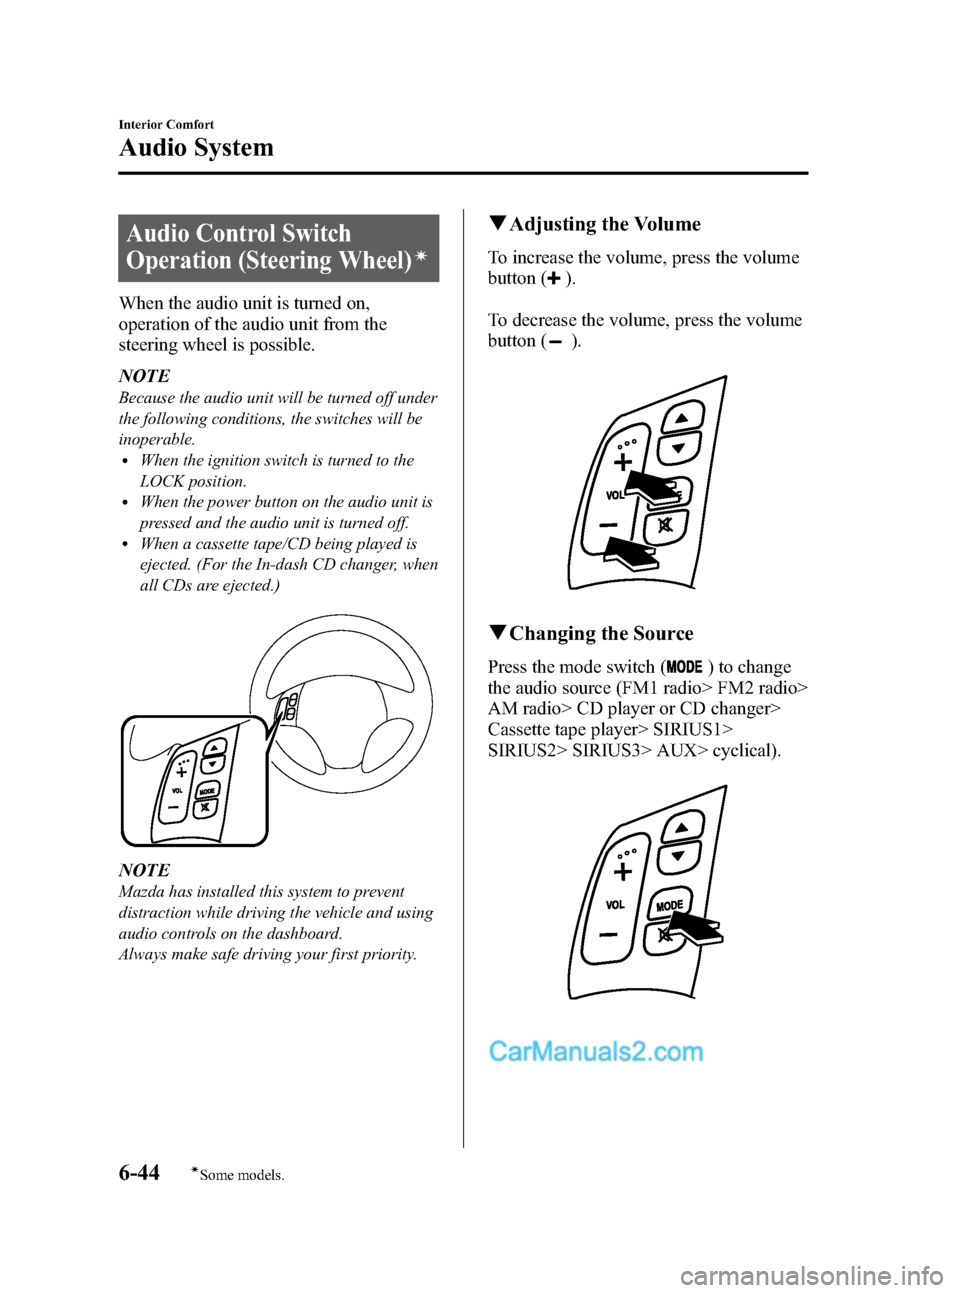
qAdjusting the Volume
To increase the volume, press the volume
button (
).
To decrease the volume, press the volume
button (
).
qChanging the Source
Press the mode switch () to change
the audio source (FM1 radio> FM2 radio>
AM radio> CD player or CD changer>
Cassette tape player> SIRIUS1>
SIRIUS2> SIRIUS3> AUX> cyclical).
6-44
Interior Comfort
íSome models.
Audio System
Mazda3_8X41-EA-07F_Edition1 Page222
Wednesday, April 25 2007 1:6 PM
Form No.8X41-EA-07F
Page 223 of 394

Black plate (223,1)
NOTE
Cassette tape, CD, CD changer and SIRIUS
digital satellite radio modes cannot be selected
in the following cases:
lA cassette deck, CD, CD changer, or
SIRIUS digital satellite radio unit is not
equipped on the audio system.
lA cassette tape, or CD has not been
inserted.
Connect a portable audio unit or similar
product on the market to the auxiliary jack to
listen to music or audio over the vehicle's
speakers. Change the audio source to AUX
mode (page 6-46).
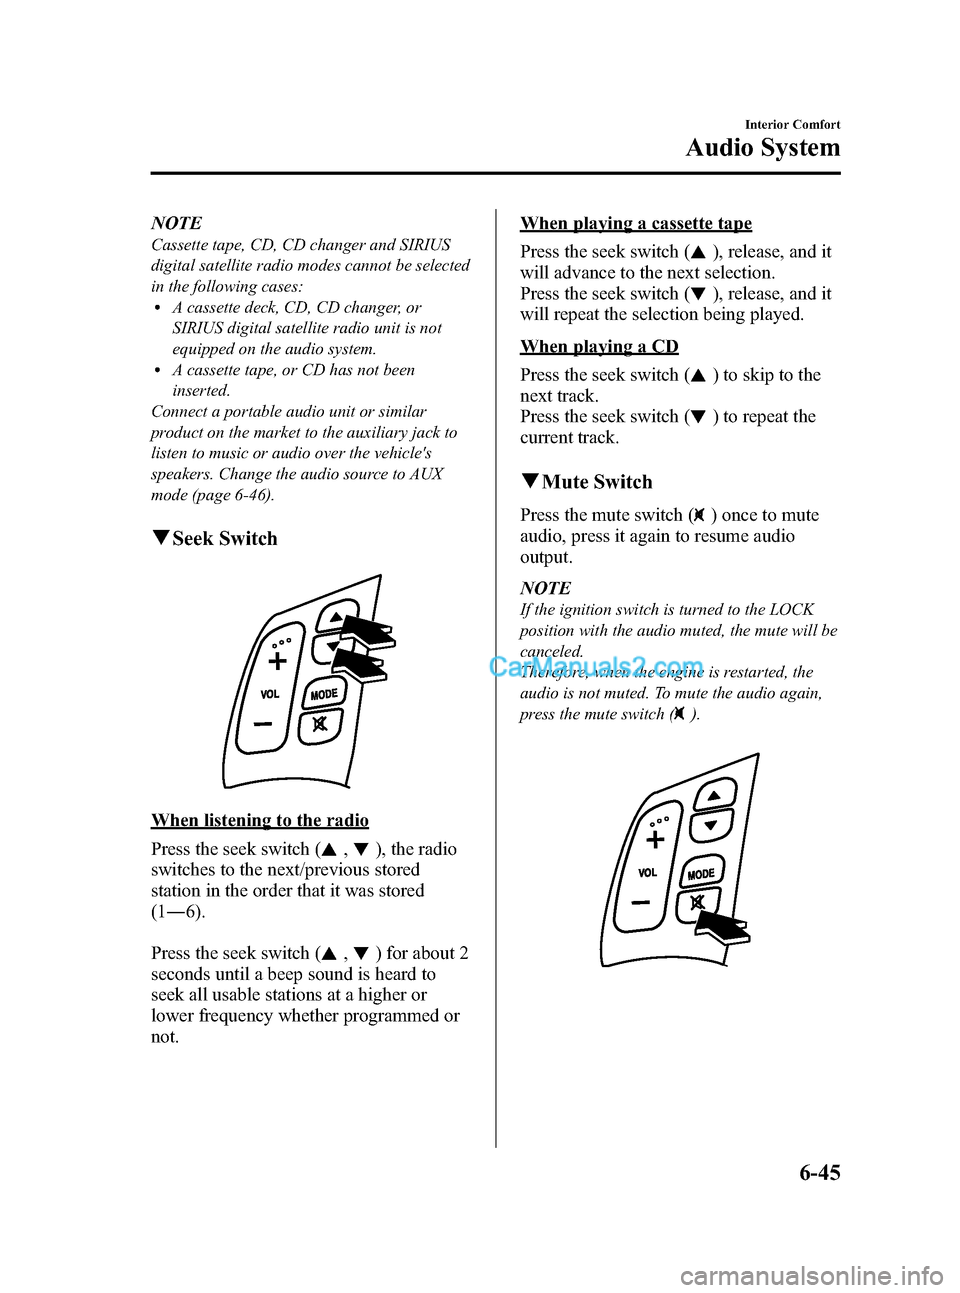
qSeek Switch
When listening to the radio
Press the seek switch (
,), the radio
switches to the next/previous stored
station in the order that it was stored
(1―6).
Press the seek switch (
,) for about 2
seconds until a beep sound is heard to
seek all usable stations at a higher or
lower frequency whether programmed or
not.
When playing a cassette tape
Press the seek switch (
), release, and it
will advance to the next selection.
Press the seek switch (
), release, and it
will repeat the selection being played.
When playing a CD
Press the seek switch (
) to skip to the
next track.
Press the seek switch (
) to repeat the
current track.
qMute Switch
Press the mute switch () once to mute
audio, press it again to resume audio
output.
NOTE
If the ignition switch is turned to the LOCK
position with the audio muted, the mute will be
canceled.
Therefore, when the engine is restarted, the
audio is not muted. To mute the audio again,
press the mute switch (
).
Interior Comfort
Audio System
6-45
Mazda3_8X41-EA-07F_Edition1 Page223
Wednesday, April 25 2007 1:6 PM
Form No.8X41-EA-07F
Page 224 of 394

Black plate (224,1)
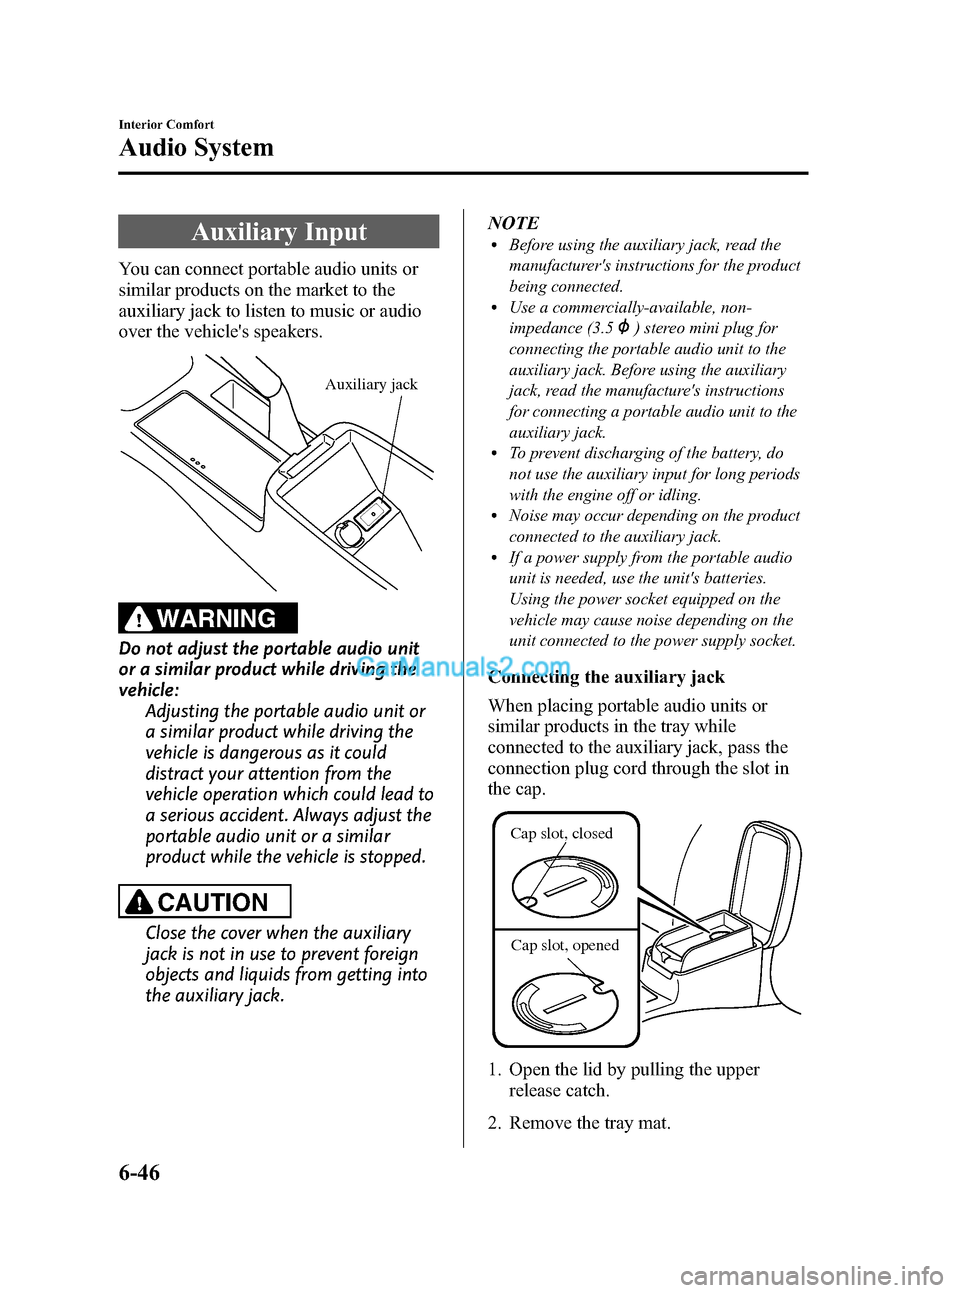
Auxiliary Input
You can connect portable audio units or
similar products on the market to the
auxiliary jack to listen to music or audio
over the vehicle's speakers.
Auxiliary jack
WARNING
Do not adjust the portable audio unit
or a similar product while driving the
vehicle:
Adjusting the portable audio unit or
a similar product while driving the
vehicle is dangerous as it could
distract your attention from the
vehicle operation which could lead to
a serious accident. Always adjust the
portable audio unit or a similar
product while the vehicle is stopped.
CAUTION
Close the cover when the auxiliary
jack is not in use to prevent foreign
objects and liquids from getting into
the auxiliary jack.NOTE
lBefore using the auxiliary jack, read the
manufacturer's instructions for the product
being connected.
lUse a commercially-available, non-
impedance (3.5
) stereo mini plug for
connecting the portable audio unit to the
auxiliary jack. Before using the auxiliary
jack, read the manufacture's instructions
for connecting a portable audio unit to the
auxiliary jack.
lTo prevent discharging of the battery, do
not use the auxiliary input for long periods
with the engine off or idling.
lNoise may occur depending on the product
connected to the auxiliary jack.
lIf a power supply from the portable audio
unit is needed, use the unit's batteries.
Using the power socket equipped on the
vehicle may cause noise depending on the
unit connected to the power supply socket.
Connecting the auxiliary jack
When placing portable audio units or
similar products in the tray while
connected to the auxiliary jack, pass the
connection plug cord through the slot in
the cap.
Cap slot, closed
Cap slot, opened
1. Open the lid by pulling the upper
release catch.
2. Remove the tray mat.
6-46
Interior Comfort
Audio System
Mazda3_8X41-EA-07F_Edition1 Page224
Wednesday, April 25 2007 1:6 PM
Form No.8X41-EA-07F