Page 9 of 58
9
Before Use
Ifnecessary
Rear View
Monitor
MEMO
<00310025003e00280025001a004300320025003a002d0043002900250012004600530053004f0004000400340045004b00490004001d00040004002a0056004d00480045005d00100004002e0059005200490004001c00100004001600140014001b000400
040017001e0019001b000400340031>
Page 10 of 58
10
Before Use
Navigation
Set Up
RDM-TMCIf
necessary
Rear View
Monitor
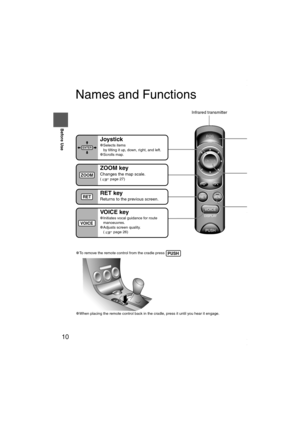
Names and Functions
lTo remove the remote control from the cradle press
lWhen placing the remote control back in the cradle, press it until you hear it engage. PUSH
Joystick
lSelects items
by tilting it up, down, right, and left.
lScrolls map.
ZOOM key
Changes the map scale.( page 27)
RET key
Returns to the previous screen.
VOICE key
lInitiates vocal guidance for route
manoeuvres.
lAdjusts screen quality.
( page 26)
POS (Po
Displays you
ENTER
lExecutes alDisplays p
MENUk
Select a me( page 1
Infrared transmitter
VOICE
POS
ENTER
MENU
ENTER
ZOOM
RET
TA L K Sw
Use for swi
recognitionTALK
<00310025003e00280025001a004300320025003a002d0043002900250012004600530053004f0004000400340045004b004900040015001400040004002a0056004d00480045005d00100004002e0059005200490004001c00100004001600140014001b00
0400040017001e0019001b000400340031>
Page 11 of 58
 11
Before Use
Ifnecessary
Rear View
Monitor
you hear it engage.
Note
Match the polarity of the batteries
with the and marks in the
battery case.
l
Battery: Two AA batteries (R6PU)lBattery lif")
11
Before Use
Ifnecessary
Rear View
Monitor
you hear it engage.
Note
Match the polarity of the batteries
with the and marks in the
battery case.
l
Battery: Two AA batteries (R6PU)lBattery life: Approximately 5
months of normal use (when
using manganese batteries at
ambient temperatures)
lBattery replacement: Replace
the batteries as soon as possible
when the infrared receiver does
not respond properly to remote
control operations, or when the
remote control does not work.
Note
Make sure that there is not any
pressure applied to any of the
remote control buttons when
placing the remote control in the
console box. Pressure on any of
the buttons will drain the batteries.
Battery Inserting
ÀOpen the
battery
compartment
cover.
ÁInsert the
new
batteries.
ÂClose the
battery
compartment
cover.
POS (Position) key
Displays your current position.
ENTER key
lExecutes a selected item.
lDisplays pop up menu.
MENU key
Select a menu.( page 14)
Infrared transmitter
POS
ENTER
MENU
TALK Switch
Use for switching to voice
recognition or canceling.TALK
<00310025003e00280025001a004300320025003a002d0043002900250012004600530053004f0004000400340045004b004900040015001500040004002a0056004d00480045005d00100004002e0059005200490004001c00100004001600140014001b00
0400040017001e0019001b000400340031>
Page 12 of 58
 12
RoutingAddress
Book
Getting started
Activation
Insert the map disc into the unit to start the Mobile Navigation System.
Note
lThe map disc cannot be inserted or ejected while the ignition switch i")
12
RoutingAddress
Book
Getting started
Activation
Insert the map disc into the unit to start the Mobile Navigation System.
Note
lThe map disc cannot be inserted or ejected while the ignition switch is in the OFF position.
lRemember that the battery can run down if the ignition switch is kept in the ON or ACC
position for a long time while the engine not running.
nMap Disc
lRefer to “Handling and Care of Map Discs” to know how to handle a map
disc ( page 58).
1
Turn the ignition switch
to the ON position and
press to open
the display.Note
lThis display angle can be adjusted by pressing .
When the is
pressed, the display
angle changes in
stages.
lPress to close the display.
2
Insert the map disc
with the printed side
facing up.Note
lThe main unit is located under the front passenger
seat.
lCondensation may form on the optical lens or the
map disc inside the unit when the temperature in
the vehicle increases in a short time such as when
heating the car on a cold day. This condensation
may cause malfunctions. If so, unload the map disc
and do not operate the unit for approximately 1
hour. Wipe the condensation off the map disc with a
soft cloth.
If the unit does not operate correctly after 1 hour,
consult an Authorized Mazda Dealer.
Cautions
OPEN/CLOSETILT
TILT
OPEN/CLOSE
(CAUTION) screen
<00310025003e00280025001a004300320025003a002d0043002900250012004600530053004f0004000400340045004b004900040015001600040004002a0056004d00480045005d00100004002e0059005200490004001c00100004001600140014001b00
0400040017001e0019001b000400340031>
Page 13 of 58
 13
Getting started
lThe Current Position screen appears.
Note
lYou can select the language by select and press . You can also change the
selected language using Language Selection. ( page 20)
lThe")
13
Getting started
lThe Current Position screen appears.
Note
lYou can select the language by select and press . You can also change the
selected language using Language Selection. ( page 20)
lThe CAUTION screen remains on the display unless you select and press .
When the ignition switch is in the ACC position and press (EJECT).
Select the buttons by using Joystick and press .
Colors for unavailable buttons will be pale.
3
Read CAUTION
carefully, and select
and press
.
Removing the Map Disc
Buttons on the screen
ENTER
Most functions are inhibited while the
vehicle is in motion.
Please read the handbook for operation
instructions.
Always obey traffic regulations.
Caution
ENTER
ENTER
Do not get your hand or fingers caught in
moving parts or in the disc slot. This can
cause injuries. Children are inquisitive, try
to install or remove the map disc without
infants looking on.
Caution
EJECT
ENTER
<00310025003e00280025001a004300320025003a002d0043002900250012004600530053004f0004000400340045004b004900040015001700040004002a0056004d00480045005d00100004002e0059005200490004001c00100004001600140014001b00
0400040017001e0019001b000400340031>
Page 14 of 58
14
RoutingAddress
Book
Getting started
Menu
Menu appears when pressing . MENU
Destination Entry and Route Search ( page 28)
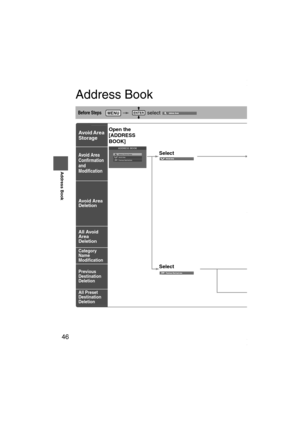
Address Book ( page 44)
Cancel Guidance ( page 39)
Route Options ( page 40)
Volume ( page 50)
Set Clock ( page 15)
Navigation Set Up ( page 16)
<00310025003e00280025001a004300320025003a002d0043002900250012004600530053004f0004000400340045004b004900040015001800040004002a0056004d00480045005d00100004002e0059005200490004001c00100004001600140014001b00
0400040017001e0019001b000400340031>
Page 15 of 58
15
Getting started
Set Clock
The current time is set using this function. Since time notification is provided by a GPS satellite.
Before Steps select MENUENTERENTER
Open the [SET CLOCK] screen
Select if you prefer 24-hour display;
for 12-hour display.
Select to move the setting ahead by one hour,
and similarly, select to move it back by one
hour.
How to exit .
Note
Minutes and seconds are adjusted by the GPS, however, it is necessary to
adjust hours under the following conditions:
lDriving across different time zones
lDaylight saving time start and end
<00310025003e00280025001a004300320025003a002d0043002900250012004600530053004f0004000400340045004b004900040015001900040004002a0056004d00480045005d00100004002e0059005200490004001c00100004001600140014001b00
0400040017001e0019001b000400340031>
Page 16 of 58
16
RoutingAddress
Book
Getting started
Navigation Set Up
lYou can alter the map display conditions, the route guidance conditions and show the
system information.
nStop your vehicle before the following operations. Do not change the settings and destination locations while driving. Minimize the time
spent viewing the monitor screen and listening to the voice guidance while driving.
Operating the system will distract the driver from looking ahead of the vehicle and may
cause an accident.
Always stop the vehicle in a safe location and put the parking brake on before operating
the system.
Before Steps select
Warning
MENUENTERENTER
Open
[NAVIGATION SETUP] ( page 17)
( page 19)
( page 20)
( page 21)
( page 22)
( page 24)
<00310025003e00280025001a004300320025003a002d0043002900250012004600530053004f0004000400340045004b004900040015001a00040004002a0056004d00480045005d00100004002e0059005200490004001c00100004001600140014001b00
0400040017001e0019001b000400340031>


 9
Before Use
Ifnecessary
Rear View
Monitor
MEMO
<00310025003e00280025001a004300320025003a002d0043002900250012004600530053004f0004000400340045004b00490004001d00040004002a0056004d00480045005d0010000400")
 10
Before Use
Navigation
Set Up
RDM-TMCIf
necessary
Rear View
Monitor
Names and Functions
lTo remove the remote control from the cradle press
lWhen placing the remote control back in the cradle, pr")
 14
RoutingAddress
Book
Getting started
Menu
Menu appears when pressing . MENU
Destination Entry and Route Search ( page 28)
Address Book ( page 44)
Cancel Guidance ( page 39)
Route Options ( page 40")
![MAZDA MODEL 6 2008 Navigation Manual (in English) 15
Getting started
Set Clock
The current time is set using this function. Since time notification is provided by a GPS satellite.
Before Steps select MENUENTERENTER
Open the [SET CLOCK] screen
S](/manual-img/28/13578/w960_13578-14.png "MAZDA MODEL 6 2008 Navigation Manual (in English) 15
Getting started
Set Clock
The current time is set using this function. Since time notification is provided by a GPS satellite.
Before Steps select MENUENTERENTER
Open the [SET CLOCK] screen
S")
 16
RoutingAddress
Book
Getting started
Navigation Set Up
lYou can alter the map display conditions, the route guidance conditions and show the
system information.
nStop your vehicle before the follo")