2008 Lexus GX470 display
[x] Cancel search: displayPage 257 of 312

AUDIO/VIDEO SYSTEM
256
(g) Operating a video CD
DPlaying a video CD
Push the “AUDIO” button to display
this screen.
When you touch“WIDE”, the screen
mode can be changed.
It you touch “PICTURE” when the vehicle
is completely stopped and the parking
brake is applied, the video screen returns.
DDisplaying video CD controls
If you touch the part where controls are not
located while you are watching video on
the video CD, video CD controls will ap-
pear.
“>Page2”: Touching this will display on
the second page of video CD controls.
“
“Hide Buttons”: Touching this will turn off
the controls from the screen.
If “
” appears on the display when you
touch a control, the operation is not per-
mitted.
GX470_Navi_U (OM60D58U) 07/06/16
Page 258 of 312

AUDIO/VIDEO SYSTEM
257
D
Description of video CD controls
CONTROLS ON TOP PAGE
“Select Number”: The track or number
search screen appears. (See “SEARCH-
ING BY TRACK” on page 257.)
“Prev. Menu”: When you touch this while
the disc menu is displayed, the previous
page appears on the screen. If you touch
this while the player is playing video, the
previous track is searched and played.
“Next Menu”: When you touch this while
the disc menu is displayed, the next page
appears on the display. If you touch this
while the player is playing video, the next
track is searched and played.
“Main/Sub”: A multiplex transmission
changing control. The mode changes from
Main/Sub to Main, to Sub and back to
Main/Sub by touching this control.
“Return”: Touching this will display the
predetermined scene and start playing
from there.
CONTROLS ON SECOND PAGE
: Use this to pause the video
screen. When you touch this again, the
video screen advance frame by frame.
AA :Touch this to fast reverse during
playback.
" :Touch this to pause during playback
and resume playing during pause.
"" :Touch this to fast forward during the
playback and start playing slowly during
pause.
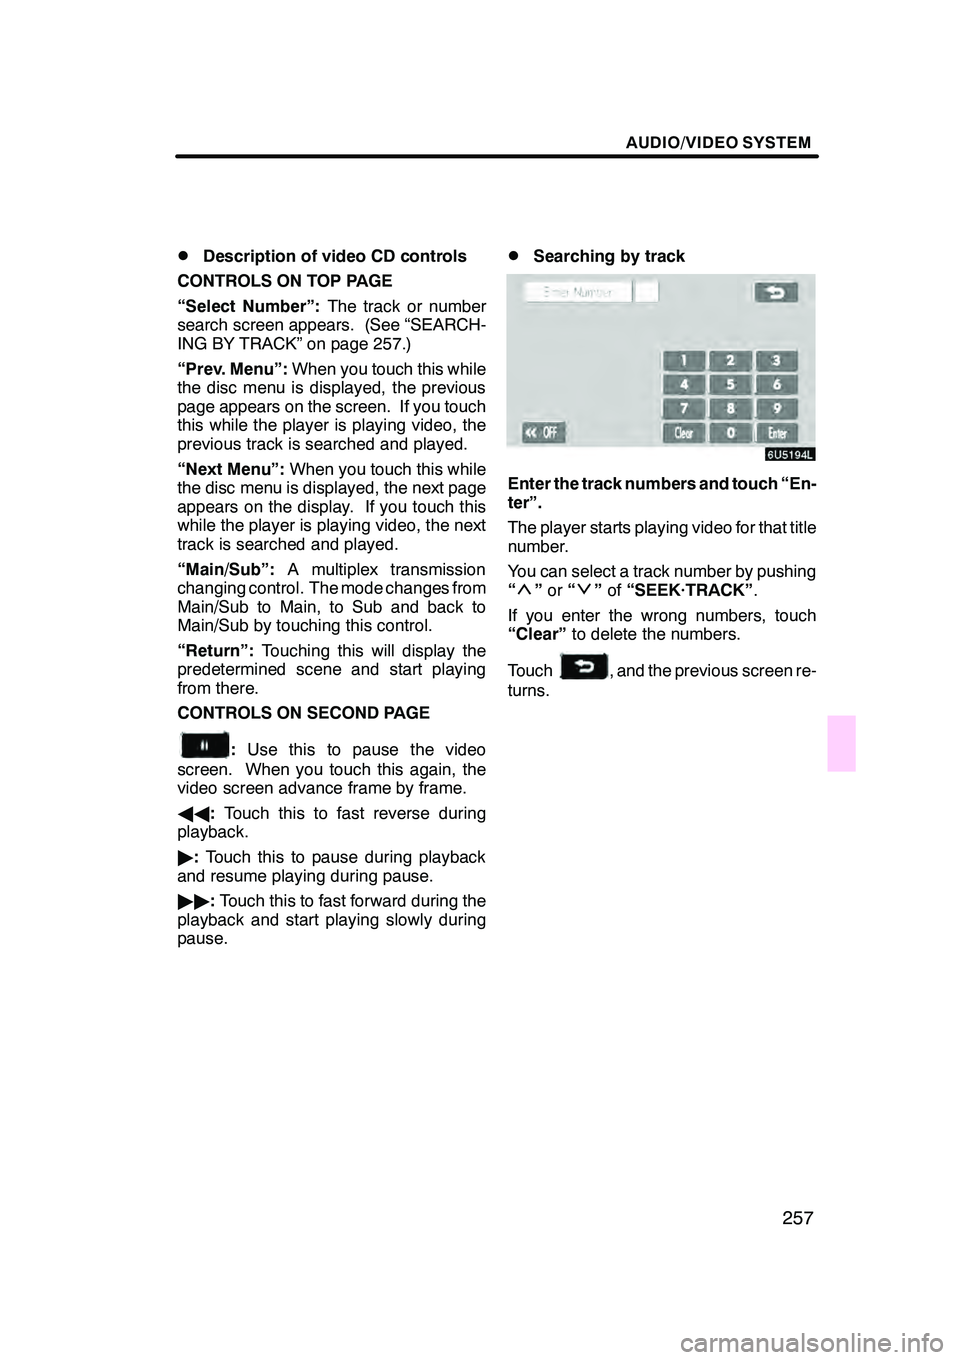
DSearching by track
Enter the track numbers and touch “En-
ter”.
The player starts playing video for that title
number.
You can select a track number by pushing
“
” or “”of “SEEK·TRACK” .
If you enter the wrong numbers, touch
“Clear” to delete the numbers.
Touch
, and the previous screen re-
turns.
GX470_Navi_U (OM60D58U) 07/06/16
Page 259 of 312

AUDIO/VIDEO SYSTEM
258
(h) If the player malfunctions
If the player or another unit equipped with
the player malfunction, your audio system
will display following messages.
If “Disc Check” appears on the display:
It indicates that the disc dirty, damaged, or
it was inserted upside down. Clean the
disc or insert it correctly. If a disc which is
not playable is inserted, “Disc Check” will
also appear on the screen. For appropri-
ate discs for this player, see “Audio/video
system operating hints” on page 262.
If “Region Code Error” appears on the
display:It indicates that the DVD region
code is not set properly.
If “DVD Error” appears on the display:
It indicates that the inside of the player unit
may be too hot due to the very high ambi-
ent temperature. Remove the disc from
the player and allow the player to cool
down.
If the malfunction is not rectified: Take
your vehicle to your dealer.
If an MP3 disc contains CD −DA files, only
CD− DA files are played. If an MP3 disc
contains files other than CD −DA, only MP3
files are played. (i) DVD player and DVD video disc in-
formation
DDVD video discs
This DVD player conforms to NTSC col-
or TV formats. The DVD video disc con-
forming to another formats such as
PAL or SECAM cannot be used.
Region codes: Some DVD video discs
have a region code indicating a country
where you can use the DVD video disc on
this DVD player. If the DVD video disc is
not labeled as “ALL” or “1”, you cannot use
it on this DVD player. If you attempt to play
an inappropriate DVD video disc on this
player, “Region Code Error” appears on
the screen. Even if the DVD video disc
does not have a region code, there is a
case that you cannot use it.
GX470_Navi_U (OM60D58U) 07/06/16
Page 262 of 312

AUDIO/VIDEO SYSTEM
261
1Volume control switch
Push “+”side to increase the volume. The
volume continues to increase while the
switch is being pressed.
Push “−”side to decrease the volume.
The volume continues to decrease while
the switch is being pressed.
2“”“” switches (Seek, search
track)
Radio
To select a preset station:
Quickly push and release the “
”or “”
switch. Do this again to select the next pre-
set station.
To seek a station:
Push and hold the “
”or “”switch until
you hear a beep. Do this again to find the
next station. If you push either the “
”or
“” switch in seek mode, the seek mode
will cancel.
Cassette tape player
To skip to a different track in either direc-
tion:
Quickly push and release the “
”or “”
switch. “FF 1” or “REW 1” will appear on
the display.
Next, push the “
”or “”switch until the
track you want to listen to is set. If you
push the switch ten times, the skip function
will turn off. (You can skip up to nine tracks
at a time.)
When counting the number of the tracks
you want to rewind, remember to count the
current track as well. For example, if you
want to rewind to a song that is two before
the song you are listening to, push the “
”
button three times.
If you push the switch further than you
wanted to, push the other side of the
switch. The track number will be increased
or reduced. The track number you select is not valid if
it is higher than the number of the tracks re-
maining on the current side of the cassette.
DWhen the tape reaches to the begin-
ning, the player will automatically start
playing that side.
DAfter the tape reaches to the end, the
player will automatically reverse and
start playing the other side.
There must be at least 3 seconds of blank
space between tracks for the switch to
work correctly. In addition, the feature may
not work well with some spoken, live, or
classical recordings.
To fast −forward or rewind:
Push and hold the “
”switch to fast −for-
ward a cassette tape. “FF” will appear on
the display. Push and hold the “
”switch
to rewind a tape. “REW” will appear on the
display.
To stop the tape while it is fast −forwarding,
push the “
”switch . To stop the tape
while it is rewinding, push the “”switch.
If a tape rewinds completely, the cassette
tape player will stop and then play that
same side. If a tape fast− forwards com-
pletely, the cassette will play the other side
of the tape using the auto −reverse feature.
DVD changer, or DVD player
Use this button to skip up or down to a dif-
ferent track, file or chapter in either direc-
tion.
To select a desired track, file or chapter:
Quickly push and release the “
”or “”
switch until the track, file or chapter you
want to play is set. If you want to return to
the beginning of the current track, file or
chapter, push the “
”switch once, quick-
ly.
To select a desired disc:
Push and hold the “
”or “”switch until
you hear a beep to change to the next or
the previous disc. Repeat this operation
until you reach the disc you want to listen
to.
GX470_Navi_U (OM60D80U) 08/01/11
Page 265 of 312

AUDIO/VIDEO SYSTEM
264
MP3/WMA files
DMP3 (MPEG Audio Layer 3) and WMA
(Windows Media Audio) are audio
compression standards.
DThe MP3/WMA player can play MP3
and WMA files on CD−ROM, CD −R
and CD −RW discs.
The unit can play disc recordings com-
patible with ISO 9660 level 1 and level
2 and with the Romeo and Joliet file
system.
DWhen naming an MP3 or WMA file, add
the appropriate file extension (.mp3 or
.wma).
DThe MP3/WMA player plays back files
with .mp3 or .wma file extensions as
MP3 or WMA files. To prevent noise
and playback errors, use the appropri-
ate file extensions.
DThe player can play only the first ses-
sion using multi −session compatible
CDs.
DMP3 files are compatible with the ID3
Tag Ver. 1.0, Ver. 1.1, Ver. 2.2 (front au-
dio system only), and Ver. 2.3 formats.
The unit cannot display disc title, track
title and artist name in other formats.
DWMA files can contain a WMA tag that
is used in the same way as an ID3 tag.
WMA tags carry information such as
track title, artist name.
DThe emphasis function is available
only when playing MP3/WMA files re-
corded at 32, 44.1 and 48 kHz. (The
system can play MP3 files with sam-
pling frequencies of 16, 22.05, and 24
kHz. However, the emphasis function
is not available for files recorded at
these frequencies.)
DThe sound quality of MP3/WMA files
generally improves with higher bit rate-
s. In order to achieve a reasonable lev-
el of sound quality, discs recorded with
a bit rate of at least 128 kbps are rec-
ommended.
Playable bit rates
MP3 files:
MPEG1 LAYER3—64 to 320 kbps
MPEG2 LSF LAYER3—64 to 160 kbps
WMA files:
Ver. 7, 8 CBR—48 to 192 kbps
Ver. 9 CBR—48 to 320 kbps
DThe MP3/WMA player does not play
back MP3/WMA files from discs re-
corder using packet write data transfer
(UDF format). Discs should be re-
corded using “pre −mastering” software
rather than packet −write software.
DThe m3u playlists are not compatible
with the audio player.
DMP3i (MP3 interactive) and MP3PRO
formats are not compatible with the au-
dio player.
DThe MP3 player is compatible with
VBR (Variable Bit Rate).
DWhen playing back files recorded as
VBR (Variable Bit Rate) files, the play
time will not be correctly displayed if
fast− forward or reverse operations are
used.
DIt is not possible to check folders that
do not include MP3/WMA files.
DMP3/WMA files in folders up to 8 levels
deep can be played. However, the
start of playback may be delayed when
using discs containing numerous lev-
els of folders. For this reason, we rec-
ommend creating discs with no more
than two levels of folders.
DIt is possible to play up to 192 folders or
255 files on one disc.
GX470_Navi_U (OM60D58U) 07/06/16
Page 273 of 312

AIR CONDITIONING
272
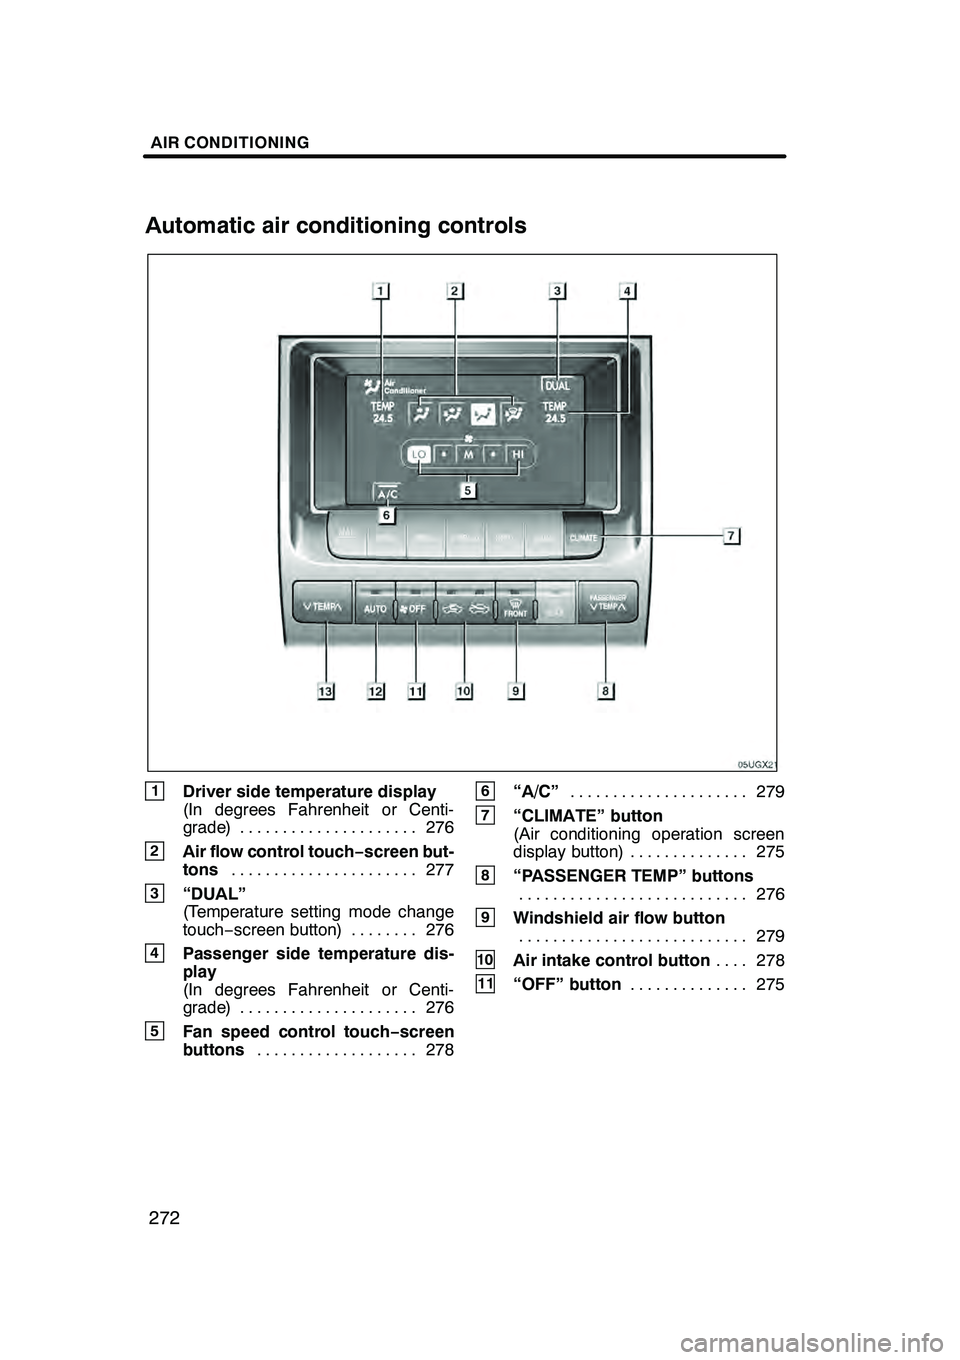
1Driver side temperature display
(In degrees Fahrenheit or Centi-
grade) 276.....................
2Air flow control touch −screen but-
tons 277
......................
3“DUAL”
(Temperature setting mode change
touch− screen button) 276 ........
4Passenger side temperature dis-
play
(In degrees Fahrenheit or Centi-
grade) 276.....................
5Fan speed control touch− screen
buttons 278
...................
6“A/C” 279
.....................
7“CLIMATE” button
(Air conditioning operation screen
display button) 275 ..............
8“PASSENGER TEMP” buttons
276
...........................
9Windshield air flow button
279
...........................
10Air intake control button 278
....
11“OFF” button 275
..............
GX470_Navi_U (OM60D58U) 07/06/16
Automatic air conditioning controls
Page 276 of 312

AIR CONDITIONING
275
The automatic air conditioning auto-
matically maintains the set tempera-
ture.
In the automatic operation mode, the air
conditioning selects the most suitable fan
speed, air flow, air intake and on−off the air
conditioning according to the temperature.
The ignition switch must be in the “ON”
position.
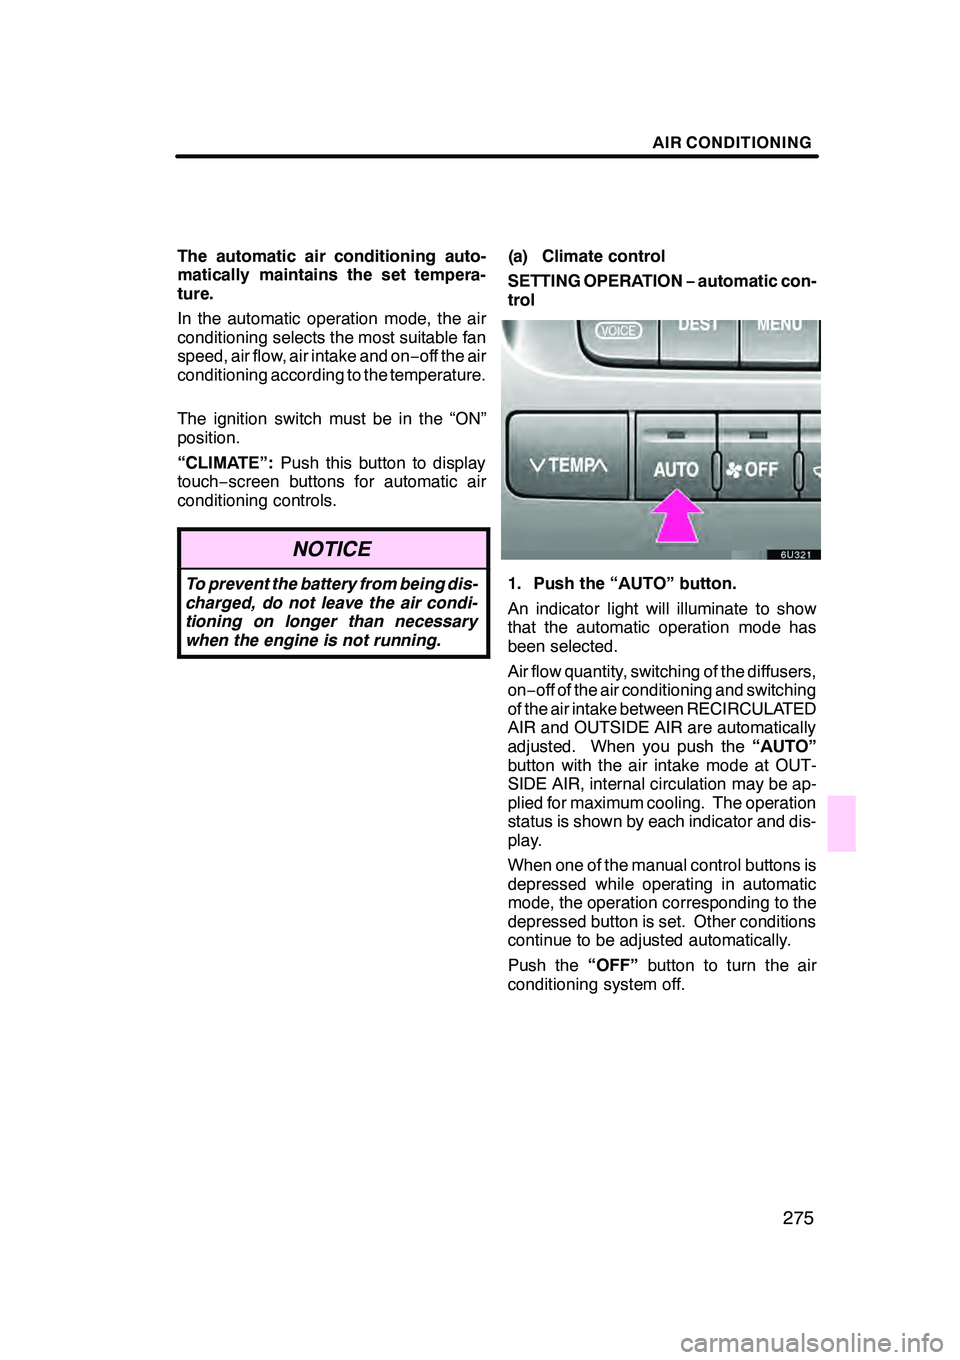
“CLIMATE”: Push this button to display
touch− screen buttons for automatic air
conditioning controls.
NOTICE
To prevent the battery from being dis-
charged, do not leave the air condi-
tioning on longer than necessary
when the engine is not running.
(a) Climate control
SETTING OPERATION −automatic con-
trol
1. Push the “AUTO” button.
An indicator light will illuminate to show
that the automatic operation mode has
been selected.
Air flow quantity, switching of the diffusers,
on− off of the air conditioning and switching
of the air intake between RECIRCULATED
AIR and OUTSIDE AIR are automatically
adjusted. When you push the “AUTO”
button with the air intake mode at OUT-
SIDE AIR, internal circulation may be ap-
plied for maximum cooling. The operation
status is shown by each indicator and dis-
play.
When one of the manual control buttons is
depressed while operating in automatic
mode, the operation corresponding to the
depressed button is set. Other conditions
continue to be adjusted automatically.
Push the “OFF”button to turn the air
conditioning system off.
GX470_Navi_U (OM60D58U) 07/06/16
Page 281 of 312

AIR CONDITIONING
280
To remove frost or exterior fog on the
windshield—
1. Push the upper side of the temperature
control button until maximum figure ap-
pears on the temperature display.
2. Push the windshield air flow button.
3. Touch “HI” of the air flow control to ob-
tain a maximum air flow.
4. Leave the air conditioning on−off con-
trol off.
When the windshield air flow button is
pushed while operating in automatic
mode, the air conditioning is set to operate
and the OUTSIDE AIR mode is set.
Touch “A/C” for dehumidified heating or
cooling. This setting clears the front view
more quickly.
If you push the windshield air flow button
once again while in the FRONT WIND-
SHIELD mode, the mode then returns to
the last mode used.
CAUTION
Do not use the windshield air flow
button during cooled air operation in
extremely humid weather. The differ-
ence between the temperature of the
outside air and that of the windshield
could cause the outer surface of the
windshield to fog up blocking your vi-
sion.
(c) Center vents and side vents
" Side vents
"Rear vents
GX470_Navi_U (OM60D58U) 07/06/16