Page 166 of 350
Driving your vehicle
48 4
1
2
3
4
5
6
7
8
9
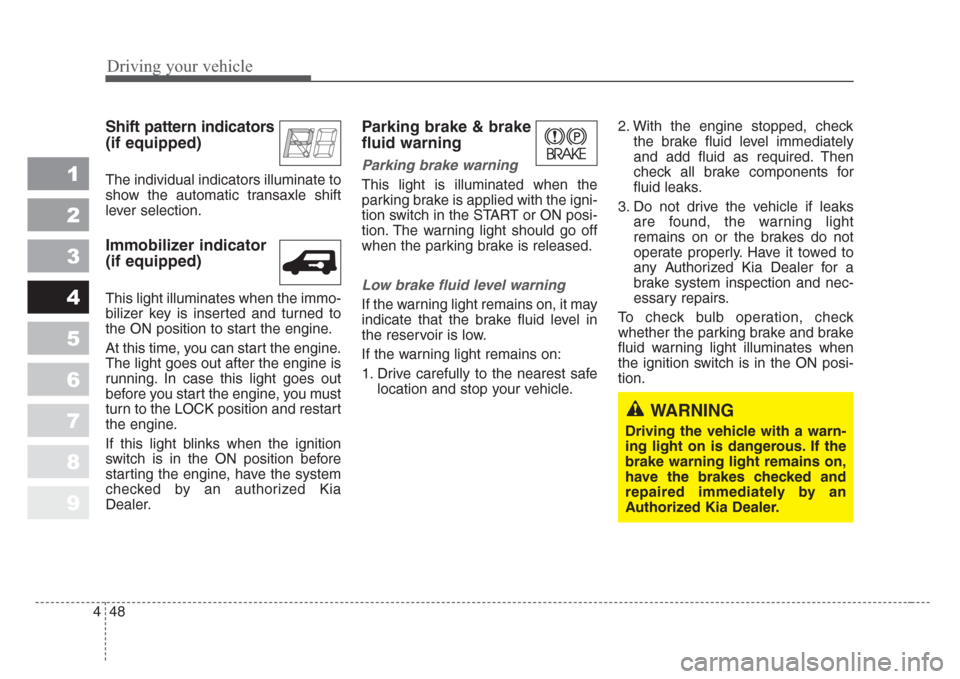
Shift pattern indicators
(if equipped)
The individual indicators illuminate to
show the automatic transaxle shift
lever selection.
Immobilizer indicator
(if equipped)
This light illuminates when the immo-
bilizer key is inserted and turned to
the ON position to start the engine.
At this time, you can start the engine.
The light goes out after the engine is
running. In case this light goes out
before you start the engine, you must
turn to the LOCK position and restart
the engine.
If this light blinks when the ignition
switch is in the ON position before
starting the engine, have the system
checked by an authorized Kia
Dealer.
Parking brake & brake
fluid warning
Parking brake warning
This light is illuminated when the
parking brake is applied with the igni-
tion switch in the START or ON posi-
tion. The warning light should go off
when the parking brake is released.
Low brake fluid level warning
If the warning light remains on, it may
indicate that the brake fluid level in
the reservoir is low.
If the warning light remains on:
1. Drive carefully to the nearest safe
location and stop your vehicle.2. With the engine stopped, check
the brake fluid level immediately
and add fluid as required. Then
check all brake components for
fluid leaks.
3. Do not drive the vehicle if leaks
are found, the warning light
remains on or the brakes do not
operate properly. Have it towed to
any Authorized Kia Dealer for a
brake system inspection and nec-
essary repairs.
To check bulb operation, check
whether the parking brake and brake
fluid warning light illuminates when
the ignition switch is in the ON posi-
tion.
WARNING
Driving the vehicle with a warn-
ing light on is dangerous.If the
brake warning light remains on,
have the brakes checked and
repaired immediately by an
Authorized Kia Dealer.
Page 176 of 350
Driving your vehicle
58 4
1
2
3
4
5
6
7
8
9
Headlight position ( )
When the light switch is in the head-
light position (2nd position) the head,
tail, position, license and instrument
panel lights are ON.
High - beam operation
To turn on the high beam headlights,
push the lever forward.
The high-beam indicator will light
when the headlight high beams are
switched on.
To prevent the battery from being
discharged, do not leave the lights
on for a prolonged time while the
engine is not running.
Flashing headlights
To flash the headlights, pull the lever
towards you. It will return to the nor-
mal (low-beam) position when
released. The headlight switch does
not need to be on to use this flashing
feature.
1KMC21121KMC21141KMC2115
Page 180 of 350
Driving your vehicle
62 4
1
2
3
4
5
6
7
8
9
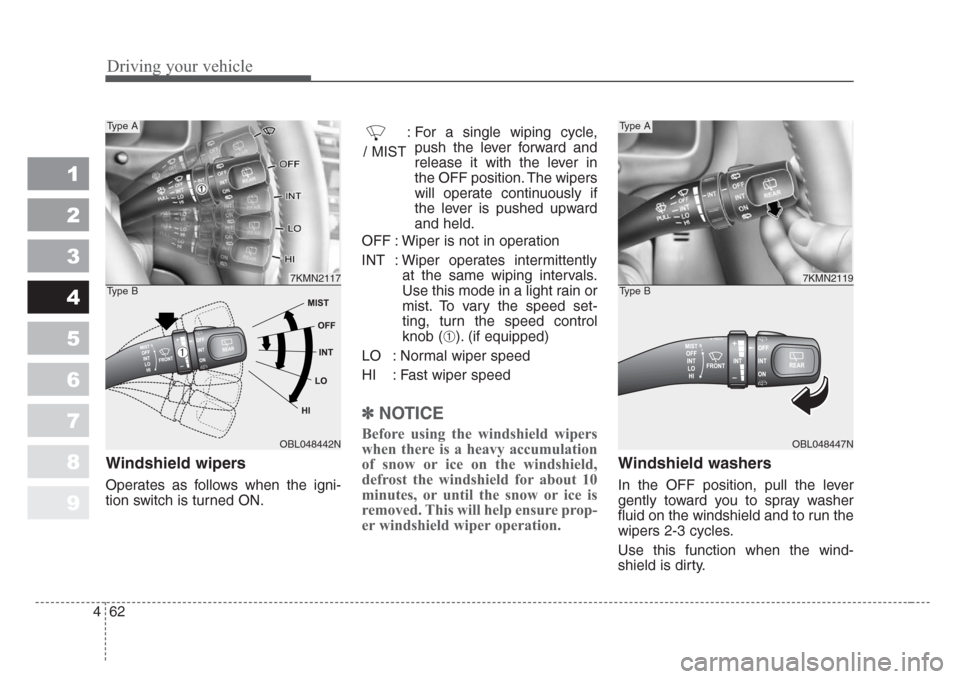
Windshield wipers
Operates as follows when the igni-
tion switch is turned ON.: For a single wiping cycle,
push the lever forward and
release it with the lever in
the OFF position. The wipers
will operate continuously if
the lever is pushed upward
and held.
OFF : Wiper is not in operation
INT : Wiper operates intermittently
at the same wiping intervals.
Use this mode in a light rain or
mist. To vary the speed set-
ting, turn the speed control
knob (
➀). (if equipped)
LO : Normal wiper speed
HI : Fast wiper speed
✽
NOTICE
Before using the windshield wipers
when there is a heavy accumulation
of snow or ice on the windshield,
defrost the windshield for about 10
minutes, or until the snow or ice is
removed. This will help ensure prop-
er windshield wiper operation.
Windshield washers
In the OFF position, pull the lever
gently toward you to spray washer
fluid on the windshield and to run the
wipers 2-3 cycles.
Use this function when the wind-
shield is dirty.
7KMN2117
OBL048442N
Type A
Type B
/ MIST
7KMN2119
OBL048447N
Type A
Type B
➀
Page 187 of 350
469
Driving your vehicle
1
2
3
4
5
6
7
8
9
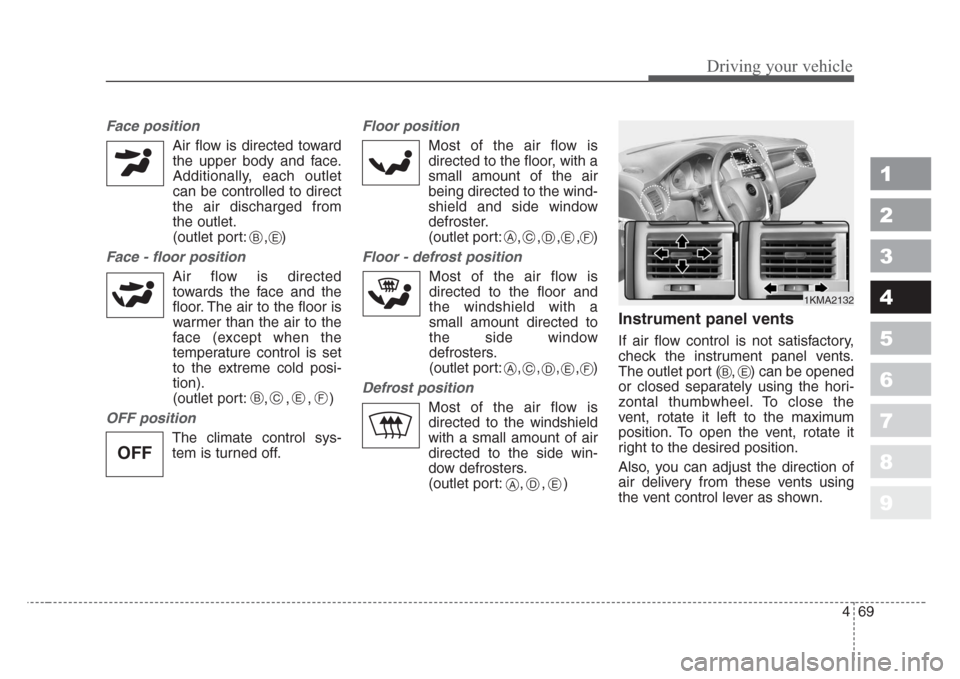
Face position
Air flow is directed toward
the upper body and face.
Additionally, each outlet
can be controlled to direct
the air discharged from
the outlet.
(outlet port: , )
Face - floor position
Air flow is directed
towards the face and the
floor. The air to the floor is
warmer than the air to the
face (except when the
temperature control is set
to the extreme cold posi-
tion).
(outlet port: , , , )
OFF position
The climate control sys-
tem is turned off.
Floor position
Most of the air flow is
directed to the floor, with a
small amount of the air
being directed to the wind-
shield and side window
defroster.
(outlet port: , , , , )
Floor - defrost position
Most of the air flow is
directed to the floor and
the windshield with a
small amount directed to
the side window
defrosters.
(outlet port:
, , , ,)
Defrost position
Most of the air flow is
directed to the windshield
with a small amount of air
directed to the side win-
dow defrosters.
(outlet port: , , )
Instrument panel vents
If air flow control is not satisfactory,
check the instrument panel vents.
The outlet port ( , ) can be opened
or closed separately using the hori-
zontal thumbwheel. To close the
vent, rotate it left to the maximum
position. To open the vent, rotate it
right to the desired position.
Also, you can adjust the direction of
air delivery from these vents using
the vent control lever as shown.
B
BCEF
CADEF
CADEF
E
ADE
1KMA2132
BE
OFF
Page 200 of 350
Driving your vehicle
82 4
1
2
3
4
5
6
7
8
9
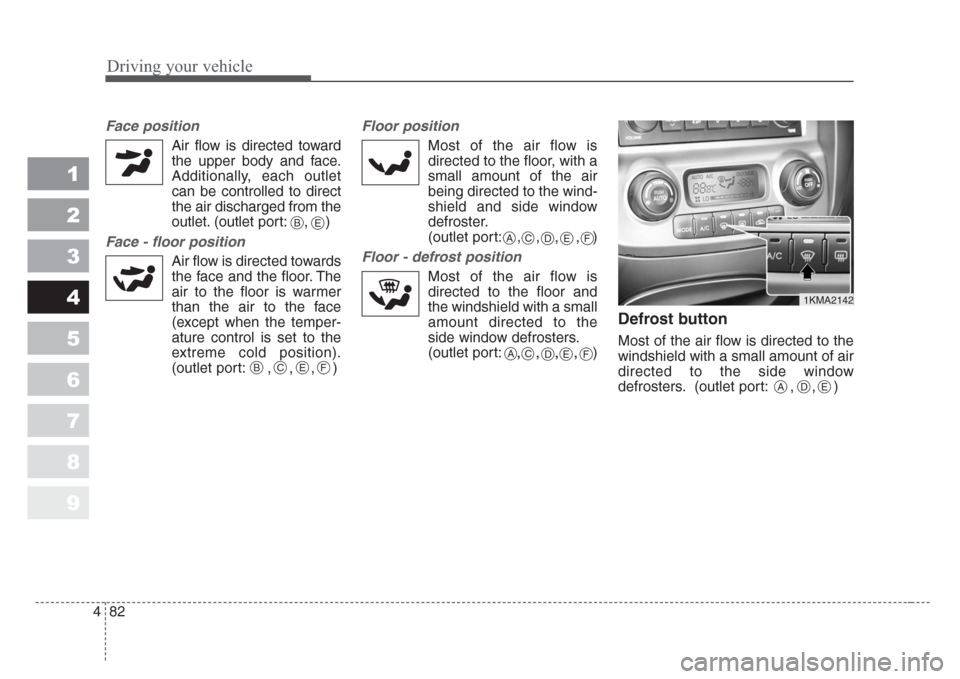
Face position
Air flow is directed toward
the upper body and face.
Additionally, each outlet
can be controlled to direct
the air discharged from the
outlet. (outlet port: , )
Face - floor position
Air flow is directed towards
the face and the floor. The
air to the floor is warmer
than the air to the face
(except when the temper-
ature control is set to the
extreme cold position).
(outlet port: , , , )
Floor position
Most of the air flow is
directed to the floor, with a
small amount of the air
being directed to the wind-
shield and side window
defroster.
(outlet port:
, , , , )
Floor - defrost position
Most of the air flow is
directed to the floor and
the windshield with a small
amount directed to the
side window defrosters.
(outlet port:
, , , , )
Defrost button
Most of the air flow is directed to the
windshield with a small amount of air
directed to the side window
defrosters. (outlet port: , , )
1KMA2142
ADE
B
BCEF
CADEF
CADEF
E
Page 211 of 350
1
2
3
4
5
6
7
8
9Fuel requirements / 5-2
Emission control system / 5-3
Before driving / 5-5
Suggestions for economical operation / 5-6
Special driving conditions / 5-8
Using four-wheel drive / 5-14
Weight of the vehicle / 5-32
Trailer towing / 5-33
Overloading / 5-40
Vehicle load limit / 5-41
Homelink® wireless control system / 5-45
Label information / 5-51
Driving tips
Page 218 of 350
Driving tips
8 5
SPECIAL DRIVING CONDITIONS
Hazardous driving conditions
When hazardous driving conditions
are encountered such as water,
snow, ice, mud, sand, or similar haz-
ards, follow these suggestions:
• Drive cautiously and allow extra
distance for braking.
• Avoid sudden movements in brak-
ing or steering.
• When braking with non-ABS
brakes pump the brake pedal with
a light up-and-down motion until
the vehicle is stopped.• If stalled in snow, mud, or sand,
use second gear. Accelerate slow-
ly to avoid spinning the drive
wheels.
• Use sand, rock salt, tire chains, or
other non-slip material under the
drive wheels to provide traction
when stalled in ice, snow, or mud.
Rocking the vehicle
If it is necessary to rock the vehicle
to free it from snow, sand, or mud,
first turn the steering wheel right and
left to clear the area around your
front wheels. Then, shift back and
forth between 1 (First) and R
(Reverse) in vehicles equipped with
a manual transaxle or R (Reverse)
and any forward gear in vehicles
equipped with an automatic
transaxle. Do not race the engine,
and spin the wheels as little as pos-
sible. If you are still stuck after a few
tries, have the vehicle pulled out by a
tow vehicle to avoid engine overheat-
ing and possible damage to the
transaxle.
✽
NOTICE
Prolonged rocking may cause engine
over-heating, transaxle damage or
failure, and tire damage.
1
2
3
4
5
6
7
8
9
WARNING - Downshifting
Downshifting with an automatic
transaxle, while driving on slip-
pery surfaces can cause an
accident.The sudden change in
tire speed could cause the tires
to skid.Be careful when down-
shifting on slippery surfaces.
CAUTION - ABS
Do not pump the brake pedal on
a vehicle equipped with ABS.
Page 226 of 350
Driving tips
16 5
1
2
3
4
5
6
7
8
9
Off-road driving with your
four-wheel drive vehicle
Off-road driving can be great fun. But
it has definite hazards. The greatest
of these is the terrain itself.
“Off-roading” means you’ve left the
paved road system behind. Traffic
lanes are not marked. Curves are not
banked.
There are no carefully engineered
road signs to warn you of dangerous
conditions or to advise you of a safe
speed. You have to assess the envi-
ronment yourself. Surfaces can be
slippery, rough, uphill or downhill.
Off-road driving involves learning
new skills. That’s why it’s important
that you read and understand this
section. You’ll find useful driving
information and suggestions. These
will help make your off-road driving
safer and more enjoyable.
Before you go off-roading
There are some things to do before
you leave the paved roads. Be sure
to have all necessary maintenance
and service work done beforehand.
Be sure to read all the information
about your four-wheel drive vehicle
in this manual. Is there enough fuel?
Is the spare tire fully inflated? Are the
fluid levels at the proper levels? What
are the local laws that apply to off-
roading where you’ll be driving? If
you don’t know, you should check
with law enforcement people in the
area. Will you be on someone’s pri-
vate land? If so, be sure to get the
necessary permission.
Loading your vehicle for off-road
driving
There are some important items to
remember about how to properly
load your vehicle.
• The heaviest things should be in
the cargo area and forward of your
rear axle. Place heavier items as
far forward as you can.
• Be sure the load is properly
secured, so driving over off-road
terrain doesn’t shift your load or
throw items toward the driver or
passengers.