Page 251 of 350

541
Driving tips
1
2
3
4
5
6
7
8
9
VEHICLE LOAD LIMIT
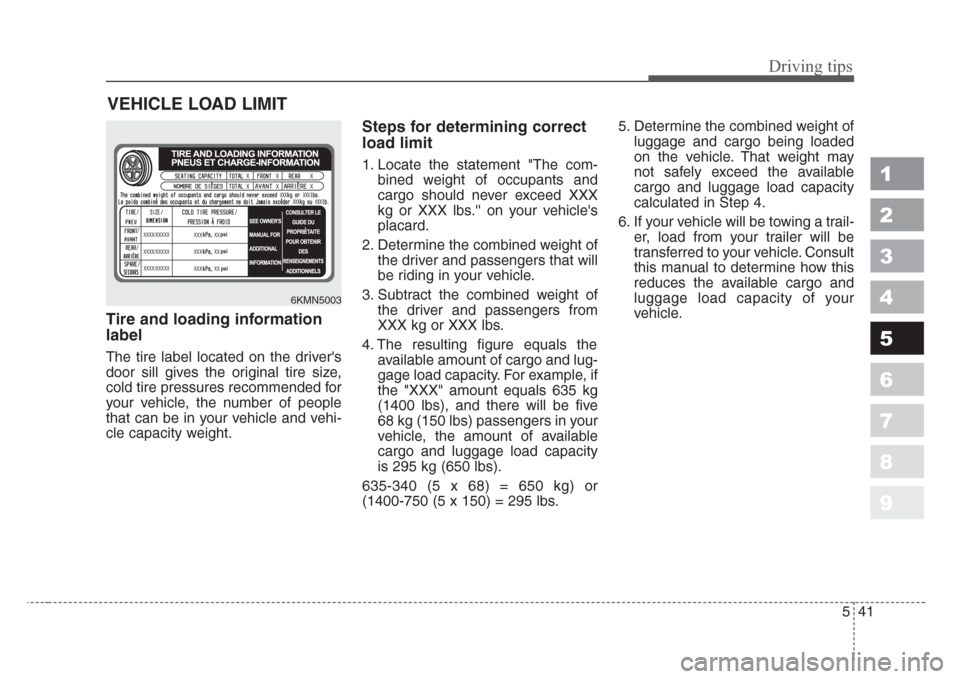
Tire and loading information
label
The tire label located on the driver's
door sill gives the original tire size,
cold tire pressures recommended for
your vehicle, the number of people
that can be in your vehicle and vehi-
cle capacity weight.
Steps for determining correct
load limit
1. Locate the statement "The com-
bined weight of occupants and
cargo should never exceed XXX
kg or XXX lbs.'' on your vehicle's
placard.
2. Determine the combined weight of
the driver and passengers that will
be riding in your vehicle.
3. Subtract the combined weight of
the driver and passengers from
XXX kg or XXX lbs.
4. The resulting figure equals the
available amount of cargo and lug-
gage load capacity. For example, if
the "XXX" amount equals 635 kg
(1400 lbs), and there will be five
68 kg (150 lbs) passengers in your
vehicle, the amount of available
cargo and luggage load capacity
is 295 kg (650 lbs).
635-340 (5 x 68) = 650 kg) or
(1400-750 (5 x 150) = 295 lbs.5. Determine the combined weight of
luggage and cargo being loaded
on the vehicle. That weight may
not safely exceed the available
cargo and luggage load capacity
calculated in Step 4.
6. If your vehicle will be towing a trail-
er, load from your trailer will be
transferred to your vehicle. Consult
this manual to determine how this
reduces the available cargo and
luggage load capacity of your
vehicle.
/ /
/
///psi
psi
psiXXXX/XXXXX
XXX XX
XXXX/XXXXX
XXX XX
XXXX/XXXXX
XXX XX
XX X
XX X
6KMN5003
Page 263 of 350
1
2
3
4
5
6
7
8
9Road warning / 6-2
Overheating / 6-3
Emergency starting / 6-4
Electrical circuit protection / 6-7
Towing / 6-14
If you have a flat tire / 6-19
In case of an emergency
Page 264 of 350
In case of an emergency
2 6
ROAD WARNING
Hazard warning flasher
The hazard warning flasher serves
as a warning to other drivers to exer-
cise extreme caution when
approaching, overtaking, or passing
your vehicle. It should be used when-
ever emergency repairs are being
made or when the vehicle is stopped
near the edge of a roadway.Depress the flasher switch with the
ignition switch in any position. The
flasher switch is located in the center
console switch panel. All turn signal
lights will flash simultaneously.
• The hazard warning flasher oper-
ates whether your vehicle is run-
ning or not.
• The turn signals do not work when
the hazard flasher is on.
• Care must be taken when using
the hazard warning flasher while
the vehicle is being towed.
1
2
3
4
5
6
7
8
9
1KMN2109
Page 266 of 350

In case of an emergency
4 6
EMERGENCY STARTING
Jump starting
Jump starting can be dangerous if
done incorrectly. Therefore, to avoid
harm to yourself or damage to your
vehicle or battery, follow the jump
starting procedures listed on page
6-6. If in doubt, we strongly recom-
mend that you have a competent
technician or towing service jump
start your vehicle.
✽
NOTICE
Use only a 12-volt jumper system.
You can damage a 12-volt starting
motor, ignition system, and other
electrical parts beyond repair by use
of a 24-volt power supply (either two
12-volt batteries in series or a 24-
volt motor generator set).
1
2
3
4
5
6
7
8
9
WARNING- Battery
• Keep all flames or sparks
away from the battery.The bat-
tery produces hydrogen gas
which may explode if exposed
to flame or sparks.
• Do not attempt to jump start
the vehicle if the discharged
battery is frozen or if the elec-
trolyte level is low; the battery
may rupture or explode.
WARNING- Battery
Never attempt to check the elec-
trolyte level of the battery as
this may cause the battery to
rupture or explode causing seri-
ous injury.
Page 268 of 350

In case of an emergency
6 6
Jump starting procedure
1. Make sure the booster battery is
12-volt and that its negative termi-
nal is grounded.
2. If the booster battery is in another
vehicle, do not allow the vehicles
to touch.
3. Turn off all unnecessary electrical
loads.
4. Connect the jumper cables in the
exact sequence shown in the pre-
vious illustration. First connect one
end of a jumper cable to the posi-
tive terminal of the discharged bat-
tery (
➀), then connect the other
end to the positive terminal on the
booster battery (
➁). Proceed to
connect one end of the other
jumper cable to the negative ter-
minal of the booster battery (
➂),
then the other end to a solid, sta-
tionary, metallic point (for exam-
ple, the engine lifting bracket)
away from the battery (
➃). Do not
connect it to or near any part that
moves when the engine is
cranked.Do not allow the jumper cables to
contact anything except the cor-
rect battery terminals or the cor-
rect ground. Do not lean over the
battery when making connections.
5. Start the engine of the vehicle with
the booster battery and let it run at
2,000 rpm, then start the engine of
the vehicle with the discharged
battery.
If the cause of your battery discharg-
ing is not apparent, you should have
your vehicle checked by an
Authorized Kia Dealer.
Refer to illustration on page 6-5.
Push-starting
Your manual transaxle-equipped
vehicle should not be push-started
because it might damage the emis-
sion control system.
Vehicles equipped with automatic
transaxle cannot be push-started.
Follow the directions in this section
for jump-starting.
1
2
3
4
5
6
7
8
9
CAUTION
Never tow a vehicle to start it
because the sudden surge for-
ward when the engine starts
could cause a collision with the
tow vehicle.
CAUTION - Battery cables
Do not connect the jumper
cable from the negative terminal
of the booster battery to the
negative terminal of the dis-
charged battery.This can cause
the discharged battery to over-
heat and crack, releasing bat-
tery acid.
Page 276 of 350
In case of an emergency
14 6
1
2
3
4
5
6
7
8
9
TOWING
If emergency towing is necessary,
we recommend having it done by an
authorized Kia dealer or a commer-
cial tow-truck service. Proper lifting
and towing procedures are neces-
sary to prevent damage to the vehi-
cle. The use of wheel dollies or
flatbed is recommended.
For trailer towing guidelines informa-
tion, refer to section 5 “Driving Tips”.
On 4WD vehicles, your vehicle
must be towed with a wheel lift
and dollies or flatbed equipment
with all the wheels off the ground.On 2WD vehicles, it is acceptable to
tow the vehicle with the rear wheels
on the ground (without dollies) and
the front wheels off the ground.
When being towed by a commercial
tow truck and wheel dollies are not
used, the front of the vehicle should
always be lifted, not the rear.
1KMA40221KMA40241KMA4023
Page 277 of 350
615
In case of an emergency
1
2
3
4
5
6
7
8
9
✽
NOTICE
• Do not tow the vehicle backwards
with the front wheels on the
ground as this may cause damage
to the vehicle.
• Do not tow with sling-type equip-
ment. Use wheel lift or flatbed
equipment.
When towing your vehicle in an
emergency without wheel dollies :
1. Set the ignition switch in the ACC
position.
2. Place the transaxle shift lever in N
(Neutral).
3. Release the parking brake.
✽
NOTICE
Failure to place the transaxle shift
lever in N (Neutral) may cause inter-
nal damage to the transaxle.
1GHA4105A1KMB4025
Page 278 of 350
In case of an emergency
16 6
1
2
3
4
5
6
7
8
9
To wing with a vehicle other
than a tow truck
If towing is necessary, we recom-
mend you to have it done by an
Authorized Kia dealer or a commer-
cial tow truck service.
If towing service is not available in an
emergency, your vehicle may be
temporarily towed using a cable or
chain secured to the emergency tow-
ing hook under the front or rear of the
vehicle. Use extreme caution when
towing the vehicle. A driver must be
in the vehicle to steer it and operate
the brakes.Towing in this manner may be done
only on hard-surfaced roads for a
short distance and at low speeds.
Also, the wheels, axles, power train,
steering and brakes must all be in
good condition.
• Do not use the tow hooks to pull a
vehicle out of mud, sand or other
conditions from which the vehicle
cannot be driven out under its own
power.
• Avoid towing a vehicle heavier than
the vehicle doing the towing.
6KMA4026 • Front
1KMA4027 • Rear