Page 73 of 350
Knowing your vehicle
64 3
1
2
3
4
5
6
7
8
9
(Continued)
• If the front seat passenger
changes their seating position
(for example, by not sitting
upright, by sitting on the edge
of the seat, or by otherwise
being out of position), the
"PASSENGER AIR BAG OFF"
indicator may be turned on,
and the passenger's airbag
may not deploy in a collision.
Always be sure to sit properly
in the front passenger’s seat
and wear the safety belt prop-
erly and do not do any of the
following.
(Continued)(Continued)
- Put a heavy load in the front
passenger seat.
- Excessively recline the front
passenger seatback.
(Continued)
1KMN3661
1KMN3662
(Continued)
-Sit with hips shifted towards
the front of the seat.
- Lean on the center console.
-Sit on one side of the front
passenger seat.
(Continued)
1KMN3663
1KMN3664
Page 95 of 350
Knowing your vehicle
86 3
1
2
3
4
5
6
7
8
9
Electric remote control
(if equipped)
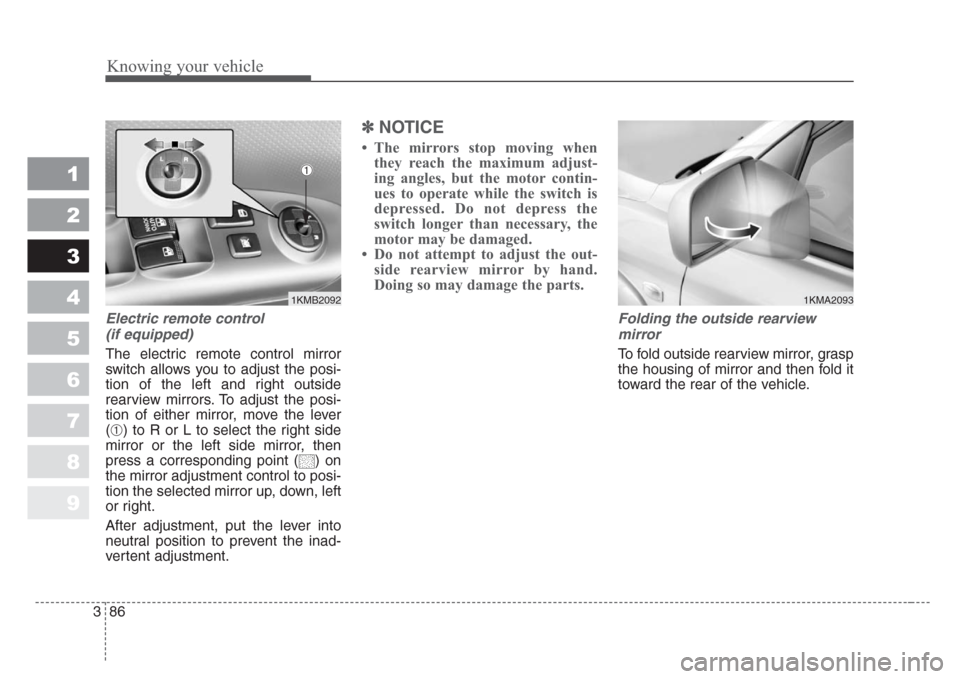
The electric remote control mirror
switch allows you to adjust the posi-
tion of the left and right outside
rearview mirrors. To adjust the posi-
tion of either mirror, move the lever
(
➀) to R or L to select the right side
mirror or the left side mirror, then
press a corresponding point ( ) on
the mirror adjustment control to posi-
tion the selected mirror up, down, left
or right.
After adjustment, put the lever into
neutral position to prevent the inad-
vertent adjustment.
✽
NOTICE
• The mirrors stop moving when
they reach the maximum adjust-
ing angles, but the motor contin-
ues to operate while the switch is
depressed. Do not depress the
switch longer than necessary, the
motor may be damaged.
• Do not attempt to adjust the out-
side rearview mirror by hand.
Doing so may damage the parts.
Folding the outside rearview
mirror
To fold outside rearview mirror, grasp
the housing of mirror and then fold it
toward the rear of the vehicle.
1KMB2092
➀
1KMA2093
Page 96 of 350
387
1
2
3
4
5
6
7
8
9
Knowing your vehicle
Outside rearview mirror heater
(if equipped)
The outside rearview mirror heater is
actuated in connection with the rear
window defroster. To heat the outside
rearview mirror glass, push the but-
ton for the rear window defroster.
The rearview mirror heater (and rear
window defroster) will not operate
unless the engine is running.
The outside rearview mirror glass will
be heated for defrosting or defogging
and will give you improved rear
vision in inclement weather condi-
tions. Push the button again to turn
the heater off. The outside rearview
mirror heater automatically turns off
after 20 minutes.
Inside rearview mirror
Adjust the rearview mirror to center
on the view through the rear window.
Make this adjustment before you
start driving.
Day/night rearview mirror
(if equipped)
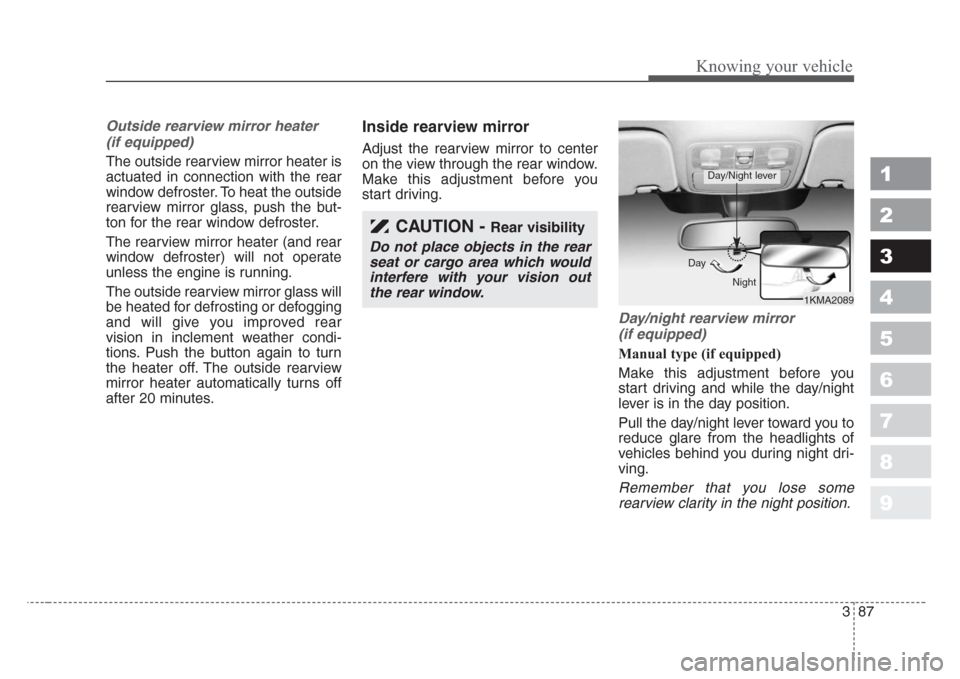
Manual type (if equipped)
Make this adjustment before you
start driving and while the day/night
lever is in the day position.
Pull the day/night lever toward you to
reduce glare from the headlights of
vehicles behind you during night dri-
ving.
Remember that you lose some
rearview clarity in the night position.
CAUTION - Rear visibility
Do not place objects in the rear
seat or cargo area which would
interfere with your vision out
the rear window.
1KMA2089 Day
Night
Day/Night lever
Page 97 of 350
Knowing your vehicle
88 3
1
2
3
4
5
6
7
8
9
Electric type (if equipped)
The electric day/night rearview mir-
ror automatically controls the glare
from the headlights of the car behind
you in nighttime or low light driving
conditions. The sensor mounted in
the mirror senses the light level
around the vehicle, and through a
chemical reaction, automatically
controls the headlight glare from
vehicles behind you.
When the engine is running, the
glare is automatically controlled by
the sensor mounted in the rearview
mirror.
Whenever the shift lever is shifted
into reverse (R), the mirror will auto-
matically go to the brightest setting in
order to improve the drivers view
behind the vehicle.
✽
NOTICE
When cleaning the mirror, use a
paper towel or similar material
dampened with glass cleaner. Do not
spray glass cleaner directly on the
mirror as that may cause the liquid
cleaner to enter the mirror housing.
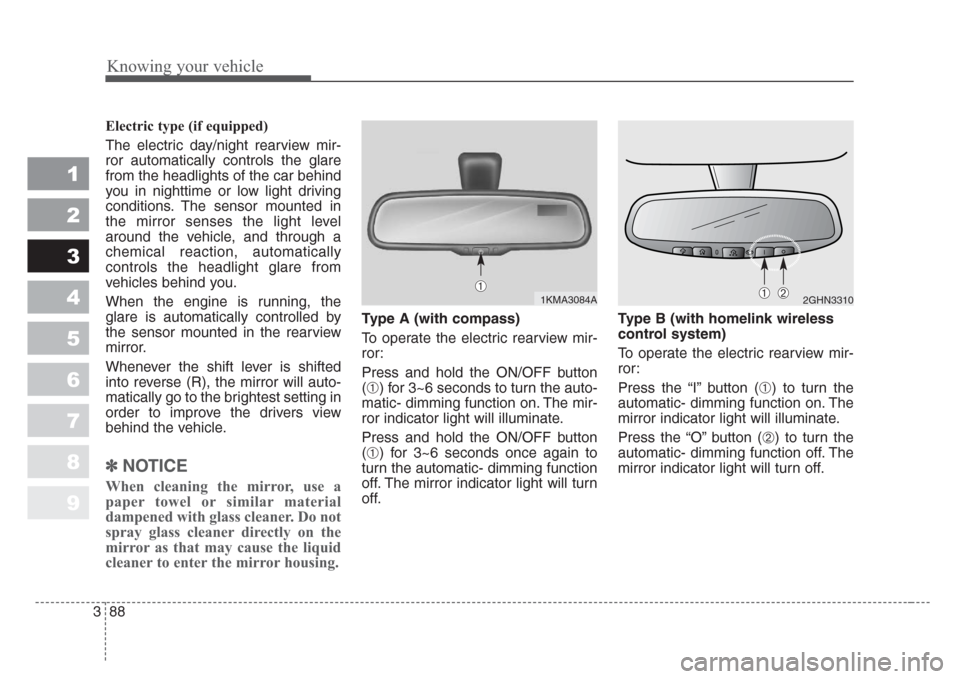
Type A (with compass)
To operate the electric rearview mir-
ror:
Press and hold the ON/OFF button
(
➀) for 3~6 seconds to turn the auto-
matic- dimming function on. The mir-
ror indicator light will illuminate.
Press and hold the ON/OFF button
(
➀) for 3~6 seconds once again to
turn the automatic- dimming function
off. The mirror indicator light will turn
off.Type B (with homelink wireless
control system)
To operate the electric rearview mir-
ror:
Press the “I” button (
➀) to turn the
automatic- dimming function on. The
mirror indicator light will illuminate.
Press the “O” button (
➁) to turn the
automatic- dimming function off. The
mirror indicator light will turn off.
2GHN3310➀➁1KMA3084A
➀
Page 120 of 350
Driving your vehicle
2 4
1
2
3
4
5
6
7
8
9
Illuminated ignition switch
(if equipped)
Whenever a door is opened, the igni-
tion switch will be illuminated for your
convenience, provided the ignition
switch is not in the ON position. The
light will go off approximately 10 sec-
onds after closing the door or when
the ignition switch is turned on.
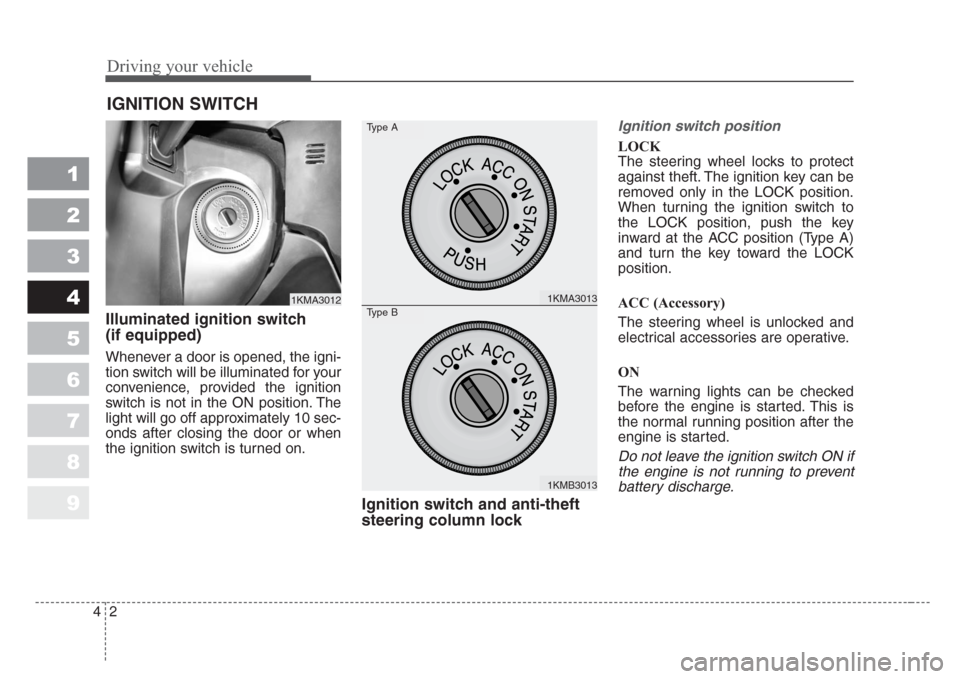
Ignition switch and anti-theft
steering column lock
Ignition switch position
LOCK
The steering wheel locks to protect
against theft. The ignition key can be
removed only in the LOCK position.
When turning the ignition switch to
the LOCK position, push the key
inward at the ACC position (Type A)
and turn the key toward the LOCK
position.
ACC (Accessory)
The steering wheel is unlocked and
electrical accessories are operative.
ON
The warning lights can be checked
before the engine is started. This is
the normal running position after the
engine is started.
Do not leave the ignition switch ON if
the engine is not running to prevent
battery discharge.
IGNITION SWITCH
1KMA30121KMA3013
1KMB3013
Type A
Type B
Page 134 of 350
Driving your vehicle
16 4
1
2
3
4
5
6
7
8
9
• If you need to drive in water, stop
your vehicle, set your transfer to
“4WD LOCK” and drive at less than
8 km/h (5 mph).
✽
NOTICE
• Do not drive in water if the level is
higher than the bottom of the vehi-
cle.
• Check your brake condition once
you are out of mud or water. Press
the brake pedal several times as
you move slowly until you feel nor-
mal braking forces return.
• Shorten your scheduled mainte-
nance interval if you drive in off-
road conditions such as sand, mud
or water (see “Maintenance
Schedule” in the Index). Always
wash you car thoroughly after off
road use, especially cleaning the
under side of the vehicle.
• Since the driving torque is always
applied to the 4 wheels the perfor-
mance of the 4WD vehicle is great-
ly affected by the condition of the
tires. Be sure to equip the vehicle
with four tires of the same size and
type.
• A full time four wheel drive vehi-
cle cannot be towed by an ordi-
nary tow truck. Make sure that
the vehicle is placed on a flat bed
truck for moving.WARNING - Wind danger
If you are driving in heavy wind,
the vehicle's higher center of
gravity decreases your steering
control capacity and requires
you to drive more slowly.WARNING - Driving
through water
Drive slowly.If you are driving
too fast in water, the water spray
can get into the engine com-
partment and wet the ignition
system, causing your vehicle to
suddenly stall.If this happens
and your vehicle is in a tilted
position, your vehicle may roll
over.
Page 139 of 350
421
Driving your vehicle
1
2
3
4
5
6
7
8
9
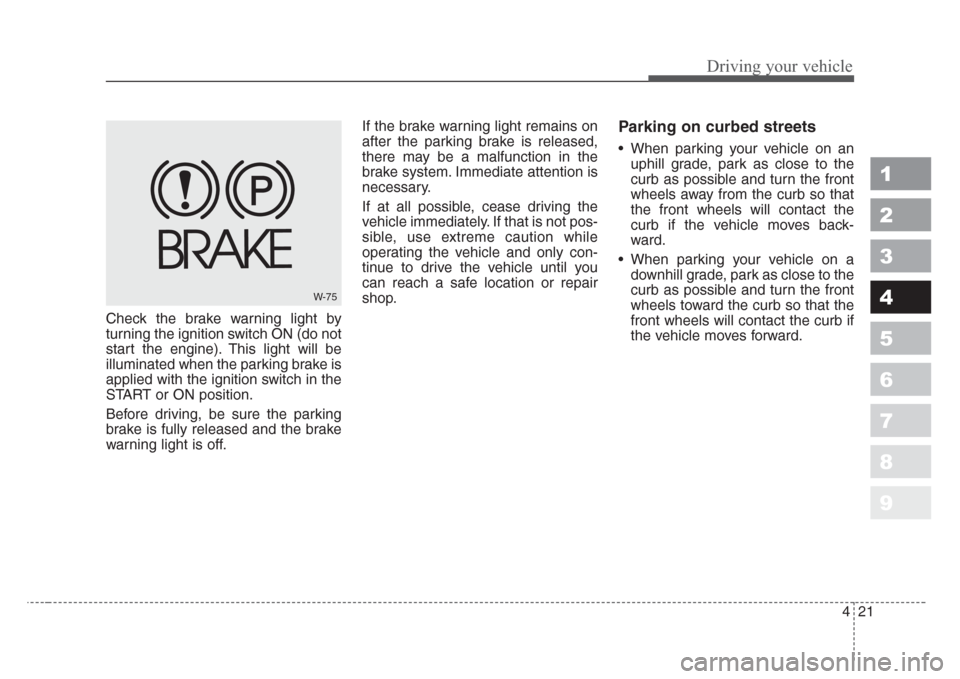
Check the brake warning light by
turning the ignition switch ON (do not
start the engine). This light will be
illuminated when the parking brake is
applied with the ignition switch in the
START or ON position.
Before driving, be sure the parking
brake is fully released and the brake
warning light is off.If the brake warning light remains on
after the parking brake is released,
there may be a malfunction in the
brake system. Immediate attention is
necessary.
If at all possible, cease driving the
vehicle immediately. If that is not pos-
sible, use extreme caution while
operating the vehicle and only con-
tinue to drive the vehicle until you
can reach a safe location or repair
shop.
Parking on curbed streets
• When parking your vehicle on an
uphill grade, park as close to the
curb as possible and turn the front
wheels away from the curb so that
the front wheels will contact the
curb if the vehicle moves back-
ward.
• When parking your vehicle on a
downhill grade, park as close to the
curb as possible and turn the front
wheels toward the curb so that the
front wheels will contact the curb if
the vehicle moves forward.
W-75
Page 159 of 350
441
Driving your vehicle
1
2
3
4
5
6
7
8
9
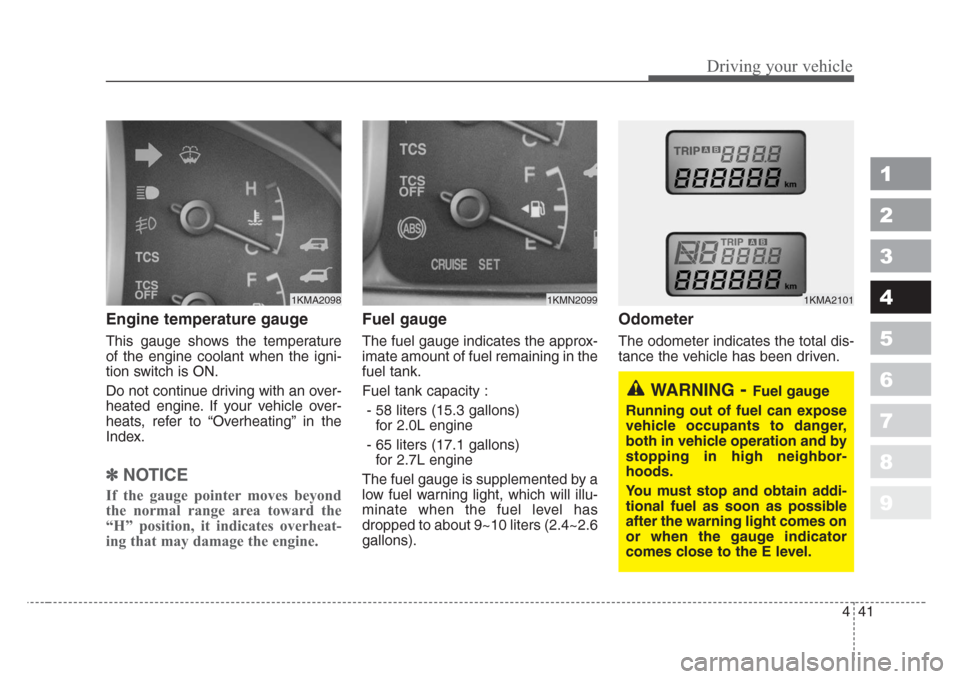
Engine temperature gauge
This gauge shows the temperature
of the engine coolant when the igni-
tion switch is ON.
Do not continue driving with an over-
heated engine. If your vehicle over-
heats, refer to “Overheating” in the
Index.
✽
NOTICE
If the gauge pointer moves beyond
the normal range area toward the
“H” position, it indicates overheat-
ing that may damage the engine.
Fuel gauge
The fuel gauge indicates the approx-
imate amount of fuel remaining in the
fuel tank.
Fuel tank capacity :
- 58 liters (15.3 gallons)
for 2.0L engine
- 65 liters (17.1 gallons)
for 2.7L engine
The fuel gauge is supplemented by a
low fuel warning light, which will illu-
minate when the fuel level has
dropped to about 9~10 liters (2.4~2.6
gallons).
Odometer
The odometer indicates the total dis-
tance the vehicle has been driven.
1KMN20991KMA21011KMA2098
WARNING-Fuel gauge
Running out of fuel can expose
vehicle occupants to danger,
both in vehicle operation and by
stopping in high neighbor-
hoods.
You must stop and obtain addi-
tional fuel as soon as possible
after the warning light comes on
or when the gauge indicator
comes close to the E level.