2008 INFINITI QX56 battery
[x] Cancel search: batteryPage 3014 of 4083
RF-30
< ECU DIAGNOSIS >
SUNROOF SYSTEM
SUNROOF SYSTEM
Reference ValueINFOID:0000000001731937
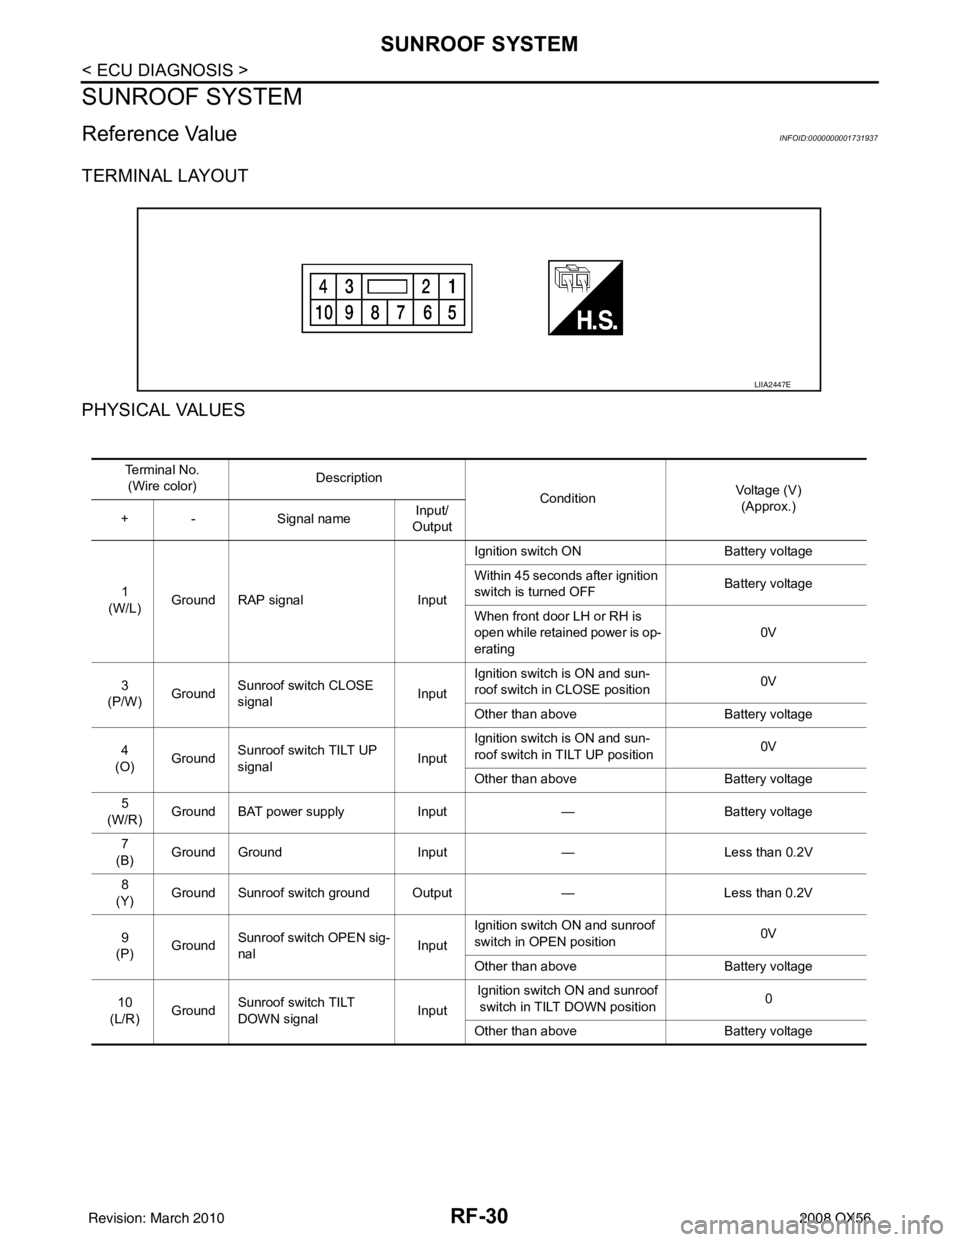
TERMINAL LAYOUT
PHYSICAL VALUES
LIIA2447E
Te r m i n a l N o .(Wire color) Description
ConditionVoltage (V)
(Approx.)
+ - Signal nameInput/
Output
1
(W/L) Ground RAP signal
InputIgnition switch ON
Battery voltage
Within 45 seconds after ignition
switch is turned OFF Battery voltage
When front door LH or RH is
open while retained power is op-
erating 0V
3
(P/W) Ground Sunroof switch CLOSE
signal InputIgnition switch is ON and sun-
roof switch in CLOSE position
0V
Other than above Battery voltage
4
(O) Ground Sunroof switch TILT UP
signal
InputIgnition switch is ON and sun-
roof switch in TILT UP position
0V
Other than above Battery voltage
5
(W/R) Ground BAT power supply
Input— Battery voltage
7
(B) Ground Ground
Input— Less than 0.2V
8
(Y) Ground Sunroof switch ground Output
—Less than 0.2V
9
(P) Ground
Sunroof switch OPEN sig-
nal InputIgnition switch ON and sunroof
switch in OPEN position
0V
Other than above Battery voltage
10
(L/R) Ground Sunroof switch TILT
DOWN signal InputIgnition switch ON and sunroof
switch in TILT DOWN position 0
Other than above Battery voltage
Revision: March 2010 2008 QX56
Page 3030 of 4083
RF-46
< PRECAUTION >
PRECAUTIONS
PRECAUTION
PRECAUTIONS
Precaution for Supplemental Restraint System (SRS) "AIR BAG" and "SEAT BELT
PRE-TENSIONER"
INFOID:0000000004884212
The Supplemental Restraint System such as “A IR BAG” and “SEAT BELT PRE-TENSIONER”, used along
with a front seat belt, helps to reduce the risk or severity of injury to the driver and front passenger for certain
types of collision. This system includes seat belt switch inputs and dual stage front air bag modules. The SRS
system uses the seat belt switches to determine the front air bag deployment, and may only deploy one front
air bag, depending on the severity of a collision and w hether the front occupants are belted or unbelted.
Information necessary to service the system safely is included in the SR and SB section of this Service Man-
ual.
WARNING:
• To avoid rendering the SRS inopera tive, which could increase the risk of personal injury or death in
the event of a collision which would result in air bag inflation, all maintenance must be performed by
an authorized NISSAN/INFINITI dealer.
• Improper maintenance, including in correct removal and installation of the SRS, can lead to personal
injury caused by unintent ional activation of the system. For re moval of Spiral Cable and Air Bag
Module, see the SR section.
• Do not use electrical test equipmen t on any circuit related to the SRS unless instructed to in this
Service Manual. SRS wiring harn esses can be identified by yellow and/or orange harnesses or har-
ness connectors.
PRECAUTIONS WHEN USING POWER TOOLS (AIR OR ELECTRIC) AND HAMMERS
WARNING:
• When working near the Airbag Diagnosis Sensor Unit or other Airbag System sensors with the Igni-
tion ON or engine running, DO NOT use air or electri c power tools or strike near the sensor(s) with a
hammer. Heavy vibration could activate the sensor( s) and deploy the air bag(s), possibly causing
serious injury.
• When using air or electric power tools or hammers , always switch the Ignition OFF, disconnect the
battery, and wait at least 3 minu tes before performing any service.
Precaution Necessary for Steering W heel Rotation After Battery Disconnect
INFOID:0000000004884213
NOTE:
• This Procedure is applied only to models with Intelligent Key system and NATS (NISSAN ANTI-THEFT SYS-
TEM).
• Remove and install all control units after disconnecting both battery cables with the ignition knob in the
″LOCK ″ position.
• Always use CONSULT-III to perform self-diagnosis as a part of each function inspection after finishing work.
If DTC is detected, perform trouble diagnosis according to self-diagnostic results.
For models equipped with the Intelligent Key system and NATS, an electrically controlled steering lock mech-
anism is adopted on the key cylinder.
For this reason, if the battery is disconnected or if the battery is discharged, the steering wheel will lock and
steering wheel rotation will become impossible.
If steering wheel rotation is required when battery pow er is interrupted, follow the procedure below before
starting the repair operation.
OPERATION PROCEDURE
1. Connect both battery cables. NOTE:
Supply power using jumper cables if battery is discharged.
2. Use the Intelligent Key or mechanical key to turn the ignition switch to the ″ACC ″ position. At this time, the
steering lock will be released.
3. Disconnect both battery cables. The steering lock will remain released and the steering wheel can be rotated.
4. Perform the necessary repair operation.
Revision: March 2010 2008 QX56
Page 3031 of 4083
PRECAUTIONSRF-47
< PRECAUTION >
C
DE
F
G H
I
J
L
M A
B
RF
N
O P
5. When the repair work is completed, return the ignition switch to the ″LOCK ″ position before connecting
the battery cables. (At this time, the steering lock mechanism will engage.)
6. Perform a self-diagnosis check of al l control units using CONSULT-III.
PrecautionINFOID:0000000001731948
• Disconnect both battery cables in advance.
• Never tamper with or force air bag lid open, as this may adversely affect air bag performance.
• Be careful not to scratch pad and other parts.
• When removing or disassembling any part, be careful not to damage or deform it. Protect parts which may
get in the way with cloth.
• When removing parts with a screwdriver or other tool , protect parts by wrapping them with vinyl or tape.
• Keep removed parts protected with cloth.
• If a clip is deformed or damaged, replace it.
• If an unreusable part is removed, replace it with a new one.
• Tighten bolts and nuts firmly to the specified torque.
• After re-assembly has been completed, make sure each part functions correctly.
• Remove stains in the following way.
Water-soluble stains:
Dip a soft cloth in warm water, and then squeeze it tight ly. After wiping the stain, wipe with a soft dry cloth.
Oil stain:
Dissolve a synthetic detergent in warm water (density of 2 to 3% or less), dip the cloth, then clean off the stain
with the cloth. Next, dip the cloth in fresh water and squeeze it tightly. Then clean off the detergent completely.
Then wipe the area with a soft dry cloth.
• Do not use any organic solvent, such as thinner or benzine.
Revision: March 2010 2008 QX56
Page 3038 of 4083
RF-54
< ON-VEHICLE REPAIR >
SUNROOF SYSTEM
1. Position glass lid to sunroof assembly.
2. Install the glass lid assembly screws. (First tighten left front bolt, then tighten right rear bolt on glass lid to
prevent lid from moving while tightening other bolts.)
3. Adjust the glass lid assembly. Refer to RF-49, "
Inspection".
4. Install side cover LH and RH.
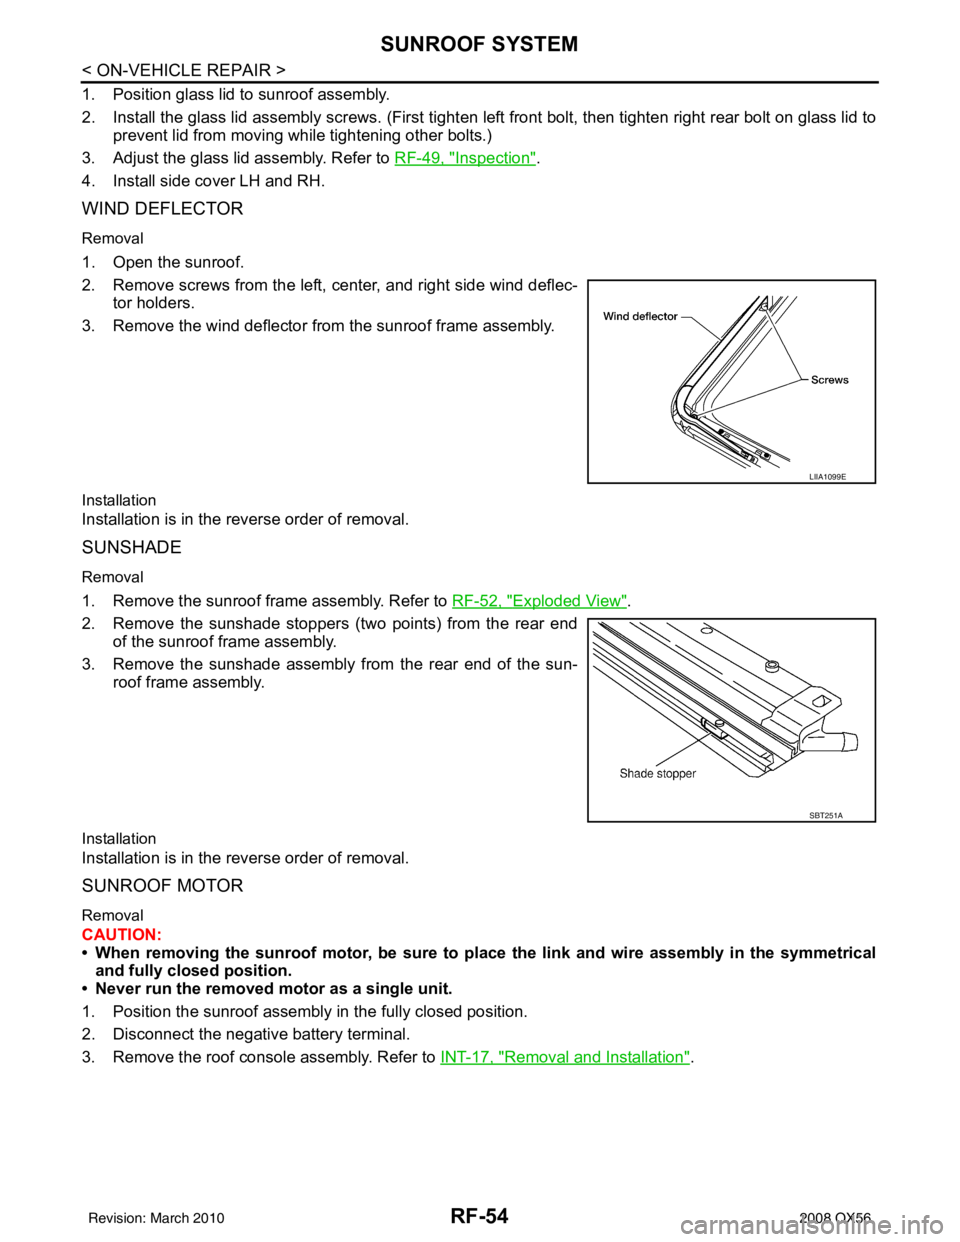
WIND DEFLECTOR
Removal
1. Open the sunroof.
2. Remove screws from the left, center, and right side wind deflec- tor holders.
3. Remove the wind deflector from the sunroof frame assembly.
Installation
Installation is in the reverse order of removal.
SUNSHADE
Removal
1. Remove the sunroof frame assembly. Refer to RF-52, "Exploded View".
2. Remove the sunshade stoppers (two points) from the rear end of the sunroof frame assembly.
3. Remove the sunshade assembly from the rear end of the sun- roof frame assembly.
Installation
Installation is in the reverse order of removal.
SUNROOF MOTOR
Removal
CAUTION:
• When removing the sunroof motor, be sure to place the link and wire assembly in the symmetrical
and fully closed position.
• Never run the removed motor as a single unit.
1. Position the sunroof assembly in the fully closed position.
2. Disconnect the negative battery terminal.
3. Remove the roof console assembly. Refer to INT-17, "
Removal and Installation".
LIIA1099E
SBT251A
Revision: March 2010 2008 QX56
Page 3040 of 4083
RSU-1
SUSPENSION
C
DF
G H
I
J
K L
M
SECTION RSU
A
B
RSU
N
O PCONTENTS
REAR SUSPENSION
PRECAUTION ....... ........................................2
PRECAUTIONS .............................................. .....2
Precaution for Supplemental Restraint System
(SRS) "AIR BAG" and "SEAT BELT PRE-TEN-
SIONER" ............................................................. ......
2
Precaution Necessary for Steering Wheel Rota-
tion After Battery Disconnect ............................... ......
2
Precaution for Rear Suspension ......................... ......3
PREPARATION ............................................4
PREPARATION .............................................. .....4
Commercial Service Tool .................................... ......4
SYMPTOM DIAGNOSIS ...............................5
NOISE, VIBRATION AND HARSHNESS
(NVH) TROUBLESHOOTING ........................ .....
5
NVH Troubleshooting Chart ................................ ......5
ON-VEHICLE MAINTENANCE .....................6
REAR SUSPENSION ASSEMBLY ................ .....6
On-Vehicle Inspection and Service ..................... ......6
Wheel Alignment Inspection ......................................6
ON-VEHICLE REPAIR ..................................9
REAR SUSPENSION ASSEMBLY ................ .....9
Component .......................................................... ......9
REMOVAL AND INSTALLATION ...............11
REAR SUSPENSION MEMBER .................... ....11
Removal and Installation .........................................11
SHOCK ABSORBER ........................................15
Removal and Installation ..................................... ....15
SUSPENSION ARM ..........................................16
Removal and Installation .........................................16
FRONT LOWER LINK .......................................18
Removal and Installation .........................................18
REAR LOWER LINK & COIL SPRING .............20
Removal and Installation .........................................20
STABILIZER BAR .............................................22
Removal and Installation .........................................22
REAR LOAD LEVELING AIR SUSPENSION
COMPRESSOR ASSEMBLY ............................
23
Removal and Installation .........................................23
CONTROL UNIT ................................................25
Removal and Installation .........................................25
Initialization Procedure ............................................25
HEIGHT SENSOR .............................................26
Removal and Installation .........................................26
SERVICE DATA AND SPECIFICATIONS
(SDS) ............... .......................................... ...
28
SERVICE DATA AND SPECIFICATIONS
(SDS) .................................................................
28
Wheel Alignment ................................................. ....28
Ball Joint ..................................................................28
Wheelarch Height (Unladen*1) ................................29
Revision: March 2010 2008 QX56
Page 3041 of 4083
RSU-2
< PRECAUTION >
PRECAUTIONS
PRECAUTION
PRECAUTIONS
Precaution for Supplemental Restraint System (SRS) "AIR BAG" and "SEAT BELT
PRE-TENSIONER"
INFOID:0000000004900767
The Supplemental Restraint System such as “A IR BAG” and “SEAT BELT PRE-TENSIONER”, used along
with a front seat belt, helps to reduce the risk or severity of injury to the driver and front passenger for certain
types of collision. This system includes seat belt switch inputs and dual stage front air bag modules. The SRS
system uses the seat belt switches to determine the front air bag deployment, and may only deploy one front
air bag, depending on the severity of a collision and w hether the front occupants are belted or unbelted.
Information necessary to service the system safely is included in the SR and SB section of this Service Man-
ual.
WARNING:
• To avoid rendering the SRS inopera tive, which could increase the risk of personal injury or death in
the event of a collision which would result in air bag inflation, all maintenance must be performed by
an authorized NISSAN/INFINITI dealer.
• Improper maintenance, including in correct removal and installation of the SRS, can lead to personal
injury caused by unintent ional activation of the system. For re moval of Spiral Cable and Air Bag
Module, see the SR section.
• Do not use electrical test equipmen t on any circuit related to the SRS unless instructed to in this
Service Manual. SRS wiring harn esses can be identified by yellow and/or orange harnesses or har-
ness connectors.
PRECAUTIONS WHEN USING POWER TOOLS (AIR OR ELECTRIC) AND HAMMERS
WARNING:
• When working near the Airbag Diagnosis Sensor Unit or other Airbag System sensors with the Igni-
tion ON or engine running, DO NOT use air or electri c power tools or strike near the sensor(s) with a
hammer. Heavy vibration could activate the sensor( s) and deploy the air bag(s), possibly causing
serious injury.
• When using air or electric power tools or hammers , always switch the Ignition OFF, disconnect the
battery, and wait at least 3 minu tes before performing any service.
Precaution Necessary for Steering W heel Rotation After Battery Disconnect
INFOID:0000000004900768
NOTE:
• This Procedure is applied only to models with Intelligent Key system and NATS (NISSAN ANTI-THEFT SYS-
TEM).
• Remove and install all control units after disconnecting both battery cables with the ignition knob in the
″LOCK ″ position.
• Always use CONSULT-III to perform self-diagnosis as a part of each function inspection after finishing work.
If DTC is detected, perform trouble diagnosis according to self-diagnostic results.
For models equipped with the Intelligent Key system and NATS, an electrically controlled steering lock mech-
anism is adopted on the key cylinder.
For this reason, if the battery is disconnected or if the battery is discharged, the steering wheel will lock and
steering wheel rotation will become impossible.
If steering wheel rotation is required when battery pow er is interrupted, follow the procedure below before
starting the repair operation.
OPERATION PROCEDURE
1. Connect both battery cables. NOTE:
Supply power using jumper cables if battery is discharged.
2. Use the Intelligent Key or mechanical key to turn the ignition switch to the ″ACC ″ position. At this time, the
steering lock will be released.
3. Disconnect both battery cables. The steering lock will remain released and the steering wheel can be rotated.
4. Perform the necessary repair operation.
Revision: March 2010 2008 QX56
Page 3042 of 4083
PRECAUTIONSRSU-3
< PRECAUTION >
C
DF
G H
I
J
K L
M A
B
RSU
N
O P
5. When the repair work is completed, return the ignition switch to the ″LOCK ″ position before connecting
the battery cables. (At this time, the steering lock mechanism will engage.)
6. Perform a self-diagnosis check of al l control units using CONSULT-III.
Precaution for Rear SuspensionINFOID:0000000001534647
• When installing the rubber bushings, the final tightening must be done under unladen condition and with the
tires on level ground. Oil will shorten the life of the rubber bushings, so wipe off any spilled oil immediately.
• Unladen condition means the fuel tank, engine coolant and lubricants are at the full specification. The spare
tire, jack, hand tools, and mats are in their designated positions.
• After installing suspension components, check the wheel alignment.
• Caulking nuts are not reusable. Always use new caulking nuts for installation. New caulking nuts are pre- oiled, do not apply any additional lubrication.
Revision: March 2010 2008 QX56
Page 3064 of 4083
CONTROL UNITRSU-25
< REMOVAL AND INSTALLATION >
C
DF
G H
I
J
K L
M A
B
RSU
N
O P
CONTROL UNIT
Removal and InstallationINFOID:0000000004900764
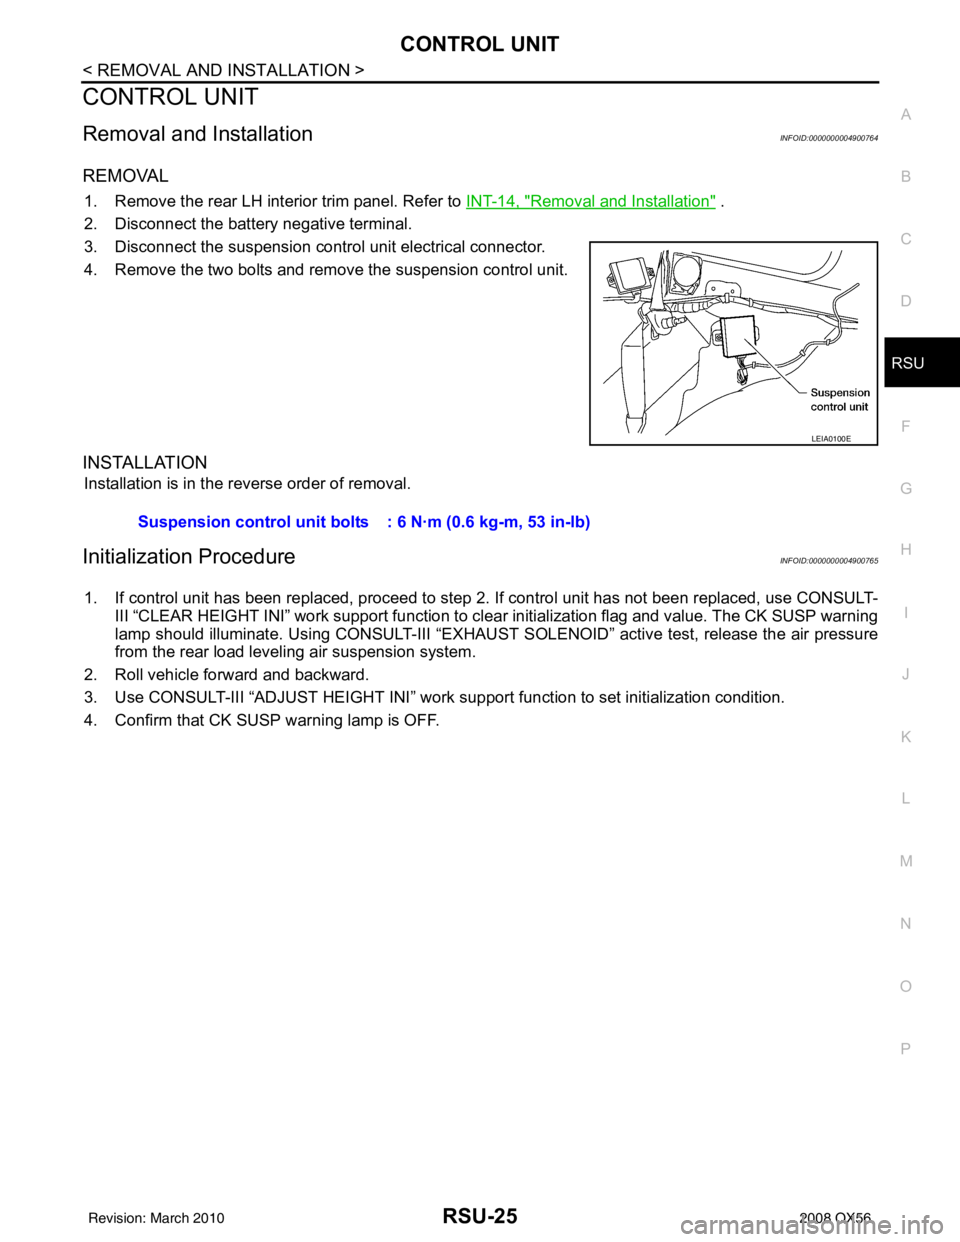
REMOVAL
1. Remove the rear LH interior trim panel. Refer to INT-14, "Removal and Installation" .
2. Disconnect the battery negative terminal.
3. Disconnect the suspension control unit electrical connector.
4. Remove the two bolts and remove the suspension control unit.
INSTALLATION
Installation is in the reverse order of removal.
Initialization ProcedureINFOID:0000000004900765
1. If control unit has been replaced, proceed to step 2. If control unit has not been replaced, use CONSULT-
III “CLEAR HEIGHT INI” work support function to cl ear initialization flag and value. The CK SUSP warning
lamp should illuminate. Using CONSULT-III “EXHAUST SOLENOID” active test, release the air pressure
from the rear load leveling air suspension system.
2. Roll vehicle forward and backward.
3. Use CONSULT-III “ADJUST HEIGHT INI” work support function to set initialization condition.
4. Confirm that CK SUSP warning lamp is OFF.
LEIA0100E
Suspension control unit bolt s : 6 N·m (0.6 kg-m, 53 in-lb)
Revision: March 2010 2008 QX56