2008 INFINITI QX56 battery
[x] Cancel search: batteryPage 2472 of 4083
IP-2
< PRECAUTION >
PRECAUTIONS
PRECAUTION
PRECAUTIONS
Precaution for Supplemental Restraint System (SRS) "AIR BAG" and "SEAT BELT
PRE-TENSIONER"
INFOID:0000000004904116
The Supplemental Restraint System such as “A IR BAG” and “SEAT BELT PRE-TENSIONER”, used along
with a front seat belt, helps to reduce the risk or severity of injury to the driver and front passenger for certain
types of collision. This system includes seat belt switch inputs and dual stage front air bag modules. The SRS
system uses the seat belt switches to determine the front air bag deployment, and may only deploy one front
air bag, depending on the severity of a collision and w hether the front occupants are belted or unbelted.
Information necessary to service the system safely is included in the SR and SB section of this Service Man-
ual.
WARNING:
• To avoid rendering the SRS inopera tive, which could increase the risk of personal injury or death in
the event of a collision which would result in air bag inflation, all maintenance must be performed by
an authorized NISSAN/INFINITI dealer.
• Improper maintenance, including in correct removal and installation of the SRS, can lead to personal
injury caused by unintent ional activation of the system. For re moval of Spiral Cable and Air Bag
Module, see the SR section.
• Do not use electrical test equipmen t on any circuit related to the SRS unless instructed to in this
Service Manual. SRS wiring harn esses can be identified by yellow and/or orange harnesses or har-
ness connectors.
PRECAUTIONS WHEN USING POWER TOOLS (AIR OR ELECTRIC) AND HAMMERS
WARNING:
• When working near the Airbag Diagnosis Sensor Unit or other Airbag System sensors with the Igni-
tion ON or engine running, DO NOT use air or electri c power tools or strike near the sensor(s) with a
hammer. Heavy vibration could activate the sensor( s) and deploy the air bag(s), possibly causing
serious injury.
• When using air or electric power tools or hammers , always switch the Ignition OFF, disconnect the
battery, and wait at least 3 minu tes before performing any service.
Precaution Necessary for Steering W heel Rotation After Battery Disconnect
INFOID:0000000004904117
NOTE:
• This Procedure is applied only to models with Intelligent Key system and NATS (NISSAN ANTI-THEFT SYS-
TEM).
• Remove and install all control units after disconnecting both battery cables with the ignition knob in the
″LOCK ″ position.
• Always use CONSULT-III to perform self-diagnosis as a part of each function inspection after finishing work.
If DTC is detected, perform trouble diagnosis according to self-diagnostic results.
For models equipped with the Intelligent Key system and NATS, an electrically controlled steering lock mech-
anism is adopted on the key cylinder.
For this reason, if the battery is disconnected or if the battery is discharged, the steering wheel will lock and
steering wheel rotation will become impossible.
If steering wheel rotation is required when battery pow er is interrupted, follow the procedure below before
starting the repair operation.
OPERATION PROCEDURE
1. Connect both battery cables. NOTE:
Supply power using jumper cables if battery is discharged.
2. Use the Intelligent Key or mechanical key to turn the ignition switch to the ″ACC ″ position. At this time, the
steering lock will be released.
3. Disconnect both battery cables. The steering lock will remain released and the steering wheel can be rotated.
4. Perform the necessary repair operation.
Revision: March 2010 2008 QX56
Page 2473 of 4083

PRECAUTIONSIP-3
< PRECAUTION >
C
DE
F
G H
I
K L
M A
B
IP
N
O P
5. When the repair work is completed, return the ignition switch to the ″LOCK ″ position before connecting
the battery cables. (At this time, the steering lock mechanism will engage.)
6. Perform a self-diagnosis check of al l control units using CONSULT-III.
Revision: March 2010 2008 QX56
Page 2482 of 4083
IP-12
< ON-VEHICLE REPAIR >
INSTRUMENT PANEL ASSEMBLY
Removal and Installation
INFOID:0000000001602122
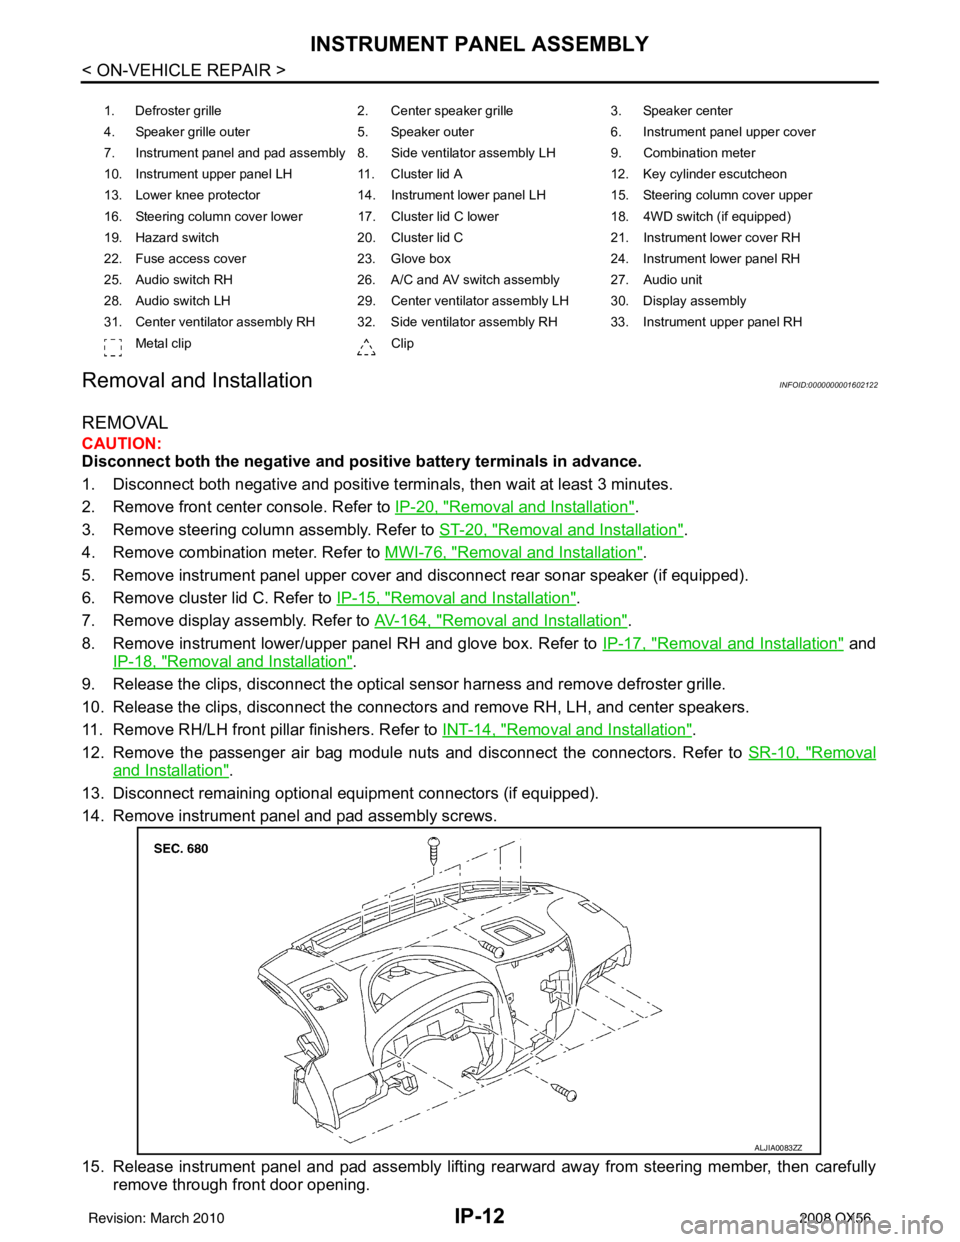
REMOVAL
CAUTION:
Disconnect both the negative and po sitive battery terminals in advance.
1. Disconnect both negative and positive termi nals, then wait at least 3 minutes.
2. Remove front center console. Refer to IP-20, "
Removal and Installation".
3. Remove steering column assembly. Refer to ST-20, "
Removal and Installation".
4. Remove combination meter. Refer to MWI-76, "
Removal and Installation".
5. Remove instrument panel upper cover and disconnect rear sonar speaker (if equipped).
6. Remove cluster lid C. Refer to IP-15, "
Removal and Installation".
7. Remove display assembly. Refer to AV-164, "
Removal and Installation".
8. Remove instrument lower/upper panel RH and glove box. Refer to IP-17, "
Removal and Installation" and
IP-18, "
Removal and Installation".
9. Release the clips, disconnect the optical sensor harness and remove defroster grille.
10. Release the clips, disconnect the connecto rs and remove RH, LH, and center speakers.
11. Remove RH/LH front pillar finishers. Refer to INT-14, "
Removal and Installation".
12. Remove the passenger air bag module nuts and disconnect the connectors. Refer to SR-10, "
Removal
and Installation".
13. Disconnect remaining optional equipment connectors (if equipped).
14. Remove instrument panel and pad assembly screws.
15. Release instrument panel and pad assembly lifting rearward away from steering member, then carefully remove through front door opening.
1. Defroster grille 2. Center speaker grille3. Speaker center
4. Speaker grille outer 5. Speaker outer6. Instrument panel upper cover
7. Instrument panel and pad assembly 8. Side ventilator assembly LH 9. Combination meter
10. Instrument upper panel LH 11. Cluster lid A 12. Key cylinder escutcheon
13. Lower knee protector 14. Instrument lower panel LH 15. Steering column cover upper
16. Steering column cover lower 17. Cluster lid C lower 18. 4WD switch (if equipped)
19. Hazard switch 20. Cluster lid C21. Instrument lower cover RH
22. Fuse access cover 23. Glove box 24. Instrument lower panel RH
25. Audio switch RH 26. A/C and AV switch assembly 27. Audio unit
28. Audio switch LH 29. Center ventilator assembly LH 30. Display assembly
31. Center ventilator assembly RH 32. Side ventilator assembly RH 33. Instrument upper panel RH Metal clip Clip
ALJIA0083ZZ
Revision: March 2010 2008 QX56
Page 2484 of 4083
IP-14
< ON-VEHICLE REPAIR >
CLUSTER LID A
CLUSTER LID A
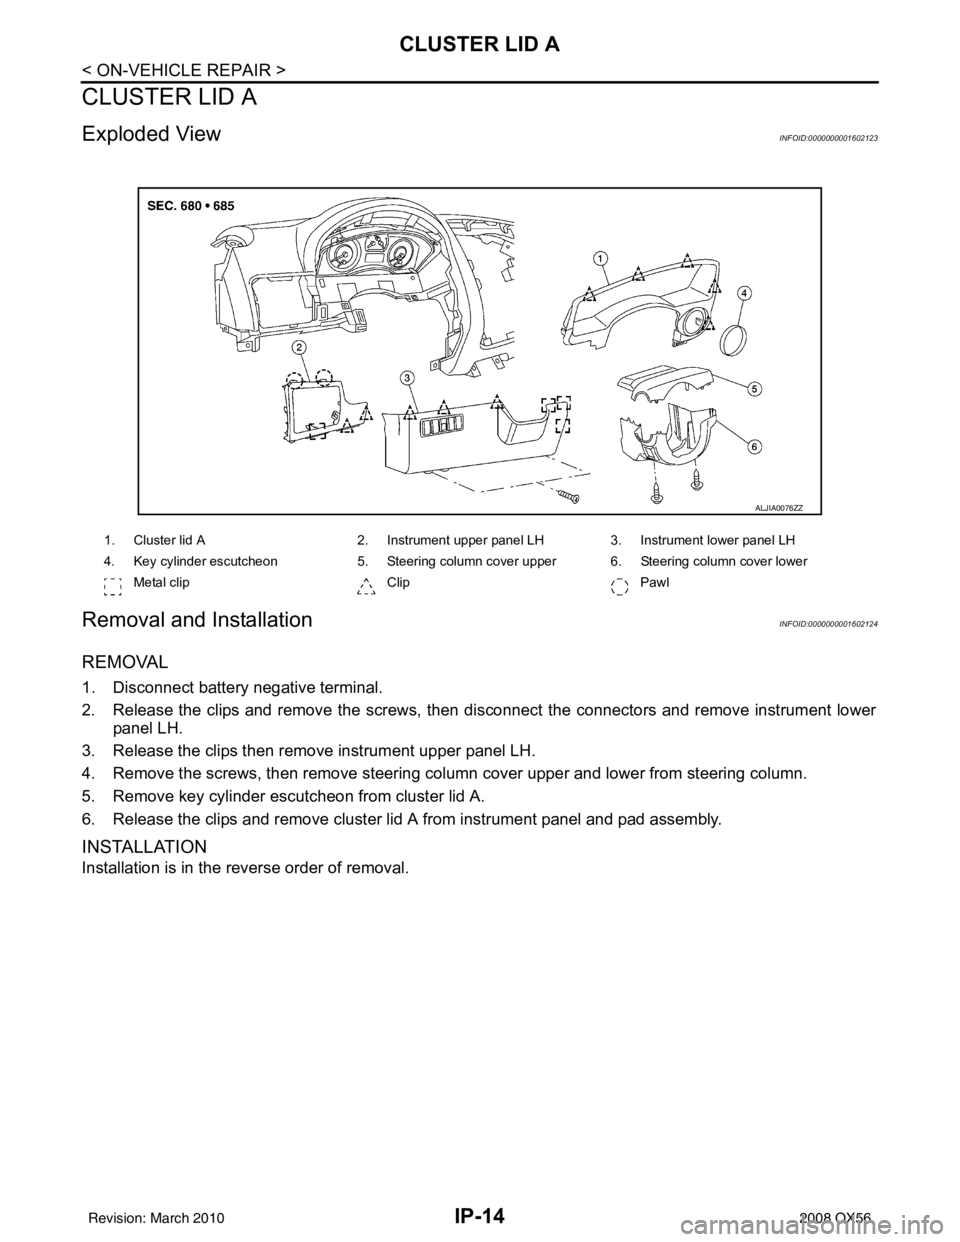
Exploded ViewINFOID:0000000001602123
Removal and InstallationINFOID:0000000001602124
REMOVAL
1. Disconnect battery negative terminal.
2. Release the clips and remove the screws, then disconnect the connectors and remove instrument lowerpanel LH.
3. Release the clips then remove instrument upper panel LH.
4. Remove the screws, then remove steering column cover upper and lower from steering column.
5. Remove key cylinder escutcheon from cluster lid A.
6. Release the clips and remove cluster lid A from instrument panel and pad assembly.
INSTALLATION
Installation is in the reverse order of removal.
ALJIA0076ZZ
1. Cluster lid A 2. Instrument upper panel LH 3. Instrument lower panel LH
4. Key cylinder escutcheon 5. Steering column cover upper 6. Steering column cover lower
Metal clip Clip Pawl
Revision: March 2010 2008 QX56
Page 2485 of 4083
CLUSTER LID CIP-15
< ON-VEHICLE REPAIR >
C
DE
F
G H
I
K L
M A
B
IP
N
O P
CLUSTER LID C
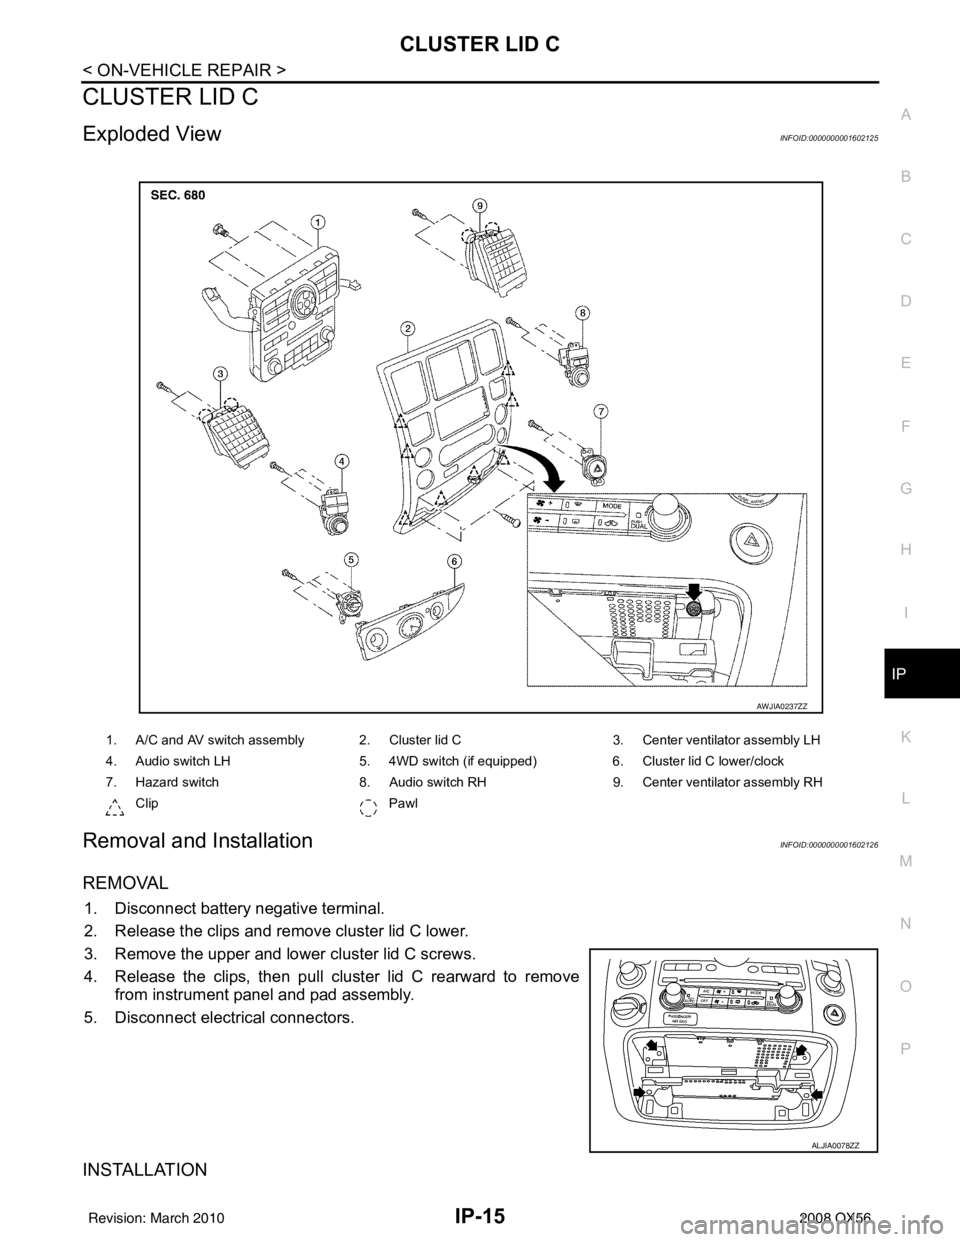
Exploded ViewINFOID:0000000001602125
Removal and InstallationINFOID:0000000001602126
REMOVAL
1. Disconnect battery negative terminal.
2. Release the clips and remove cluster lid C lower.
3. Remove the upper and lower cluster lid C screws.
4. Release the clips, then pull cluster lid C rearward to remove from instrument panel and pad assembly.
5. Disconnect electrical connectors.
INSTALLATION
1. A/C and AV switch assembly 2. Cluster lid C 3. Center ventilator assembly LH
4. Audio switch LH 5. 4WD switch (if equipped) 6. Cluster lid C lower/clock
7. Hazard switch 8. Audio switch RH9. Center ventilator assembly RH
Clip Pawl
AWJIA0237ZZ
ALJIA0078ZZ
Revision: March 2010 2008 QX56
Page 2490 of 4083
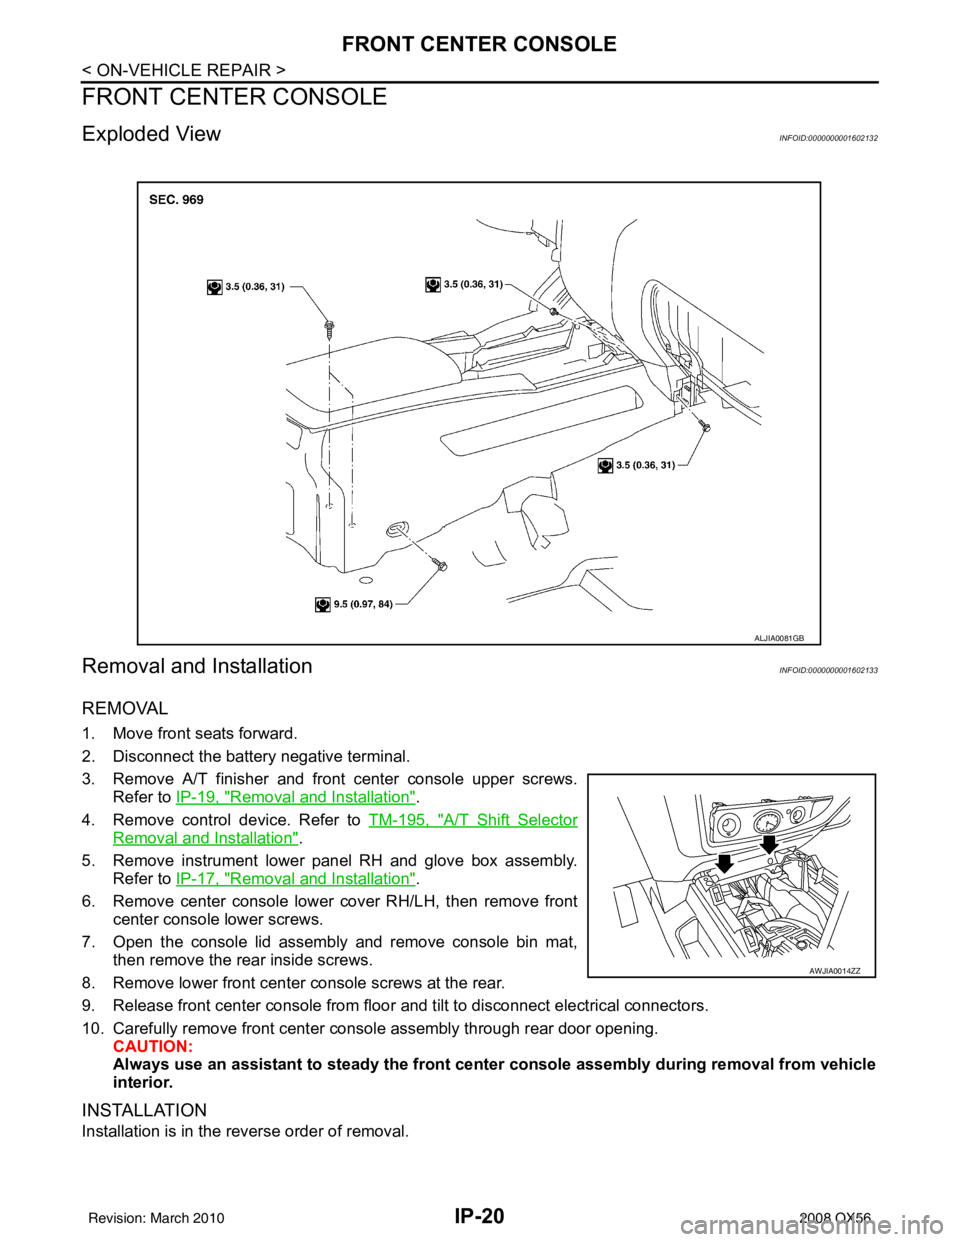
IP-20
< ON-VEHICLE REPAIR >
FRONT CENTER CONSOLE
FRONT CENTER CONSOLE
Exploded ViewINFOID:0000000001602132
Removal and InstallationINFOID:0000000001602133
REMOVAL
1. Move front seats forward.
2. Disconnect the battery negative terminal.
3. Remove A/T finisher and front center console upper screws.Refer to IP-19, "
Removal and Installation".
4. Remove control device. Refer to TM-195, "
A/T Shift Selector
Removal and Installation".
5. Remove instrument lower panel RH and glove box assembly. Refer to IP-17, "
Removal and Installation".
6. Remove center console lower cover RH/LH, then remove front center console lower screws.
7. Open the console lid assembly and remove console bin mat, then remove the rear inside screws.
8. Remove lower front center console screws at the rear.
9. Release front center console from floor and tilt to disconnect electrical connectors.
10. Carefully remove front center console assembly through rear door opening. CAUTION:
Always use an assistant to steady the front cen ter console assembly during removal from vehicle
interior.
INSTALLATION
Installation is in the reverse order of removal.
ALJIA0081GB
AWJIA0014ZZ
Revision: March 2010 2008 QX56
Page 2498 of 4083
![INFINITI QX56 2008 Factory Service Manual LAN
PRECAUTIONSLAN-3
< PRECAUTION > [CAN FUNDAMENTAL]
C
D
E
F
G H
I
J
K L
B A
O P
N
PRECAUTION
PRECAUTIONS
Precaution for Trouble DiagnosisINFOID:0000000001374959
CAUTION:
• Never apply 7.0 V or mor INFINITI QX56 2008 Factory Service Manual LAN
PRECAUTIONSLAN-3
< PRECAUTION > [CAN FUNDAMENTAL]
C
D
E
F
G H
I
J
K L
B A
O P
N
PRECAUTION
PRECAUTIONS
Precaution for Trouble DiagnosisINFOID:0000000001374959
CAUTION:
• Never apply 7.0 V or mor](/manual-img/42/57030/w960_57030-2497.png)
LAN
PRECAUTIONSLAN-3
< PRECAUTION > [CAN FUNDAMENTAL]
C
D
E
F
G H
I
J
K L
B A
O P
N
PRECAUTION
PRECAUTIONS
Precaution for Trouble DiagnosisINFOID:0000000001374959
CAUTION:
• Never apply 7.0 V or more to the measurement terminal.
• Use a tester with open terminal voltage of 7.0 V or less.
• Turn the ignition switch OFF and disconnect th
e battery cable from the negative terminal when
checking the harness.
Precaution for Harness RepairINFOID:0000000001374960
• Solder the repaired area and wrap tape around the soldered area. NOTE:
A fray of twisted lines must be within 110 mm (4.33 in).
• Bypass connection is never allowed at the repaired area. NOTE:
Bypass connection may cause CAN communication error. The
spliced wire becomes separated and t he characteristics of twisted
line are lost.
• Replace the applicable harness as an assembly if error is detected on the shield lines of CAN communica- tion line.
SKIB8766E
SKIB8767E
Revision: March 2010 2008 QX56
Page 2502 of 4083
![INFINITI QX56 2008 Factory Service Manual LAN
TROUBLE DIAGNOSISLAN-7
< FUNCTION DIAGNOSIS > [CAN FUNDAMENTAL]
C
D
E
F
G H
I
J
K L
B A
O P
N
TROUBLE DIAGNOSIS
Condition of Error DetectionINFOID:0000000001374966
“U1000” or “U1001” is in INFINITI QX56 2008 Factory Service Manual LAN
TROUBLE DIAGNOSISLAN-7
< FUNCTION DIAGNOSIS > [CAN FUNDAMENTAL]
C
D
E
F
G H
I
J
K L
B A
O P
N
TROUBLE DIAGNOSIS
Condition of Error DetectionINFOID:0000000001374966
“U1000” or “U1001” is in](/manual-img/42/57030/w960_57030-2501.png)
LAN
TROUBLE DIAGNOSISLAN-7
< FUNCTION DIAGNOSIS > [CAN FUNDAMENTAL]
C
D
E
F
G H
I
J
K L
B A
O P
N
TROUBLE DIAGNOSIS
Condition of Error DetectionINFOID:0000000001374966
“U1000” or “U1001” is indicated on SELF-DIAG RESULTS on CONSULT-III if CAN communication signal is
not transmitted or received between units for 2 seconds or more.
CAN COMMUNICATION SYSTEM ERROR
• CAN communication line open (CAN-H, CAN-L, or both)
• CAN communication line short (ground, betw
een CAN communication lines, other harnesses)
• Error of CAN communication control circuit of the unit connected to CAN communication line
WHEN “U1000” OR “U1001” IS INDICATED EV EN THOUGH CAN COMMUNICATION SYSTEM IS
NORMAL
• Removal/installation of parts: Error may be detec ted when removing and installing CAN communication unit
and related parts while turning the ignition switch ON. (A DTC except for CAN communication may be
detected.)
• Fuse blown out (removed): CAN communication of the unit may cease.
• Voltage drop: Error may be detected if voltage drops due to discharged battery when turning the ignition
switch ON (Depending on the control unit which carries out CAN communication).
• Error may be detected if the power supply circuit of the control unit, which carries out CAN communication,
malfunctions (Depending on the control unit which carries out CAN communication).
• Error may be detected if reprogramming is not completed normally.
NOTE:
CAN communication system is normal if “U1000” or “U 1001” is indicated on SELF-DIAG RESULTS of CON-
SULT-III under the above conditions. Erase the memory of the self-diagnosis of each unit.
Symptom When Error Occurs in CAN Communication SystemINFOID:0000000001374967
In CAN communication system, multiple units mutually transmit and receive signals. Each unit cannot transmit
and receive signals if any error occurs on CAN communicati on line. Under this condition, multiple control units
related to the root cause malfunction or go into fail-safe mode.
ERROR EXAMPLE
NOTE:
• Each vehicle differs in symptom of each unit under fail-safe mode and CAN communication line wiring.
• Refer to LAN-36, "
Abbreviation List" for the unit abbreviation.
Example: TCM branch line open circuit
SKIB8738E
Unit name Symptom
ECM Engine torque limiting is affected, and shift harshness increases.
BCM Reverse warning chime does not sound.
Revision: March 2010 2008 QX56