2008 INFINITI QX56 air condition
[x] Cancel search: air conditionPage 2496 of 4083

LAN
LAN-1
ELECTRICAL & POWER CONTROL
C
DE
F
G H
I
J
K L
B
SECTION LAN
A
O P
N
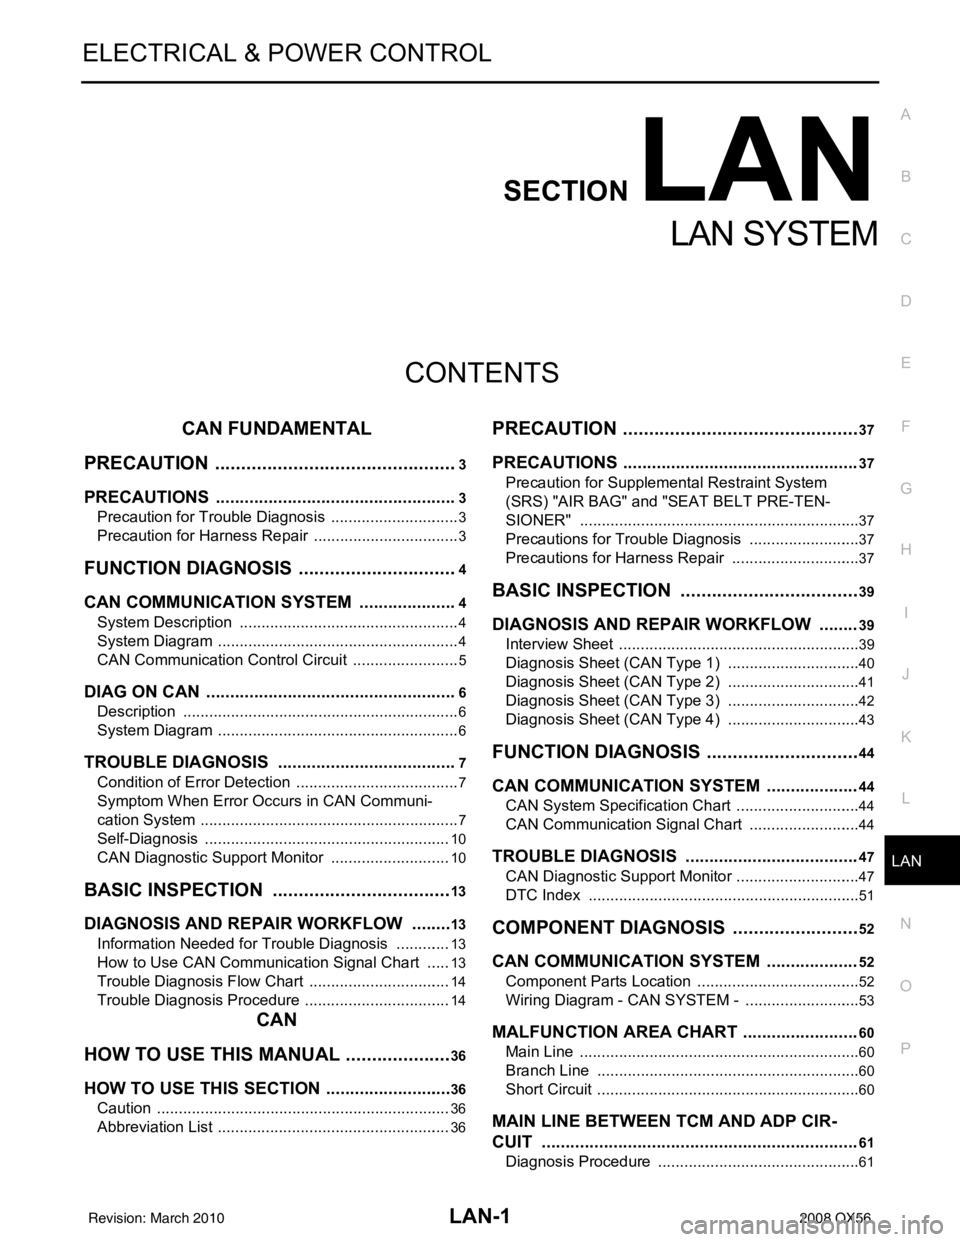
CONTENTS
LAN SYSTEM
CAN FUNDAMENTAL
PRECAUTION ....... ........................................
3
PRECAUTIONS .............................................. .....3
Precaution for Trouble Diagnosis ........................ ......3
Precaution for Harness Repair ..................................3
FUNCTION DIAGNOSIS .. .............................4
CAN COMMUNICATION SYSTEM ................ .....4
System Description ............................................. ......4
System Diagram ........................................................4
CAN Communication Control Circuit .........................5
DIAG ON CAN .....................................................6
Description .......................................................... ......6
System Diagram ........................................................6
TROUBLE DIAGNOSIS ......................................7
Condition of Error Detection ................................ ......7
Symptom When Error Occurs in CAN Communi-
cation System ...................................................... ......
7
Self-Diagnosis .........................................................10
CAN Diagnostic Support Monitor ............................10
BASIC INSPECTION ...................................13
DIAGNOSIS AND REPAIR WORKFLOW ..... ....13
Information Needed for Trouble Diagnosis ......... ....13
How to Use CAN Communication Signal Chart ......13
Trouble Diagnosis Flow Chart .................................14
Trouble Diagnosis Procedure ..................................14
CAN
HOW TO USE THIS MANU AL .....................
36
HOW TO USE THIS SECTION ....................... ....36
Caution ................................................................ ....36
Abbreviation List ......................................................36
PRECAUTION ..............................................37
PRECAUTIONS .................................................37
Precaution for Supplemental Restraint System
(SRS) "AIR BAG" and "SEAT BELT PRE-TEN-
SIONER" ............................................................. ....
37
Precautions for Trouble Diagnosis ..........................37
Precautions for Harness Repair ..............................37
BASIC INSPECTION ...................................39
DIAGNOSIS AND REPAIR WORKFLOW ........39
Interview Sheet .................................................... ....39
Diagnosis Sheet (CAN Type 1) ...............................40
Diagnosis Sheet (CAN Type 2) ...............................41
Diagnosis Sheet (CAN Type 3) ...............................42
Diagnosis Sheet (CAN Type 4) ...............................43
FUNCTION DIAGNOSIS ..............................44
CAN COMMUNICATION SYSTEM ...................44
CAN System Specification Chart ......................... ....44
CAN Communication Signal Chart ..........................44
TROUBLE DIAGNOSIS ....................................47
CAN Diagnostic Support Monitor .............................47
DTC Index ...............................................................51
COMPONENT DIAGNOSIS .........................52
CAN COMMUNICATION SYSTEM ...................52
Component Parts Location .................................. ....52
Wiring Diagram - CAN SYSTEM - ...........................53
MALFUNCTION AREA CHART ........................60
Main Line ............................................................. ....60
Branch Line .............................................................60
Short Circuit .............................................................60
MAIN LINE BETWEEN TCM AND ADP CIR-
CUIT ..................................................................
61
Diagnosis Procedure ...............................................61
Revision: March 2010 2008 QX56
Page 2508 of 4083
![INFINITI QX56 2008 Factory Service Manual LAN
DIAGNOSIS AND REPAIR WORKFLOWLAN-13
< BASIC INSPECTION > [CAN FUNDAMENTAL]
C
D
E
F
G H
I
J
K L
B A
O P
N
BASIC INSPECTION
DIAGNOSIS AND REPAIR WORKFLOW
Information Needed for Trouble DiagnosisINFO INFINITI QX56 2008 Factory Service Manual LAN
DIAGNOSIS AND REPAIR WORKFLOWLAN-13
< BASIC INSPECTION > [CAN FUNDAMENTAL]
C
D
E
F
G H
I
J
K L
B A
O P
N
BASIC INSPECTION
DIAGNOSIS AND REPAIR WORKFLOW
Information Needed for Trouble DiagnosisINFO](/manual-img/42/57030/w960_57030-2507.png)
LAN
DIAGNOSIS AND REPAIR WORKFLOWLAN-13
< BASIC INSPECTION > [CAN FUNDAMENTAL]
C
D
E
F
G H
I
J
K L
B A
O P
N
BASIC INSPECTION
DIAGNOSIS AND REPAIR WORKFLOW
Information Needed for Trouble DiagnosisINFOID:0000000001374970
CAN communication system performs trouble diagnosis with the following tools.
How to Use CAN Communication Signal ChartINFOID:0000000001374971
The CAN communication signal chart lists the signals needed for trouble diagnosis. It is useful for detecting
the root cause by finding a signal related to the sy
mptom, and by checking transmission and reception unit.
To o l U s a g e
Interview sheet For filling in vehicle information and interview with customer.
Data sheet For copying on-board diagnosis data.
Diagnosis sheet For detecting the root cause. (Diagnosis sheet includes system diagram for every CAN system type)
ECU list
(On the “CAN DIAG SUPPORT
MNTR”) For checking the condition of control units and the status of CAN communication.
SELF-DIAG RESULTS
(CONSULT-III)
CAN DIAG SUPPORT MNTR
(CONSULT-III)
CAN communication signal
chart For converting information received from a customer into CAN communication signal transmission
and reception. This information can be used to judge whether a circuit between control units is nor-
mal or abnormal.
Abbreviation list For checking abbreviations in CAN communication signal chart and diagnosis sheet.
SKIB8715E
Revision: March 2010 2008 QX56
Page 2509 of 4083
![INFINITI QX56 2008 Factory Service Manual LAN-14
< BASIC INSPECTION >[CAN FUNDAMENTAL]
DIAGNOSIS AND REPAIR WORKFLOW
Trouble Diagnosis Flow Chart
INFOID:0000000001374972
Trouble Diagnosis ProcedureINFOID:0000000001374973
INTERVIEW WITH CUSTOM INFINITI QX56 2008 Factory Service Manual LAN-14
< BASIC INSPECTION >[CAN FUNDAMENTAL]
DIAGNOSIS AND REPAIR WORKFLOW
Trouble Diagnosis Flow Chart
INFOID:0000000001374972
Trouble Diagnosis ProcedureINFOID:0000000001374973
INTERVIEW WITH CUSTOM](/manual-img/42/57030/w960_57030-2508.png)
LAN-14
< BASIC INSPECTION >[CAN FUNDAMENTAL]
DIAGNOSIS AND REPAIR WORKFLOW
Trouble Diagnosis Flow Chart
INFOID:0000000001374972
Trouble Diagnosis ProcedureINFOID:0000000001374973
INTERVIEW WITH CUSTOMER
Interview with the customer is important to detect the root cause of CAN communication system errors and to
understand vehicle condition and symptoms for proper trouble diagnosis.
Points in interview• What: Parts name, system name
• When: Date, Frequency
• Where: Road condition, Place
• In what condition: Driving condition/environment
PKID1210E
Revision: March 2010 2008 QX56
Page 2510 of 4083
![INFINITI QX56 2008 Factory Service Manual LAN
DIAGNOSIS AND REPAIR WORKFLOWLAN-15
< BASIC INSPECTION > [CAN FUNDAMENTAL]
C
D
E
F
G H
I
J
K L
B A
O P
N
• Result: Symptom
NOTE:
• Check normal units as well as error symptoms.
- Example: Circ INFINITI QX56 2008 Factory Service Manual LAN
DIAGNOSIS AND REPAIR WORKFLOWLAN-15
< BASIC INSPECTION > [CAN FUNDAMENTAL]
C
D
E
F
G H
I
J
K L
B A
O P
N
• Result: Symptom
NOTE:
• Check normal units as well as error symptoms.
- Example: Circ](/manual-img/42/57030/w960_57030-2509.png)
LAN
DIAGNOSIS AND REPAIR WORKFLOWLAN-15
< BASIC INSPECTION > [CAN FUNDAMENTAL]
C
D
E
F
G H
I
J
K L
B A
O P
N
• Result: Symptom
NOTE:
• Check normal units as well as error symptoms.
- Example: Circuit between ECM and the combination meter is judged normal if the customer indicates
tachometer functions normally.
• When a CAN communication system error is present, multiple control units may malfunction or go into fail-
safe mode.
• Indication of the combination meter is important to detect the root cause because it is the most obvious to
the customer, and it performs CAN communication with many units.
INSPECTION OF VEHICLE CONDITION
• Check whether or not “U1000” or “U1001” is indi cated on “SELF-DIAG RESULTS” by CONSULT-III.
NOTE:
Root cause cannot be detected using the procedure in this section if “U1000” or “U1001” is not indicated.
• Check whether the symptom is reproduced or not.
NOTE:
• Do not turn the ignition switch OFF or disconnect the battery cable while reproducing the error. The error may temporarily correct itself, making it difficult to determine the root cause.
• The procedures for present errors differ from the procedures for past errors. Refer to “DETECT THE ROOT CAUSE”.
CHECK OF CAN SYSTEM TYPE (HOW TO USE CAN SYSTEM TYPE SPECIFICATION CHART)
Determine CAN system type based on vehicle equipm ent. Then choose the correct diagnosis sheet.
NOTE:
There are two styles for CAN system type specificat ion charts. Depending on the number of available system
types, either style A or style B may be used.
CAN System Type Specification Chart (Style A)
NOTE:
SKIB8717E
Revision: March 2010 2008 QX56
Page 2512 of 4083
![INFINITI QX56 2008 Factory Service Manual LAN
DIAGNOSIS AND REPAIR WORKFLOWLAN-17
< BASIC INSPECTION > [CAN FUNDAMENTAL]
C
D
E
F
G H
I
J
K L
B A
O P
N
CAN system type is easily checked wi
th the vehicle equipment identification information sh INFINITI QX56 2008 Factory Service Manual LAN
DIAGNOSIS AND REPAIR WORKFLOWLAN-17
< BASIC INSPECTION > [CAN FUNDAMENTAL]
C
D
E
F
G H
I
J
K L
B A
O P
N
CAN system type is easily checked wi
th the vehicle equipment identification information sh](/manual-img/42/57030/w960_57030-2511.png)
LAN
DIAGNOSIS AND REPAIR WORKFLOWLAN-17
< BASIC INSPECTION > [CAN FUNDAMENTAL]
C
D
E
F
G H
I
J
K L
B A
O P
N
CAN system type is easily checked wi
th the vehicle equipment identification information shown in the chart.
CREATE INTERVIEW SHEET
Fill out the symptom described by the customer, vehicle condition, and CAN system type on the interview
sheet.
SKIB8889E
Revision: March 2010 2008 QX56
Page 2604 of 4083

MA-6
< ON-VEHICLE MAINTENANCE >
GENERAL MAINTENANCE
ON-VEHICLE MAINTENANCE
GENERAL MAINTENANCE
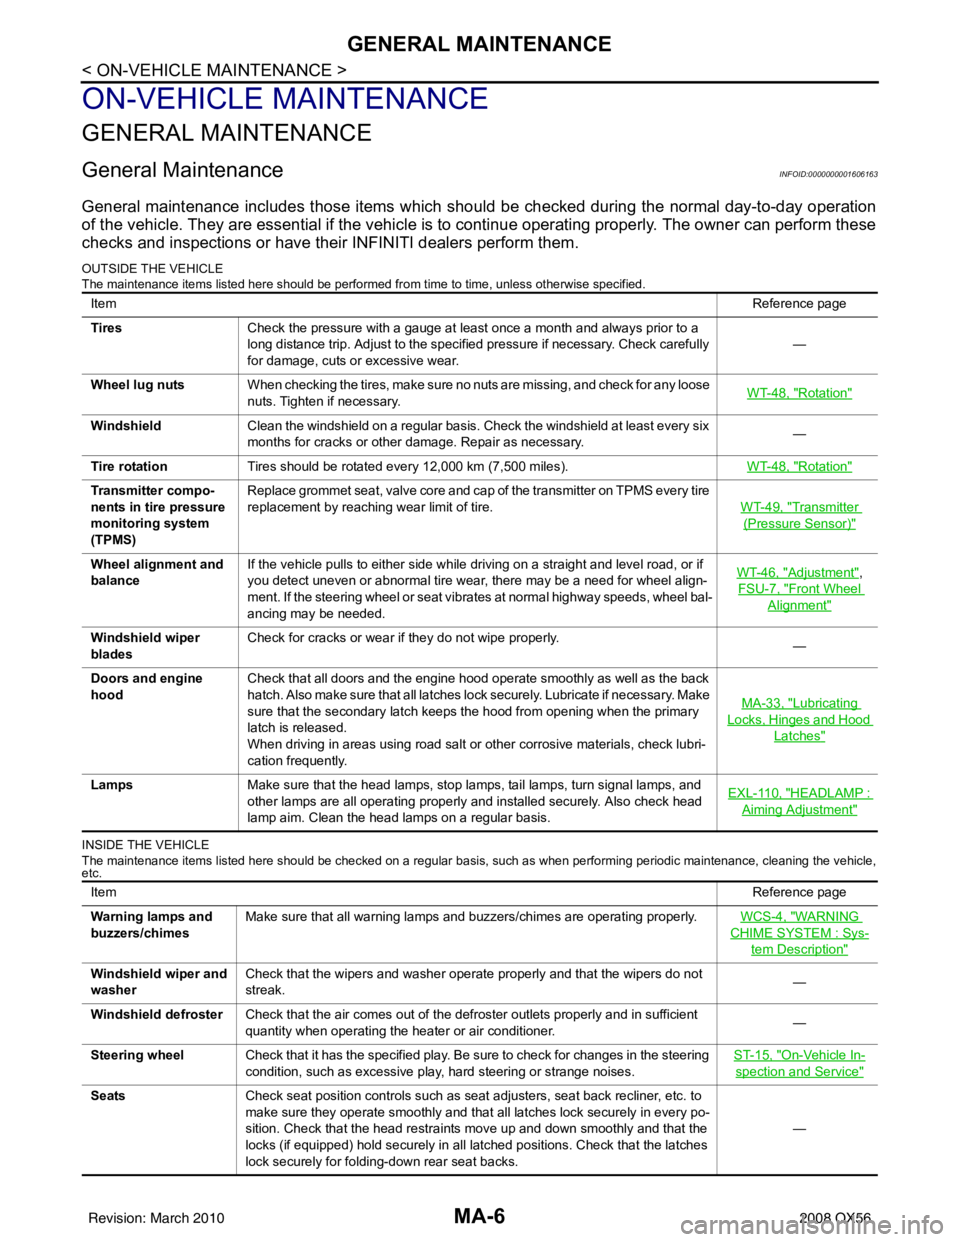
General MaintenanceINFOID:0000000001606163
General maintenance includes those items which should be checked during the normal day-to-day operation
of the vehicle. They are essential if the vehicle is to continue operating properly. The owner can perform these
checks and inspections or have thei r INFINITI dealers perform them.
OUTSIDE THE VEHICLE
The maintenance items listed here should be performed fr om time to time, unless otherwise specified.
INSIDE THE VEHICLE
The maintenance items listed here should be checked on a regular basis, such as when performing periodic maintenance, cleaning the vehicle,
etc.
Item Reference page
Tires Check the pressure with a gauge at least once a month and always prior to a
long distance trip. Adjust to the specified pressure if necessary. Check carefully
for damage, cuts or excessive wear. —
Wheel lug nuts When checking the tires, make sure no nuts are missing, and check for any loose
nuts. Tighten if necessary. WT-48, "
Rotation"
Windshield
Clean the windshield on a regular basis. Check the windshield at least every six
months for cracks or other damage. Repair as necessary. —
Tire rotation Tires should be rotated every 12,000 km (7,500 miles). WT-48, "
Rotation"
Transmitter compo-
nents in tire pressure
monitoring system
(TPMS)Replace grommet seat, valve core and cap of the transmitter on TPMS every tire
replacement by reaching wear limit of tire.
WT-49, "
Transmitter
(Pressure Sensor)"
Wheel alignment and
balanceIf the vehicle pulls to either side while driving on a straight and level road, or if
you detect uneven or abnormal tire wear, there may be a need for wheel align-
ment. If the steering wheel or seat vibrates at normal highway speeds, wheel bal-
ancing may be needed. WT-46, "Adjustment",
FSU-7, "
Front Wheel
Alignment"
Windshield wiper
blades Check for cracks or wear if they do not wipe properly.
—
Doors and engine
hood Check that all doors and the engine hood operate smoothly as well as the back
hatch. Also make sure that all latches lock securely. Lubricate if necessary. Make
sure that the secondary latch keeps the hood from opening when the primary
latch is released.
When driving in areas using road salt or other corrosive materials, check lubri-
cation frequently. MA-33, "
Lubricating
Locks, Hinges and Hood
Latches"
Lamps
Make sure that the head lamps, stop lamps, tail lamps, turn signal lamps, and
other lamps are all operating properly and installed securely. Also check head
lamp aim. Clean the head lamps on a regular basis. EXL-110, "HEADLAMP :
Aiming Adjustment"
Item
Reference page
Warning lamps and
buzzers/chimes Make sure that all warning lamps and buzzers/chimes are operating properly.
WCS-4, "
WARNING
CHIME SYSTEM : Sys-
tem Description"
Windshield wiper and
washerCheck that the wipers and washer operate properly and that the wipers do not
streak.
—
Windshield defroster Check that the air comes out of the defroster outlets properly and in sufficient
quantity when operating the heater or air conditioner. —
Steering wheel Check that it has the specified play. Be sure to check for changes in the steering
condition, such as excessive play, hard steering or strange noises. ST-15, "
On-Vehicle In-
spection and Service"
Seats
Check seat position controls such as seat adjusters, seat back recliner, etc. to
make sure they operate smoothly and that all latches lock securely in every po-
sition. Check that the head restraints move up and down smoothly and that the
locks (if equipped) hold securely in all latched positions. Check that the latches
lock securely for folding-down rear seat backs. —
Revision: March 2010
2008 QX56
Page 2605 of 4083

GENERAL MAINTENANCEMA-7
< ON-VEHICLE MAINTENANCE >
C
DE
F
G H
I
J
K L
M B
MA
N
O A
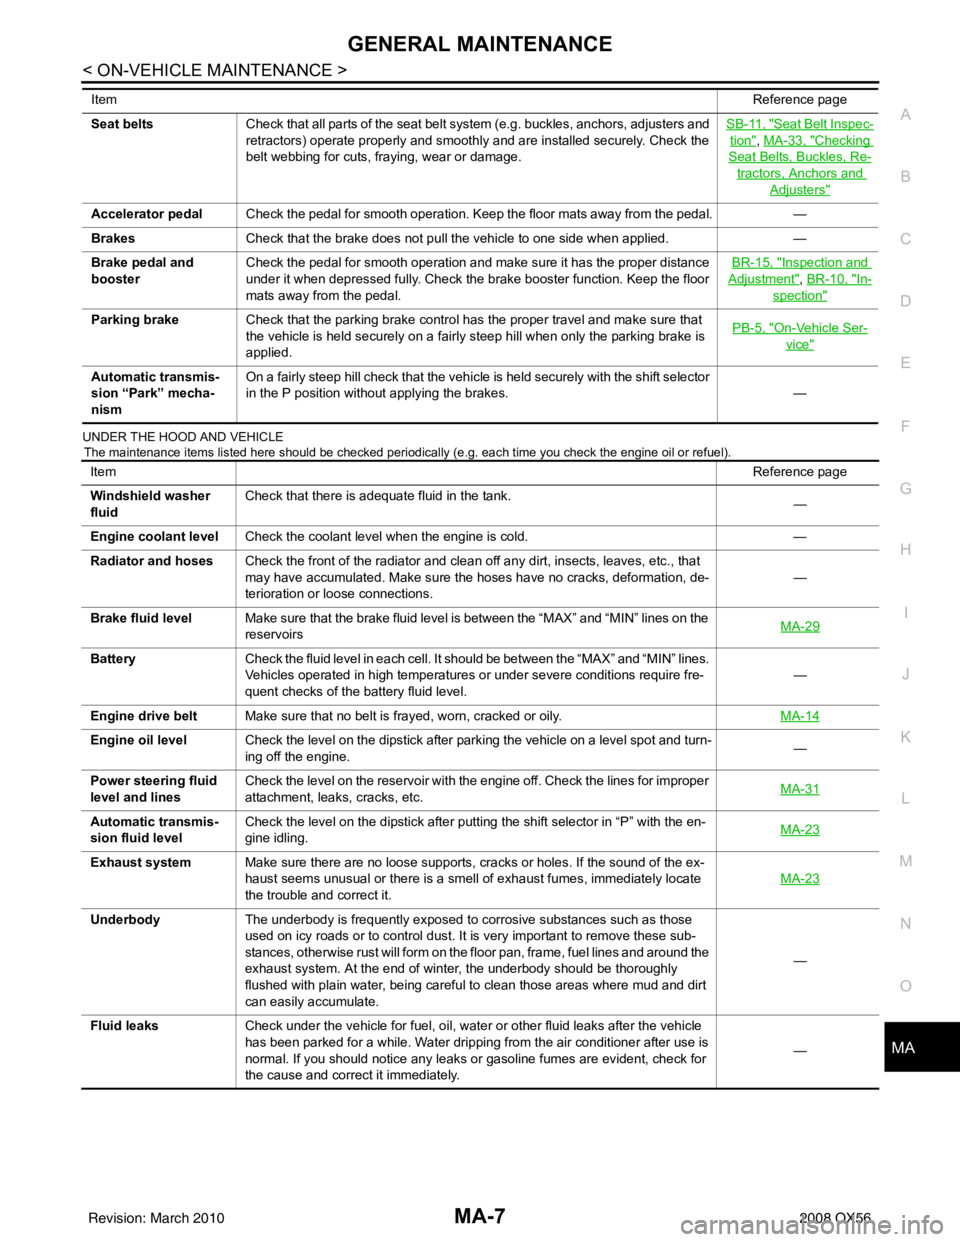
UNDER THE HOOD AND VEHICLE
The maintenance items listed here should be checked periodically (e.g. each time you check the engine oil or refuel).
Seat beltsCheck that all parts of the seat belt system (e.g. buckles, anchors, adjusters and
retractors) operate properly and smoothly and are installed securely. Check the
belt webbing for cuts, fraying, wear or damage. SB-11, "Seat Belt Inspec-
tion", MA-33, "Checking
Seat Belts, Buckles, Re-
tractors, Anchors and
Adjusters"
Accelerator pedal
Check the pedal for smooth operation. Keep the floor mats away from the pedal. —
Brakes Check that the brake does not pull the vehicle to one side when applied. —
Brake pedal and
booster Check the pedal for smooth operation and make sure it has the proper distance
under it when depressed fully. Check the brake booster function. Keep the floor
mats away from the pedal. BR-15, "
Inspection and
Adjustment", BR-10, "In-
spection"
Parking brake
Check that the parking brake control has the proper travel and make sure that
the vehicle is held securely on a fairly steep hill when only the parking brake is
applied. PB-5, "On-Vehicle Ser-
vice"
Automatic transmis-
sion “Park” mecha-
nismOn a fairly steep hill check that the vehicle is held securely with the shift selector
in the P position without applying the brakes.
—
Item
Reference page
Item Reference page
Windshield washer
fluid Check that there is adequate fluid in the tank.
—
Engine coolant level Check the coolant level when the engine is cold. —
Radiator and hoses Check the front of the radiator and clean off any dirt, insects, leaves, etc., that
may have accumulated. Make sure the hoses have no cracks, deformation, de-
terioration or loose connections. —
Brake fluid level Make sure that the brake fluid level is between the “MAX” and “MIN” lines on the
reservoirs MA-29
Battery
Check the fluid level in each cell. It should be between the “MAX” and “MIN” lines.
Vehicles operated in high temperatures or under severe conditions require fre-
quent checks of the battery fluid level. —
Engine drive belt Make sure that no belt is frayed, worn, cracked or oily. MA-14
Engine oil levelCheck the level on the dipstick after parking the vehicle on a level spot and turn-
ing off the engine. —
Power steering fluid
level and lines Check the level on the reservoir with the engine off. Check the lines for improper
attachment, leaks, cracks, etc.
MA-31
Automatic transmis-
sion fluid levelCheck the level on the dipstick after putting the shift selector in “P” with the en-
gine idling.
MA-23
Exhaust system
Make sure there are no loose supports, cracks or holes. If the sound of the ex-
haust seems unusual or there is a smell of exhaust fumes, immediately locate
the trouble and correct it. MA-23
Underbody
The underbody is frequently exposed to corrosive substances such as those
used on icy roads or to control dust. It is very important to remove these sub-
stances, otherwise rust will form on the floor pan, frame, fuel lines and around the
exhaust system. At the end of winter, the underbody should be thoroughly
flushed with plain water, being careful to clean those areas where mud and dirt
can easily accumulate. —
Fluid leaks Check under the vehicle for fuel, oil, water or other fluid leaks after the vehicle
has been parked for a while. Water dripping from the air conditioner after use is
normal. If you should notice any leaks or gasoline fumes are evident, check for
the cause and correct it immediately. —
Revision: March 2010
2008 QX56
Page 2606 of 4083

MA-8
< ON-VEHICLE MAINTENANCE >
PERIODIC MAINTENANCE
PERIODIC MAINTENANCE
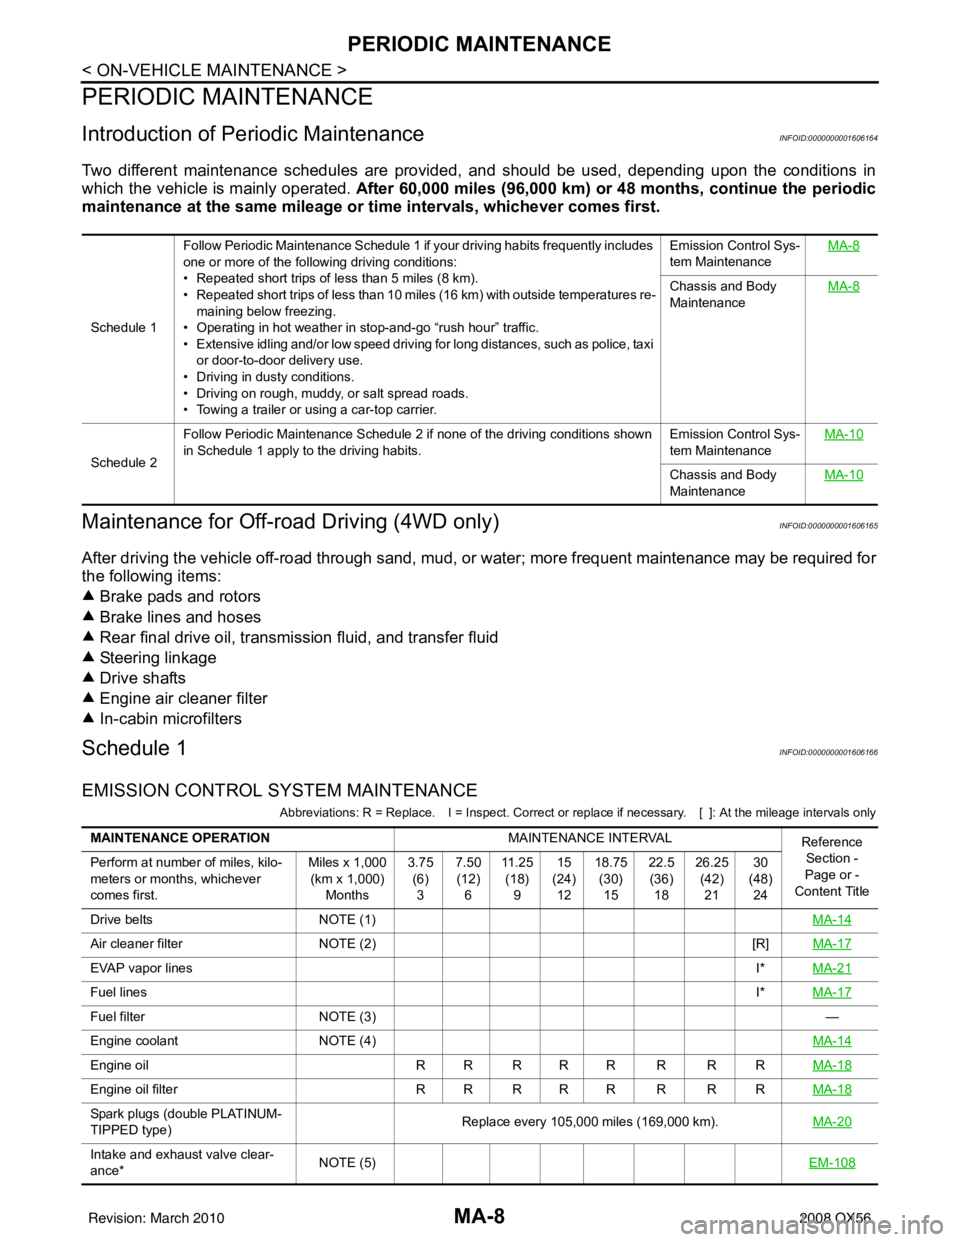
Introduction of Periodic MaintenanceINFOID:0000000001606164
Two different maintenance schedules are provided, and should be used, depending upon the conditions in
which the vehicle is mainly operated. After 60,000 miles (96,000 km) or 48 months, continue the periodic
maintenance at the same mileage or ti me intervals, whichever comes first.
Maintenance for Off-road Driving (4WD only)INFOID:0000000001606165
After driving the vehicle off-road through sand, mud, or water; more frequent maintenance may be required for
the following items:
Brake pads and rotors
Brake lines and hoses
Rear final drive oil, transmission fluid, and transfer fluid
Steering linkage
Drive shafts
Engine air cleaner filter
In-cabin microfilters
Schedule 1INFOID:0000000001606166
EMISSION CONTROL SYSTEM MAINTENANCE
Abbreviations: R = Replace. I = Inspect. Correct or r eplace if necessary. [ ]: At the mileage intervals only
Schedule 1Follow Periodic Maintenance Schedule 1 if your driving habits frequently includes
one or more of the following driving conditions:
• Repeated short trips of less than 5 miles (8 km).
• Repeated short trips of less than 10 miles (16 km) with outside temperatures re-
maining below freezing.
• Operating in hot weather in stop-and-go “rush hour” traffic.
• Extensive idling and/or low speed driving for long distances, such as police, taxi
or door-to-door delivery use.
• Driving in dusty conditions.
• Driving on rough, muddy, or salt spread roads.
• Towing a trailer or using a car-top carrier. Emission Control Sys-
tem Maintenance
MA-8
Chassis and Body
Maintenance
MA-8
Schedule 2Follow Periodic Maintenance Schedule 2 if none of the driving conditions shown
in Schedule 1 apply to the driving habits.
Emission Control Sys-
tem MaintenanceMA-10Chassis and Body
Maintenance
MA-10
MAINTENANCE OPERATION
MAINTENANCE INTERVAL
Reference
Section -
Page or -
Content Title
Perform at number of miles, kilo-
meters or months, whichever
comes first. Miles x 1,000
(km x 1,000) Months 3.75
(6)3 7.50
(12) 6 11 . 2 5
(18) 9 15
(24) 12 18.75
(30)15 22.5
(36) 18 26.25
(42)21 30
(48) 24
Drive belts NOTE (1) MA-14
Air cleaner filterNOTE (2) [R]MA-17
EVAP vapor lines I*MA-21
Fuel lines I*MA-17
Fuel filter NOTE (3) —
Engine coolant NOTE (4) MA-14
Engine oilR R R R R R R R MA-18
Engine oil filterR R R R R R R R MA-18
Spark plugs (double PLATINUM-
TIPPED type)Replace every 105,000 miles (169,000 km).
MA-20
Intake and exhaust valve clear-
ance*NOTE (5)
EM-108
Revision: March 2010 2008 QX56