2008 INFINITI QX56 4WD
[x] Cancel search: 4WDPage 2707 of 4083
MWI-62
< ECU DIAGNOSIS >
COMBINATION METER
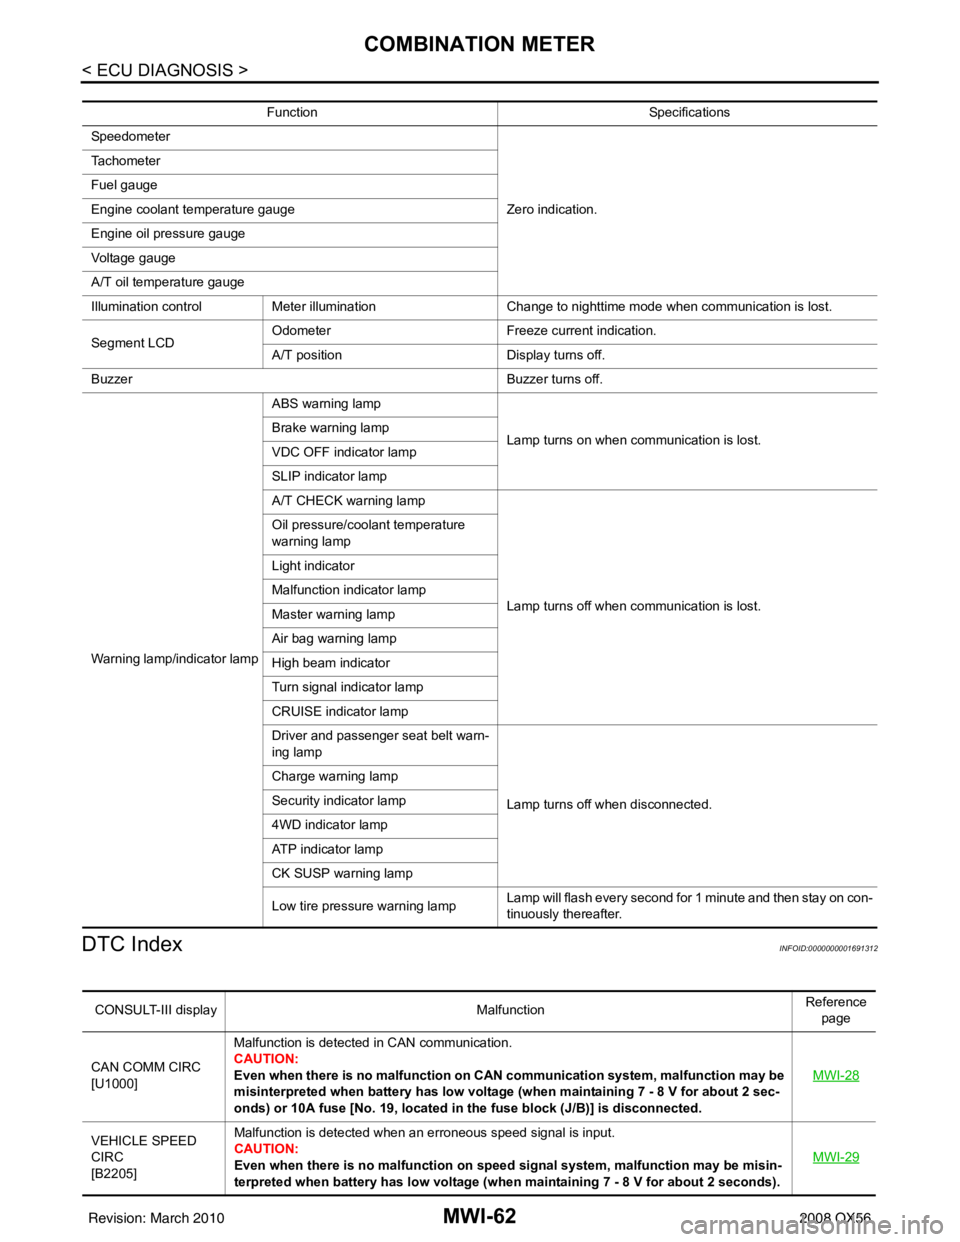
DTC Index
INFOID:0000000001691312
Function Specifications
Speedometer
Zero indication.
Tachometer
Fuel gauge
Engine coolant temperature gauge
Engine oil pressure gauge
Voltage gauge
A/T oil temperature gauge
Illumination control
Meter illumination Change to nighttime mode when communication is lost.
Segment LCD Odometer
Freeze current indication.
A/T position Display turns off.
Buzzer Buzzer turns off.
Warning lamp/indicator lamp ABS warning lamp
Lamp turns on when communication is lost.
Brake warning lamp
VDC OFF indicator lamp
SLIP indicator lamp
A/T CHECK warning lamp
Lamp turns off when communication is lost.
Oil pressure/coolant temperature
warning lamp
Light indicator
Malfunction indicator lamp
Master warning lamp
Air bag warning lamp
High beam indicator
Turn signal indicator lamp
CRUISE indicator lamp
Driver and passenger seat belt warn-
ing lamp
Lamp turns off when disconnected.
Charge warning lamp
Security indicator lamp
4WD indicator lamp
AT P i n d i c a t o r l a m p
CK SUSP warning lamp
Low tire pressure warning lamp
Lamp will flash every second for 1 minute and then stay on con-
tinuously thereafter.
CONSULT-III display
MalfunctionReference
page
CAN COMM CIRC
[U1000] Malfunction is detected in CAN communication.
CAUTION:
Even when there is no malfunction on CAN communication system, malfunction may be
misinterpreted when battery has low voltage (when maintaining 7 - 8 V for about 2 sec-
onds) or 10A fuse [No. 19, located in
the fuse block (J/B)] is disconnected. MWI-28
VEHICLE SPEED
CIRC
[B2205]Malfunction is detected when an erroneous speed signal is input.
CAUTION:
Even when there is no malfunction on speed signal system, malfunction may be misin-
terpreted when battery has lo
w voltage (when maintaining 7 - 8 V for about 2 seconds). MWI-29
Revision: March 2010
2008 QX56
Page 2809 of 4083

PG-42
< COMPONENT DIAGNOSIS >
HARNESS
A3 M6 W/10 : To E10A2 M92 B/6 : Power liftgate switch
A2 M7 B/5 : Passenger select unlock relay D1 M93 W/24 : Display unit
A3 M8 W/16 : To D2 A2 M95 W/6 : Rear power vent window switch
A2 M9 BR/24 : To D1 A2 M96 BR/6 : Pedal adjusting switch
A3 M10 Y/4 : To E29 C2 M98 W/16 : A/C and AV switch assembly
A3 M11 B/1 : Parking brake switch C3 M99 BR/2 : Foot lamp LH
C3 M12 GR/6 : Key switch and ignition knob switch F4 M100 BR/2 : Foot lamp RH
D3 M13 BR/2 : Front passenger air bag OFF indicator F4 M101 Y/2 : Driver air bag module
B3 M15 W/4 : Steering lock solenoid F4 M102 GR/8 : Combination switch (spiral cable)
A2 M16 GR/6 : ADP steering switch F4 M103 Y/2 : Driver air bag module
B2 M17 W/8 : Steering angle sensor E3 M104 W/4 : Aux jack
C2 M18 W/40 : BCM (body control module) F2 M105 Y/2 : Front passenger air bag module
C2 M19 W/15 : BCM (body control module) F2 M106 O/2 : Front passenger air bag module
C2 M20 B/15 : BCM (body control module) F3 M107 B/5 : Front blower relay
C3 M22 W/16 : Data link connector D5 M108 B/6 : Yaw rate/ side/ decel G sensor
B1 M23 W/12 : Combination meter A1 M109 BR/2 : Front tweeter LH
C1 M24 W/40 : Combination meter D2 M110 BR/2 : Center speaker
F2 M25 B/4 : Remote keyless entry receiver F2 M111 BR/2 : Front tweeter LH
B2 M26 W/6 : Ignition switch C2M112 BR/14 : BO SE speaker amp.
A2 M27 B/2 : Diode-3 C2 M113 BR/23 : BOSE speaker amp.
B2 M28 W/16 : Combination switch B3 M114 W/2 : Heated steering wheel
B2 M29 Y/6 : Combination switch (spiral cable) A2 M116 GR/8 : Sonar system OFF switch
B3 M30 GR/8 : Combination switch (spiral cable) B1 M118 BR/2 : Front sonar buzzer
G4 M31 SMJ : To E152 F2 M120 W/4 : Remote keyless entry receiver
C3 M32 W/4 : In-vehicle sensor F4 M122 W/4 : Variable blower control (front)
B3 M33 W/32 : Automatic drive position control unit C3 M123 W/2 : Tire pressure warning check connector
B3 M34 W/16 : Automatic drive position control unit D2 M124 GR/3 : AV control unit
C5 M35 Y/28 : Air bag diagnosis sensor unit D2 M125 B/1 : Satellite radio antenna
G4 M36 SMJ : To B149 C3 M129 V/1 : Satellite radio tuner
G3 M37 B/1 : Fuse block (J/B) D2 M139 B/2 : Diode-1
G3 M38 B/2 : Fuse block (J/B) D1 M140 B/2 : Diode-2
D3 M39 W/8 : Fuse block (J/B) C2 M141 GR/8 : 4WD shift switch
A3 M40 SMJ : To B69 E1 M142 B/6 : Mode door motor (front)
D2 M42 W/20 : AV control unit E3 M143 B/6 : Air mix door motor (passenger)
D2 M43 W/12 : AV control unit C1 M144 B/6 : Defroster door motor
D2 M44 W/32 : AV control unit E3 M146 GR/2 : Intake sensor
D3 M45 W/40 : AV control unit D3 M147B/6 : Air mix doo r motor (driver)
D2 M46 W/32 : AV control unit D2 M148 W/4 : Headlamp aiming switch
D2 M49 L/26 : A/C auto AMP D3 M149 W/4 : Clock
D2 M50 B/26 : A/C auto AMP B1 M150 W/2 : Ignition keyhole illumination
B3 M51 L/4 : Trailer tow relay 1 G4 M157 W/20 : To B161
B2 M52 W/2 : Combination switch (spiral cable) A3 M158 W/10 : To D3
D3 M53 B/3 : Front power socket LH Console sub-harness
E3 M54 B/3 : Front power socket RH (for cigarette
lighter) D4 M201 W/16 : To M56
D2 M55 W/4 : Hazard switch D4 M202 BR/24 : To M64
Revision: March 2010 2008 QX56
Page 3068 of 4083
SERVICE DATA AND SPECIFICATIONS (SDS)RSU-29
< SERVICE DATA AND SPECIFICATIONS (SDS)
C
DF
G H
I
J
K L
M A
B
RSU
N
O P
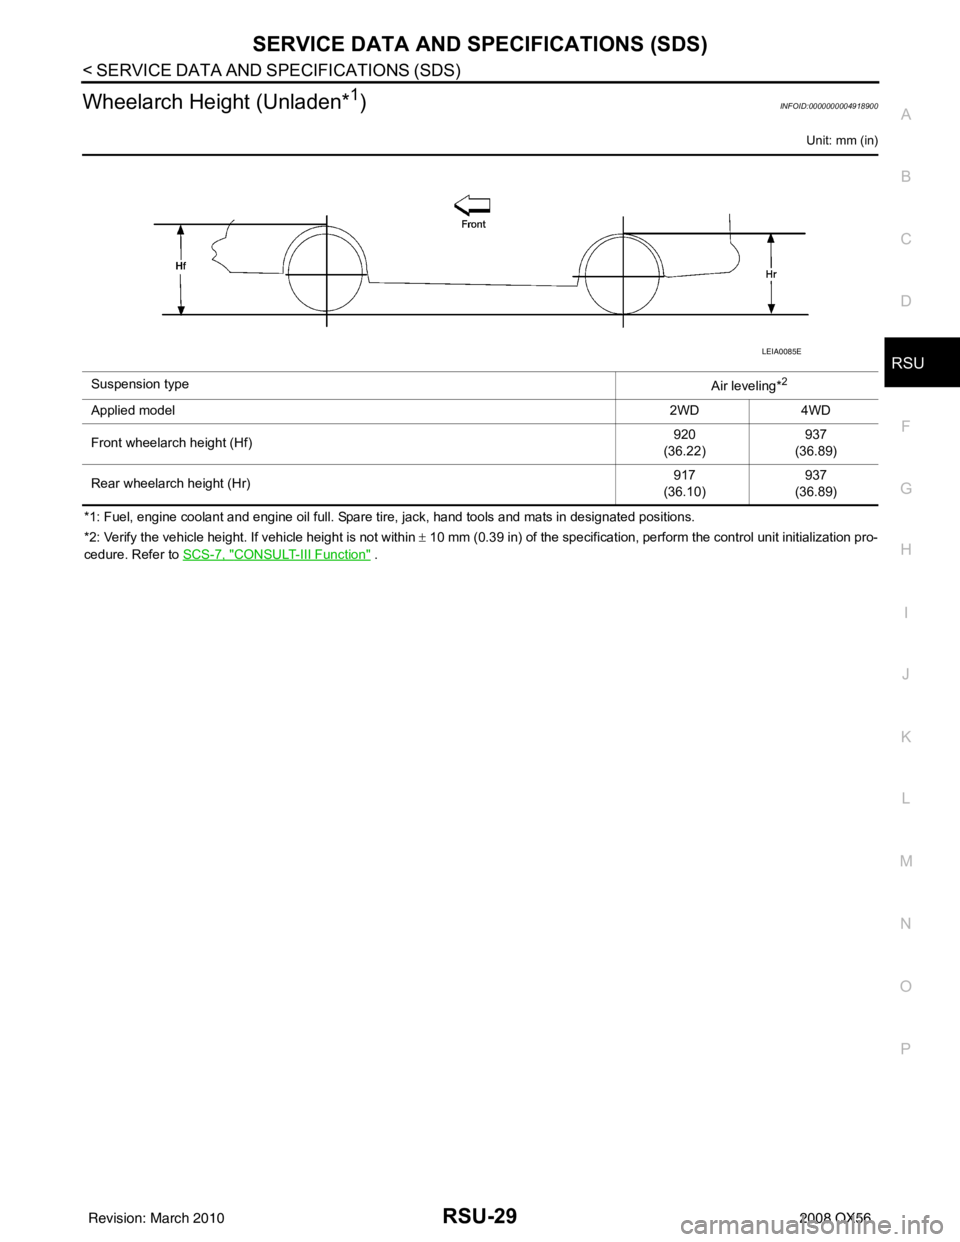
Wheelarch Height (Unladen*1)INFOID:0000000004918900
Unit: mm (in)
*1: Fuel, engine coolant and engine oil full. Spare tire, jack, hand tools and mats in designated positions.
*2: Verify the vehicle height. If vehicle height is not within ± 10 mm (0.39 in) of the specification, perform the control unit initialization pro-
cedure. Refer to SCS-7, "
CONSULT-III Function" .
Suspension type
Air leveling*
2
Applied model2WD 4WD
Front wheelarch height (Hf) 920
(36.22) 937
(36.89)
Rear wheelarch height (Hr) 917
(36.10) 937
(36.89)
LEIA0085E
Revision: March 2010 2008 QX56
Page 3514 of 4083
POWER STEERING GEAR AND LINKAGEST-23
< REMOVAL AND INSTALLATION >
C
DE
F
H I
J
K L
M A
B
ST
N
O P
POWER STEERING GEAR AND LINKAGE
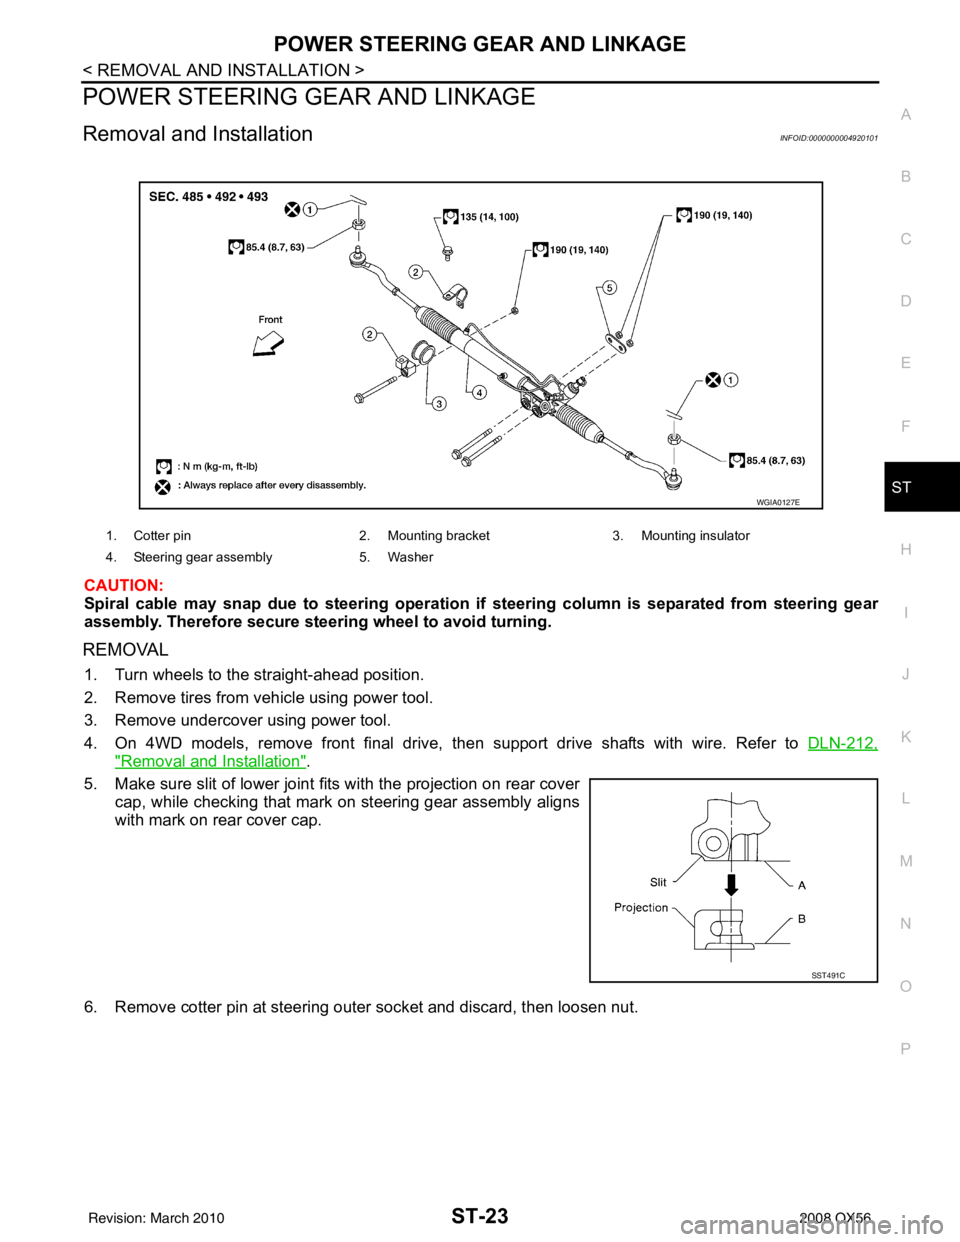
Removal and InstallationINFOID:0000000004920101
CAUTION:
Spiral cable may snap due to steering operation if steering column is separated from steering gear
assembly. Therefore secure steer ing wheel to avoid turning.
REMOVAL
1. Turn wheels to the straight-ahead position.
2. Remove tires from vehicle using power tool.
3. Remove undercover using power tool.
4. On 4WD models, remove front final drive, then support drive shafts with wire. Refer to DLN-212,
"Removal and Installation".
5. Make sure slit of lower joint fits with the projection on rear cover cap, while checking that mark on steering gear assembly aligns
with mark on rear cover cap.
6. Remove cotter pin at steering outer socket and discard, then loosen nut.
1. Cotter pin 2. Mounting bracket 3. Mounting insulator
4. Steering gear assembly 5. Washer
WGIA0127E
SST491C
Revision: March 2010 2008 QX56
Page 3548 of 4083
TM-1
TRANSMISSION & DRIVELINE
CEF
G H
I
J
K L
M
SECTION TM
A
B
TM
N
O P
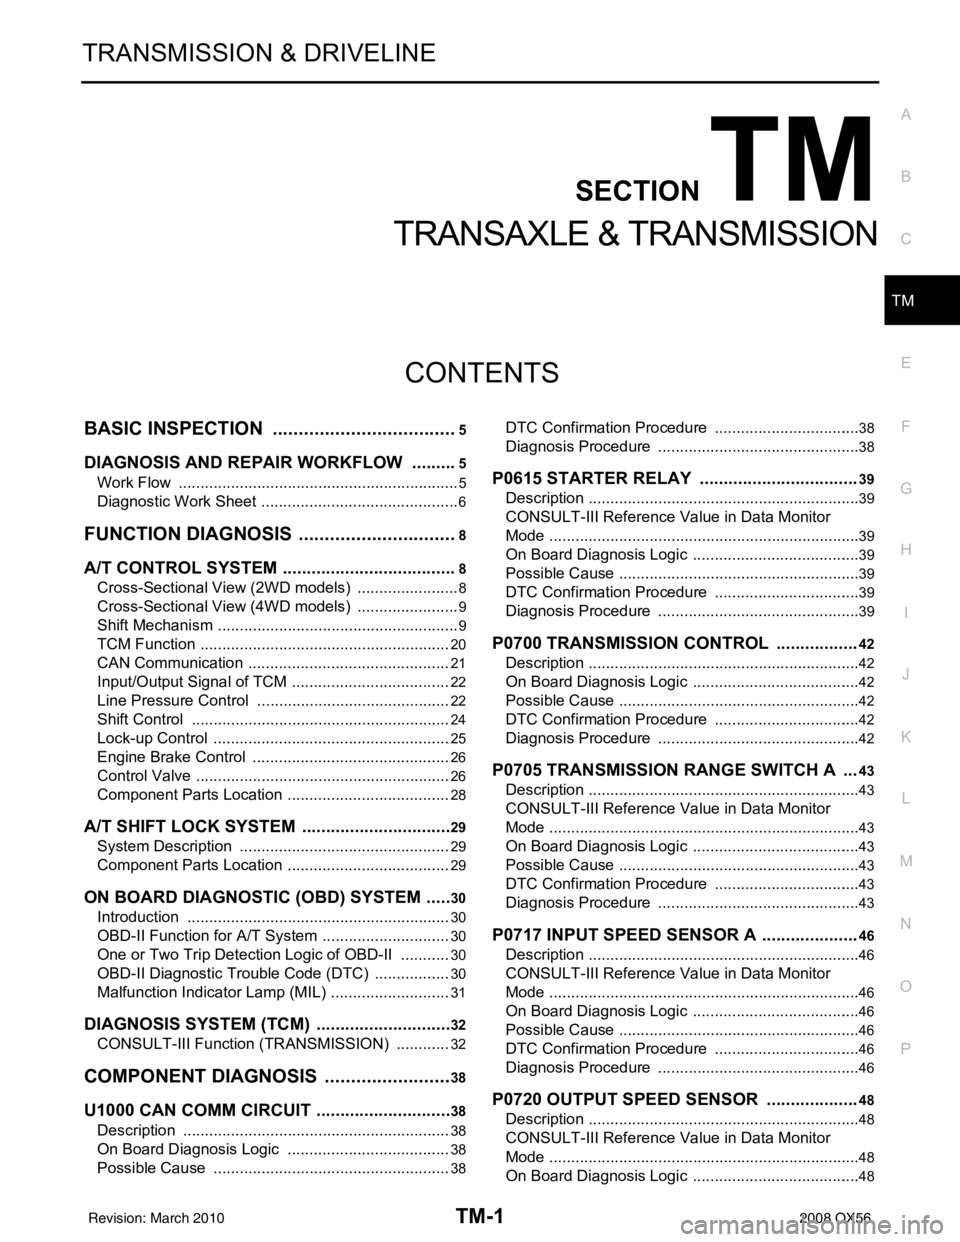
CONTENTS
TRANSAXLE & TRANSMISSION
BASIC INSPECTION ....... .............................5
DIAGNOSIS AND REPAIR WORKFLOW ..... .....5
Work Flow ........................................................... ......5
Diagnostic Work Sheet ..............................................6
FUNCTION DIAGNOSIS ...............................8
A/T CONTROL SYSTEM ................................ .....8
Cross-Sectional View (2WD models) .................. ......8
Cross-Sectional View (4WD models) ........................9
Shift Mechanism ........................................................9
TCM Function ..........................................................20
CAN Communication ...............................................21
Input/Output Signal of TCM .....................................22
Line Pressure Control .............................................22
Shift Control ........................................................ ....24
Lock-up Control .......................................................25
Engine Brake Control ..............................................26
Control Valve ...........................................................26
Component Parts Location ......................................28
A/T SHIFT LOCK SYSTEM ............................ ....29
System Description ............................................. ....29
Component Parts Location ......................................29
ON BOARD DIAGNOSTIC (OBD) SYSTEM ......30
Introduction ......................................................... ....30
OBD-II Function for A/T System ..............................30
One or Two Trip Detection Logic of OBD-II ............30
OBD-II Diagnostic Trouble Code (DTC) ..................30
Malfunction Indicator Lamp (MIL) ............................31
DIAGNOSIS SYSTEM (TCM) .............................32
CONSULT-III Function (TRANSMISSION) ......... ....32
COMPONENT DIAGNOSIS .........................38
U1000 CAN COMM CI RCUIT .............................38
Description .......................................................... ....38
On Board Diagnosis Logic ......................................38
Possible Cause .......................................................38
DTC Confirmation Procedure .............................. ....38
Diagnosis Procedure ...............................................38
P0615 STARTER RELAY .................................39
Description ...............................................................39
CONSULT-III Reference Value in Data Monitor
Mode .................................................................... ....
39
On Board Diagnosis Logic .......................................39
Possible Cause ........................................................39
DTC Confirmation Procedure ..................................39
Diagnosis Procedure ...............................................39
P0700 TRANSMISSION CONTROL .................42
Description ...............................................................42
On Board Diagnosis Logic .......................................42
Possible Cause ........................................................42
DTC Confirmation Procedure ..................................42
Diagnosis Procedure ...............................................42
P0705 TRANSMISSION RANGE SWITCH A ...43
Description ...............................................................43
CONSULT-III Reference Value in Data Monitor
Mode .................................................................... ....
43
On Board Diagnosis Logic .......................................43
Possible Cause ........................................................43
DTC Confirmation Procedure ..................................43
Diagnosis Procedure ...............................................43
P0717 INPUT SPEED SENSOR A ....................46
Description ...............................................................46
CONSULT-III Reference Value in Data Monitor
Mode .................................................................... ....
46
On Board Diagnosis Logic .......................................46
Possible Cause ........................................................46
DTC Confirmation Procedure ..................................46
Diagnosis Procedure ...............................................46
P0720 OUTPUT SPEED SENSOR ...................48
Description ...............................................................48
CONSULT-III Reference Value in Data Monitor
Mode .................................................................... ....
48
On Board Diagnosis Logic .......................................48
Revision: March 2010 2008 QX56
Page 3551 of 4083

TM-4
Precaution for Supplemental Restraint System
(SRS) "AIR BAG" and "SEAT BELT PRE-TEN-
SIONER" ................................................................
173
Precaution Necessary for Steering Wheel Rota-
tion After Battery Disconnect .................................
173
Precaution for On Board Diagnosis (OBD) System
of A/T and Engine ..................................................
174
Precaution .............................................................174
Service Notice or Precaution .................................175
PREPARATION ..........................................176
PREPARATION .............................................. .176
Special Service Tool ............................................ ..176
Commercial Service Tool ......................................177
ON-VEHICLE MAINTENANCE ..................178
A/T FLUID ....................................................... .178
Checking the A/T Fluid (ATF) .............................. ..178
Changing the A/T Fluid (ATF) ................................180
A/T FLUID COOLER ........................................182
A/T Fluid Cooler Cleaning ................................... ..182
Inspection ..............................................................184
STALL TEST ....................................................185
Inspection and Judgment .................................... ..185
LINE PRESSURE TEST ..................................187
Inspection and Judgment .................................... ..187
ROAD TEST .....................................................189
Description ........................................................... ..189
Check Before Engine Is Started ............................189
Check At Idle ....................................................... ..189
Cruise Test - Part 1 ...............................................190
Cruise Test - Part 2 ...............................................192
Cruise Test - Part 3 ...............................................193
Vehicle Speed When Shifting Gears .....................193
Vehicle Speed When Performing and Releasing
Complete Lock-up .................................................
193
A/T POSITION .................................................194
Checking of A/T Position ..................................... ..194
Adjustment of A/T Position ....................................194
ON-VEHICLE REPAIR ...............................195
SHIFT CONTROL SYSTEM ........................... .195
A/T Shift Selector Removal and Installation ..........195
Checking of A/T Position ..................................... ..196
Adjustment of A/T Position ....................................196
AIR BREATHER HOSE ...................................197
Removal and Installation ..................................... ..197
OIL PAN ...........................................................199
Oil Pan ................................................................. .199
CONTROL VALVE WITH TCM ........................201
Control Valve with TCM and A/T Fluid Tempera-
ture Sensor 2 ....................................................... .
201
REAR OIL SEAL ..............................................213
Rear Oil Seal ........................................................ .213
REMOVAL AND INSTALLATION .............214
TRANSMISSION ASSEMBLY ........................ ..214
Removal and Installation (2WD) .......................... .214
Removal and Installation (4WD) ...........................216
DISASSEMBLY AND ASSEMBLY ...........220
OVERHAUL ......................................................220
Component .......................................................... .220
Oil Channel ...........................................................227
Location of Adjusting Shims, Needle Bearings,
Thrust Washers and Snap Rings ......................... .
229
DISASSEMBLY .............................................. ..232
Disassembly ......................................................... .232
REPAIR FOR COMPONENT PARTS ..............250
Oil Pump .............................................................. .250
Front Sun Gear, 3rd One-Way Clutch ...................252
Front Carrier, Input Clutch, Rear Internal Gear .....254
Mid Sun Gear, Rear Sun Gear, High and Low Re-
verse Clutch Hub ................................................. .
259
High and Low Reverse Clutch ..............................264
Direct Clutch .........................................................266
ASSEMBLY .................................................... ..269
Assembly (1) ........................................................ .269
Adjustment ............................................................282
Assembly (2) .........................................................284
SERVICE DATA AND SPECIFICATIONS
(SDS) ........ .................................................
291
SERVICE DATA AND SPECIFICATIONS
(SDS) .............................................................. ..
291
General Specification ........................................... .291
Vehicle Speed at Which Gear Shifting Occurs .....291
Vehicle Speed at Which Lock-up Occurs/Releas-
es ......................................................................... .
291
Stall Speed ............................................................292
Line Pressure ........................................................292
A/T Fluid Temperature Sensor ..............................292
Input Speed Sensor ..............................................292
Output Speed Sensor ...........................................292
Reverse Brake ......................................................292
Total End Play .......................................................292
Torque Converter ..................................................293
Revision: March 2010 2008 QX56
Page 3556 of 4083
A/T CONTROL SYSTEMTM-9
< FUNCTION DIAGNOSIS >
CEF
G H
I
J
K L
M A
B
TM
N
O P
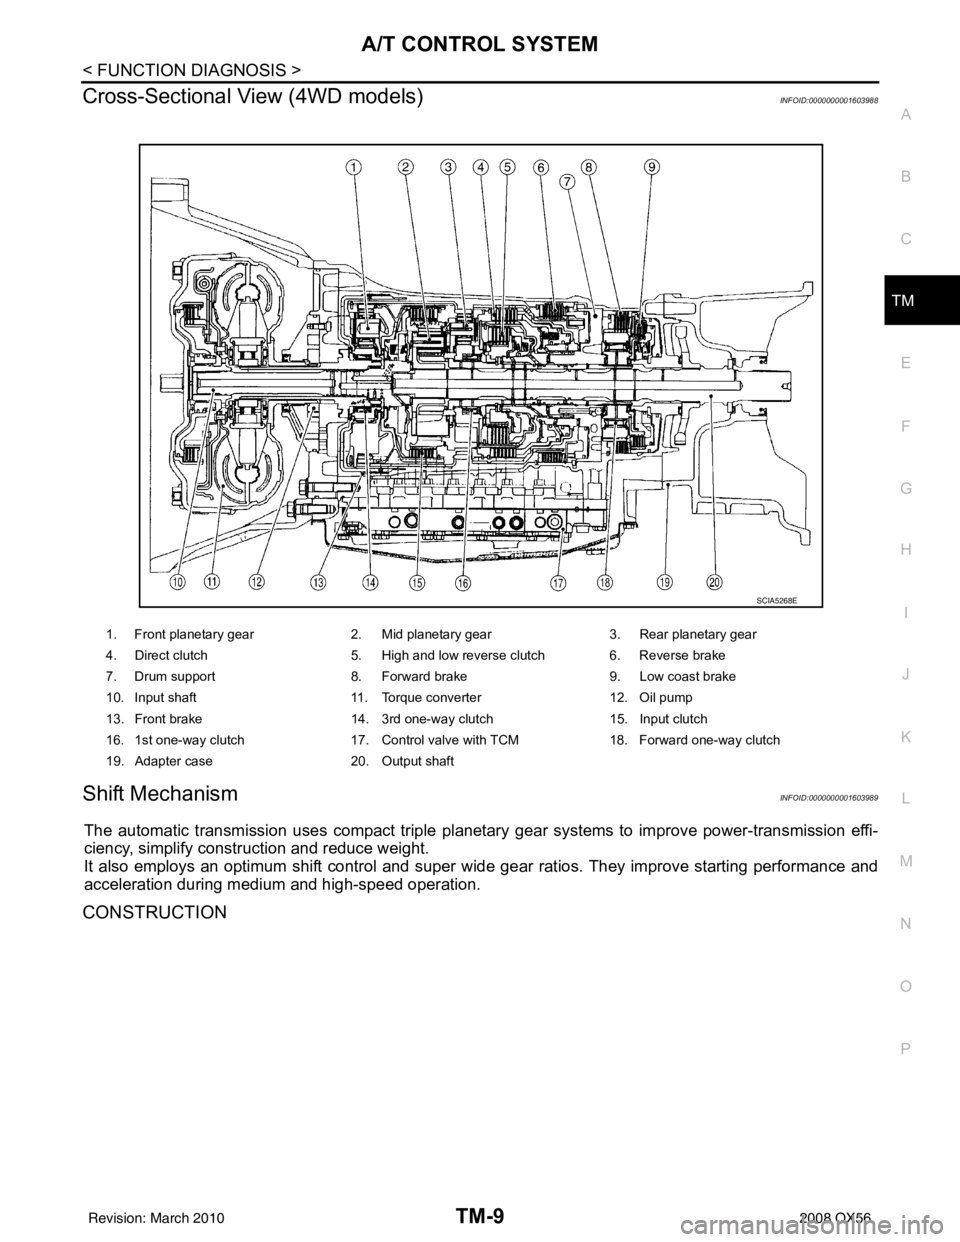
Cross-Sectional View (4WD models)INFOID:0000000001603988
Shift MechanismINFOID:0000000001603989
The automatic transmission uses compact triple planet ary gear systems to improve power-transmission effi-
ciency, simplify construction and reduce weight.
It also employs an optimum shift control and super wide gear ratios. They improve starting performance and
acceleration during medium and high-speed operation.
CONSTRUCTION
1. Front planetary gear 2. Mid planetary gear 3. Rear planetary gear
4. Direct clutch 5. High and low reverse clutch 6. Reverse brake
7. Drum support 8. Forward brake 9. Low coast brake
10. Input shaft 11. Torque converter 12. Oil pump
13. Front brake 14. 3rd one-way clutch 15. Input clutch
16. 1st one-way clutch 17. Control valve with TCM 18. Forward one-way clutch
19. Adapter case 20. Output shaft
SCIA5268E
Revision: March 2010 2008 QX56
Page 3724 of 4083
PREPARATIONTM-177
< PREPARATION >
CEF
G H
I
J
K L
M A
B
TM
N
O P
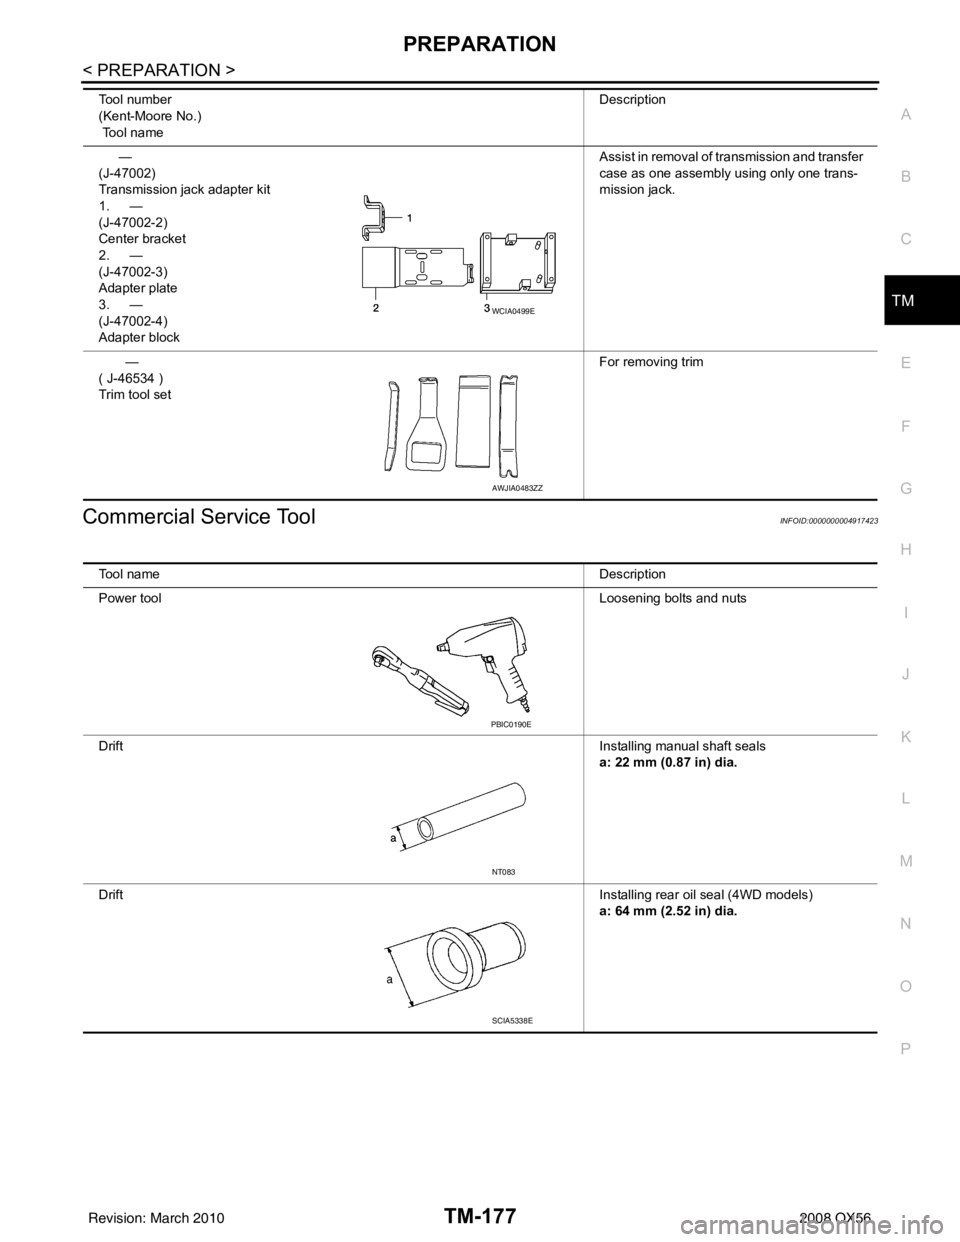
Commercial Service ToolINFOID:0000000004917423
—
(J-47002)
Transmission jack adapter kit
1. —
(J-47002-2)
Center bracket
2. —
(J-47002-3)
Adapter plate
3. —
(J-47002-4)
Adapter block Assist in removal of transmission and transfer
case as one assembly using only one trans-
mission jack.
—
( J-46534 )
Trim tool set For removing trim
Tool number
(Kent-Moore No.)
Tool name
Description
WCIA0499E
AWJIA0483ZZ
Tool name
Description
Power tool Loosening bolts and nuts
Drift Installing manual shaft seals
a: 22 mm (0.87 in) dia.
Drift Installing rear oil seal (4WD models)
a: 64 mm (2.52 in) dia.
PBIC0190E
NT083
SCIA5338E
Revision: March 2010 2008 QX56