2008 INFINITI FX35 engine oil
[x] Cancel search: engine oilPage 2 of 3924

QUICK REFERENCE CHART FX35/FX45
QUICK REFERENCE CHART FX35/FX45PFP:00000
ENGINE TUNE-UP DATA (VQ35DE)ELS0003W
Engine modelVQ35DE
Firing order1-2-3-4-5-6
Idle speed
A/T (In “P” or “N” position)rpm
650 ± 50
Ignition timing (BTDC at idle speed)
A/T (In “P” or “N” position)15° ± 5°
Drive BeltDeflection adjustment Unit: mm (in) Tension adjustment Unit: N (kg, lb)
Used belt
New beltUsed belt
New belt
Limit After adjustment Limit After adjust-
ment
Alternator and power
steering oil pump belt7 (0.28)7 - 8
(0.28 - 0.31)6 - 7
(0.24 - 0.28)294 (30, 66)730 - 818
(74.5 - 83.5,
164 - 184)838 - 926
(85.5 - 94.5,
188 - 208)
A/C compresor belt 12 (0.47)9 - 10
(0.35 - 0.39)8 - 9
(0.31 - 0.35)196 (20, 44)348 - 436
(35.5 - 44.5,
78 - 98)470 - 559
(47.9 -
5 7 . 0 ,
106 - 126)
Applied pushing force 98N (10kg, 22lb) —
Radiator cap relief pressure
kPa (kg/cm
2 , psi)
Standard 78 - 98 (0.8 - 1.0, 11 - 14)
Limit 59 (0.6, 9)
Cooling system leakage testing pressure
kPa (kg/cm
2 , psi)157 (1.6, 23)
Compression pressure
kPa (kg/cm
2 , psi)/rpm
Standard 1,275 (13.0, 185) /300
Minimum 981 (10.0, 142) /300
Spark plug Standard type PLFR5A-11
Hot type PLFR4A-11
Cold type PLFR6A-11
2008
Page 3 of 3924

QUICK REFERENCE CHART FX35/FX45
ENGINE TUNE-UP DATA (VK45DE)
FRONT WHEEL ALIGNMENT (Unladen* )
ELS0003X
* : Fuel, engine coolant and engine oil full. Spare tire, jack, hand tools and mats in designated positions.Engine modelVK45DE
Firing order1-8-7-3-6-5-4-2
Idle speed
A/T (In “P” or “N” position) rpm650 ± 50
Ignition timing (BTDC at idle speed)
A/T (In “P” or “N” position)12° ± 5°
Tensions of drive belts Auto adjustment by auto tensioner
Radiater cap relief pressure
kPa (kg/cm
2 , psi)
78 - 98 (0.8-1.0 , 11-14) Standard
Limit 59 (0.6, 9)
Cooling system leakage testing pressure
157 (1.6, 23)
kPa (kg/cm
2 , psi)
Compression pressure
kPa (kg/cm
2 , psi)/rpm
1,320 (13.5, 191) /300 Standard
Minimum 1,130 (11.5, 164) /300
Spark plug Standard type PLFR5A-11
Hot type PLFR4A-11
Cold type PLFR6A-11
Camber Degree minute (Decimal degree) Minimum –1° 29′ (–1.48°)
Nominal –0° 44′ (–0.73°)
Maximum 0° 01′ (0.02°)
Left and right difference 45′ (0.75°) or less
Caster Degree minute (Decimal degree) Minimum 3° 02′ (3.03°)
Nominal 3° 47′ (3.78°)
Maximum 4° 32′ (4.53°)
Left and right difference 45′ (0.75°) or less
Kingpin inclination Degree minute (Decimal degree) Minimum 12° 20′ (12.33°)
Nominal 13° 05′ (13.08°)
Maximum 13° 50′ (13.83°)
Total toe-in Distance Minimum 0.6 mm (0.024 in)
Nominal 1.6 mm (0.063 in)
Maximum 2.6 mm (0.102 in)
Angle (left wheel or right wheel)
Degree minute (Decimal degree)Minimum 0° 01′ (0.02°)
Nominal 0° 04′ (0.06°)
Maximum 0° 06′ (0.10°)
Wheel turning angle (Full turn) Inside Minimum 32° 00 (32.0°)
Degree minute (Decimal degree) Nominal 35° 00 (35.0°)
Maximum 36° 00 (36.0°)
Outside
Nominal 30° 00 (30.0°)
Degree minute (Decimal degree)
2008
Page 4 of 3924

QUICK REFERENCE CHART FX35/FX45
REAR WHEEL ALIGNMENT (Unladen*)
ELS0003Y
* : Fuel, engine coolant and engine oil full. Spare tire, jack, hand tools and mats in designated positions.
BRAKEELS0003Z
* : Under force of 490 N (50 kg, 110 lb) with engine running.
REFILL CAPACITIESELS00040
Camber
Degree minute (Decimal degree)Minimum –1° 18′ (–1.30°)
Nominal –0° 48′ (–0.80°)
Maximum – 0° 18′ (– 0.30°)
Total toe-inDistance Minimum 2.4 mm (0.09 in)
Nominal 4.7 mm (0.19 in)
Maximum 7.0 mm (0.28 in)
Angle (left wheel or right wheel)
Degree minute (Decimal degree)Minimum 0° 05′ (0.08°)
Nominal 0° 10′ (0.17°)
Maximum 0° 15′ (0.25°)
Front brake Pad repair limit 2.0 mm (0.079 in)
Rotor wear limit 32.0 mm (1.260 in)
Rear brake Pad repair limit 2.0 mm (0.079 in)
Rotor wear limit 14.0 mm (0.551 in)
Pedal free height 161.5 - 171.5 mm (6.358 - 6.752 in)
Pedal depressed height* More than 95 mm (3.74 in)
UNITLiter US measure
Fuel tank90 23 - 3/4 gal
Coolant (With reservoir tank)VQ35DE 8.6 9 - 1/8 qt
VK45DE 10.0 10 - 5/8 qt
Engine (VQ35DE)Drain and refill
With oil filter change 4.7 5 qt
Without oil filter change 4.4 4 - 5/8 qt
Dry engine (Overhaul) 5.4 5 - 3/4 qt
Engine (VK45DE)Drain and refill
With oil filter change 5.8 6 - 1/8 qt
Without oil filter change 5.2 5 - 1/2 qt
Dry engine (Overhaul) 7.0 7 - 3/8 qt
Transmission A/T 10.3 10 - 7/8 qt
Transfer1.25 2 - 5/8 pt
Differential carrierFront 0.65 1 - 3/8 pt
Rear 1.4 3 pt
Power steering system 1.0 1 - 1/8 qt
Air conditioning systemCompressor oil 0.18 6.0 fl oz
Refrigerant 0.55 kg 1.21 lb
2008
Page 21 of 3924
![INFINITI FX35 2008 Service Manual
ACS-14
< SERVICE INFORMATION >[ICC]
LASER BEAM AIMING ADJUSTMENT
LASER BEAM AIMING ADJUSTMENT
OutlineINFOID:0000000001328812
Adjust the laser beam aiming every time the ICC sensor is removed or insta INFINITI FX35 2008 Service Manual
ACS-14
< SERVICE INFORMATION >[ICC]
LASER BEAM AIMING ADJUSTMENT
LASER BEAM AIMING ADJUSTMENT
OutlineINFOID:0000000001328812
Adjust the laser beam aiming every time the ICC sensor is removed or insta](/manual-img/42/57017/w960_57017-20.png)
ACS-14
< SERVICE INFORMATION >[ICC]
LASER BEAM AIMING ADJUSTMENT
LASER BEAM AIMING ADJUSTMENT
OutlineINFOID:0000000001328812
Adjust the laser beam aiming every time the ICC sensor is removed or installed.
CAUTION:
Adjust laser beam aiming at a horizontal place as
far as 12 m (39 ft) forward the vehicle can be seen.
Adjust laser beam aiming 5 seconds after starting engine.
Never view ICC sensor integrated un it body window directly during laser beam aiming adjustment.
Follow the CONSULT-III when adju sting the laser beam aiming (laser beam aiming adjustment can-
not be operated without CONSULT-III).
Never ride on vehicle during l aser beam aiming adjustment.
Idle and turn headlamps OFF duri ng laser beam aiming adjustment.
PreparationINFOID:0000000001328813
Adjust the tire pressure to the specified value.
See that there is no load in the vehicle.
Coolant, engine oil filled up to correct level and full fuel tank.
Shift the gear into “P” position and release the parking brake.
Clean the ICC sensor with a soft cloth.
Outline of Adjustment ProcedureINFOID:0000000001328814
1. Set up the ICC target board [KV99110100 (J-45718)].
2. Adjust the sensor following the procedure on CONSUL T-III. (Turn manually the screw for up-down position
adjustment. ICC sensor automatically adjust the right-left position.)
Setting the ICC Target BoardINFOID:0000000001328815
Accurate ICC target board setting is required for the laser beam aiming adjustment.
CAUTION:
ICC system does not function normally if laser beam aiming is not accurate.
ADJUSTING HEIGHT OF THE TARGET
1. Attach a triangle scale at the center.
SKIA6179E
SKIA5974E
3AA93ABC3ACD3AC03ACA3AC03AC63AC53A913A773A893A873A873A8E3A773A983AC73AC93AC03AC3
3A893A873A873A8F3A773A9D3AAF3A8A3A8C3A863A9D3AAF3A8B3A8C
Page 77 of 3924

AT-4
BRAKE SIGNAL CIRCUIT ..............................165
CONSULT-III Reference Value in Data Monitor
Mode .................................................................... ..
165
Diagnosis Procedure .............................................165
A/T INDICATOR CIRCUIT ...............................166
Description ........................................................... ..166
CONSULT-III Reference Value in Data Monitor
Mode .................................................................... ..
166
Diagnosis Procedure .............................................166
TROUBLE DIAGNOSIS FOR SYMPTOMS .....167
Wiring Diagram - AT - NONDTC .......................... ..167
A/T Check Indicator Lamp Does Not Come On .....170
Engine Cannot Be Started in "P" or "N" Position ...170
In "P" Position, Vehicle Moves When Pushed .......171
In "N" Position, Vehicle Moves ..............................172
Large Shock ("N" to "D" Position) ..........................173
Vehicle Does Not Creep Backward in "R" Position ..175
Vehicle Does Not Creep Forward in "D" Position ..178
Vehicle Cannot Be Started from D1 .......................180
A/T Does Not Shift: D1→ D2 ................................ ..182
A/T Does Not Shift: D2→ D3 ................................ ..184
A/T Does Not Shift: D3→ D4 ................................ ..186
A/T Does Not Shift: D4→ D5 ................................ ..188
A/T Does Not Lock-up ......................................... ..190
A/T Does Not Hold Lock-up Condition ...................192
Lock-up Is Not Released .......................................194
Engine Speed Does Not Return to Idle .................194
Cannot Be Changed to Manual Mode ...................195
A/T Does Not Shift: 5th Gear → 4th Gear ........... ..196
A/T Does Not Shift: 4th Gear → 3rd Gear ........... ..197
A/T Does Not Shift: 3rd Gear → 2nd Gear .......... ..199
A/T Does Not Shift: 2nd Gear → 1st Gear ........... ..201
Vehicle Does Not Decelerate by Engine Brake ... ..202
SHIFT CONTROL SYSTEM ............................205
Control Device Removal and Installation ............. ..205
Control Rod Removal and Installation ...................206
Adjustment of A/T Position ....................................207
Checking of A/T Position .......................................207
A/T SHIFT LOCK SYSTEM .............................208
Description ........................................................... ..208
Shift Lock System Electrical Parts Location ..........208
Wiring Diagram - AT - SHIFT .................................209
Diagnosis Procedure .............................................209
KEY INTERLOCK CABLE ...............................212
Component .......................................................... ..212
Removal and Installation .......................................212
ON-VEHICLE SERVICE ...................................215
Control Valve with TCM and A/T Fluid Tempera-
ture Sensor 2 ....................................................... .
215
Parking Component (2WD Models Only) ..............226
Rear Oil Seal .........................................................233
Revolution Sensor Component (2WD Models
Only) .....................................................................
233
AIR BREATHER HOSE ....................................239
Removal and Installation ...................................... .239
TRANSMISSION ASSEMBLY ..........................241
Removal and Installation (2WD Models) .............. .241
Removal and Installation (AWD Models) ..............243
OVERHAUL ......................................................249
Component .......................................................... .249
Oil Channel ...........................................................261
Location of Adjusting Shims, Needle Bearings,
Thrust Washers and Snap Rings ......................... .
264
DISASSEMBLY .............................................. ..267
Disassembly ......................................................... .267
REPAIR FOR COMPONENT PARTS ..............285
Oil Pump .............................................................. .285
Front Sun Gear, 3rd One-Way Clutch ...................287
Front Carrier, Input Clutch, Rear Internal Gear .....289
Mid Sun Gear, Rear Sun Gear, High and Low Re-
verse Clutch Hub ..................................................
295
High and Low Reverse Clutch ..............................301
Direct Clutch .........................................................303
ASSEMBLY .................................................... ..306
Assembly (1) ........................................................ .306
Adjustment ............................................................320
Assembly (2) .........................................................323
SERVICE DATA AND SPECIFICATIONS
(SDS) ................................................................
330
General Specification ........................................... .330
Vehicle Speed at Which Gear Shifting Occurs .....330
Vehicle Speed at Which Lock-up Occurs/Releas-
es ..........................................................................
331
Stall Speed ............................................................331
Line Pressure ........................................................331
A/T Fluid Temperature Sensor ..............................332
Turbine Revolution Sensor ...................................332
Vehicle Speed Sensor A/T (Revolution Sensor) ...332
Reverse Brake ......................................................332
Total End Play .......................................................332
3AA93ABC3ACD3AC03ACA3AC03AC63AC53A913A773A893A873A873A8E3A773A983AC73AC93AC03AC3
3A893A873A873A8F3A773A9D3AAF3A8A3A8C3A863A9D3AAF3A8B3A8C
Page 105 of 3924

AT-32
< SERVICE INFORMATION >
A/T CONTROL SYSTEM
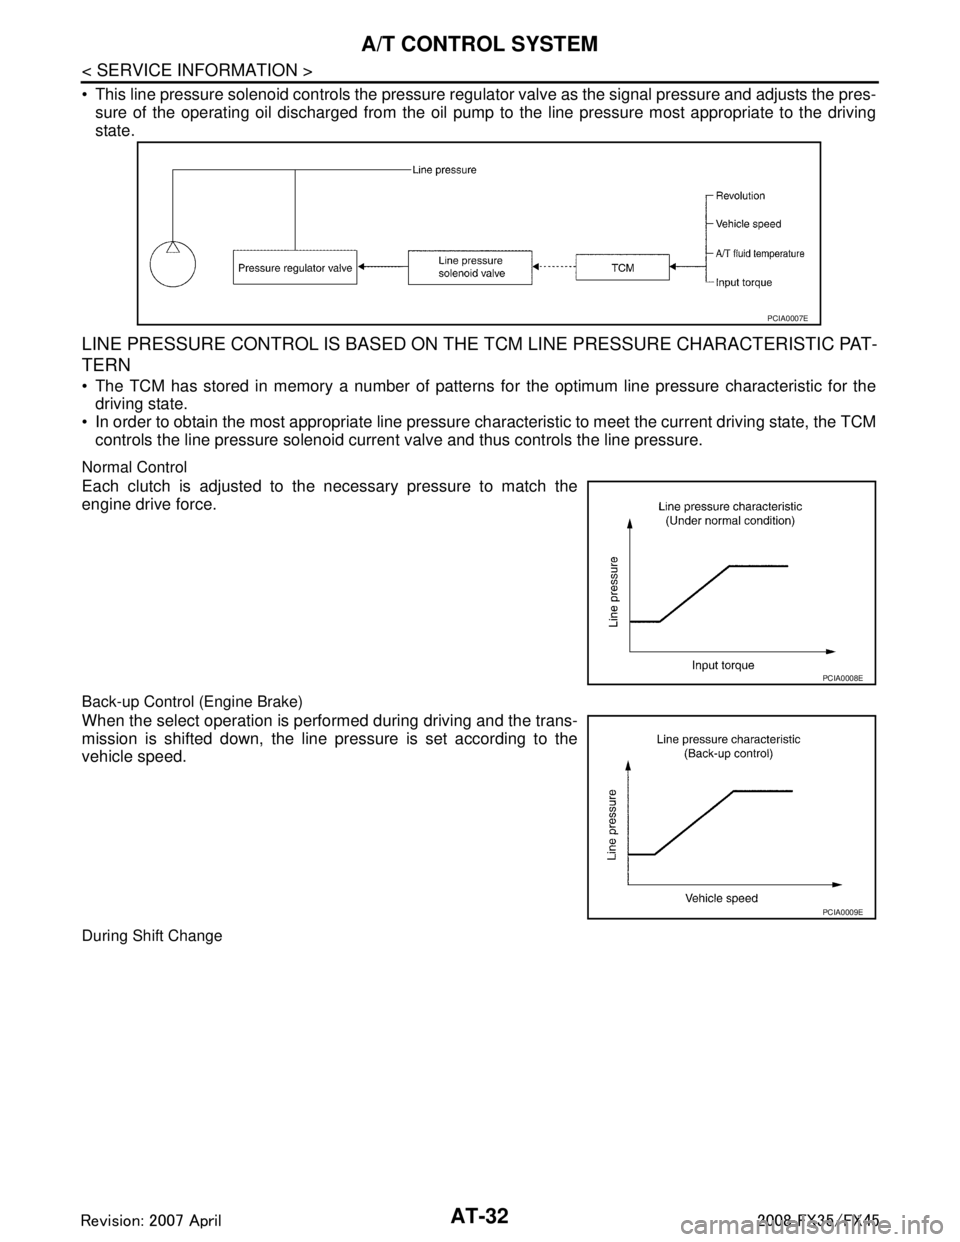
This line pressure solenoid controls the pressure regulator valve as the signal pressure and adjusts the pres-
sure of the operating oil discharged from the oil pump to the line pressure most appropriate to the driving
state.
LINE PRESSURE CONTROL IS BASED ON TH E TCM LINE PRESSURE CHARACTERISTIC PAT-
TERN
The TCM has stored in memory a number of patterns fo r the optimum line pressure characteristic for the
driving state.
In order to obtain the most appropriate line pressure char acteristic to meet the current driving state, the TCM
controls the line pressure solenoid current valve and thus controls the line pressure.
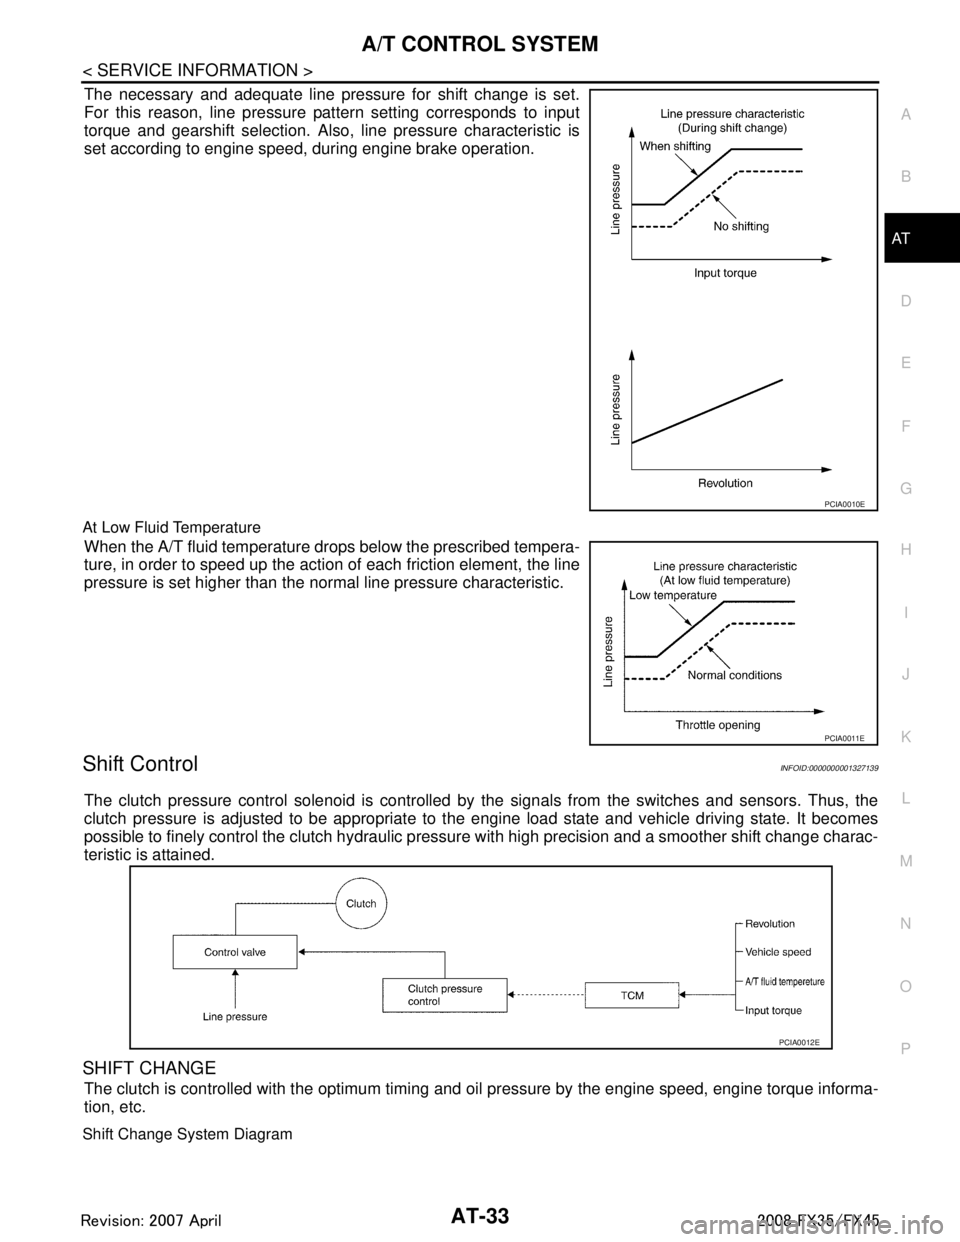
Normal Control
Each clutch is adjusted to the necessary pressure to match the
engine drive force.
Back-up Control (Engine Brake)
When the select operation is performed during driving and the trans-
mission is shifted down, the line pressure is set according to the
vehicle speed.
During Shift Change
PCIA0007E
PCIA0008E
PCIA0009E
3AA93ABC3ACD3AC03ACA3AC03AC63AC53A913A773A893A873A873A8E3A773A983AC73AC93AC03AC3
3A893A873A873A8F3A773A9D3AAF3A8A3A8C3A863A9D3AAF3A8B3A8C
Page 106 of 3924

A/T CONTROL SYSTEMAT-33
< SERVICE INFORMATION >
DE
F
G H
I
J
K L
M A
B
AT
N
O P
The necessary and adequate line pressure for shift change is set.
For this reason, line pressure pattern setting corresponds to input
torque and gearshift selection. Also, line pressure characteristic is
set according to engine speed, during engine brake operation.
At Low Fluid Temperature
When the A/T fluid temperature drops below the prescribed tempera-
ture, in order to speed up the action of each friction element, the line
pressure is set higher than the normal line pressure characteristic.
Shift ControlINFOID:0000000001327139
The clutch pressure control solenoid is controlled by the signals from the switches and sensors. Thus, the
clutch pressure is adjusted to be appropriate to t he engine load state and vehicle driving state. It becomes
possible to finely control the clutch hydraulic pressu re with high precision and a smoother shift change charac-
teristic is attained.
SHIFT CHANGE
The clutch is controlled with the optimum timing and oil pressure by the engine speed, engine torque informa-
tion, etc.
Shift Change System Diagram
PCIA0010E
PCIA0011E
PCIA0012E
3AA93ABC3ACD3AC03ACA3AC03AC63AC53A913A773A893A873A873A8E3A773A983AC73AC93AC03AC3
3A893A873A873A8F3A773A9D3AAF3A8A3A8C3A863A9D3AAF3A8B3A8C
Page 107 of 3924

AT-34
< SERVICE INFORMATION >
A/T CONTROL SYSTEM
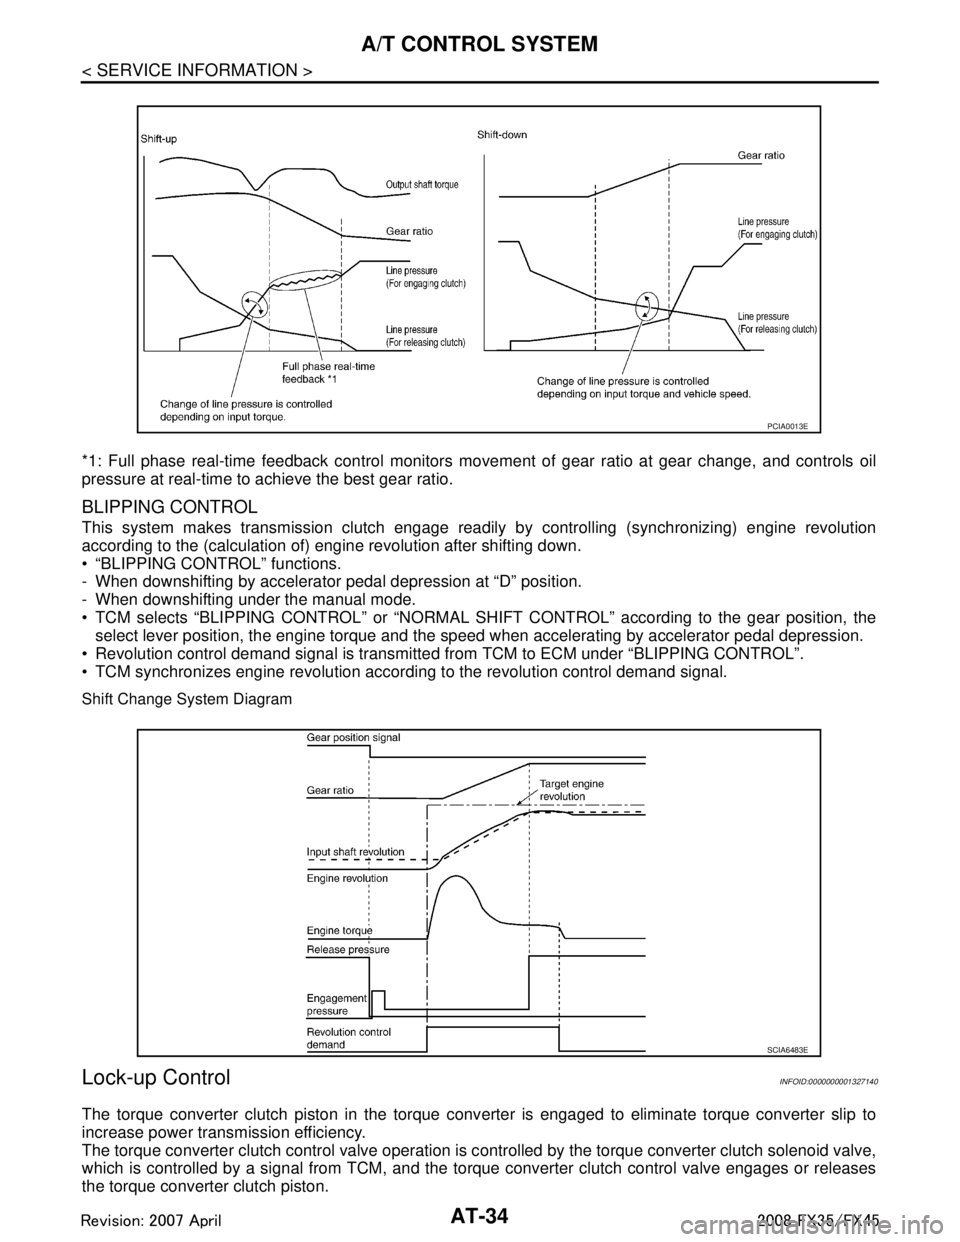
*1: Full phase real-time feedback control monitors movement of gear ratio at gear change, and controls oil
pressure at real-time to achieve the best gear ratio.
BLIPPING CONTROL
This system makes transmission clutch engage readily by controlling (synchronizing) engine revolution
according to the (calculation of) engine revolution after shifting down.
“BLIPPING CONTROL” functions.
- When downshifting by accelerator pedal depression at “D” position.
- When downshifting under the manual mode.
TCM selects “BLIPPING CONTROL” or “NORMAL SHIFT CONTROL” according to the gear position, the
select lever position, the engine torque and the speed when accelerating by accelerator pedal depression.
Revolution control demand signal is transmitted from TCM to ECM under “BLIPPING CONTROL”.
TCM synchronizes engine revolution according to the revolution control demand signal.
Shift Change System Diagram
Lock-up ControlINFOID:0000000001327140
The torque converter clutch piston in the torque conv erter is engaged to eliminate torque converter slip to
increase power transmission efficiency.
The torque converter clutch control valve operation is c ontrolled by the torque converter clutch solenoid valve,
which is controlled by a signal from TCM, and the to rque converter clutch control valve engages or releases
the torque converter clutch piston.
PCIA0013E
SCIA6483E
3AA93ABC3ACD3AC03ACA3AC03AC63AC53A913A773A893A873A873A8E3A773A983AC73AC93AC03AC3
3A893A873A873A8F3A773A9D3AAF3A8A3A8C3A863A9D3AAF3A8B3A8C