2008 INFINITI FX35 fuse
[x] Cancel search: fusePage 3815 of 3924
TROUBLE DIAGNOSIS FOR SYSTEMTF-29
< SERVICE INFORMATION >
CEF
G H
I
J
K L
M A
B
TF
N
O P
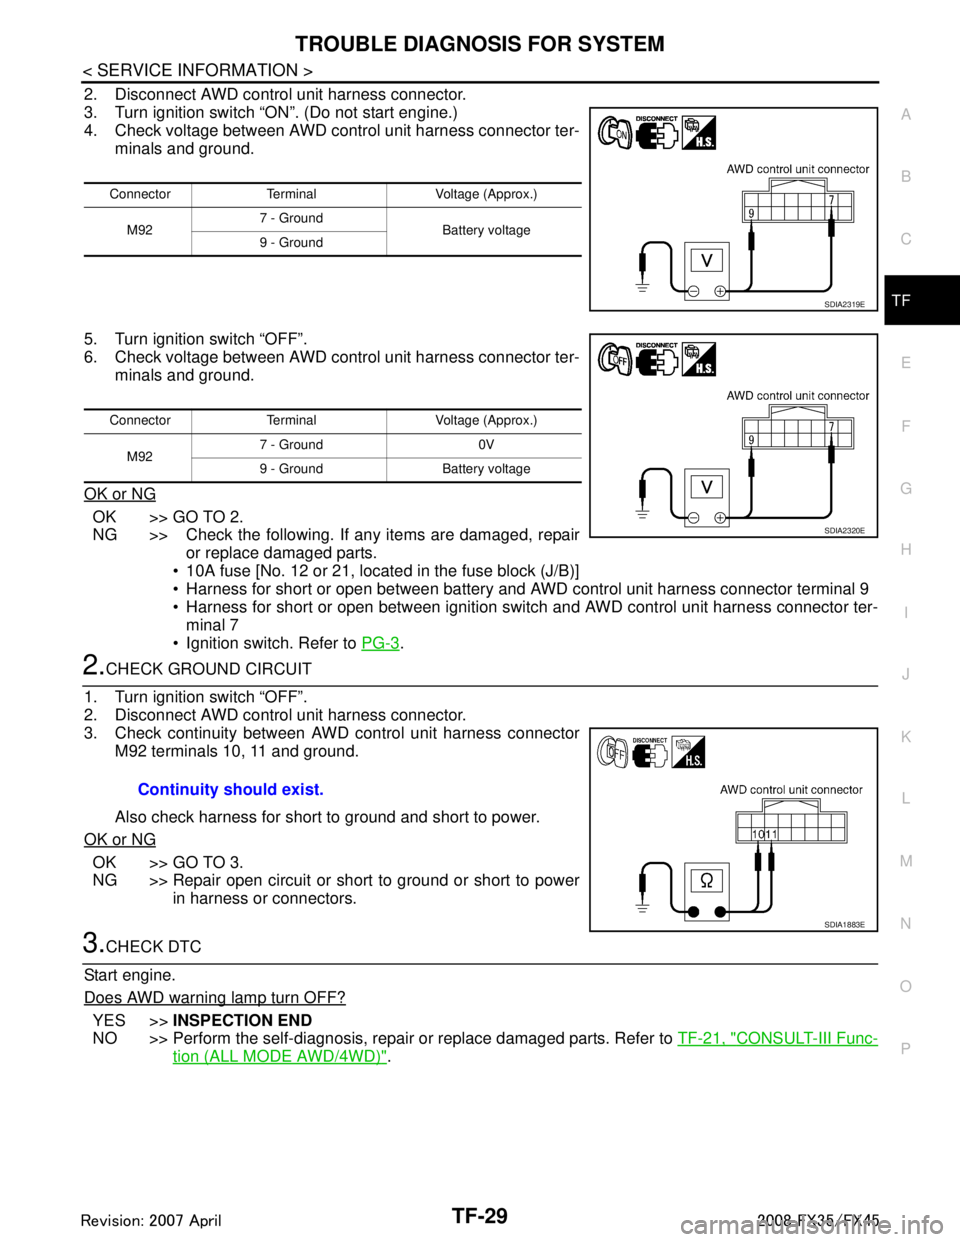
2. Disconnect AWD control unit harness connector.
3. Turn ignition switch “ON”. (Do not start engine.)
4. Check voltage between AWD control unit harness connector ter- minals and ground.
5. Turn ignition switch “OFF”.
6. Check voltage between AWD control unit harness connector ter- minals and ground.
OK or NG
OK >> GO TO 2.
NG >> Check the following. If any items are damaged, repair or replace damaged parts.
10A fuse [No. 12 or 21, located in the fuse block (J/B)]
Harness for short or open between battery and AWD control unit harness connector terminal 9
Harness for short or open between ignition switch and AWD control unit harness connector ter- minal 7
Ignition switch. Refer to PG-3
.
2.CHECK GROUND CIRCUIT
1. Turn ignition switch “OFF”.
2. Disconnect AWD control unit harness connector.
3. Check continuity between AWD control unit harness connector M92 terminals 10, 11 and ground.
Also check harness for short to ground and short to power.
OK or NG
OK >> GO TO 3.
NG >> Repair open circuit or short to ground or short to power in harness or connectors.
3.CHECK DTC
Start engine.
Does AWD warning lamp turn OFF?
YES >> INSPECTION END
NO >> Perform the self-diagnosis, repair or replace damaged parts. Refer to TF-21, "
CONSULT-III Func-
tion (ALL MODE AWD/4WD)".
Connector Terminal Voltage (Approx.)
M92 7 - Ground
Battery voltage
9 - Ground
SDIA2319E
Connector Terminal Voltage (Approx.)
M92 7 - Ground 0V
9 - Ground Battery voltage
SDIA2320E
Continuity should exist.
SDIA1883E
3AA93ABC3ACD3AC03ACA3AC03AC63AC53A913A773A893A873A873A8E3A773A983AC73AC93AC03AC3
3A893A873A873A8F3A773A9D3AAF3A8A3A8C3A863A9D3AAF3A8B3A8C
Page 3817 of 3924
TROUBLE DIAGNOSIS FOR SYMPTOMSTF-31
< SERVICE INFORMATION >
CEF
G H
I
J
K L
M A
B
TF
N
O P
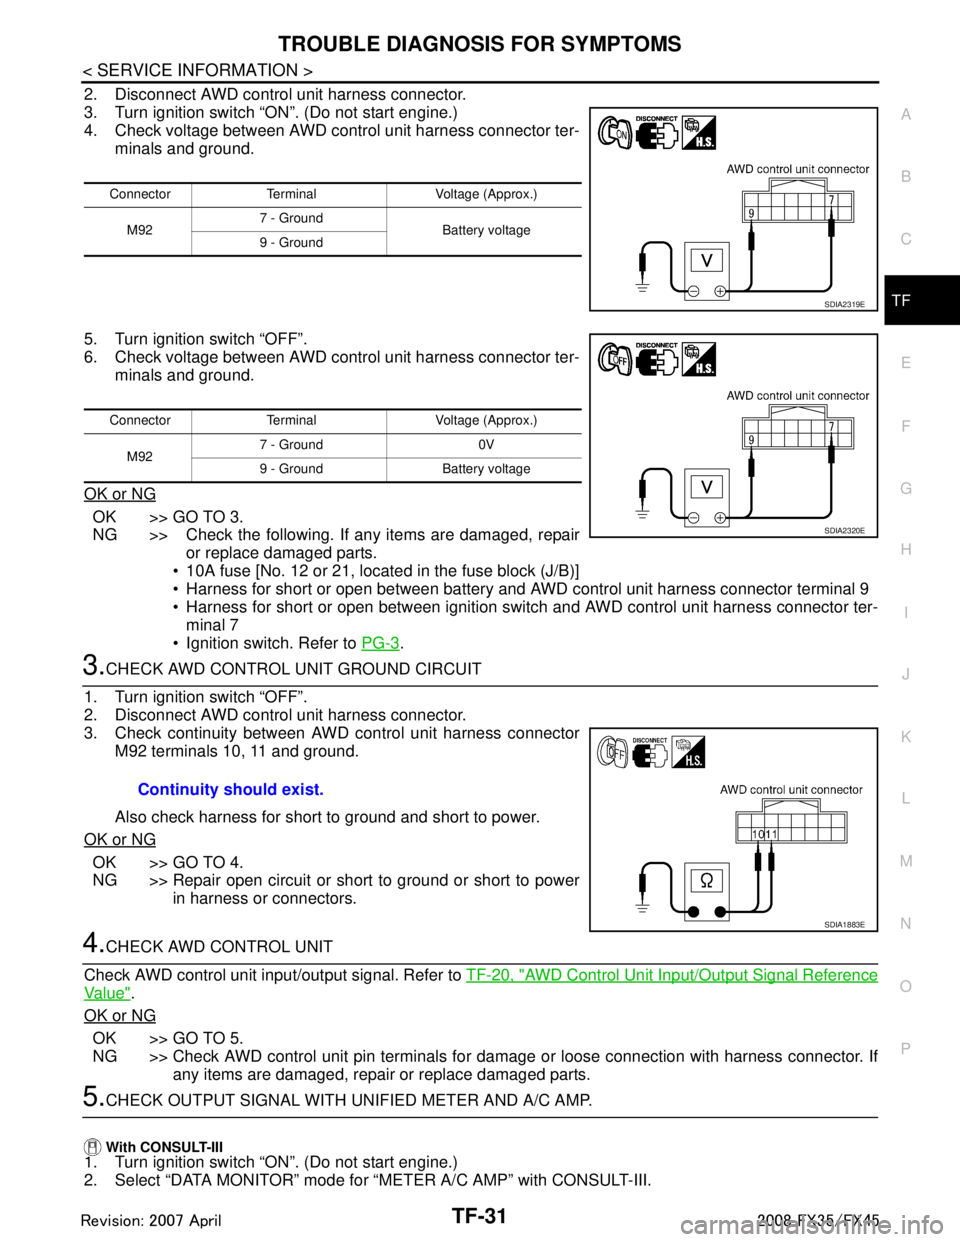
2. Disconnect AWD control unit harness connector.
3. Turn ignition switch “ON”. (Do not start engine.)
4. Check voltage between AWD control unit harness connector ter- minals and ground.
5. Turn ignition switch “OFF”.
6. Check voltage between AWD control unit harness connector ter- minals and ground.
OK or NG
OK >> GO TO 3.
NG >> Check the following. If any items are damaged, repair or replace damaged parts.
10A fuse [No. 12 or 21, located in the fuse block (J/B)]
Harness for short or open between battery and AWD control unit harness connector terminal 9
Harness for short or open between ignition switch and AWD control unit harness connector ter- minal 7
Ignition switch. Refer to PG-3
.
3.CHECK AWD CONTROL UNIT GROUND CIRCUIT
1. Turn ignition switch “OFF”.
2. Disconnect AWD control unit harness connector.
3. Check continuity between AWD control unit harness connector M92 terminals 10, 11 and ground.
Also check harness for short to ground and short to power.
OK or NG
OK >> GO TO 4.
NG >> Repair open circuit or short to ground or short to power in harness or connectors.
4.CHECK AWD CONTROL UNIT
Check AWD control unit input/output signal. Refer to TF-20, "
AWD Control Unit Input/Output Signal Reference
Va l u e".
OK or NG
OK >> GO TO 5.
NG >> Check AWD control unit pin terminals for damage or loose connection with harness connector. If any items are damaged, repair or replace damaged parts.
5.CHECK OUTPUT SIGNAL WITH UNIFIED METER AND A/C AMP.
With CONSULT-III
1. Turn ignition switch “ON”. (Do not start engine.)
2. Select “DATA MONITOR” mode for “METER A/C AMP” with CONSULT-III.
Connector Terminal Voltage (Approx.)
M92 7 - Ground
Battery voltage
9 - Ground
SDIA2319E
Connector Terminal Voltage (Approx.)
M92 7 - Ground 0V
9 - Ground Battery voltage
SDIA2320E
Continuity should exist.
SDIA1883E
3AA93ABC3ACD3AC03ACA3AC03AC63AC53A913A773A893A873A873A8E3A773A983AC73AC93AC03AC3
3A893A873A873A8F3A773A9D3AAF3A8A3A8C3A863A9D3AAF3A8B3A8C
Page 3858 of 3924
WT-18
< SERVICE INFORMATION >
TROUBLE DIAGNOSES
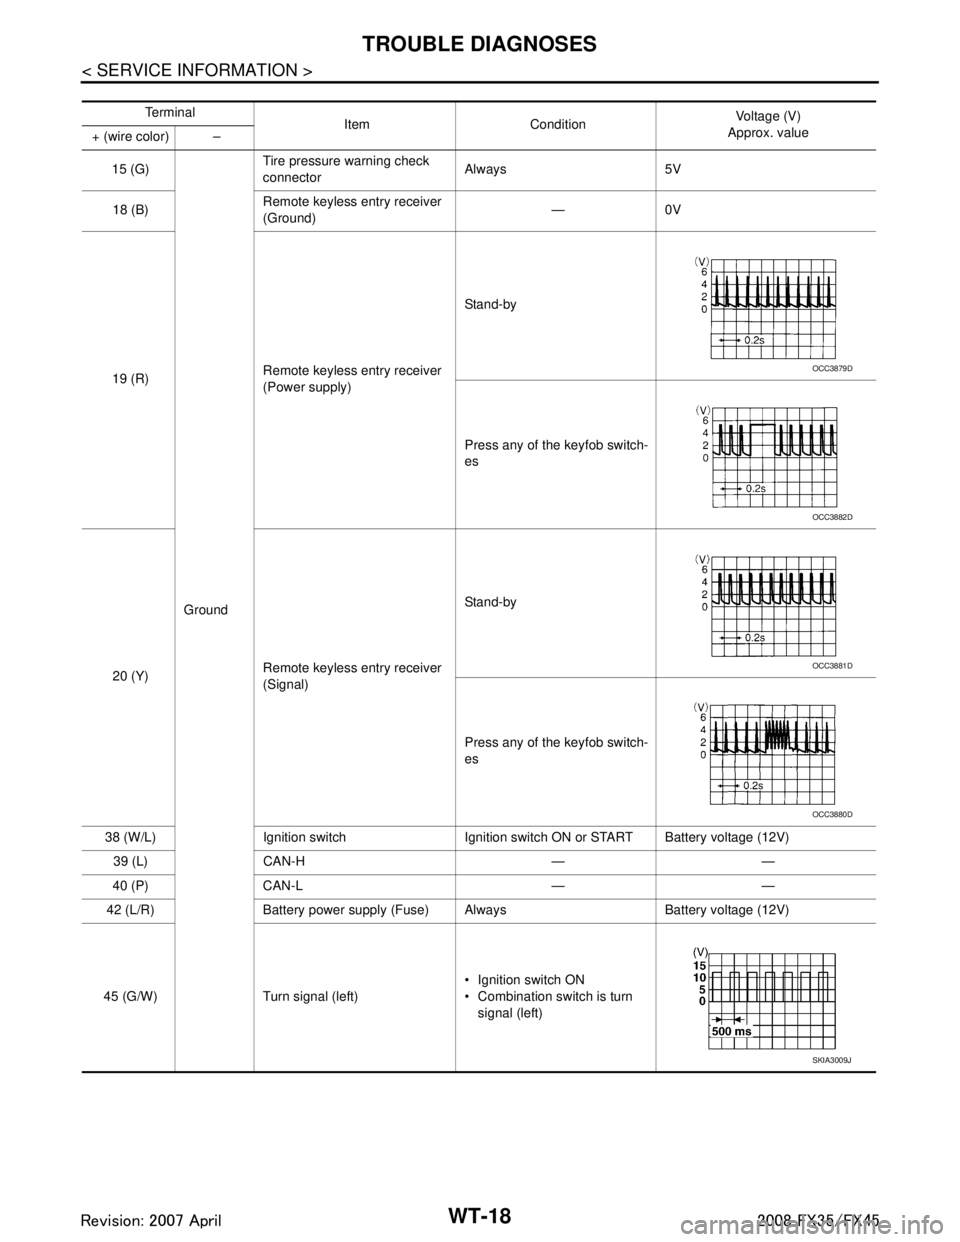
Te r m i n a lItem Condition Voltage (V)
Approx. value
+ (wire color) –
15 (G)
Ground Tire pressure
warning check
connector Always 5V
18 (B) Remote keyless entry receiver
(Ground) —0V
19 (R) Remote keyless entry receiver
(Power supply) Stand-by
Press any of the keyfob switch-
es
20 (Y) Remote keyless entry receiver
(Signal) Stand-by
Press any of the keyfob switch-
es
38 (W/L) Ignition switch Ignition switch ON or START Battery voltage (12V) 39 (L) CAN-H — —
40 (P) CAN-L — —
42 (L/R) Battery power supply (Fuse) Always Battery voltage (12V)
45 (G/W) Turn signal (left) Ignition switch ON
Combination switch is turn
signal (left)
OCC3879D
OCC3882D
OCC3881D
OCC3880D
SKIA3009J
3AA93ABC3ACD3AC03ACA3AC03AC63AC53A913A773A893A873A873A8E3A773A983AC73AC93AC03AC3
3A893A873A873A8F3A773A9D3AAF3A8A3A8C3A863A9D3AAF3A8B3A8C
Page 3862 of 3924
WT-22
< SERVICE INFORMATION >
TROUBLE DIAGNOSES
NOTE:
If more than one wheel transmitter is NOT activated, the warning lamp blinking patterns for those wheels will combine. (Example: one
blink/OFF/three blinks = Rear LH and Rear RH transmitters are not activated.)
RUN-FLAT TIRE WARNING LAMP DIAGNOSTIC CHART
CONSULT-III Function (BCM)INFOID:0000000001327585
FUNCTION
CONSULT-III can display each self-diagnostic item using the diagnostic test modes shown following.
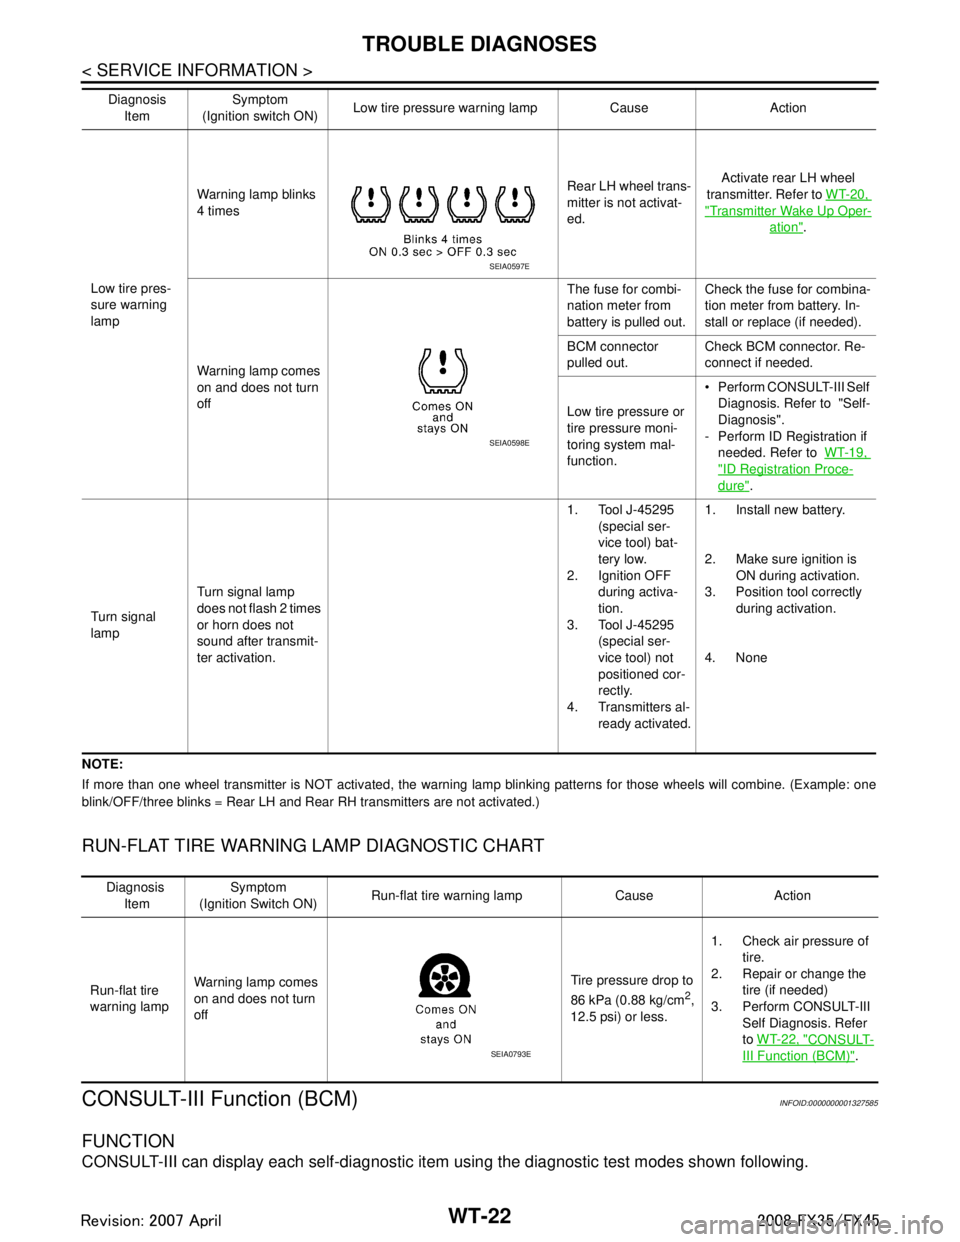
Low tire pres-
sure warning
lampWarning lamp blinks
4 times
Rear LH wheel trans-
mitter is not activat-
ed.Activate rear LH wheel
transmitter. Refer to WT-20,
"Transmitter Wake Up Oper-
ation".
Warning lamp comes
on and does not turn
off The fuse for combi-
nation meter from
battery is pulled out.
Check the fuse for combina-
tion meter from battery. In-
stall or replace (if needed).
BCM connector
pulled out. Check BCM connector. Re-
connect if needed.
Low tire pressure or
tire pressure moni-
toring system mal-
function. Perform CONSULT-III Self
Diagnosis. Refer to "Self-
Diagnosis".
- Perform ID Registration if needed. Refer to WT-19,
"ID Registration Proce-
dure".
Turn signal
lamp Turn signal lamp
does not flash 2 times
or horn does not
sound after transmit-
ter activation. 1. Tool J-45295
(special ser-
vice tool) bat-
tery low.
2. Ignition OFF
during activa-
tion.
3. Tool J-45295
(special ser-
vice tool) not
positioned cor-
rectly.
4. Transmitters al- ready activated. 1. Install new battery.
2. Make sure ignition is
ON during activation.
3. Position tool correctly during activation.
4. None
Diagnosis
Item Symptom
(Ignition switch ON) Low tire pressure wa
rning lamp Cause Action
SEIA0597E
SEIA0598E
Diagnosis
Item Symptom
(Ignition Switch ON) Run-flat tire warning lamp Cause Action
Run-flat tire
warning lamp Warning lamp comes
on and does not turn
off Tire pressure drop to
86 kPa (0.88 kg/cm
2,
12.5 psi) or less. 1. Check air pressure of
tire.
2. Repair or change the
tire (if needed)
3. Perform CONSULT-III Self Diagnosis. Refer
to WT-22, "
CONSULT-
III Function (BCM)".SEIA0793E
3AA93ABC3ACD3AC03ACA3AC03AC63AC53A913A773A893A873A873A8E3A773A983AC73AC93AC03AC3
3A893A873A873A8F3A773A9D3AAF3A8A3A8C3A863A9D3AAF3A8B3A8C
Page 3865 of 3924

TROUBLE DIAGNOSESWT-25
< SERVICE INFORMATION >
C
DF
G H
I
J
K L
M A
B
WT
N
O P
Preliminary CheckINFOID:0000000001327587
BASIC INSPECTION
1.CHECK ALL TIRE PRESSURES
Check all tire pressures. Refer to WT-35, "
Tire".
OK or NG
OK >> GO TO 2.
NG >> Adjust tire pressure to specified value.
2.CHECK LOW TIRE PRESSURE WARNING LAMP ACTIVATION
1. Check low tire pressure warning lamp activation.
2. Does low tire pressure warning lamp activate for 1 second when ignition switch is turned “ON”?
Does warning lamp activate?
YES >> GO TO 3.
NO >> Check fuse and combination meter.
3.CHECK CONNECTOR
1. Disconnect BCM harness connectors M3 and M4.
2. Check terminals for damage or loose connection.
Preliminary check: WT-25Self-diagnosis:WT-20Trouble diagnosis for symptoms: WT-30
SEIA0100E
3AA93ABC3ACD3AC03ACA3AC03AC63AC53A913A773A893A873A873A8E3A773A983AC73AC93AC03AC3
3A893A873A873A8F3A773A9D3AAF3A8A3A8C3A863A9D3AAF3A8B3A8C
Page 3866 of 3924
WT-26
< SERVICE INFORMATION >
TROUBLE DIAGNOSES
OK or NG
OK >> GO TO 4.
NG >> Repair or replace damaged parts.
4.CHECK TRANSMITTER TOOL
Check activation tool battery.
OK or NG
OK >> Perform self-diagnosis.
NG >> Replace activation tool battery.
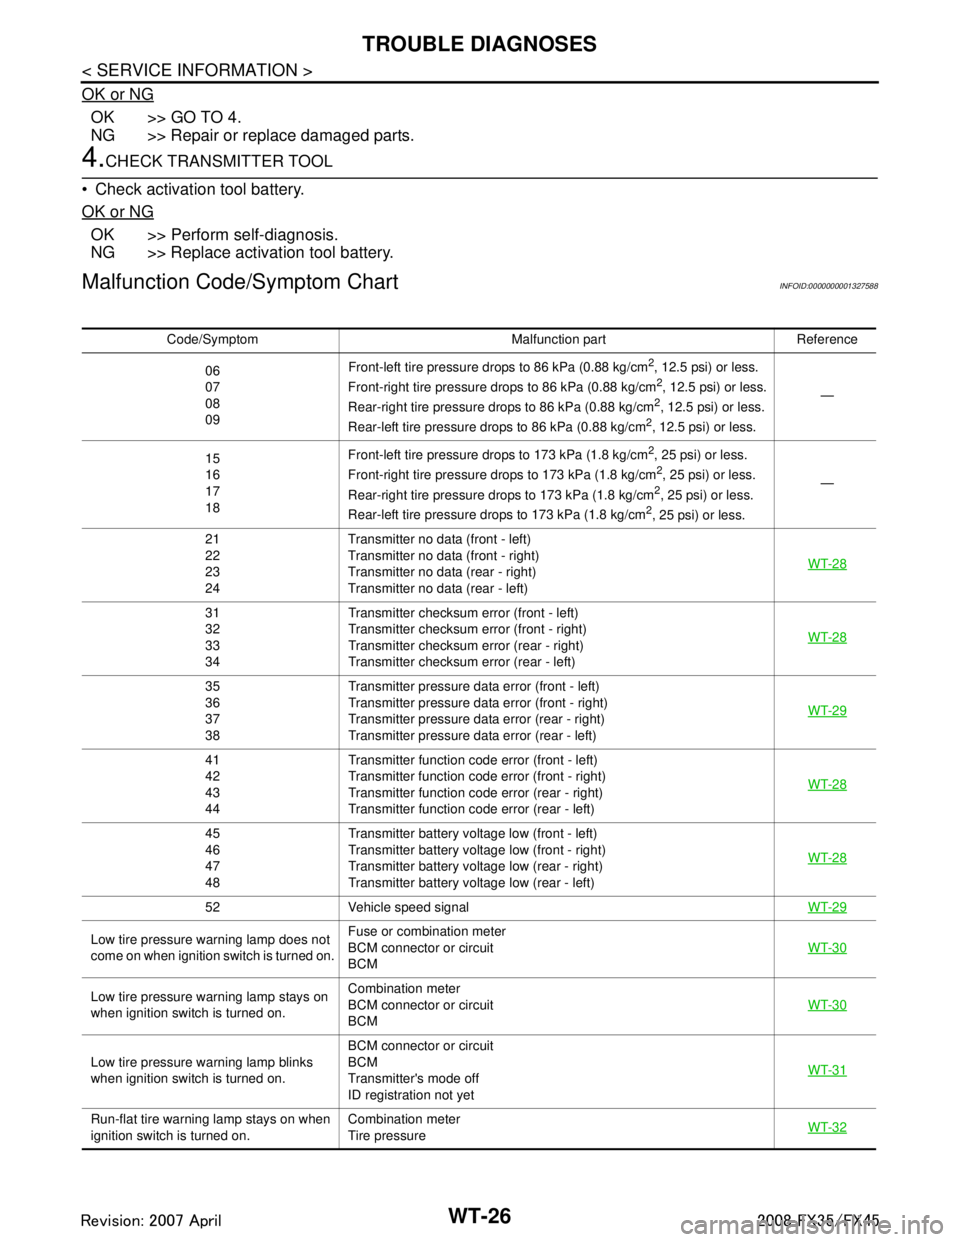
Malfunction Code/Symptom ChartINFOID:0000000001327588
Code/Symptom Malfunction part Reference
06
07
08
09 Front-left tire pressure drops to 86 kPa (0.88 kg/cm
2, 12.5 psi) or less.
Front-right tire pressure drops to 86 kPa (0.88 kg/cm2, 12.5 psi) or less.
Rear-right tire pre ssure drops to 86 kPa (0.88 kg/cm2, 12.5 psi) or less.
Rear-left tire pressure drops to 86 kPa (0.88 kg/cm2, 12.5 psi) or less. —
15
16
17
18 Front-left tire pressure drops to 173 kPa (1.8 kg/cm
2, 25 psi) or less.
Front-right tire pressure drops to 173 kPa (1.8 kg/cm2, 25 psi) or less.
Rear-right tire pre ssure drops to 173 kPa (1.8 kg/cm2, 25 psi) or less.
Rear-left tire pressure drops to 173 kPa (1.8 kg/cm2, 25 psi) or less. —
21
22
23
24 Transmitter no data (front - left)
Transmitter no data (front - right)
Transmitter no data (rear - right)
Transmitter no data (rear - left)
WT-28
31
32
33
34Transmitter checksum e
rror (front - left)
Transmitter checksum e rror (front - right)
Transmitter checksum error (rear - right)
Transmitter checksum error (rear - left) WT-28
35
36
37
38Transmitter pressure data
error (front - left)
Transmitter pressure data error (front - right)
Transmitter pressure data error (rear - right)
Transmitter pressure data error (rear - left) WT-29
41
42
43
44Transmitter function code error (front - left)
Transmitter function code
error (front - right)
Transmitter function code error (rear - right)
Transmitter function code error (rear - left) WT-28
45
46
47
48Transmitter battery voltage low (front - left)
Transmitter battery voltage low (front - right)
Transmitter battery voltage low (rear - right)
Transmitter battery voltage low (rear - left)
WT-28
52 Vehicle speed signal
WT-29
Low tire pressure warning lamp does not
come on when ignition switch is turned on.Fuse or combination meter
BCM connector or circuit
BCM
WT-30
Low tire pressure warning lamp stays on
when ignition switch is turned on.Combination meter
BCM connector or circuit
BCM
WT-30
Low tire pressure wa
rning lamp blinks
when ignition switch is turned on. BCM connector or circuit
BCM
Transmitter's mode off
ID registration not yet
WT-31
Run-flat tire warning lamp stays on when
ignition switch is turned on.
Combination meter
Tire pressure
WT-32
3AA93ABC3ACD3AC03ACA3AC03AC63AC53A913A773A893A873A873A8E3A773A983AC73AC93AC03AC3
3A893A873A873A8F3A773A9D3AAF3A8A3A8C3A863A9D3AAF3A8B3A8C
Page 3879 of 3924
WW-4
< SERVICE INFORMATION >
FRONT WIPER AND WASHER SYSTEM
FRONT WIPER AND WASHER SYSTEM
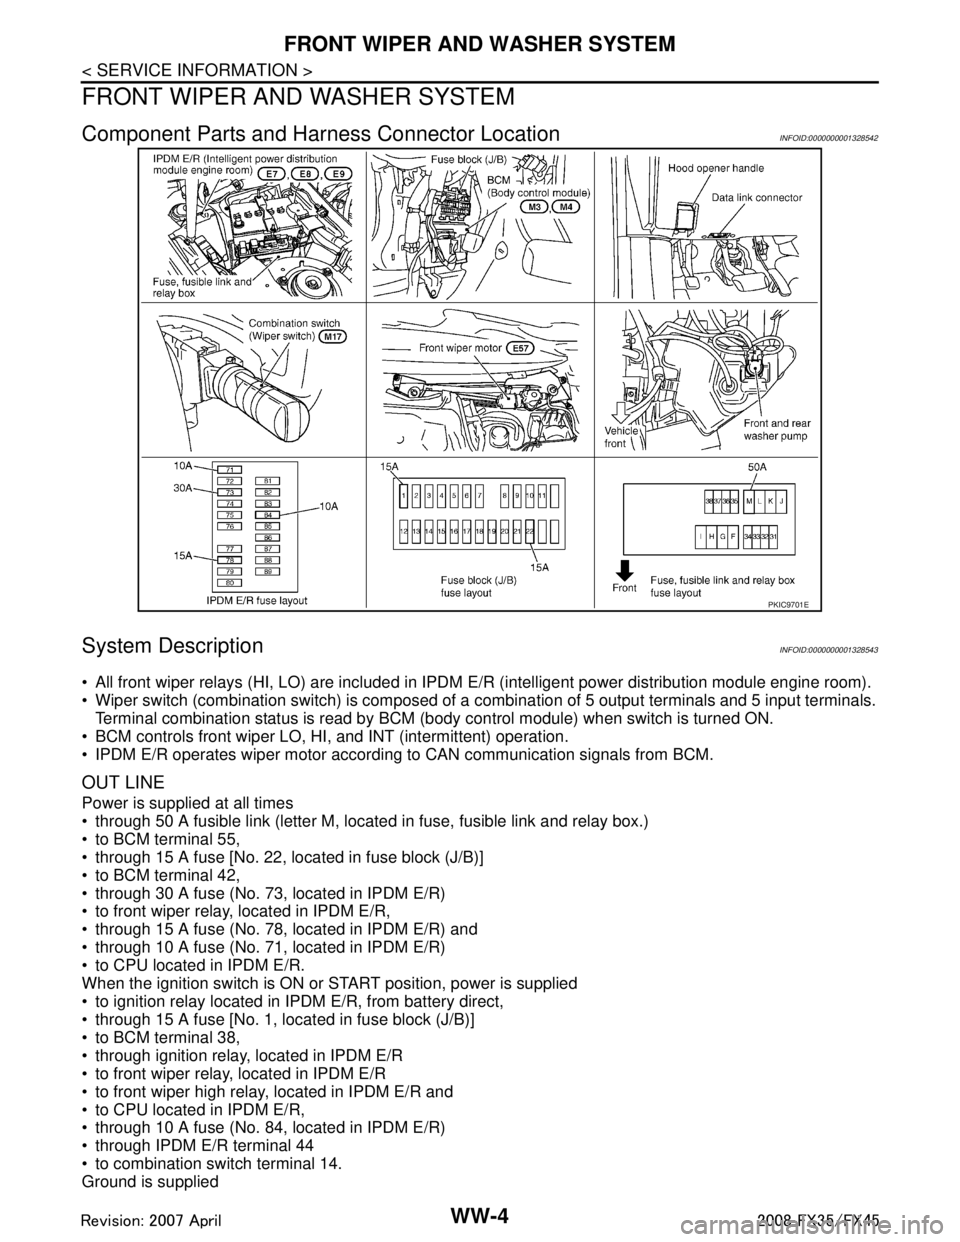
Component Parts and Harness Connector LocationINFOID:0000000001328542
System DescriptionINFOID:0000000001328543
All front wiper relays (HI, LO) are included in IPDM E/R (intelligent power distribution module engine room).
Wiper switch (combination switch) is composed of a combination of 5 output terminals and 5 input terminals.
Terminal combination status is read by BCM ( body control module) when switch is turned ON.
BCM controls front wiper LO, HI, and INT (intermittent) operation.
IPDM E/R operates wiper motor according to CAN communication signals from BCM.
OUT LINE
Power is supplied at all times
through 50 A fusible link (letter M, located in fuse, fusible link and relay box.)
to BCM terminal 55,
through 15 A fuse [No. 22, located in fuse block (J/B)]
to BCM terminal 42,
through 30 A fuse (No. 73, located in IPDM E/R)
to front wiper relay, located in IPDM E/R,
through 15 A fuse (No. 78, located in IPDM E/R) and
through 10 A fuse (No. 71, located in IPDM E/R)
to CPU located in IPDM E/R.
When the ignition switch is ON or START position, power is supplied
to ignition relay located in IPDM E/R, from battery direct,
through 15 A fuse [No. 1, located in fuse block (J/B)]
to BCM terminal 38,
through ignition relay, located in IPDM E/R
to front wiper relay, located in IPDM E/R
to front wiper high relay, located in IPDM E/R and
to CPU located in IPDM E/R,
through 10 A fuse (No. 84, located in IPDM E/R)
through IPDM E/R terminal 44
to combination switch terminal 14.
Ground is supplied
PKIC9701E
3AA93ABC3ACD3AC03ACA3AC03AC63AC53A913A773A893A873A873A8E3A773A983AC73AC93AC03AC3
3A893A873A873A8F3A773A9D3AAF3A8A3A8C3A863A9D3AAF3A8B3A8C
Page 3889 of 3924
WW-14
< SERVICE INFORMATION >
FRONT WIPER AND WASHER SYSTEM
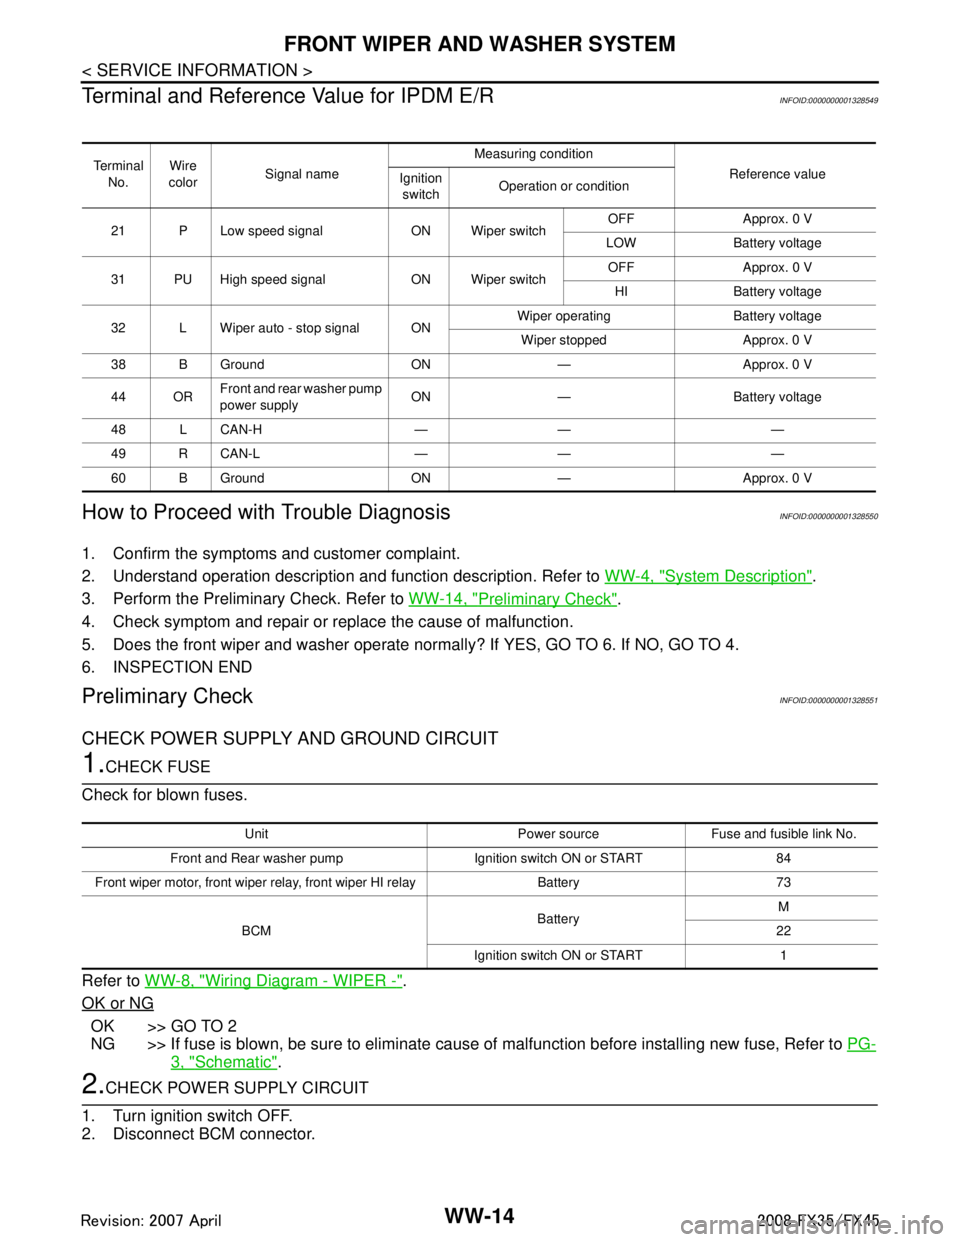
Terminal and Reference Value for IPDM E/R
INFOID:0000000001328549
How to Proceed with Trouble DiagnosisINFOID:0000000001328550
1. Confirm the symptoms and customer complaint.
2. Understand operation description and function description. Refer to WW-4, "
System Description".
3. Perform the Preliminary Check. Refer to WW-14, "
Preliminary Check".
4. Check symptom and repair or r eplace the cause of malfunction.
5. Does the front wiper and washer operate norma lly? If YES, GO TO 6. If NO, GO TO 4.
6. INSPECTION END
Preliminary CheckINFOID:0000000001328551
CHECK POWER SUPPLY AND GROUND CIRCUIT
1.CHECK FUSE
Check for blown fuses.
Refer to WW-8, "
Wiring Diagram - WIPER -".
OK or NG
OK >> GO TO 2
NG >> If fuse is blown, be sure to eliminate caus e of malfunction before installing new fuse, Refer to PG-
3, "Schematic".
2.CHECK POWER SUPPLY CIRCUIT
1. Turn ignition switch OFF.
2. Disconnect BCM connector.
Te r m i n a l No. Wire
color Signal name Measuring condition
Reference value
Ignition
switch Operation or condition
21 P Low speed signal ON Wiper switch OFF Approx. 0 V
LOW Battery voltage
31 PU High speed signal ON Wiper switch OFF Approx. 0 V
HI Battery voltage
32 L Wiper auto - stop signal ON Wiper operating Battery voltage
Wiper stopped Approx. 0 V
38 B Ground ON — Approx. 0 V
44 OR Front and rear washer pump
power supply ON — Battery voltage
48 L CAN-H — — —
49 R CAN-L — — —
60 B Ground ON — Approx. 0 V
Unit Power source Fuse and fusible link No.
Front and Rear washer pump Ignition switch ON or START 84
Front wiper motor, front wiper rela y, front wiper HI relay Battery 73
BCM BatteryM
22
Ignition switch ON or START 1
3AA93ABC3ACD3AC03ACA3AC03AC63AC53A913A773A893A873A873A8E3A773A983AC73AC93AC03AC3
3A893A873A873A8F3A773A9D3AAF3A8A3A8C3A863A9D3AAF3A8B3A8C