Page 3467 of 3924
PS-12
< SERVICE INFORMATION >
STEERING COLUMN
STEERING COLUMN
Removal and InstallationINFOID:0000000001327714
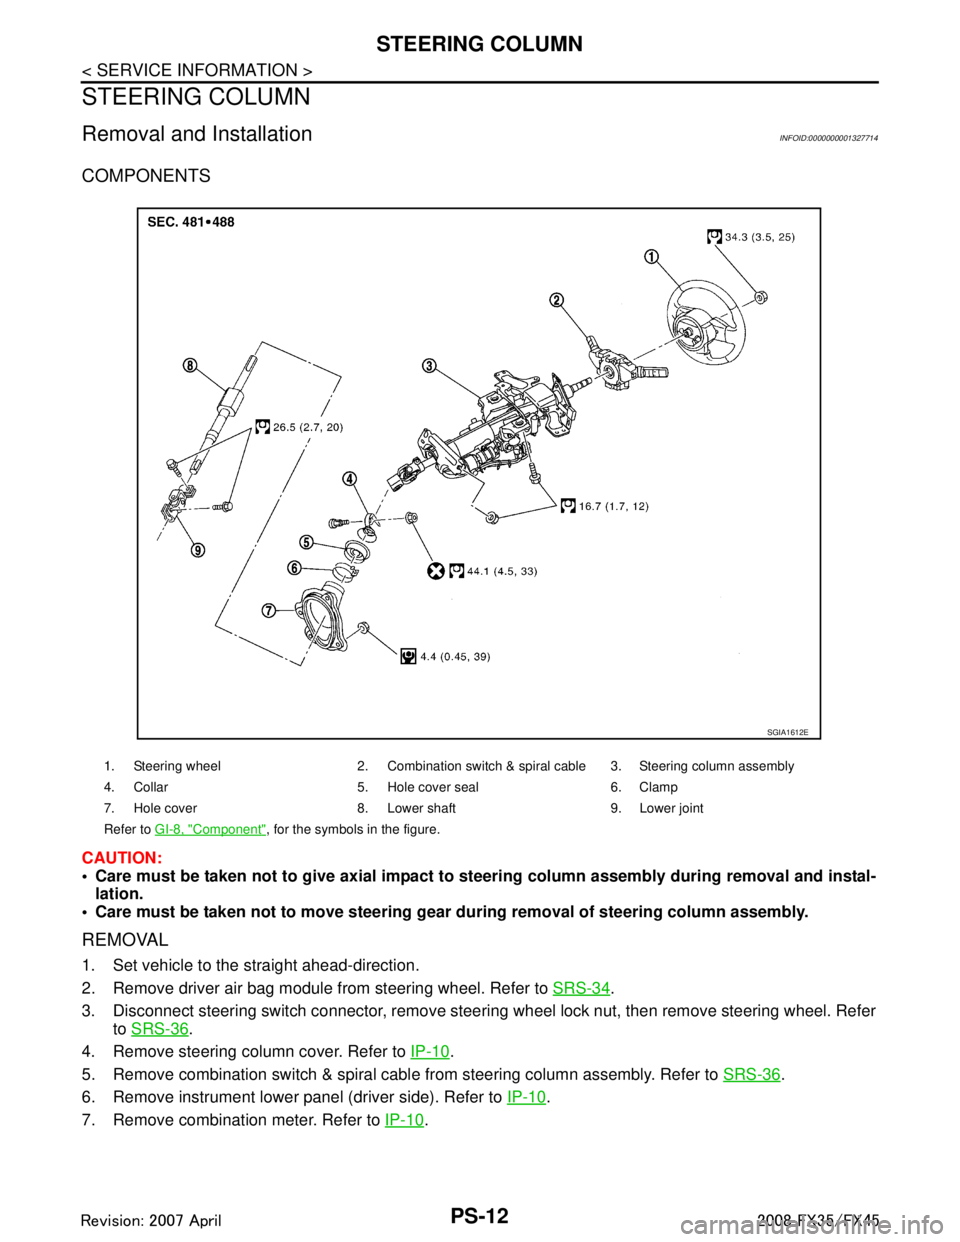
COMPONENTS
CAUTION:
Care must be taken not to give axial impact to steering column assembly during removal and instal-
lation.
Care must be taken not to move steering gear during removal of steering column assembly.
REMOVAL
1. Set vehicle to the straight ahead-direction.
2. Remove driver air bag module from steering wheel. Refer to SRS-34
.
3. Disconnect steering switch connector, remove steering wheel lock nut, then remove steering wheel. Refer to SRS-36
.
4. Remove steering column cover. Refer to IP-10
.
5. Remove combination switch & spiral cabl e from steering column assembly. Refer to SRS-36
.
6. Remove instrument lower panel (driver side). Refer to IP-10
.
7. Remove combination meter. Refer to IP-10
.
1. Steering wheel 2. Combination switch & spiral cable 3. Steering column assembly
4. Collar 5. Hole cover seal 6. Clamp
7. Hole cover 8. Lower shaft 9. Lower joint
Refer to GI-8, "
Component", for the symbols in the figure.
SGIA1612E
3AA93ABC3ACD3AC03ACA3AC03AC63AC53A913A773A893A873A873A8E3A773A983AC73AC93AC03AC3
3A893A873A873A8F3A773A9D3AAF3A8A3A8C3A863A9D3AAF3A8B3A8C
Page 3469 of 3924
PS-14
< SERVICE INFORMATION >
STEERING COLUMN
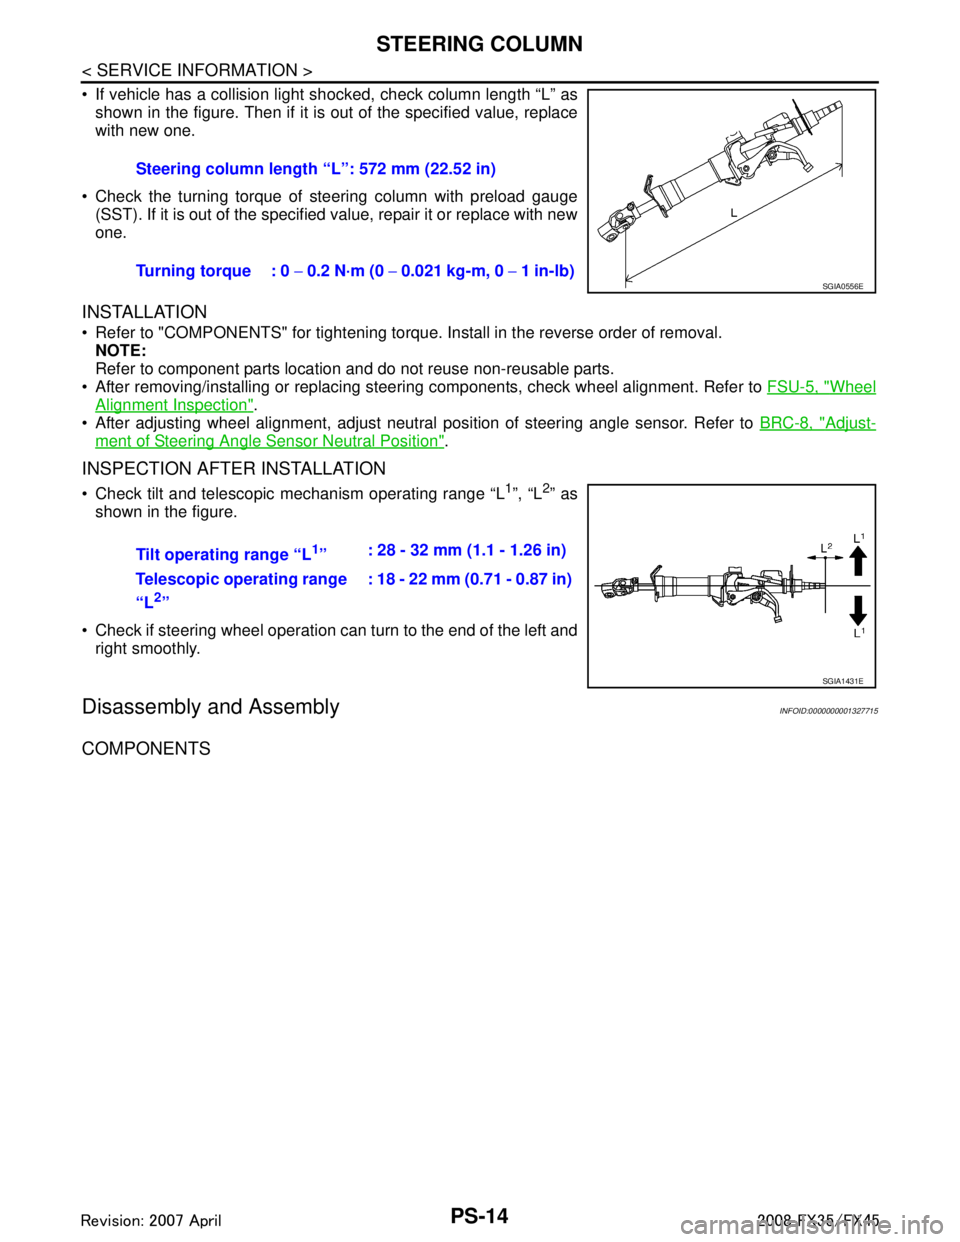
If vehicle has a collision light shocked, check column length “L” as
shown in the figure. Then if it is out of the specified value, replace
with new one.
Check the turning torque of steering column with preload gauge (SST). If it is out of the specified value, repair it or replace with new
one.
INSTALLATION
Refer to "COMPONENTS" for tightening torque. Install in the reverse order of removal.NOTE:
Refer to component parts location and do not reuse non-reusable parts.
After removing/installing or replacing steering components, check wheel alignment. Refer to FSU-5, "
Wheel
Alignment Inspection".
After adjusting wheel alignment, adjust neutral position of steering angle sensor. Refer to BRC-8, "
Adjust-
ment of Steering Angle Sensor Neutral Position".
INSPECTION AFTER INSTALLATION
Check tilt and telescopic mechanism operating range “L1”, “L2” as
shown in the figure.
Check if steering wheel operation can turn to the end of the left and right smoothly.
Disassembly and AssemblyINFOID:0000000001327715
COMPONENTS
Steering column length “L”: 572 mm (22.52 in)
Turning torque : 0 − 0.2 N·m (0 − 0.021 kg-m, 0 − 1 in-lb)
SGIA0556E
Tilt operating range “L1” : 28 - 32 mm (1.1 - 1.26 in)
Telescopic operating range
“L
2” : 18 - 22 mm (0.71 - 0.87 in)
SGIA1431E
3AA93ABC3ACD3AC03ACA3AC03AC63AC53A913A773A893A873A873A8E3A773A983AC73AC93AC03AC3
3A893A873A873A8F3A773A9D3AAF3A8A3A8C3A863A9D3AAF3A8B3A8C
Page 3472 of 3924
POWER STEERING GEAR AND LINKAGEPS-17
< SERVICE INFORMATION >
C
DE
F
H I
J
K L
M A
B
PS
N
O P
POWER STEERING GEAR AND LINKAGE
Removal and InstallationINFOID:0000000001327716
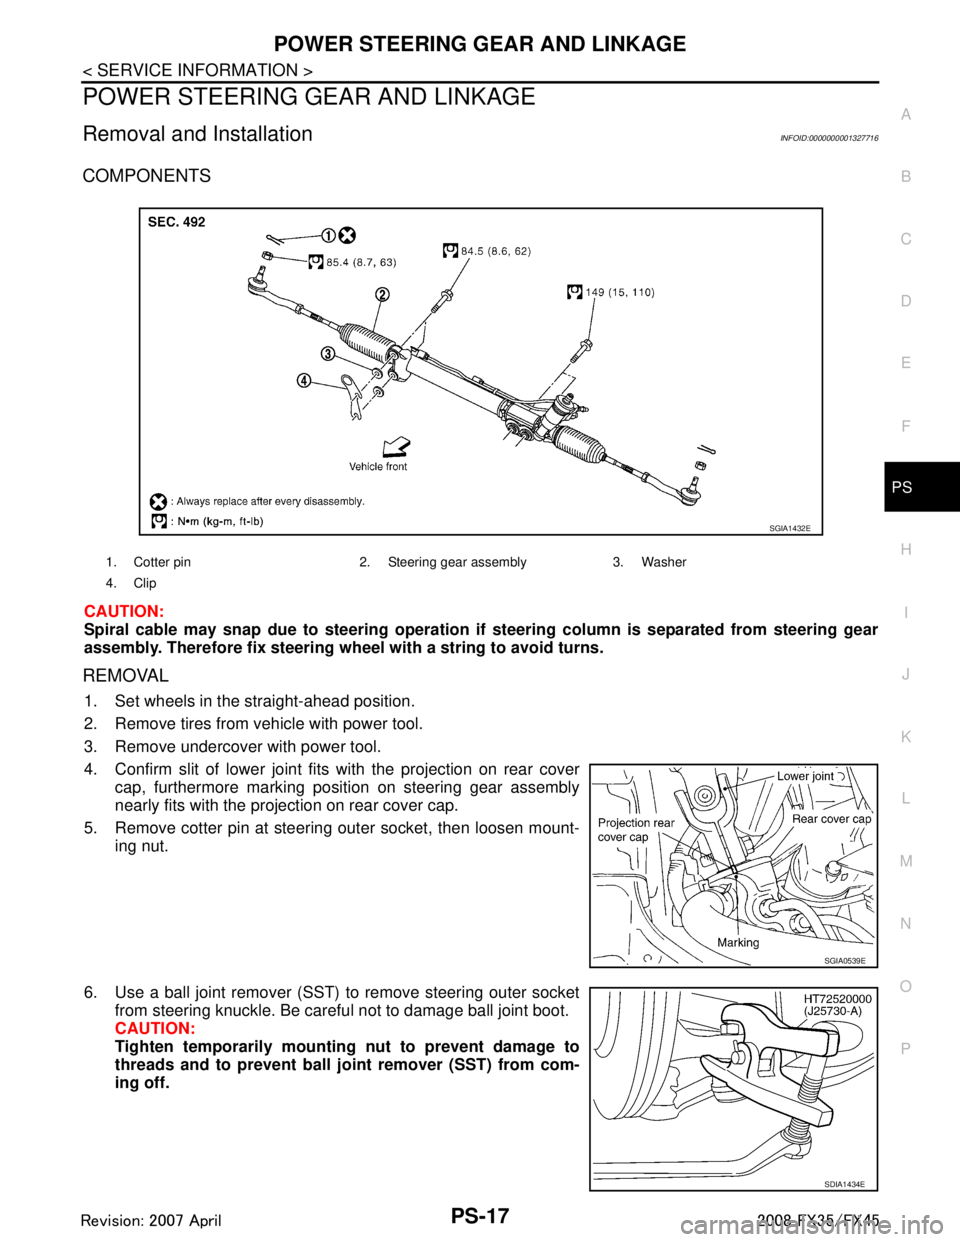
COMPONENTS
CAUTION:
Spiral cable may snap due to steering operation if steering column is separated from steering gear
assembly. Therefore fix steering wheel with a string to avoid turns.
REMOVAL
1. Set wheels in the straight-ahead position.
2. Remove tires from vehicle with power tool.
3. Remove undercover with power tool.
4. Confirm slit of lower joint fits with the projection on rear cover
cap, furthermore marking position on steering gear assembly
nearly fits with the projection on rear cover cap.
5. Remove cotter pin at steeri ng outer socket, then loosen mount-
ing nut.
6. Use a ball joint remover (SST) to remove steering outer socket from steering knuckle. Be careful not to damage ball joint boot.
CAUTION:
Tighten temporarily mounting nut to prevent damage to
threads and to prevent ball jo int remover (SST) from com-
ing off.
1. Cotter pin 2. Steering gear assembly 3. Washer
4. Clip
SGIA1432E
SGIA0539E
SDIA1434E
3AA93ABC3ACD3AC03ACA3AC03AC63AC53A913A773A893A873A873A8E3A773A983AC73AC93AC03AC3
3A893A873A873A8F3A773A9D3AAF3A8A3A8C3A863A9D3AAF3A8B3A8C
Page 3473 of 3924
PS-18
< SERVICE INFORMATION >
POWER STEERING GEAR AND LINKAGE
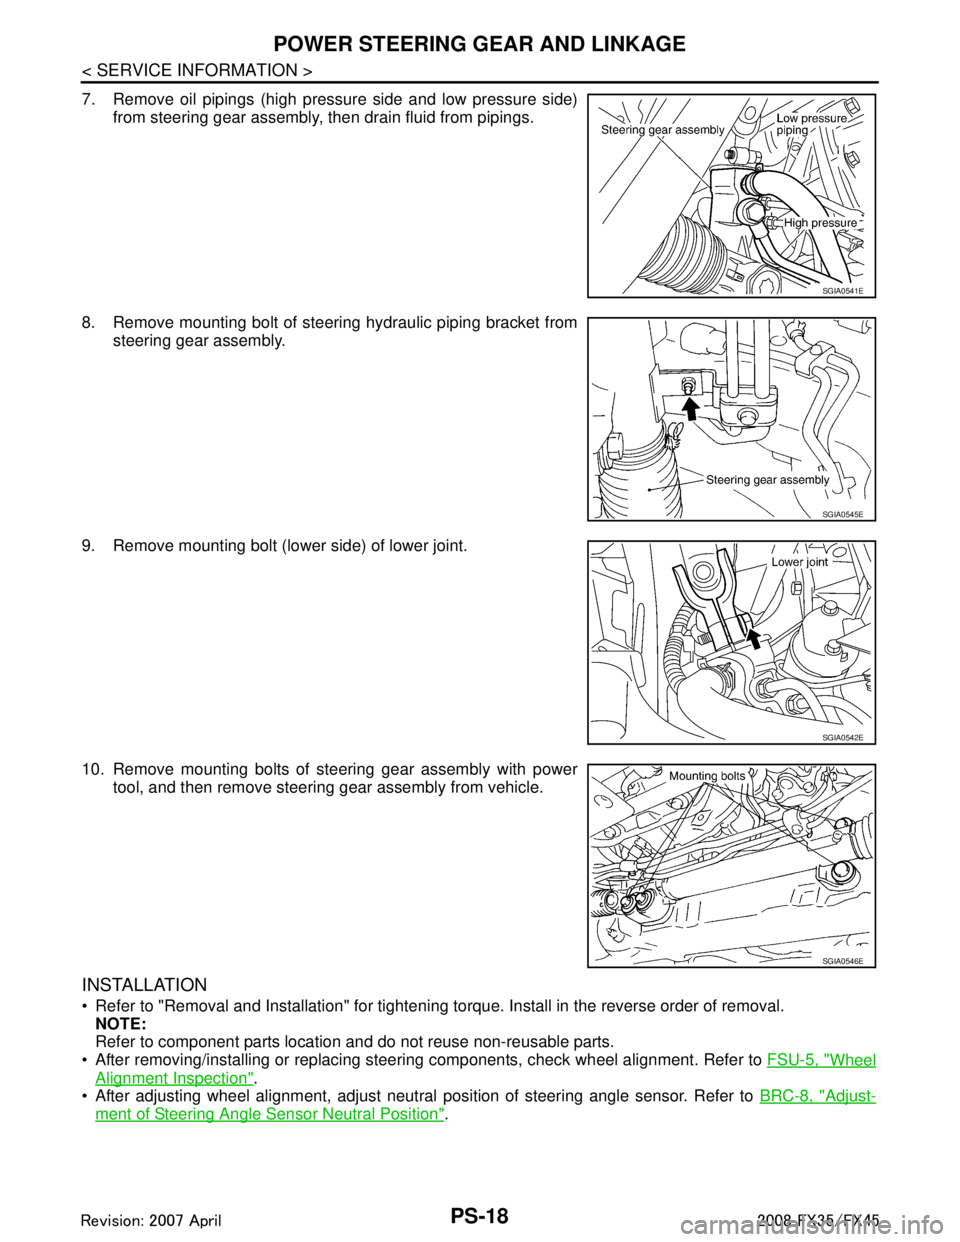
7. Remove oil pipings (high pressure side and low pressure side)from steering gear assembly, then drain fluid from pipings.
8. Remove mounting bolt of steering hydraulic piping bracket from steering gear assembly.
9. Remove mounting bolt (lower side) of lower joint.
10. Remove mounting bolts of steering gear assembly with power tool, and then remove steering gear assembly from vehicle.
INSTALLATION
Refer to "Removal and Installation" for tightening torque. Install in the reverse order of removal.
NOTE:
Refer to component parts location and do not reuse non-reusable parts.
After removing/installing or replacing steering components, check wheel alignment. Refer to FSU-5, "
Wheel
Alignment Inspection".
After adjusting wheel alignment, adjust neutral position of steering angle sensor. Refer to BRC-8, "
Adjust-
ment of Steering Angle Sensor Neutral Position".
SGIA0541E
SGIA0545E
SGIA0542E
SGIA0546E
3AA93ABC3ACD3AC03ACA3AC03AC63AC53A913A773A893A873A873A8E3A773A983AC73AC93AC03AC3
3A893A873A873A8F3A773A9D3AAF3A8A3A8C3A863A9D3AAF3A8B3A8C
Page 3474 of 3924
POWER STEERING GEAR AND LINKAGEPS-19
< SERVICE INFORMATION >
C
DE
F
H I
J
K L
M A
B
PS
N
O P
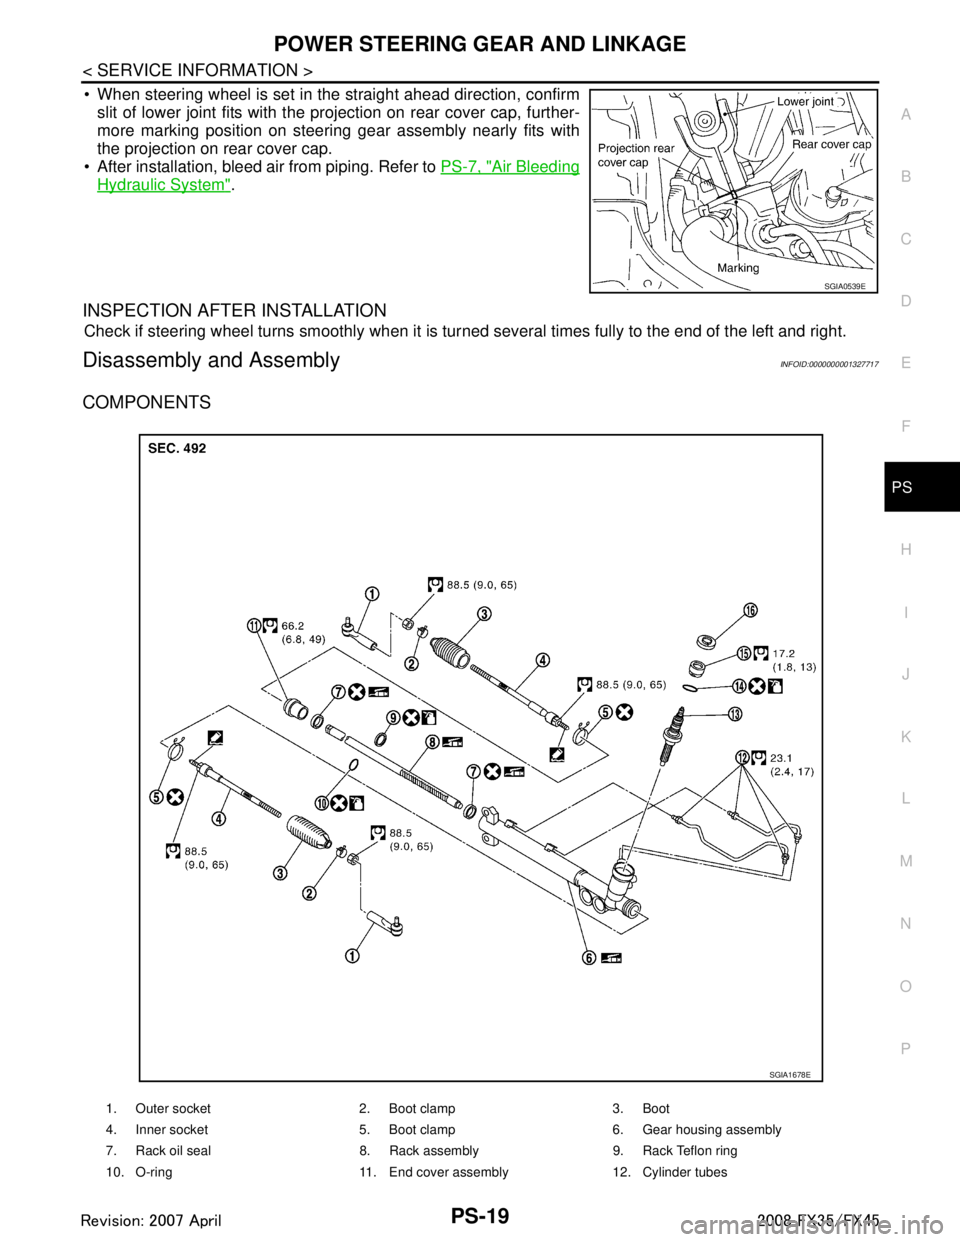
When steering wheel is set in the straight ahead direction, confirm slit of lower joint fits with the projection on rear cover cap, further-
more marking position on steering gear assembly nearly fits with
the projection on rear cover cap.
After installation, bleed air from piping. Refer to PS-7, "
Air Bleeding
Hydraulic System".
INSPECTION AFTER INSTALLATION
Check if steering wheel turns smoothly when it is tur ned several times fully to the end of the left and right.
Disassembly and AssemblyINFOID:0000000001327717
COMPONENTS
SGIA0539E
1. Outer socket 2. Boot clamp 3. Boot
4. Inner socket 5. Boot clamp 6. Gear housing assembly
7. Rack oil seal 8. Rack assembly 9. Rack Teflon ring
10. O-ring 11. End cover assembly 12. Cylinder tubes
SGIA1678E
3AA93ABC3ACD3AC03ACA3AC03AC63AC53A913A773A893A873A873A8E3A773A983AC73AC93AC03AC3
3A893A873A873A8F3A773A9D3AAF3A8A3A8C3A863A9D3AAF3A8B3A8C
Page 3496 of 3924
SERVICE DATA AND SPECIFICATIONS (SDS)
PS-41
< SERVICE INFORMATION >
C
D E
F
H I
J
K L
M A
B
PS
N
O P
SERVICE DATA AND SPECIFICATIONS (SDS)
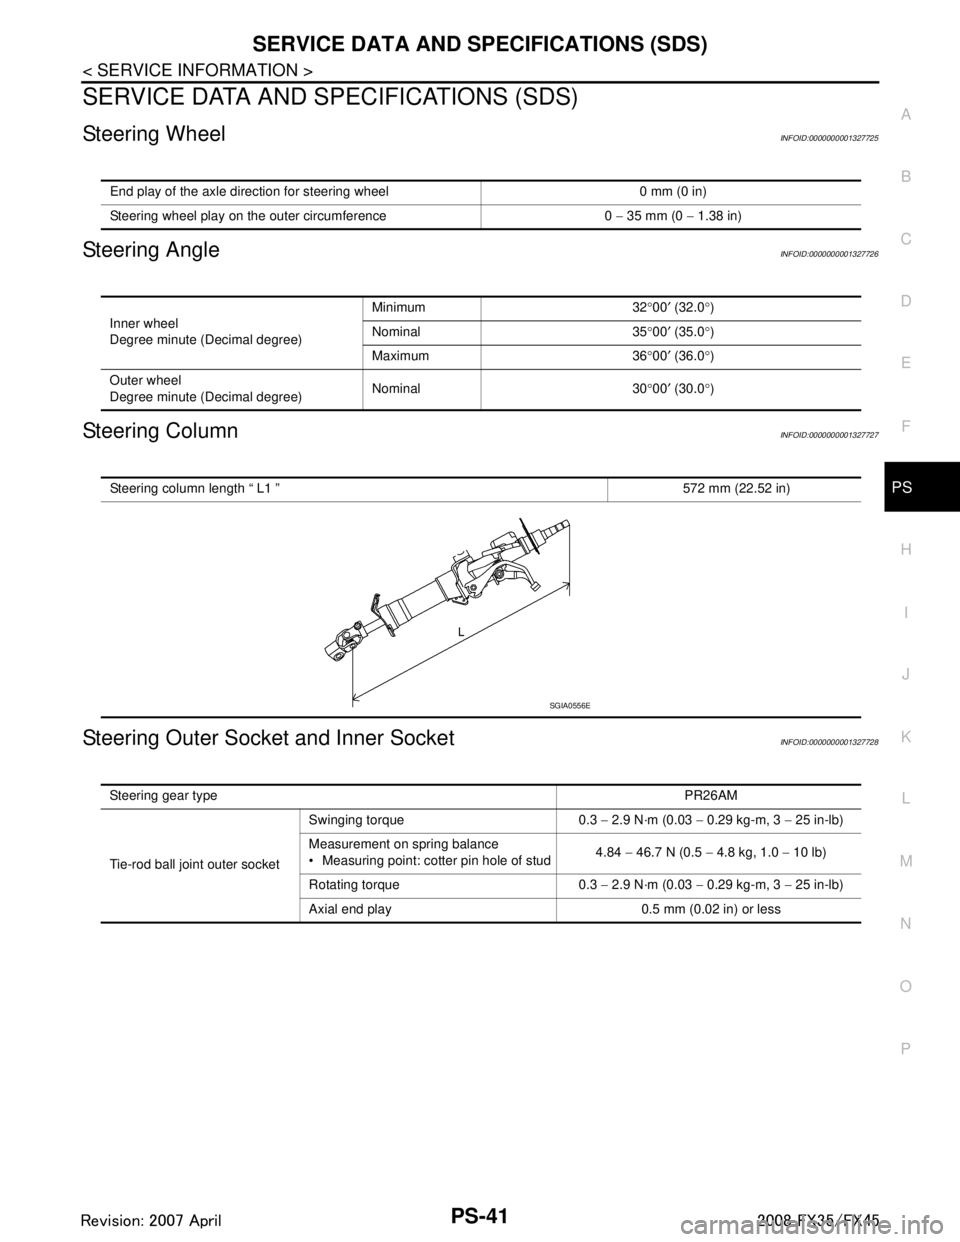
Steering WheelINFOID:0000000001327725
Steering AngleINFOID:0000000001327726
Steering ColumnINFOID:0000000001327727
Steering Outer Socket and Inner SocketINFOID:0000000001327728
End play of the axle direction for steering wheel 0 mm (0 in)
Steering wheel play on the outer circumference 0 − 35 mm (0 − 1.38 in)
Inner wheel
Degree minute (Decimal degree) Minimum 32
°00 ′ (32.0 °)
Nominal 35 °00 ′ (35.0 °)
Maximum 36 °00 ′ (36.0 °)
Outer wheel
Degree minute (Decimal degree) Nominal 30
°00 ′ (30.0 °)
Steering column length “ L1 ” 572 mm (22.52 in)
SGIA0556E
Steering gear type PR26AM
Tie-rod ball joint outer socket Swinging torque 0.3
− 2.9 N·m (0.03 − 0.29 kg-m, 3 − 25 in-lb)
Measurement on spring balance
Measuring point: cotter pin hole of stud 4.84
− 46.7 N (0.5 − 4.8 kg, 1.0 − 10 lb)
Rotating torque 0.3 − 2.9 N·m (0.03 − 0.29 kg-m, 3 − 25 in-lb)
Axial end play 0.5 mm (0.02 in) or less
3AA93ABC3ACD3AC03ACA3AC03AC63AC53A913A773A893A873A873A8E3A773A983AC73AC93AC03AC3
3A893A873A873A8F3A773A9D3AAF3A8A3A8C3A863A9D3AAF3A8B3A8C
Page 3499 of 3924
RAX-1
DRIVELINE/AXLE
CEF
G H
I
J
K L
M
SECTION RAX
A
B
RAX
N
O P
CONTENTS
REAR AXLE
SERVICE INFORMATION .. ..........................2
PRECAUTIONS .............................................. .....2
Caution ................................................................ ......2
PREPARATION ...................................................3
Special Service Tool ........................................... ......3
Commercial Service Tool ..........................................4
NOISE, VIBRATION AND HARSHNESS
(NVH) TROUBLESHOOTING .............................
5
NVH Troubleshooting Chart ................................ ......5
REAR WHEEL HUB AND KNUCKLE ...............6
On-Vehicle Inspection ......................................... .....6
Removal and Installation ..........................................6
Disassembly and Assembly ......................................7
REAR DRIVE SHAFT ........................................10
Removal and Installation .........................................10
Disassembly and Assembly .....................................10
SERVICE DATA AND SPECIFICATIONS
(SDS) .................................................................
17
Wheel Bearing .........................................................17
Drive Shaft ...............................................................17
3AA93ABC3ACD3AC03ACA3AC03AC63AC53A913A773A893A873A873A8E3A773A983AC73AC93AC03AC3
3A893A873A873A8F3A773A9D3AAF3A8A3A8C3A863A9D3AAF3A8B3A8C
Page 3501 of 3924
PREPARATIONRAX-3
< SERVICE INFORMATION >
CEF
G H
I
J
K L
M A
B
RAX
N
O P
PREPARATION
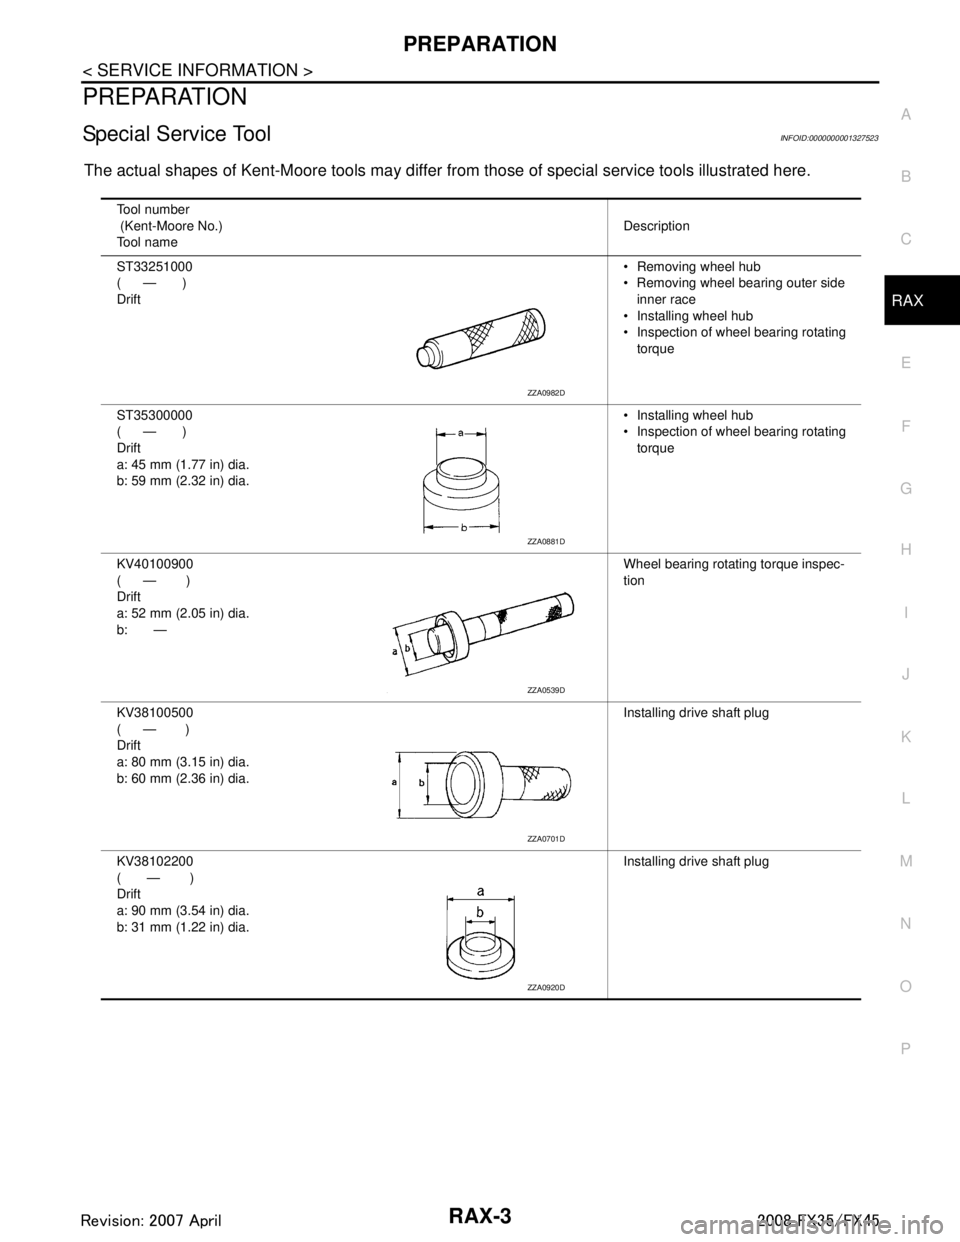
Special Service ToolINFOID:0000000001327523
The actual shapes of Kent-Moore tools may differ fr om those of special service tools illustrated here.
Tool number
(Kent-Moore No.)
Tool name Description
ST33251000
( — )
Drift Removing wheel hub
Removing wheel bearing outer side
inner race
Installing wheel hub
Inspection of wheel bearing rotating torque
ST35300000
( — )
Drift
a: 45 mm (1.77 in) dia.
b: 59 mm (2.32 in) dia. Installing wheel hub
Inspection of wheel bearing rotating
torque
KV40100900
( — )
Drift
a: 52 mm (2.05 in) dia.
b: — Wheel bearing rotating torque inspec-
tion
KV38100500
( — )
Drift
a: 80 mm (3.15 in) dia.
b: 60 mm (2.36 in) dia. Installing drive shaft plug
KV38102200
( — )
Drift
a: 90 mm (3.54 in) dia.
b: 31 mm (1.22 in) dia. Installing drive shaft plug
ZZA0982D
ZZA0881D
ZZA0539D
ZZA0701D
ZZA0920D
3AA93ABC3ACD3AC03ACA3AC03AC63AC53A913A773A893A873A873A8E3A773A983AC73AC93AC03AC3
3A893A873A873A8F3A773A9D3AAF3A8A3A8C3A863A9D3AAF3A8B3A8C