Page 37 of 419
![GEELY FC 2008 Workshop Manual Engine mechanismEngine assemblyInspection1. Check coolant.
2. Check engine oil.
3. Check battery.
4. Check air filter assembly.
5. Check spark plug [4G18-3705113].
6. Check drive belt [4G18-1307107].H GEELY FC 2008 Workshop Manual Engine mechanismEngine assemblyInspection1. Check coolant.
2. Check engine oil.
3. Check battery.
4. Check air filter assembly.
5. Check spark plug [4G18-3705113].
6. Check drive belt [4G18-1307107].H](/manual-img/58/57161/w960_57161-36.png)
Engine mechanismEngine assemblyInspection1. Check coolant.
2. Check engine oil.
3. Check battery.
4. Check air filter assembly.
5. Check spark plug [4G18-3705113].
6. Check drive belt [4G18-1307107].Hint: do not check belt tension, because automatic tensioner is applied.7. Check ignition timing.(a) Warm up engine.
(b) Connect timing lamp to engine.
(c) Check ignition timing at idle speed.
Ignition timing: before top dead center Note: when checking ignition timing, place
transmission at neutral position.
Hint: After run the engine for 5 seconds with rotating
speed of 1000-1300rpm, check the engine could
recover to idle running.8. Check engine idle speed.(a) Warm up engine and run it at idle speed.
(b) Read engine rotating number in data flow with diagnostic instrument.
(c) Check idle speed.
Idle speed: about 750-850rpm
Notes:When checking idle speed, place cooling fan at OFF position.Turn off all auxiliary devices and air conditioner.Engine mechanism - Engine assemblyK-line 26
Page 38 of 419

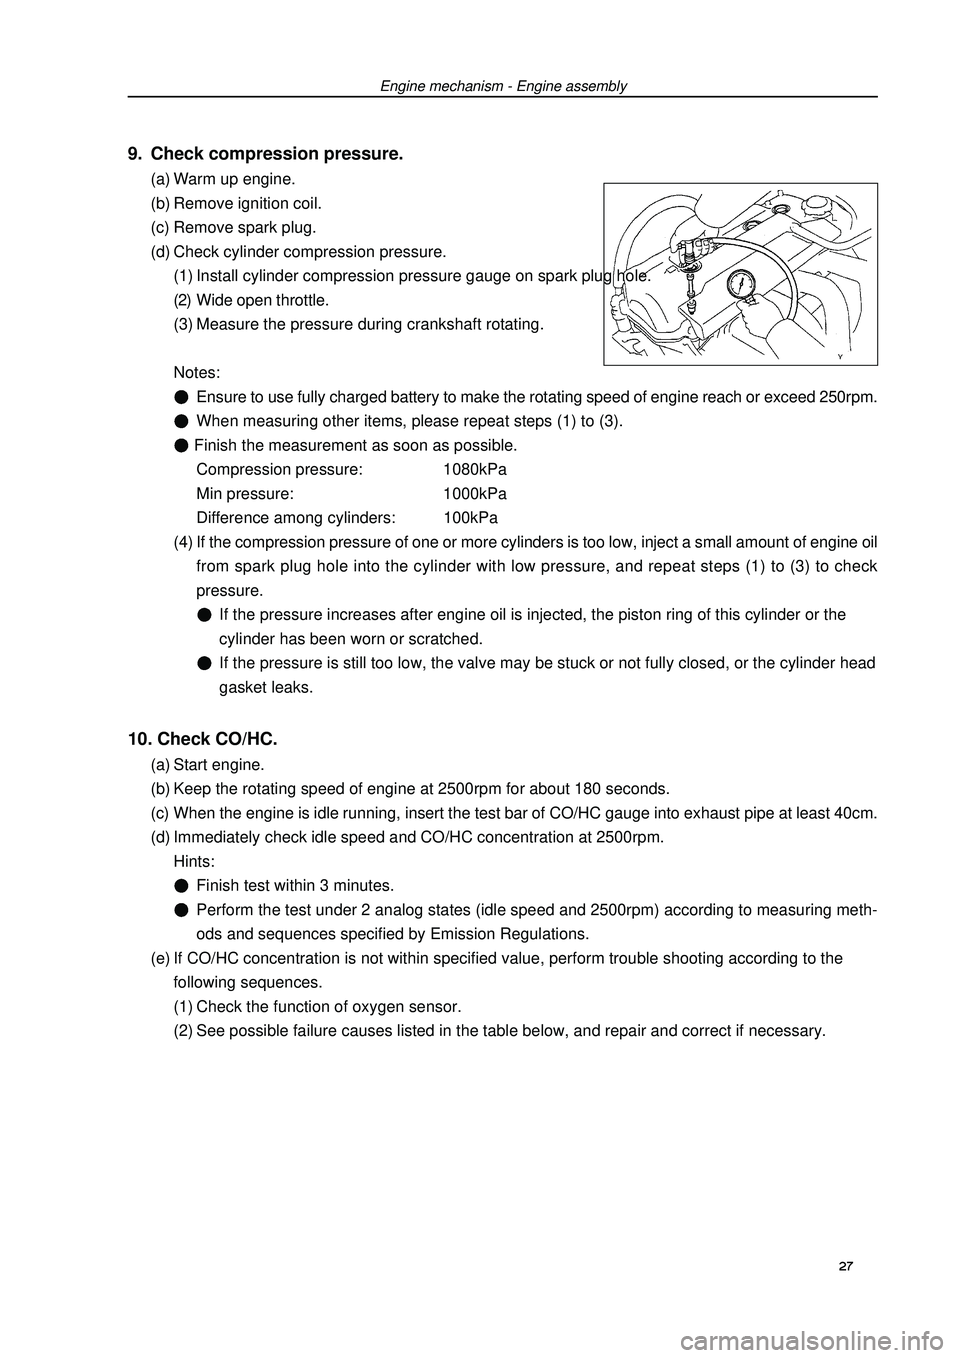
9. Check compression pressure.(a) Warm up engine.
(b) Remove ignition coil.
(c) Remove spark plug.
(d) Check cylinder compression pressure.
(1) Install cylinder compression pressure gauge on spark plug hole.
(2) Wide open throttle.
(3) Measure the pressure during crankshaft rotating.
Notes:Ensure to use fully charged battery to make the rotating speed of engine reach or exceed 250rpm.When measuring other items, please repeat steps (1) to (3). Finish the measurement as soon as possible.
Compression pressure: 1080kPa
Min pressure: 1000kPa
Difference among cylinders: 100kPa
(4) If the compression pressure of one or more cylinders is too low, inject a small amount of engine oil
from spark plug hole into the cylinder with low pressure, and repeat steps (1) to (3) to check
pressure.If the pressure increases after engine oil is injected, the piston ring of this cylinder or the
cylinder has been worn or scratched.If the pressure is still too low, the valve may be stuck or not fully closed, or the cylinder head
gasket leaks.10. Check CO/HC.(a) Start engine.
(b) Keep the rotating speed of engine at 2500rpm for about 180 seconds.
(c) When the engine is idle running, insert the test bar of CO/HC gauge into exhaust pipe at least 40cm.
(d) Immediately check idle speed and CO/HC concentration at 2500rpm.
Hints:Finish test within 3 minutes.Perform the test under 2 analog states (idle speed and 2500rpm) according to measuring meth-
ods and sequences specified by Emission Regulations.
(e) If CO/HC concentration is not within specified value, perform trouble shooting according to the
following sequences.
(1) Check the function of oxygen sensor.
(2) See possible failure causes listed in the table below, and repair and correct if necessary.Engine mechanism - Engine assembly27
Page 41 of 419
![GEELY FC 2008 Workshop Manual Engine mechanism - Valve clearanceValve clearanceAdjustment1. Remove engine plastic hood components.
2. Remove ignition coil components [4G18-3705110].
3. Remove cylinder head cover components [4G18-
GEELY FC 2008 Workshop Manual Engine mechanism - Valve clearanceValve clearanceAdjustment1. Remove engine plastic hood components.
2. Remove ignition coil components [4G18-3705110].
3. Remove cylinder head cover components [4G18-](/manual-img/58/57161/w960_57161-40.png)
Engine mechanism - Valve clearanceValve clearanceAdjustment1. Remove engine plastic hood components.
2. Remove ignition coil components [4G18-3705110].
3. Remove cylinder head cover components [4G18-
1003130].
4. Remove engine right bottom shield.
5. Turn crankshaft to cylinder 1 compression top dead
center position.(a) Turn crankshaft pulley to align its groove with “o” mark on
timing chain hood.
(b) Check dot marks on camshaft timing sprocket and VVT
timing sprocket, and they should be in a line on timing chain
hood surface as shown in the diagram.
Hint: if not, turn crankshaft for one circle again
and align the above marks.6. Check valve clearance.(a) Only check the valves shown in the diagram.
(1) Measure the clearance between valve tappet and cam-
shaft with plug gauge.
(2) Record valve clearance measuring value exceeding
specification, and this value will be used to determine
valve tappet thickness that needs change.
Valve clearance (cold vehicle)Intake airExhaust(b) Turn crankshaft for one circle ), and cylinder 4 is
turned to compression top dead center position.
(c) Only check the valves shown in the diagram. Measure valve
clearance (see step (a)).7. Remove drive beltSlowly turn drive belt tensioner clockwise to loosen it.
Then remove drive belt and put back drive belt tensioner slowly
and gently. 30 Mark
Mark
Mark
Timing chain
hood surface
Groove
Page 42 of 419

Engine mechanism - Valve clearance8. Remove right engine mounting assembly(a) Remove PS oil pump reservoir and put it aside.
(b) Place wooden block between jack and engine, properly
place the jack, and then remove right engine mounting
assembly.9. Remove drive belt tensioner device [4G18-
1300200].Hint: operate the jack up and down to remove bolts.10. Adjust valve clearance.Note: do not turn crankshaft before installing chain
tensioner.
(a) Turn crankshaft to cylinder 1 top dead center position.
(b) Align the marks on timing chain and camshaft timing
sprocket.
(c) Remove 2 bolts and chain tensioner.
(d) Fix camshaft with adjustable wrench and then loosen
the fixed bolts of exhaust camshaft timing sprocket.
Note: be careful not to damage valve lifter.
(e) As sequences shown in the diagram, loosen camshaft
bearing cover bolts on exhaust camshaft at several
times and remove the bearing cover at the same time.
(f) As shown in the diagram, remove exhaust camshaft
timing sprocket.Painting
mark
LooseningFixing 31
Page 45 of 419
Engine mechanism - Valve clearance(t) Check the matching marks on timing chain and cam-
shaft timing sprocket, and then align the groove of crank-
shaft pulley with the timing mark on timing chain hood
as shown in the diagram.
(u) Install chain tensioner.
(1) Check o-ring is clean, and buckle on the hook as
shown in the diagram.
(2) Coat engine oil on the chain tensioner, and then
install it.
Note: when installing the chain temsioner, buckle
on the hook again if plunger has ejected.
(3) Turn crankshaft counterclockwise to separate the
hook from lock pin on the plunger.Mark
Mark
Mark
Timing chain
hood surface
GroovePressing in 34 Lifting
HookPressing
inPinTurning Pin Separation
Hook
Page 46 of 419

Engine mechanism - Valve clearance(4) Turn crankshaft clockwise, and check the sliding
parts are blocked by plunger.
Hint: if the plunger does not eject, press the chain ten-
sion rail toward chain tensioner with screwdriver
or fingers to separate the hook from lock pin and
make the plunger eject.11.Install cylinder head cover components.(a) Install cylinder head cover gasket on cylinder head cover.
(b) Eliminate all old sealant (FIPG) materials.
(c) Coat sealant on 2 positions shown in the diagram.
Notes:Wipe off all the oil stains on junction plane.After coating sealant, finish installation of cylinder head
cover within 3 minutes.After installing, do not refill engine oil within 2 minutes.
(d) Install cylinder head cover components with 9 bolts, 2 seal washers and 2 nuts.
Evenly tighten bolts and nuts at several times.
Torque:
Short bolt: Nut, long bolt etc.: m12. Install drive belt tensioner device.Torque: nut: Bolt: 13. Install fixing bracket absorber on the left of engine.Torque: 14. Check there is oil leakage.Sealant 35 Plunger
TurningPushing
Page 49 of 419
Engine mechanism - Engine assembly30. Disassemble left end front stabilizer link
assembly.Fix bolts with hex socket wrench, and then remove nuts.
Hint: perform the same steps at another side.31. Disassemble lower left control arm assembly.(a) As shown in the diagram, remove bolt and 2 nuts.
(b) Disassemble drive shaft from shaft hub with plastic
hammer.
Hint: perform the same steps at another side.32. Remove oil return pipe assembly.After removing 3 retaining clips and 2 bolts of power steer-
ing oil reservoir, remove the oil return pipe from vehicle.33. Remover engine assembly [4G18-1000000] and
transmission assembly.(a) Erect engine hanger.
(b) Remove 4 bolts, 2 nuts and right engine mounting
assembly.
(c) Remove through bolt and nut, and then remove left
engine mounting assembly from vehicle.
(d) As shown in the diagram, remove 6 bolts.
(e) Carefully remove engine assembly and transmission
assembly from vehicle. 38
Page 50 of 419

34. Remove power steering pump assembly.
35. Remove sub frame together with side member.(a) Remove front engine mounting assembly and rear en-
gine mounting assembly from engine assembly.
(b) Remove sub frame assembly.36. Remove starter mounting components
[4G18-3708100].
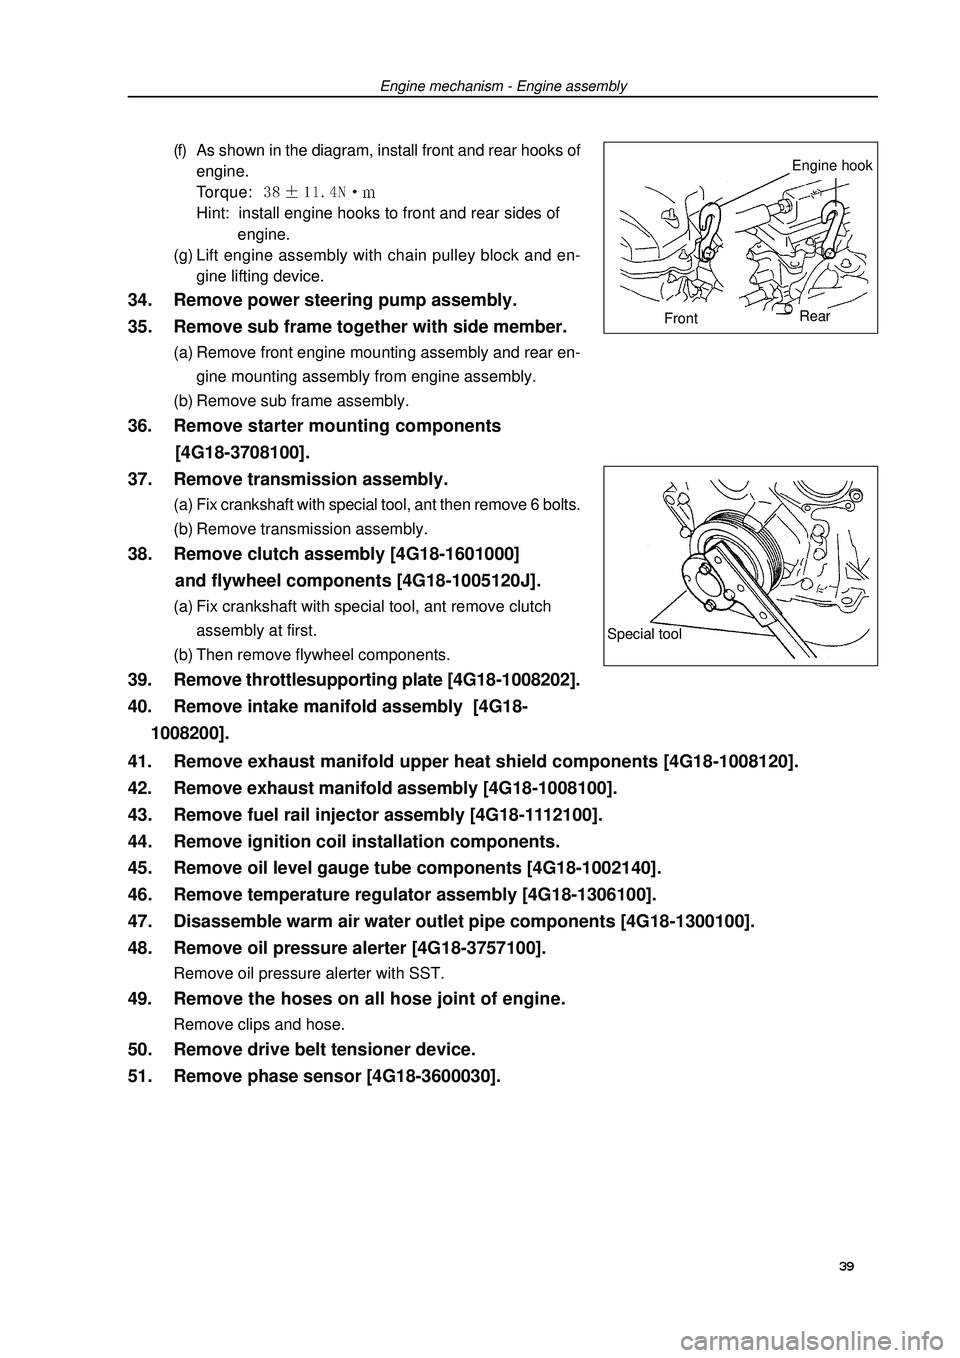
37. Remove transmission assembly.(a) Fix crankshaft with special tool, ant then remove 6 bolts.
(b) Remove transmission assembly.38. Remove clutch assembly [4G18-1601000]
and flywheel components [4G18-1005120J].(a) Fix crankshaft with special tool, ant remove clutch
assembly at first.
(b) Then remove flywheel components.39. Remove throttlesupporting plate [4G18-1008202].
40. Remove intake manifold assembly [4G18-
1008200].(f) As shown in the diagram, install front and rear hooks of
engine.
Torque: Hint: install engine hooks to front and rear sides of
engine.
(g) Lift engine assembly with chain pulley block and en-
gine lifting device.Engine mechanism - Engine assemblySpecial tool39 41. Remove exhaust manifold upper heat shield components [4G18-1008120].
42. Remove exhaust manifold assembly [4G18-1008100].
43. Remove fuel rail injector assembly [4G18-1112100].
44. Remove ignition coil installation components.
45. Remove oil level gauge tube components [4G18-1002140].
46. Remove temperature regulator assembly [4G18-1306100].
47. Disassemble warm air water outlet pipe components [4G18-1300100].
48. Remove oil pressure alerter [4G18-3757100].Remove oil pressure alerter with SST.49. Remove the hoses on all hose joint of engine.Remove clips and hose.50. Remove drive belt tensioner device.
51. Remove phase sensor [4G18-3600030].Engine hook
FrontRear