Page 41 of 282

40
SAFETY
DEVICES
CORRECT USE
OF THE
VEHICLE
WARNING
LIGHTS AND
MESSAGES
IN AN
EMERGENCY
VEHICLE
MAINTENANCE
TECHNICAL
SPECIFICATIONS
INDEX
DASHBOARD
AND CONTROLS
Back rest angle adjustment
Operate lever A-fig. 29.
Seat height adjustment fig. 29
Operate controls Bor Cto raise/lower
the front/rear section of the seat respec-
tively.
Revolving the seat
The seat can be turned 180° toward the
facing seat and 35° toward the door.
May be locked in driving position and to
180°.
fig. 29F0N0174m
fig. 30aF0N0175m
To revolve the seat, operate lever D-
fig. 30a(set on the right side of the seat).
Before turning the seat it must be first
moved forward and only after adjusted in
longitudinal direction fig. 27a.
fig. 30bF0N0213m
Ensure the seat is locked in
driving position before dri-
ving off in the vehicle
WARNING
Seat warming fig. 30b
(where provided)
With ignition key at MAR, press button
Eto switch the seat warming on/off. The
led on the button will light up when the
function is on.
fig. 30cF0N0149m
FOLDING SHELF ON BENCH
SEAT (where provided) fig. 30c
The seat is fitted with a folding shelf that
may be used as a work surface for papers.
To use, pull tab Aand lower the shelf.
The shelf incorporates two glass holders
and a clip board for documents.
Do not position heavy
weights on the shelf with the
vehicle in motion because the items
could be thrown against the vehicle oc-
cupants in the event of sudden brak-
ing or impact, causing severe injury.
WARNING
037-101 Ducato GB 6-11-2007 9:56 Pagina 40
Page 42 of 282

41
SAFETY
DEVICES
CORRECT USE
OF THE
VEHICLE
WARNING
LIGHTS AND
MESSAGES
IN AN
EMERGENCY
VEHICLE
MAINTENANCE
TECHNICAL
SPECIFICATIONS
INDEX
DASHBOARD
AND CONTROLS
fig. 30dF0N0237mfig. 30eF0N0238m
UNDER-SEAT BASKET
(where provided)
The basket under the driver’s seat A-fig.
30dmay be removed easily by withdraw-
ing from the hooks on the support base.
Do not position heavy
weights inside the basket
with the vehicle in motion because the
items could be thrown against the ve-
hicle occupants in the event of sudden
braking or impact, causing severe in-
jury.
WARNING
SEAT BASE PLASTIC COVERS
(where provided) fig. 30e
Front trim Amay be opened by operat-
ing the release handle Bin the upper part.
This gives access to the under-seat basket
(see paragraph “Under-seat basket”)
The seat must be as far back as possible
to facilitate front trim opening and access
to the basket.
To allow removal of the front trim, the
trim must be turned forward as far as pos-
sible and withdrawn from the hooks pre-
sent in the lower part by pulling toward
the front of the vehicle.PANORAMA VERSIONS
Passengers’ seats back rest angle
adjustment fig. 31
Turn knob A.
Access to the second row seats
fig. 31
For accessing the second seat row, oper-
ate lever Bof the external right side seat
of the first row and fold the back of the
seat forward guiding it with your left hand.
Moving the seat back to standard position
the seat will lock into the locking device
without using the lever again.
On Panorama 2
ndrow complete seat both
side seats are fixed.
037-101 Ducato GB 6-11-2007 9:56 Pagina 41
Page 43 of 282

42
SAFETY
DEVICES
CORRECT USE
OF THE
VEHICLE
WARNING
LIGHTS AND
MESSAGES
IN AN
EMERGENCY
VEHICLE
MAINTENANCE
TECHNICAL
SPECIFICATIONS
INDEX
DASHBOARD
AND CONTROLS
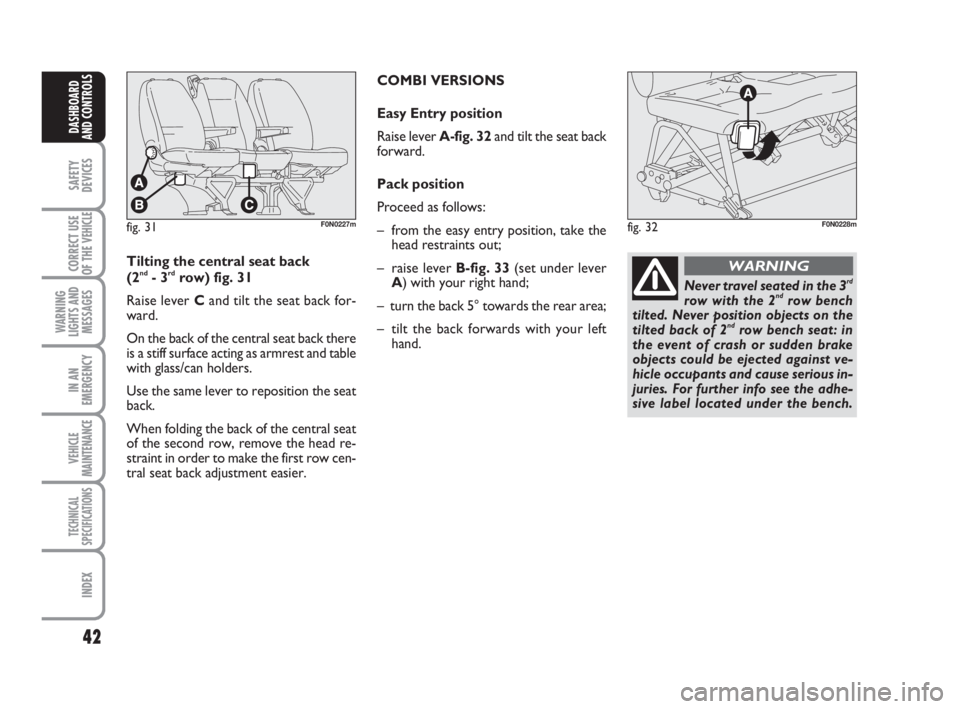
fig. 31F0N0227mfig. 32F0N0228m
Tilting the central seat back
(2nd- 3rdrow) fig. 31
Raise lever Cand tilt the seat back for-
ward.
On the back of the central seat back there
is a stiff surface acting as armrest and table
with glass/can holders.
Use the same lever to reposition the seat
back.
When folding the back of the central seat
of the second row, remove the head re-
straint in order to make the first row cen-
tral seat back adjustment easier.COMBI VERSIONS
Easy Entry position
Raise lever A-fig. 32and tilt the seat back
forward.
Pack position
Proceed as follows:
– from the easy entry position, take the
head restraints out;
– raise lever B-fig. 33(set under lever
A) with your right hand;
– turn the back 5° towards the rear area;
– tilt the back forwards with your left
hand.Never travel seated in the 3rd
row with the 2ndrow bench
tilted. Never position objects on the
tilted back of 2
ndrow bench seat: in
the event of crash or sudden brake
objects could be ejected against ve-
hicle occupants and cause serious in-
juries. For further info see the adhe-
sive label located under the bench.
WARNING
037-101 Ducato GB 6-11-2007 9:56 Pagina 42
Page 44 of 282

43
SAFETY
DEVICES
CORRECT USE
OF THE
VEHICLE
WARNING
LIGHTS AND
MESSAGES
IN AN
EMERGENCY
VEHICLE
MAINTENANCE
TECHNICAL
SPECIFICATIONS
INDEX
DASHBOARD
AND CONTROLS
HEAD RESTRAINTS
FRONT fig. 36
On certain versions head restraints are ad-
justable in height and they lock automati-
cally in the required position.
To adjust head restraints
❒to raise: raise the head restraint until
hearing the locking click.fig. 33F0N0229mfig. 34F0N0230m
fig. 35F0N0231m
Removing the bench
IMPORTANT Two persons are required
to remove the bench.
To remove the bench proceed as follows:
– from pack position, turn levers Cand
D-fig. 34forward (as specified on the
adhesive label located on the lower
crossmember)
– raise forward the seat base;
– set the seat in vertical position
– from vertical position, turn levers Eand
F-fig. 35upwards;
– raise the bench from the floor and re-
move it.
When refitting the bench
make sure it is properly se-
cured into floor runners.
WARNING
037-101 Ducato GB 6-11-2007 9:56 Pagina 43
Page 45 of 282

44
SAFETY
DEVICES
CORRECT USE
OF THE
VEHICLE
WARNING
LIGHTS AND
MESSAGES
IN AN
EMERGENCY
VEHICLE
MAINTENANCE
TECHNICAL
SPECIFICATIONS
INDEX
DASHBOARD
AND CONTROLS
❒to lower: press button Aand lower
the head restraint.
To lift out front head restraints: press at
the same time buttons Aand Bset on
both sides and take them out.
fig. 36F0N0020m
To optimise head restraint protective ac-
tion, adjust the seat back upright and keep
your head as close as possible to the head
restraint.
Remember that the head re-
straints should be adjusted
to support the back of your head and
not your neck. Only in this position
do they exert their protective action
WARNING
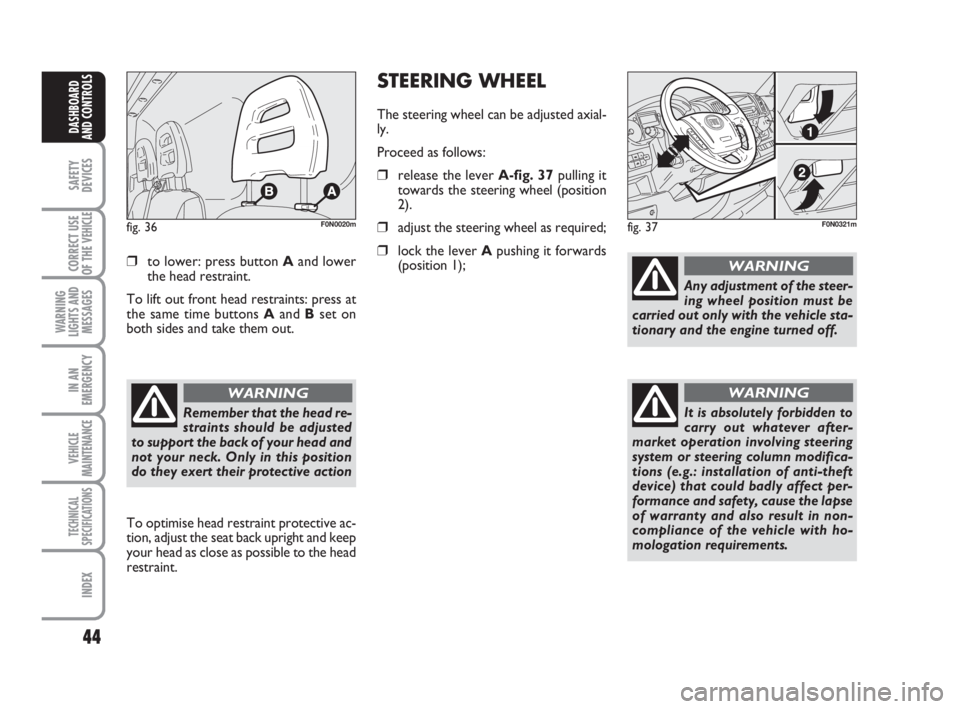
STEERING WHEEL
The steering wheel can be adjusted axial-
ly.
Proceed as follows:
❒release the lever A-fig. 37pulling it
towards the steering wheel (position
2).
❒adjust the steering wheel as required;
❒lock the lever Apushing it forwards
(position 1);
fig. 37F0N0321m
Any adjustment of the steer-
ing wheel position must be
carried out only with the vehicle sta-
tionary and the engine turned off.
WARNING
It is absolutely forbidden to
carry out whatever after-
market operation involving steering
system or steering column modifica-
tions (e.g.: installation of anti-theft
device) that could badly affect per-
formance and safety, cause the lapse
of warranty and also result in non-
compliance of the vehicle with ho-
mologation requirements.
WARNING
037-101 Ducato GB 6-11-2007 9:56 Pagina 44
Page 46 of 282
45
SAFETY
DEVICES
CORRECT USE
OF THE
VEHICLE
WARNING
LIGHTS AND
MESSAGES
IN AN
EMERGENCY
VEHICLE
MAINTENANCE
TECHNICAL
SPECIFICATIONS
INDEX
DASHBOARD
AND CONTROLS
DOOR MIRRORS
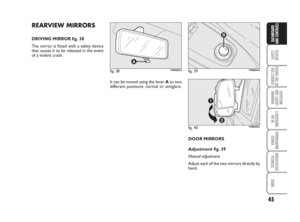
Adjustment fig. 39
Manual adjustment
Adjust each of the two mirrors directly by
hand.
fig. 38F0N0022mfig. 39F0N0024m
It can be moved using the lever Ato two
different positions: normal or antiglare.
REARVIEW MIRRORS
DRIVING MIRROR fig. 38
The mirror is fitted with a safety device
that causes it to be released in the event
of a violent crash.
fig. 40F0N0023m
037-101 Ducato GB 6-11-2007 9:56 Pagina 45
Page 47 of 282

46
SAFETY
DEVICES
CORRECT USE
OF THE
VEHICLE
WARNING
LIGHTS AND
MESSAGES
IN AN
EMERGENCY
VEHICLE
MAINTENANCE
TECHNICAL
SPECIFICATIONS
INDEX
DASHBOARD
AND CONTROLS
Folding
When required (for example when the
mirror causes difficulty in narrow spaces)
it is possible to fold the mirror moving it
from position 1-fig. 40to position 2.
Powered folding
(where provided)
Press the swinging button A-fig. 41side
1to set the mirror in driving position and
side 2to fold the mirror.When driving the mirrors shall
always be in position 1-fig. 40.
As the driver’s door mirror is
curved, it may slightly alter
the perception of distance.
WARNING
IMPORTANT If the mirror is folded by
hand it shall be returned to driving posi-
tion by hand. If the mirror is folded elec-
trically it can be returned to driving posi-
tion electrically.
Demisting/defrosting
(where provided)
Mirrors are fitted with resistors that will
activate when turning the heated rear win-
dow on (by pressing button
().
IMPORTANT This function is timed and
it will turn off automatically a few minutes
later. The reflecting surface of the
lower part of the mirror is
parabolic to increase the range. Con-
sequently, the dimension of the re-
flected image is reduced, giving the
impression that the object is more dis-
tant than it is in fact.
WARNING
Electrical adjustment
The mirrors can only be adjusted electri-
cally when the key is at MAR. To adjust
mirrors, turn knob Bto one of the fol-
lowing four positions:
ÿ1 left mirror, ⁄2 right mirror, ¤3 left
wide-angle, Ÿ4 right wide-angle
Once the knob has been positioned, move
it in the direction indicated by the arrows
to adjust the reflecting surface of the se-
lected mirror.
fig. 41F0N0159m
037-101 Ducato GB 6-11-2007 9:56 Pagina 46
Page 48 of 282
47
SAFETY
DEVICES
CORRECT USE
OF THE
VEHICLE
WARNING
LIGHTS AND
MESSAGES
IN AN
EMERGENCY
VEHICLE
MAINTENANCE
TECHNICAL
SPECIFICATIONS
INDEX
DASHBOARD
AND CONTROLS
fig. 42
F0N0322m
HEATING AND VENTILATION
1.Fixed upper vent - 2.Central swivel vents - 3.Fixed side vents - 4.Side swivel vents - 5. Lower vents for front seats.
037-101 Ducato GB 6-11-2007 9:56 Pagina 47