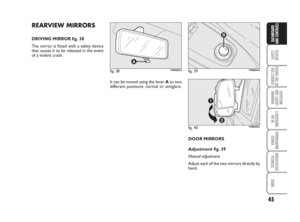
Page 161 of 282

160
WARNING
LIGHTS AND
MESSAGES
VEHICLE
MAINTENANCE
TECHNICAL
SPECIFICATIONS
IINDEX
DASHBOARD
AND CONTROLS
SAFETY
DEVICES
CORRECT USE
OF THE
VEHICLE
IN AN
EMERGENCY
To change a wheel proceed as
follows:
❒stop the vehicle in a position that is
not dangerous for oncoming traffic
where you can change the wheel safe-
ly. The ground should be flat and ad-
equately firm;
❒turn the engine off and pull up the
handbrake;
❒engage first gear or reverse;
❒wear the reflecting safety jacket (com-
pulsory by law in certain countries) be-
fore getting out of the vehicle;
❒alert other drivers that the vehicle is
stationary, using the proper devices in
compliance with the regulations in
force (e.g.: warning triangle, hazard
warning lights, etc …);
❒take the extension and the wrench
from the tool bag under the passen-
ger’s seat (see “Compartment under
the front passenger’s seat” in section
“dashboard and controls”);
The jack shall only be used
for changing wheels on the
vehicle with which it is provided or on
vehicles of the same model. It must
not be used for other purposes such
as for instance raising vehicles of oth-
er models. In no case should it be used
for repairs under the vehicle. Incor-
rect positioning of the jack may cause
the jacked vehicle to fall. Do not use
the jack for higher capacities than
stated on its label.
WARNING
Never tamper with the in-
flation valve. Never place
tools between the rim and tyre.
Check and restore, if required, the
pressure of tyres and spare wheel to
the values given in section “Technical
Specifications”.
WARNING
Please note:
❒the jack weight is 4.5 kg;
❒the jack requires no adjustment;
❒the jack cannot be repaired. If it breaks
it must be replaced with a new jack;
❒no tool other than its cranking device
may be fitted on the jack.
fig. 3F0N0193m
157-188 Ducato GB 6-11-2007 10:32 Pagina 160
Page 162 of 282

161
WARNING
LIGHTS AND
MESSAGES
VEHICLE
MAINTENANCE
TECHNICAL
SPECIFICATIONS
INDEX
DASHBOARD
AND CONTROLS
SAFETY
DEVICES
CORRECT USE
OF THE
VEHICLE
IN AN
EMERGENCY
❒on versions with alloy wheels, remote
the press-fitted hub cap;
❒loosen one turn the bolts of the wheel
to change;
❒turn the ring nut to extend the jack
partially;
❒set the jack near the lifting support
close to the wheel to change in the
points shown in fig. 3. For short wheelbase versions with re-
tractable footboard, the jack shall be
set in the point shown in fig. 4and
shall be suitably directed (45°) to avoid
interference with the retractable foot-
board;
❒warn anybody nearby that the vehicle
is about to be lifted. They must stay
clear and not touch the vehicle until
it is back on the ground. Jack the ve-
hicle.
fig. 4F0N0194m
fig. 5F0N0186m
fig. 6F0N0163m
fig. 7F0N0164m
After jacking the vehicle:
❒for chassis-cabs, from the rear right
side of the vehicle fig. 5use the
wrench to operate the wheel re-
straining device screw,
❒for vans, open 180° the load compart-
ment door and remove the cap from
the hole A-fig. 6to fit the extension B-
fig. 6and the wrench C-fig. 7;
– fit the extension B-fig. 6into the
hole;
– fit the wrench C-fig. 7and turn it
counterclockwise to lower the
spare wheel;
❒use the wrench Cto take the wheel
out of the vehicle fig. 7a;
❒loosen the knob D , remove the sup-
port Eand release the wheel.
157-188 Ducato GB 6-11-2007 10:32 Pagina 161
Page 163 of 282

162
WARNING
LIGHTS AND
MESSAGES
VEHICLE
MAINTENANCE
TECHNICAL
SPECIFICATIONS
IINDEX
DASHBOARD
AND CONTROLS
SAFETY
DEVICES
CORRECT USE
OF THE
VEHICLE
IN AN
EMERGENCY
❒fit the spare wheel making the holes
G-fig. 9coincide with the respective
pins H. Make sure the contact surfaces
between spare wheel and hub are
clean so that the fastening bolts will
not come loose;
❒tighten the 5 fastening bolts;
❒operate the wheel wrench to lower
the vehicle and remove the jack;
❒fasten bolts completely, working in a
criss-cross fashion as shown in fig. 9.
When you have finished:
❒take the flat tyre, hook it to support
E-fig. 7band screw knob D-fig. 7b;
❒fit the wrench C-fig. 7to extension
B-fig. 6and turn it clockwise to raise
the spare wheel;
fig. 8F0N0167mfig. 9F0N0168m
The moving parts of the jack (screw and
joints) may also cause injury if touched.
Clean off any grease.
❒loosen the bolts completely using the
wrench F-fig. 8and remove the
wheel;
fig. 7aF0N0165m
fig. 7bF0N0166m
For both van fig. 9a and
chassis cab fig. 9b, after hav-
ing completed spare wheel raising/
locking, take out the wrench paying
attention not to turn it to opposite di-
rection making an attempt to ease
wrench extraction, in order to pre-
vent catch release.
WARNING
As regards vehicles equipped with alloy
wheel trims, proceed as follows:
– Take the relevant kit from the tool box;
– Assemble the relevant plate A-fig. 9c
on the alloy wheel, fixing it with the sup-
plied screws B-fig. 9cusing wrench
C-fig. 7;
157-188 Ducato GB 6-11-2007 10:32 Pagina 162
Page 164 of 282

163
WARNING
LIGHTS AND
MESSAGES
VEHICLE
MAINTENANCE
TECHNICAL
SPECIFICATIONS
INDEX
DASHBOARD
AND CONTROLS
SAFETY
DEVICES
CORRECT USE
OF THE
VEHICLE
IN AN
EMERGENCY
QUICK TYRE REPAIR
KIT - FIX & GO automatic
The automatic Fix & Go fast tyre repair
kit is located in the front part of the pas-
senger compartment and contains:
❒bottle A containing sealer and fitted
with:
– filling pipe B;
– sticker Cbearing the notice “max.
80 km/h”, to be placed in a position
visible to the driver (on the instru-
ment panel) after fixing the tyre;
❒instruction brochure (see fig. 11), to
be used for prompt and proper use
of the quick repair kit and to be then
handed to the personnel charged with
handling the treated tyre;
❒compressor D-fig. 10including gauge
and connections;
❒adapters for inflating different ele-
ments.❒check for proper arrangement in the
space under the floor provided for the
purpose (the lifting system is provid-
ed with a stop limit catch; incorrect
positioning impair safety);
❒remove the extension B-fig. 6and re-
fit it together with the wrench C-
fig. 7into the tool compartment;
❒refit the tool compartment into the
proper space under the passenger’s
seat.
fig. 9aF0N0224m
fig. 9bF0N0223m
– Re-attach the wheel onto the support
turning it until it reaches the end of the
slot (as illustrated in fig. 9d) and fasten
the ball grip D-fig. 9d;
– Introduce the wheel disassembly wrench
C-fig. 7on extension B-fig. 6and turn
it clockwise in order to allow the spare
wheel to rise.
fig. 9cF0N0251m
fig. 9dF0N0252m
157-188 Ducato GB 6-11-2007 10:32 Pagina 163
Page 165 of 282

164
WARNING
LIGHTS AND
MESSAGES
VEHICLE
MAINTENANCE
TECHNICAL
SPECIFICATIONS
IINDEX
DASHBOARD
AND CONTROLS
SAFETY
DEVICES
CORRECT USE
OF THE
VEHICLE
IN AN
EMERGENCY
IT SHOULD BE NOTICED THAT:
The sealing fluid of the quick tyre repair
kit is effective with external temperatures
between –20 °C and +50 °C.
The sealing fluid has limited life.
The compressor shall not be
operated for more than 20
minutes. Risk of overheating!. Tyres
repaired with the quick tyre repair kit
shall be used temporarily only.
WARNING
In the event of a puncture
caused by foreign bodies, it is
possible to repair tyres show-
ing damages on the track or
shoulder up to max 4 mm diameter.
Holes and damages on the
tyre side walls cannot be re-
paired. Do not use the quick tyre re-
pair kit if damaging is due to running
with flat tyre.
WARNING
Repairs are not possible in
case of damages on the
wheel rim (bad groove distortion
causing air loss). Do not remove for-
eign bodies (screws or nails) from the
tyre.
WARNINGIf the compressor stops due to excessive
overheating, wait a few minutes to allow
for compressor cooling, press the RESET
button set aside the compressor, then re-
activate the compressor.
fig. 11F0N0178m
Hand the instruction
brochure to the personnel
charged with treating the tyre re-
paired with the kit.
WARNING
fig. 10F0N0177m
157-188 Ducato GB 6-11-2007 10:32 Pagina 164
Page 166 of 282

165
WARNING
LIGHTS AND
MESSAGES
VEHICLE
MAINTENANCE
TECHNICAL
SPECIFICATIONS
INDEX
DASHBOARD
AND CONTROLS
SAFETY
DEVICES
CORRECT USE
OF THE
VEHICLE
IN AN
EMERGENCY
The cylinder contains ethyl-
ene glycol. The cylinder con-
tains latex: it can cause allergic reac-
tions. It is harmful if ingested or in-
haled and irritant for the eyes and in
case of contact. In case of contact
rinse immediately with water and take
off contaminated clothes. If swal-
lowed, do not induce vomit, rinse out
the mouth, drink a lot of water and
call the doctor immediately. Keep
away from children. This product must
not be used by asthmatics. Do not in-
hale vapours. Call the doctor imme-
diately in case of allergic reactions.
Keep the cylinder in the space provid-
ed for the purpose and far from heat.
The sealing fluid has limited life.
WARNINGReplace the cylinder if sealer
has run out. Do not throw
away the cylinder and the
sealing fluid. Have the sealing
fluid and the cylinder disposed of in
compliance with national and local
regulations.
Put on the protection gloves
provided together with quick
tyre repair kit.
WARNING
❒Pull up the handbrake. Loosen tyre
inflation valve cap, take out the filler
hose A-fig. 12and screw the ring nut
Bon the tyre valve;
fig. 12F0N0325m
INFLATING PROCEDURE
157-188 Ducato GB 6-11-2007 10:32 Pagina 165
Page 167 of 282

166
WARNING
LIGHTS AND
MESSAGES
VEHICLE
MAINTENANCE
TECHNICAL
SPECIFICATIONS
IINDEX
DASHBOARD
AND CONTROLS
SAFETY
DEVICES
CORRECT USE
OF THE
VEHICLE
IN AN
EMERGENCY
❒make sure the compressor switch D-
fig. 13is set to 0(off), start the en-
gine and fit plug E-fig. 14into the
nearest current outlet and then turn
on the compressor by setting switch
D-fig. 13to I(on). Inflate tyre at 4 bar
pressure.
Check tyre pressure on gauge F-fig.
13with compressor off to obtain pre-
cise reading;
❒if after 5 minutes it is still impossible
to reach at least 3 bar, disengage com-
pressor from valve and current outlet,
then move the vehicle forth for ap-
prox. ten metres in order to distrib-
ute the sealing fluid inside the tyre
evenly, then repeat the inflation op-
eration;
❒if after this operation it is still impos-
sible after 10 minutes to reach at least
3 bar, do not start driving since the
tyre is excessively damaged and the
quick tyre repair kit cannot guarantee
suitable sealing, contact Fiat Dealer-
ship;
❒re-start immediately if the tyre has
been inflated to 4 bar pressure;
fig. 13F0N0180m
fig. 14F0N0182m
Apply the sticker in a visible
position for the driver to in-
dicate that the tyre has been treat-
ed with the quick tyre repair kit. Dri-
ve carefully especially when corner-
ing. Do not exceed 80 km/h. Avoid
heavy braking and accelerating.
WARNING
❒after driving for about 10 minutes
stop and check again the tyre pres-
sure; pull up the handbrake;
If the pressure falls below 3
bars, do not drive any fur-
ther: the quick tyre repair kit Fix & Go
automatic cannot guarantee proper
hold because the tyre is too much
damaged. Contact Fiat Dealership.
WARNING
157-188 Ducato GB 6-11-2007 10:32 Pagina 166
Page 168 of 282

167
WARNING
LIGHTS AND
MESSAGES
VEHICLE
MAINTENANCE
TECHNICAL
SPECIFICATIONS
INDEX
DASHBOARD
AND CONTROLS
SAFETY
DEVICES
CORRECT USE
OF THE
VEHICLE
IN AN
EMERGENCY
❒if at laest 3 bar pressure is read, re-
store proper pressure specified in
paragraph” Tyre pressure” in section
“Technical Specifications” (with engine
running and handbrake on) and
restart;
❒drive with the utmost care to the
nearest Fiat Dealership.
FOR CHECKING AND
RESTORING PRESSURE ONLY
The compressor can be also used just for
restoring pressure. Disconnect the quick
connection Cand connect it directly to
the tyre valve fig. 15; in this way the cylin-
der is not connected to compressor and
the sealing fluid will not flow into the tyre.
NOTE If the tyre shall be deflated, con-
nect quick connection Cto the tyre valve
and press the yellow button set in the mid-
dle of the compressor switch.CYLINDER REPLACEMENT
PROCEDURE
To replace the cylinder proceed as fol-
lows:
❒disconnect connection A-fig. 17;
❒turn counter-clockwise the cylinder
to replace and raise it;
❒fit the new cylinder and turn it clock-
wise;
❒fit connection Aand connect tube B
into its seat.
It is of vital importance to
communicate that the tyre
has been repaired using the quick tyre
repair kit. Hand the instruction
brochure to the personnel charged
with treating the tyre repaired with
the kit.
WARNING
fig. 17F0N0184mfig. 15F0N0326m
Repair may not be possible
if tyres other than those sup-
plied with the vehicle are used. If the
tyres are replaced, it is advisable to
fit products approved by the manu-
facturer. Consult the Fiat Dealership.
WARNING
157-188 Ducato GB 6-11-2007 10:32 Pagina 167