Page 201 of 426

6. To save the new time setting, touch the screen where
the word ªSaveº is displayed.
Show Time if Radio is Off
When selected, this feature will display the time of day
on the touch screen when the system is turned off.
Proceed as follows to change the current setting:
1. Turn on the system.
2. Touch the screen where the time is displayed. The
clock setting menu will appear on the screen.
3. When this feature is on, a check mark will appear in
the box next to the words ªShow Time if Radio is Off.º
Touch the screen where the words ªShow Time if Radio is
Offº are displayed to change the current setting.
SATELLITE RADIO (RSC) Ð IF EQUIPPED
(RER/REQ/REN RADIOS ONLY)
Satellite radio uses direct satellite to receiver broadcast-
ing technology to provide clear digital sound, coast to
coast. The subscription service provider is SiriusŸ Satel-
lite Radio. This service offers up to 100 channels of music,
sports, news, entertainment, and programming for chil-
dren, directly from its satellites and broadcasting studios.
System Activation
Sirius Satellite Radio service is pre-activated, and you
may begin listening immediately to the one year of
SIRIUS audio service that is included with the factory-
installed satellite radio system in your vehicle. Sirius will
contact you to supply a welcome kit and to confirm
subscription information, including the set up of your
on-line listening account at no additional charge. For
INSTRUMENT PANEL AND CONTROLS 201
4
Page 202 of 426

further information, call the toll-free number 888-539-
7474, or visit the Sirius web site at www.sirius.com.
Please have the following information available when
calling:
1. The Electronic Serial Number/Sirius Identification
Number (ESN/SID).
2. Your Vehicle Identification Number.
Electronic Serial Number/Sirius Identification
Number (ENS/SID)
The Electronic Serial Number/Sirius Identification Num-
ber is needed to activate your Sirius Satellite Radio
system. To access the ESN/SID, refer to the following
steps:
ESN/SID Access
With the ignition switch in the ON/RUN or ACCESSORY
position and the radio ON, press the SETUP button and
scroll using the TUNE control knob until Sirius ID isselected. Press the TUNE control knob and the Sirius ID
number will display. The Sirius ID number display will
time out in 2 minutes. Press any button on the radio to
exit this screen.
Selecting Satellite Mode
Press the SAT button until9SAT9appears in the display. A
CD may remain in the radio while in the Satellite radio
mode.
Satellite Antenna
To ensure optimum reception, do not place items on the
roof around the rooftop antenna location or strap items to
the trunk lid around the trunk lid antenna (if equipped).
Metal objects placed within the line of sight of the
antenna will cause decreased performance. Larger lug-
gage items such as bikes should be placed as far rearward
as possible, within the loading design of the rack. Do not
place items directly on or above the antenna.
202 INSTRUMENT PANEL AND CONTROLS
Page 203 of 426

Reception Quality
Satellite reception may be interrupted due to one of the
following reasons:
²The vehicle is parked in an underground parking
structure or under a physical obstacle.
²Dense tree coverage may interrupt reception in the
form of short audio mutes.
²Driving under wide bridges or along tall buildings can
cause intermittent reception.
²Placing objects over or too close to the antenna can
cause signal blockage.
Operating Instructions - Satellite Mode
NOTE:The ignition switch must be in the ON or ACC
position to operate the radio.
SEEK Buttons
Press and release the SEEK buttons to search for the next
channel in Satellite mode. Press the right switch to seek
up and the left switch to seek down. The radio will
remain tuned to the new channel until you make another
selection. Holding either button will bypass channels
without stopping until you release it.
SCAN Button
Pressing the SCAN button causes the tuner to search for
the next channel, pausing for 8 seconds before continuing
to the next. To stop the search, press the SCAN button a
second time.
INFO Button
Pressing the INFO button will cycle between Artist, Song
Title, and Composer (if available) information. Also,
pressing and holding the INFO button for an additional
INSTRUMENT PANEL AND CONTROLS 203
4
Page 204 of 426

3 seconds will make the radio display the Song Title all of
the time (press and hold again to return to normal
display).
RW/FF
Pressing the RW (Rewind) or FF (Fast Forward) buttons
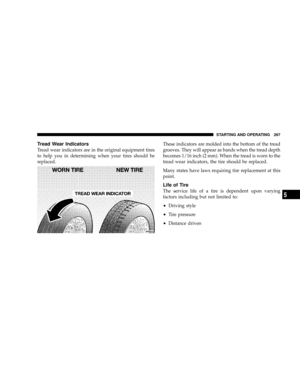
causes the tuner to search for the next channel in the
direction of the arrows.
TUNE Control (Rotary)
Turn the right side rotary control clockwise to increase or
counter-clockwise to decrease the channel.
MUSIC TYPE Button
Pressing this button once will turn on the Music Type
mode for 5 seconds. Pressing the MUSIC TYPE button or
turning the TUNE control knob within 5 seconds will
allow the program format type to be selected.
Toggle the MUSIC TYPE button again to select the music
type.By pressing the SEEK button when the Music Type
function is active, the radio will be tuned to the next
channel with the same selected Music Type name.
If a preset button is activated while in the Music Type
(Program Type) mode, the Music Type mode will be
exited and the radio will tune to the preset channel.
SETUP Button
Pressing the SETUP button allows you to select the
following items:
²Display Sirius ID number Ð Press the SELECT button
to display the Sirius ID number. This number is used
to activate, deactivate, or change the Sirius subscrip-
tion.
SET Button Ð To Set the Push-Button Memory
When you are receiving a channel that you wish to
commit to push-button memory, press the SET button.
The symbol SET 1 will now show in the display window.
204 INSTRUMENT PANEL AND CONTROLS
Page 205 of 426

Select the button (1-6) you wish to lock onto this channel
and press and release that button. If a button is not
selected within 5 seconds after pressing the SET button,
the channel will continue to play but will not be stored
into push-button memory.
You may add a second channel to each push-button by
repeating the above procedure with this exception: Press
the SET button twice and SET 2 will show in the display
window. Each button can be set for SET 1 and SET 2. This
allows a total of 12 Satellite channels to be stored into
push-button memory. The channels stored in SET 2
memory can be selected by pressing the push-button
twice.
Every time a preset button is used, a corresponding
button number will display.
Buttons1-6
These buttons tune the radio to the channels that you
commit to push-button memory {12 Satellite stations}.
Operating Instructions - Hands Free Phone (If
Equipped)
Refer to ªHands-Free Communication (UConnectŸ)º in
Section 3 of this manual.
Operating Instructions - Video Entertainment
System (VESŸ) (If Equipped)
Refer to separate ªVideo Entertainment System (VESŸ)
Guide.º
REMOTE SOUND SYSTEM CONTROLS Ð IF
EQUIPPED
The remote sound system controls are located on the rear
surface of the steering wheel. Reach behind the wheel to
access the switches.
INSTRUMENT PANEL AND CONTROLS 205
4
Page 206 of 426

The right hand control is a rocker type switch with a push
button in the center. Pressing the top of the switch will
increase the volume and pressing the bottom of the
switch will decrease the volume.
The button located in the center of the right hand control
will switch modes to Radio or CD.The left hand control is a rocker type switch with a push
button in the center. The function of the left hand control
is different depending on which mode you are in.
The following describes the left hand control operation in
each mode.
Radio Operation
Pressing the top of the switch will SEEK up for the next
listenable station and pressing the bottom of the switch
will SEEK down for the next listenable station.
The button located in the center of the left hand control
will tune to the next pre-set station that you have
programmed in the radio pre-set push-buttons.
CD Player
Pressing the top of the switch once will go to the next
track on the CD. Pressing the bottom of the switch once
206 INSTRUMENT PANEL AND CONTROLS
Page 207 of 426

will go to the beginning of the current track or to the
beginning of the previous track if it is within one second
after the current track begins to play.
If you press the switch up or down twice it plays the
second track, three times, it will play the third, etc.
The button in the center of the left hand switch changes
CD's on the 6±Disc in-dash CD changer radio. This
button does not function for all other radios.
COMPACT DISC MAINTENANCE
To keep the compact discs in good condition, take the
following precautions:
1. Handle the disc by its edge; avoid touching the
surface.
2. If the disc is stained, clean the surface with a soft cloth,
wiping from center to edge.3. Do not apply paper or tape to the disc; avoid scratch-
ing the disc.
4. Do not use solvents such as benzine, thinner, cleaners,
or antistatic sprays.
5. Store the disc in its case after playing.
6. Do not expose the disc to direct sunlight.
7. Do not store the disc where temperatures may become
too high.
NOTE:If you experience difficulty in playing a particu-
lar disc, it may be damaged (i.e. scratched, reflective
coating removed, a hair, moisture or dew on the disc)
oversized, or have theft protection encoding. Try a
known good disc before considering disc player service.
INSTRUMENT PANEL AND CONTROLS 207
4
Page 208 of 426
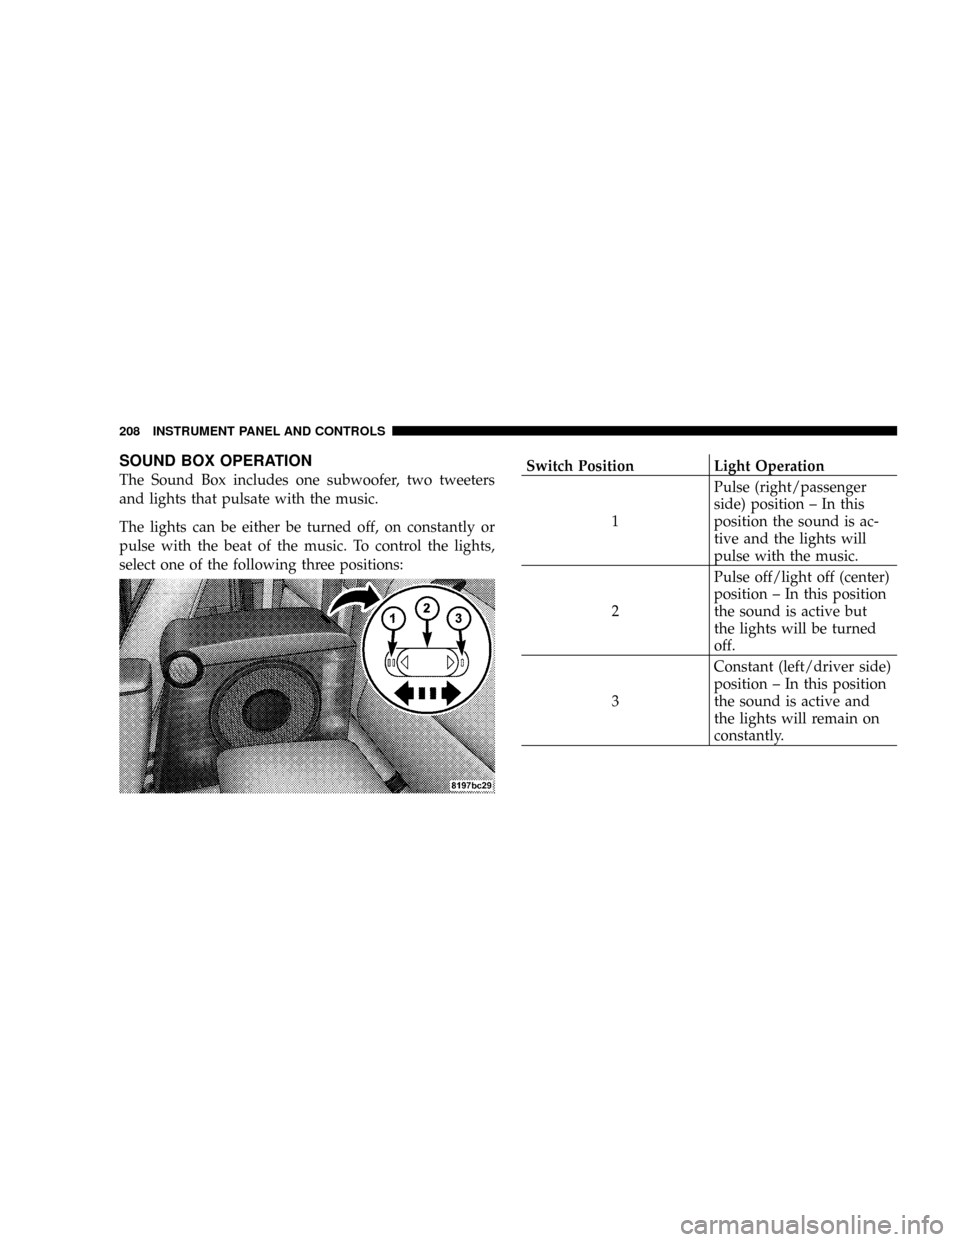
SOUND BOX OPERATION
The Sound Box includes one subwoofer, two tweeters
and lights that pulsate with the music.
The lights can be either be turned off, on constantly or
pulse with the beat of the music. To control the lights,
select one of the following three positions:Switch Position Light Operation
1Pulse (right/passenger
side) position ± In this
position the sound is ac-
tive and the lights will
pulse with the music.
2Pulse off/light off (center)
position ± In this position
the sound is active but
the lights will be turned
off.
3Constant (left/driver side)
position ± In this position
the sound is active and
the lights will remain on
constantly.
208 INSTRUMENT PANEL AND CONTROLS