2008 BMW 760I tow
[x] Cancel search: towPage 126 of 254

Things to remember when driving
124
Cargo loading
To avoid loading the tires beyond their
approved carrying capacity, never over-
load the vehicle. Overloading can lead to over-
heating of the tires and increases the rate at
which damage develops inside them. The ulti-
mate result can come in the form of a sudden
blow-out.<
Determining loading limit
1.Locate the following statement on your
vehicle's placard
*:
The combined weight of occupants
and cargo should never exceed
XXX lbs. or YYY kg; otherwise, the vehicle
may be damaged and unstable driving con-
ditions may result.<
2.Determine the combined weight of the
driver and passengers that will be riding in
your vehicle.
3.Subtract the combined weight of the driver
and passenger from XXX lbs. or YYY kg.
4.The resulting figure equals the available
amount of cargo and luggage load capacity.
For example, if the XXX amount equals
1400 lbs. and there will be five 150-lb. pas-
sengers in your vehicle, the amount of avail-
able cargo and luggage load capacity is
650 lbs.:
1400 lbs. minus 750 lbs. = 650 lbs.
5.Determine the combined weight of luggage
and cargo being loaded into the vehicle.
This weight may not safely exceed the avail-
able cargo and luggage load capacity calcu-
lated in step 4.6.If your vehicle will be towing a trailer, part of
the load from your trailer will be transferred
to your vehicle. Consult the manual for
transporting a trailer to determine how this
may reduce the available cargo and luggage
load capacity of the vehicle.
Load
The permissible load is the total of the weight of
occupants and cargo/luggage. The greater the
weight of occupants, the less cargo/luggage
can be transported.
Stowing cargo
>Place heavy cargo as far forward and as low
as possible, placing it directly behind the
bulkhead behind the rear seats.
>Cover sharp edges and corners.
>For very heavy cargo when the rear seat is
not occupied, secure each outside rear
safety belt in the opposite buckle.
Page 132 of 254
Starting navigation system
130
Starting navigation system
Your navigation system can use satellites to
ascertain the precise position of your vehicle
and guide you reliably to any destination you
enter.
Navigation CD/DVD
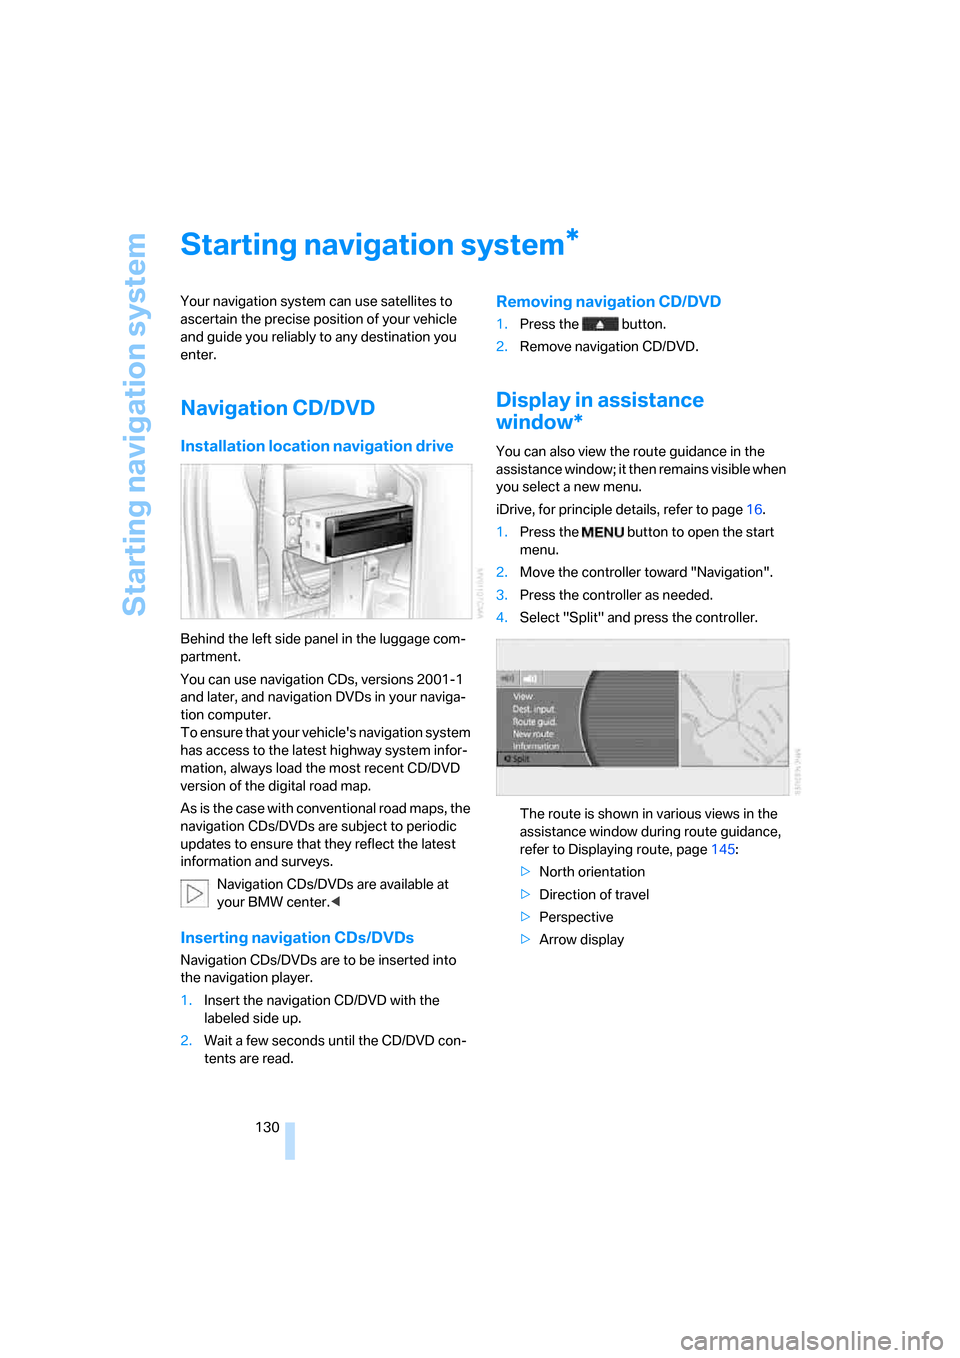
Installation location navigation drive
Behind the left side panel in the luggage com-
partment.
You can use navigation CDs, versions 2001-1
and later, and navigation DVDs in your naviga-
tion computer.
To ensure that your vehicle's navigation system
has access to the latest highway system infor-
mation, always load the most recent CD/DVD
version of the digital road map.
As is the case with conventional road maps, the
navigation CDs/DVDs are subject to periodic
updates to ensure that they reflect the latest
information and surveys.
Navigation CDs/DVDs are available at
your BMW center.<
Inserting navigation CDs/DVDs
Navigation CDs/DVDs are to be inserted into
the navigation player.
1.Insert the navigation CD/DVD with the
labeled side up.
2.Wait a few seconds until the CD/DVD con-
tents are read.
Removing navigation CD/DVD
1.Press the button.
2.Remove navigation CD/DVD.
Display in assistance
window*
You can also view the route guidance in the
assistance window; it then remains visible when
you select a new menu.
iDrive, for principle details, refer to page16.
1.Press the button to open the start
menu.
2.Move the controller toward "Navigation".
3.Press the controller as needed.
4.Select "Split" and press the controller.
The route is shown in various views in the
assistance window during route guidance,
refer to Displaying route, page145:
>North orientation
>Direction of travel
>Perspective
>Arrow display
*
Page 133 of 254
Navigation
Driving tips
131Reference
At a glance
Controls
Communications
Entertainment
Mobility
Destination input
When entering your destination, you can select
from among the following options:
>Entering destination manually, see below.
>Selecting destination using a map, refer to
page135.
>Selecting destination using information,
refer to page135.
>Selecting from among recent destinations,
refer to page137.
>Selecting destination from address book,
refer to page139.
>Selecting home address, refer to page141.
After selecting your destination you can pro-
ceed to start the route guidance, refer to
page144.
Enter data only when the vehicle is sta-
tionary, and always give priority to the
applicable traffic regulations in the event of any
contradiction between traffic and road condi-
tions and the instructions issued by the naviga-
tion system. If you do not comply with this pre-
caution, you can endanger vehicle occupants
and other road users.<
iDrive, for principle details, refer to page16.
1.Press the button to open the start
menu.
2.Move the controller toward "Navigation".
Entering destination
manually
The system relies on a wordmatch principle to
make it easier for you to enter the names of
towns or streets. It supports various spellings
as well as automatic name completion, refer to
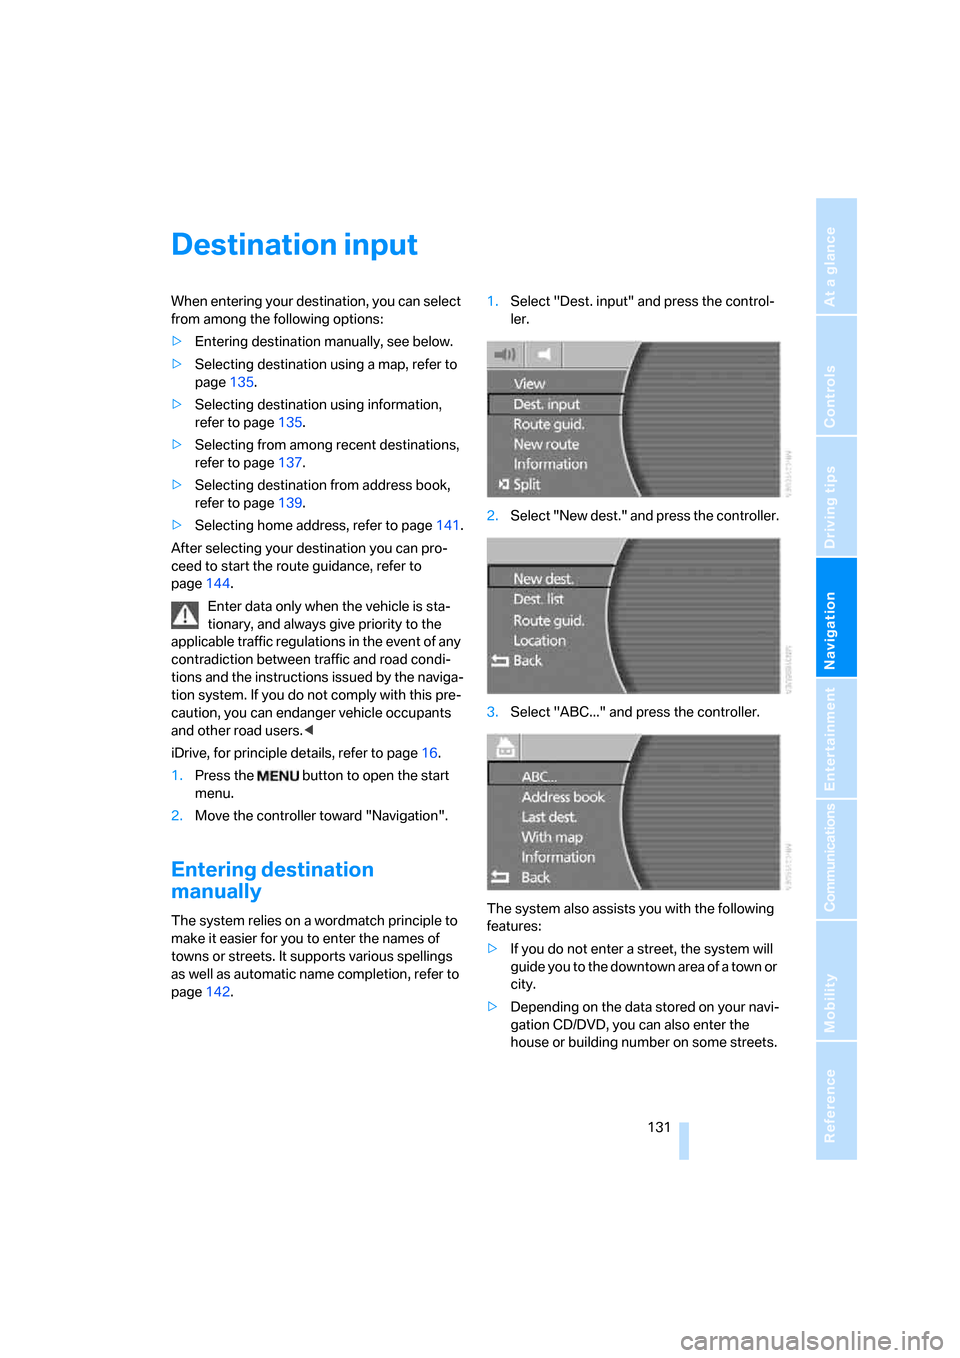
page142.1.Select "Dest. input" and press the control-
ler.
2.Select "New dest." and press the controller.
3.Select "ABC..." and press the controller.
The system also assists you with the following
features:
>If you do not enter a street, the system will
guide you to the downtown area of a town or
city.
>Depending on the data stored on your navi-
gation CD/DVD, you can also enter the
house or building number on some streets.
Page 134 of 254
Destination input
132 >You can skip the entry of country and city if
the existing entries should be retained for
your new destination.
Using the voice command system:
Entering name
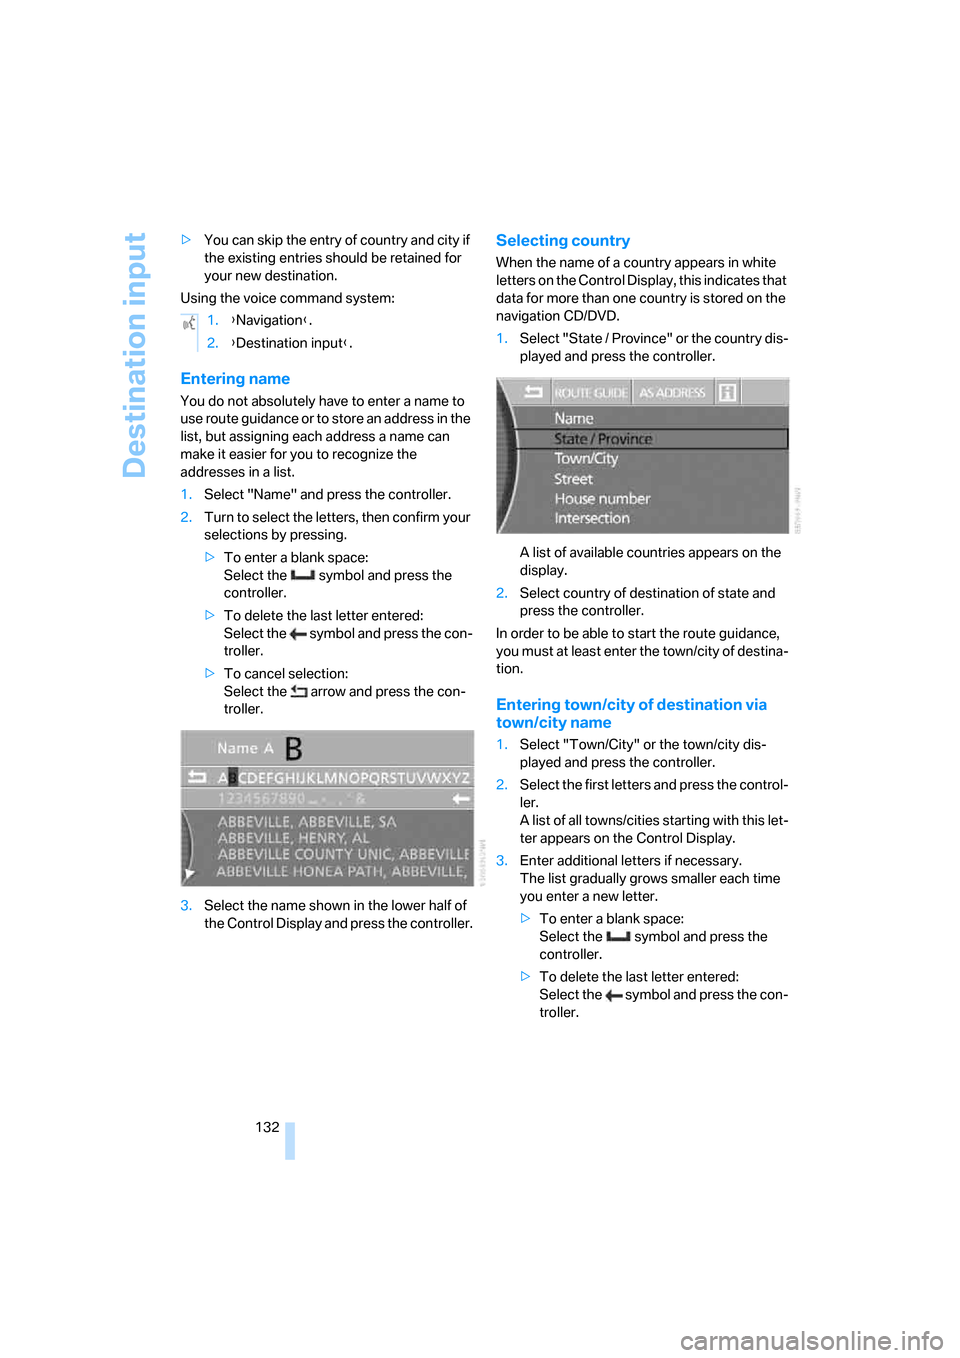
You do not absolutely have to enter a name to
use route guidance or to store an address in the
list, but assigning each address a name can
make it easier for you to recognize the
addresses in a list.
1.Select "Name" and press the controller.
2.Turn to select the letters, then confirm your
selections by pressing.
>To enter a blank space:
Select the symbol and press the
controller.
>To delete the last letter entered:
Select the symbol and press the con-
troller.
>To cancel selection:
Select the arrow and press the con-
troller.
3.Select the name shown in the lower half of
the Control Display and press the controller.
Selecting country
When the name of a country appears in white
letters on the Control Display, this indicates that
data for more than one country is stored on the
navigation CD/DVD.
1.Select "State / Province" or the country dis-
played and press the controller.
A list of available countries appears on the
display.
2.Select country of destination of state and
press the controller.
In order to be able to start the route guidance,
you must at least enter the town/city of destina-
tion.
Entering town/city of destination via
town/city name
1.Select "Town/City" or the town/city dis-
played and press the controller.
2.Select the first letters and press the control-
ler.
A list of all towns/cities starting with this let-
ter appears on the Control Display.
3.Enter additional letters if necessary.
The list gradually grows smaller each time
you enter a new letter.
>To enter a blank space:
Select the symbol and press the
controller.
>To delete the last letter entered:
Select the symbol and press the con-
troller. 1.{Navigation}.
2.{Destination input}.
Page 135 of 254
Navigation
Driving tips
133Reference
At a glance
Controls
Communications
Entertainment
Mobility
>To cancel selection:
Select the arrow and press the con-
troller.
4.Turn the controller to select place names in
the list and press the controller.
Entering town/city of destination with
zip code*
You can enter the zip code if the navigation CD/
DVD supports this function.
1.Select "City / Postal Code" and press the
controller.
2.Enter the zip code:
Select numbers individually and press the
controller each time.
>To enter a blank space:
Select the symbol and press the
controller.
>To delete last digit or letter:
Select the symbol and press the con-
troller.
>To cancel selection:
Select the arrow and press the con-
troller.
3.Select the zip code and press the controller.
The corresponding town/city of destination
is displayed.
4.Turn the controller to select place names in
the list and press the controller.
Entering street, house number, and
intersection
Entering street
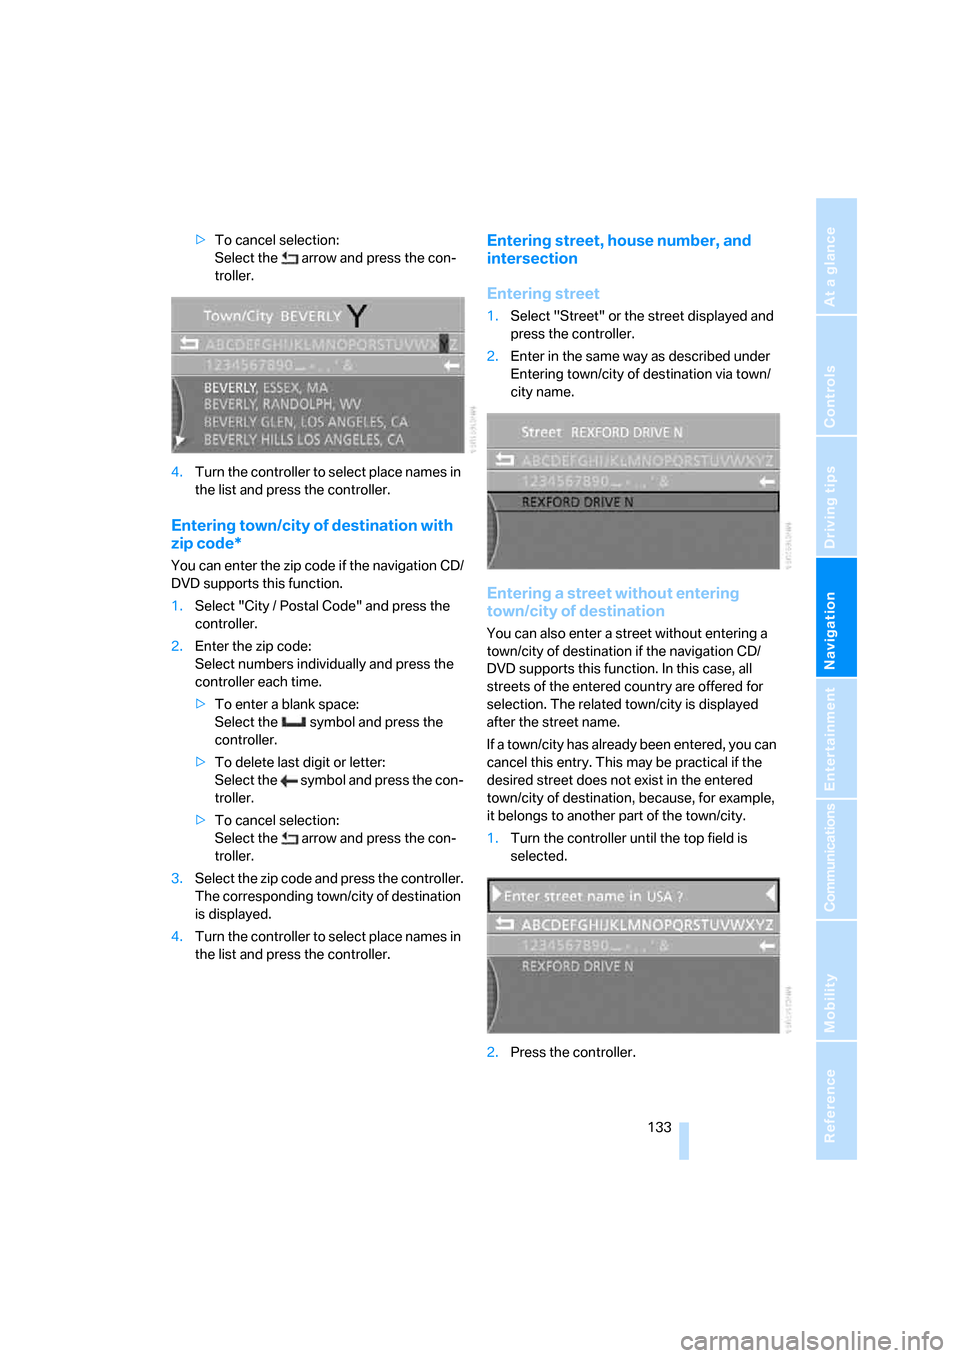
1.Select "Street" or the street displayed and
press the controller.
2.Enter in the same way as described under
Entering town/city of destination via town/
city name.
Entering a street without entering
town/city of destination
You can also enter a street without entering a
town/city of destination if the navigation CD/
DVD supports this function. In this case, all
streets of the entered country are offered for
selection. The related town/city is displayed
after the street name.
If a town/city has already been entered, you can
cancel this entry. This may be practical if the
desired street does not exist in the entered
town/city of destination, because, for example,
it belongs to another part of the town/city.
1.Turn the controller until the top field is
selected.
2.Press the controller.
Page 136 of 254
Destination input
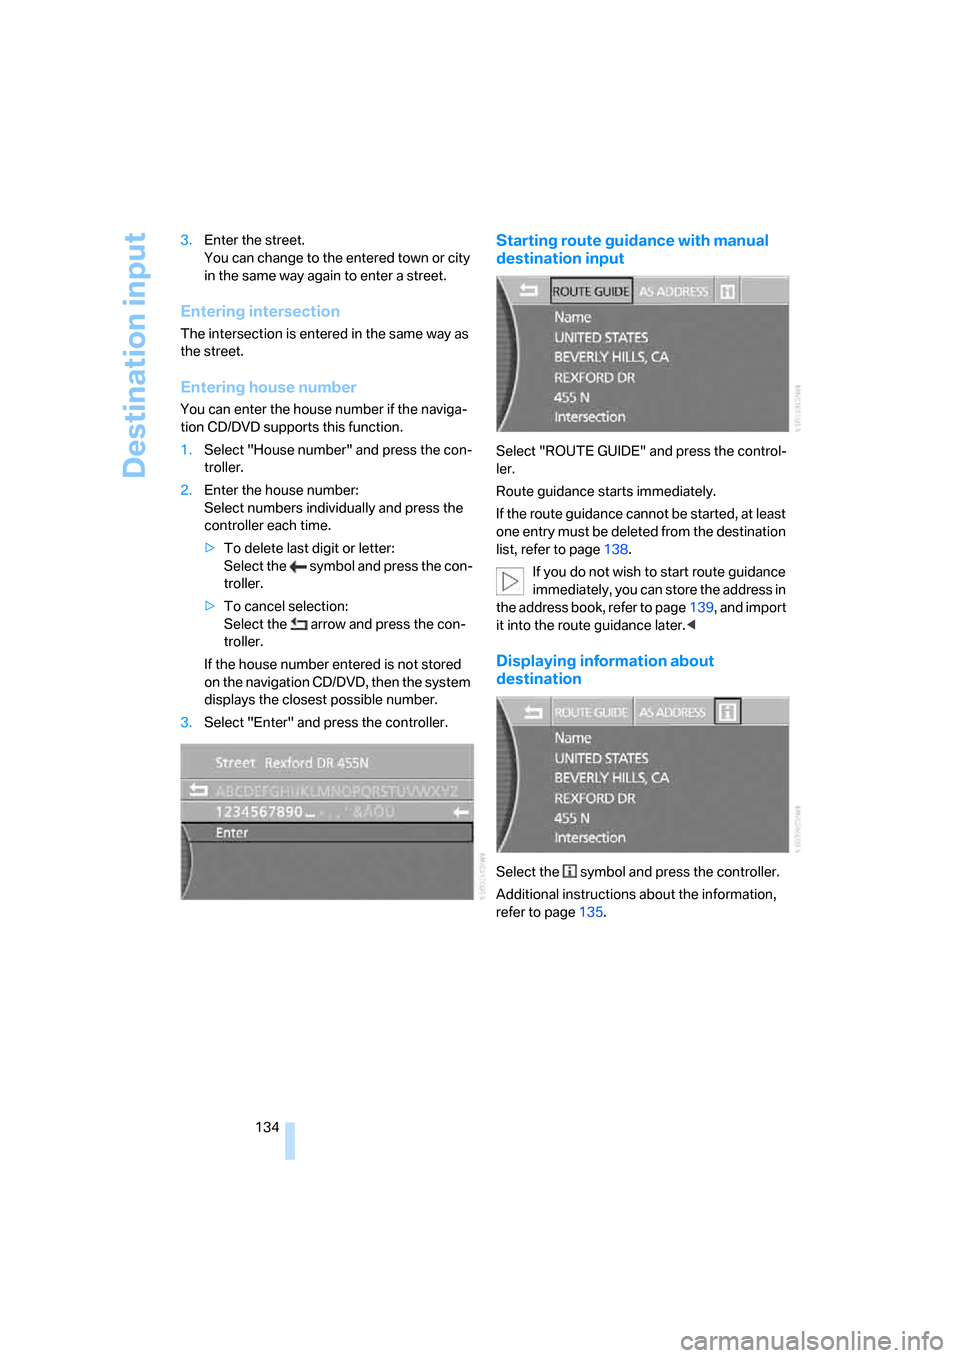
134 3.Enter the street.
You can change to the entered town or city
in the same way again to enter a street.
Entering intersection
The intersection is entered in the same way as
the street.
Entering house number
You can enter the house number if the naviga-
tion CD/DVD supports this function.
1.Select "House number" and press the con-
troller.
2.Enter the house number:
Select numbers individually and press the
controller each time.
>To delete last digit or letter:
Select the symbol and press the con-
troller.
>To cancel selection:
Select the arrow and press the con-
troller.
If the house number entered is not stored
on the navigation CD/DVD, then the system
displays the closest possible number.
3.Select "Enter" and press the controller.
Starting route guidance with manual
destination input
Select "ROUTE GUIDE" and press the control-
ler.
Route guidance starts immediately.
If the route guidance cannot be started, at least
one entry must be deleted from the destination
list, refer to page138.
If you do not wish to start route guidance
immediately, you can store the address in
the address book, refer to page139, and import
it into the route guidance later.<
Displaying information about
destination
Select the symbol and press the controller.
Additional instructions about the information,
refer to page135.
Page 137 of 254
Navigation
Driving tips
135Reference
At a glance
Controls
Communications
Entertainment
Mobility
Map-guided destination
selection
If you only know the street or location of the
town/city of destination, then you can enter the
destination using a map. You can select the
destination on the map using crosshairs and
then adopt it into the route guidance:
1.Select "Dest. input" and press the control-
ler.
2.Select "New dest." and press the controller.
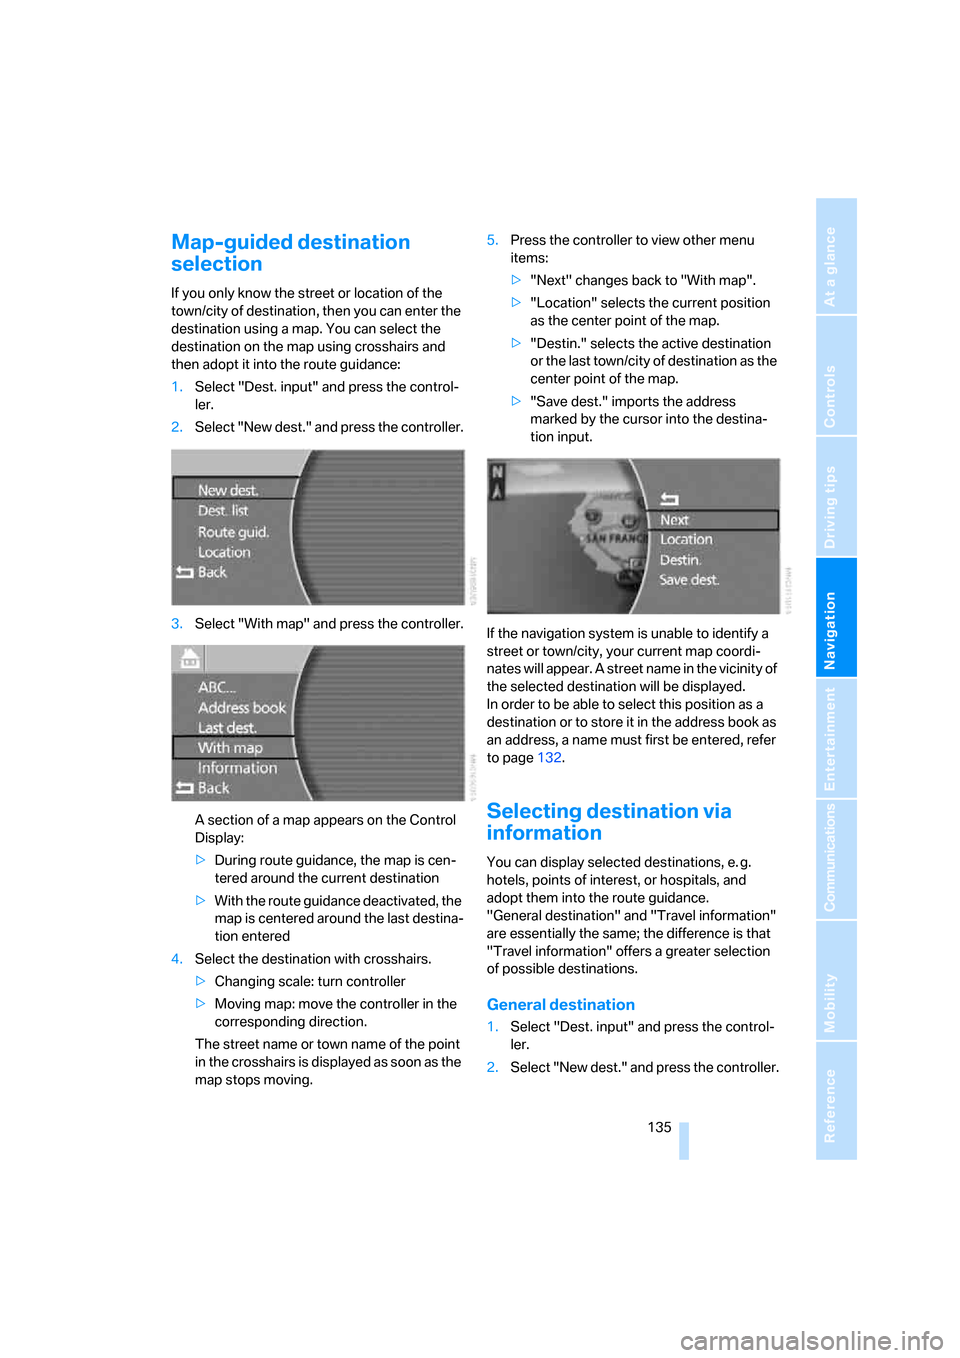
3.Select "With map" and press the controller.
A section of a map appears on the Control
Display:
>During route guidance, the map is cen-
tered around the current destination
>With the route guidance deactivated, the
map is centered around the last destina-
tion entered
4.Select the destination with crosshairs.
>Changing scale: turn controller
>Moving map: move the controller in the
corresponding direction.
The street name or town name of the point
in the crosshairs is displayed as soon as the
map stops moving.5.Press the controller to view other menu
items:
>"Next" changes back to "With map".
>"Location" selects the current position
as the center point of the map.
>"Destin." selects the active destination
or the last town/city of destination as the
center point of the map.
>"Save dest." imports the address
marked by the cursor into the destina-
tion input.
If the navigation system is unable to identify a
street or town/city, your current map coordi-
nates will appear. A street name in the vicinity of
the selected destination will be displayed.
In order to be able to select this position as a
destination or to store it in the address book as
an address, a name must first be entered, refer
to page132.
Selecting destination via
information
You can display selected destinations, e. g.
hotels, points of interest, or hospitals, and
adopt them into the route guidance.
"General destination" and "Travel information"
are essentially the same; the difference is that
"Travel information" offers a greater selection
of possible destinations.
General destination
1.Select "Dest. input" and press the control-
ler.
2.Select "New dest." and press the controller.
Page 138 of 254
Destination input
136 3.Select "Information" and press the control-
ler.
4.Select "General destination" and press the
controller.
5.Select "On location" and press the control-
ler.
6.Select from the individual categories of
information, e.g. select "Public places, busi-
ness and shopping" and press the control-
ler.
When selecting information "On
dest.", "On country" and "On town/
city", enter destination, country, and town/
city as needed. If destinations have already
been entered, information about the desti-
nation is displayed at the top of the destina-
tion list.<7.Make a different selection, e.g. industrial
centers.
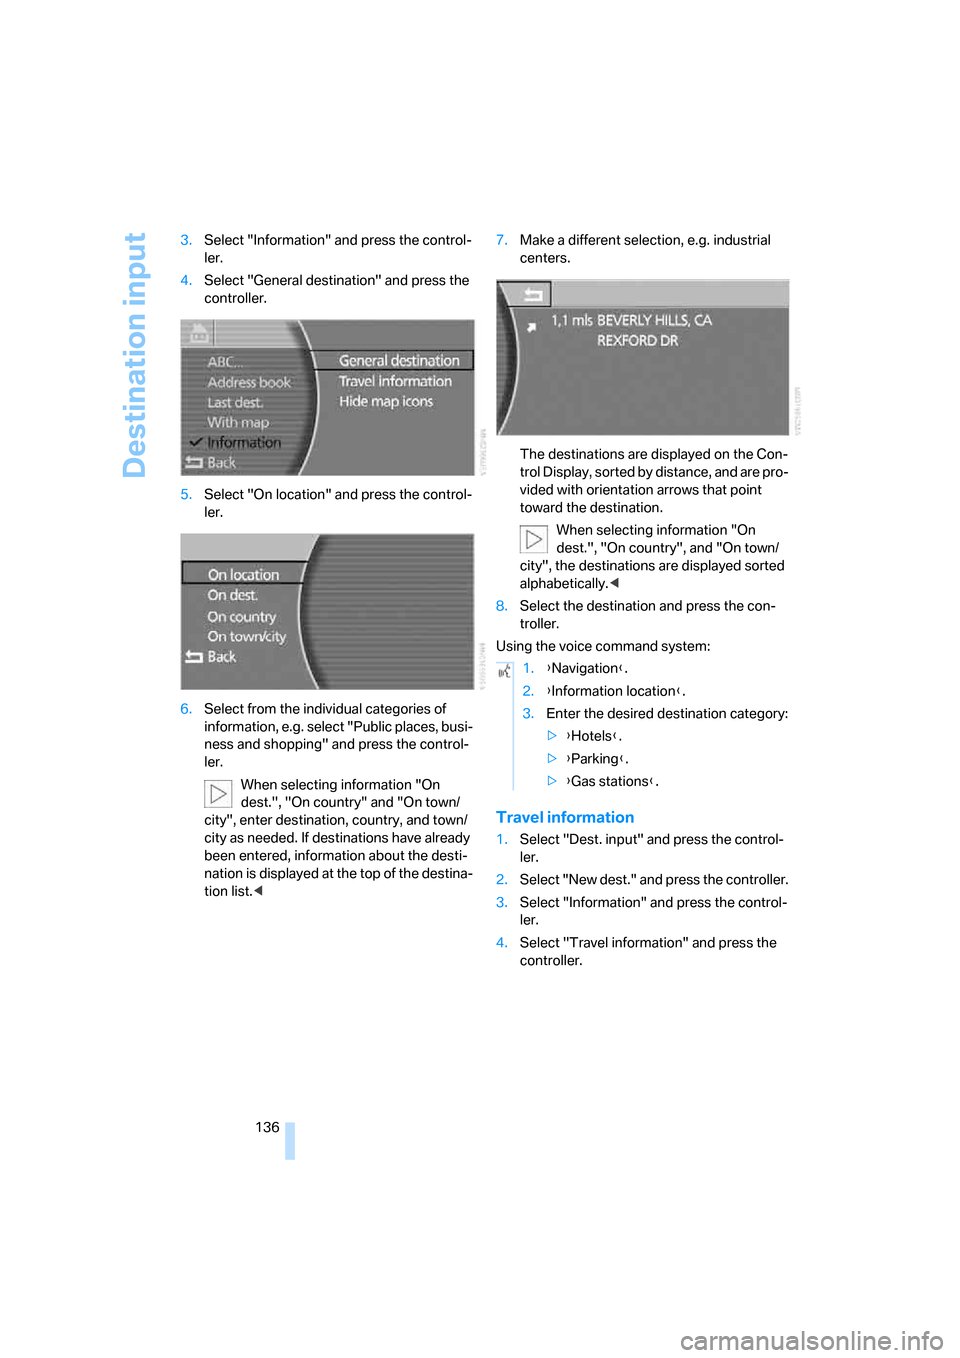
The destinations are displayed on the Con-
trol Display, sorted by distance, and are pro-
vided with orientation arrows that point
toward the destination.
When selecting information "On
dest.", "On country", and "On town/
city", the destinations are displayed sorted
alphabetically.<
8.Select the destination and press the con-
troller.
Using the voice command system:
Travel information
1.Select "Dest. input" and press the control-
ler.
2.Select "New dest." and press the controller.
3.Select "Information" and press the control-
ler.
4.Select "Travel information" and press the
controller.
1.{Navigation}.
2.{Information location}.
3.Enter the desired destination category:
>{Hotels}.
>{Parking}.
>{Gas stations}.