2008 BMW 760I tow
[x] Cancel search: towPage 162 of 254

Radio
160 please contact the nearest office of the National
Weather Service or write to the National
Weather Service at: W/OM1, National Oceanic
and Atmospheric Administration, 1325 East-
West Highway, Silver Spring, MD 20910.
Calling up weather reports
iDrive, for principle details, refer to page16.
1.Press the button to open the start
menu.
2.Move the controller toward "Entertain-
ment".
3.Select "WB" and press the controller.
A list of the available channels is displayed.
4.Turn the controller until the desired channel
is selected and press the controller.
The display shows a list of weather band sta-
tions
In some regions, only one or two channels
can be received or Weather Band chan-
nels are unavailable.<
Using the voice command system
Satellite radio*
You can receive approx. 100 different channels
with high sound quality.
The channels are offered to you in predefined
packages. To listen to the channels of your
choice, you must have these channels enabled.
With this new technology the signal may fail,
causing interruptions in reception.Using the voice command system:
Enabling or disabling channels
iDrive, for principle details, refer to page16.
1.Press the button to open the start
menu.
2.Move the controller toward "Entertain-
ment".
3.Select "SAT" and press the controller.
4.Select "Channels" and press the controller.
The channels that can be received are
shown in the list.
5.Select channel and press the controller.
A phone number and the electronic serial
number, ESN, are displayed.
The electronic serial number is
required to enable or disable.<
6.Dial the displayed telephone number to
have the channel enabled or disabled.
During the enabling or disabling process,
leave the ignition switched on.
These channels are enabled.
Channel selection
Using buttons in center console
Press the button for the corresponding
direction until you reach the next station.
Using the voice command system: 1.{Weatherband}.
2.{Channel 1...7}.
1.{Satellite Radio} or {SDARS}.
2.{Turn on}.
1.{Satellite Radio} or {SDARS}.
2.{Previous station} or {Next station}
Page 164 of 254
Radio
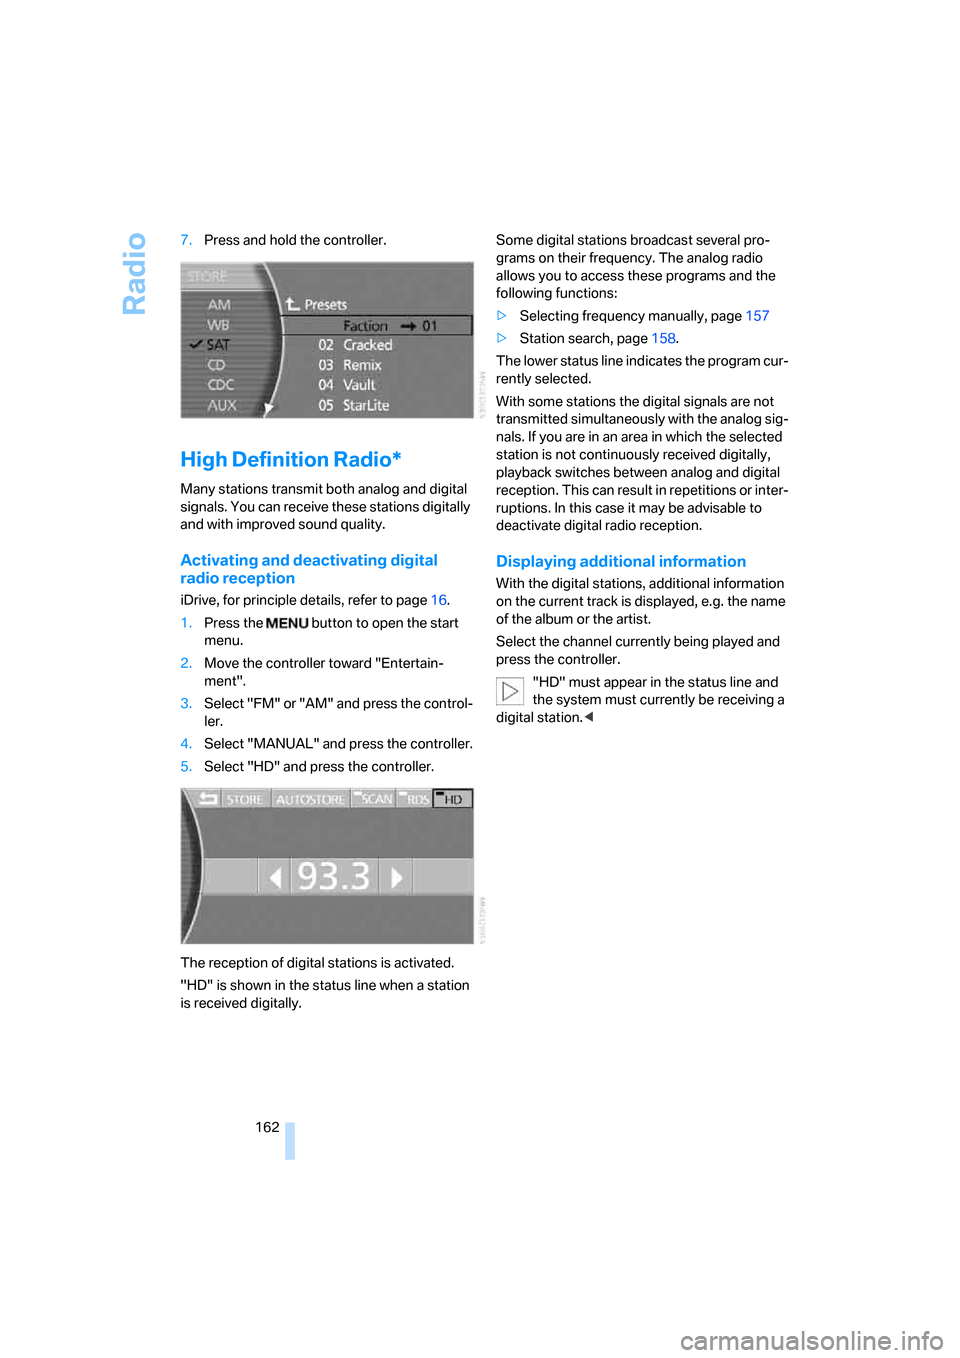
162 7.Press and hold the controller.
High Definition Radio*
Many stations transmit both analog and digital
signals. You can receive these stations digitally
and with improved sound quality.
Activating and deactivating digital
radio reception
iDrive, for principle details, refer to page16.
1.Press the button to open the start
menu.
2.Move the controller toward "Entertain-
ment".
3.Select "FM" or "AM" and press the control-
ler.
4.Select "MANUAL" and press the controller.
5.Select "HD" and press the controller.
The reception of digital stations is activated.
"HD" is shown in the status line when a station
is received digitally.Some digital stations broadcast several pro-
grams on their frequency. The analog radio
allows you to access these programs and the
following functions:
>Selecting frequency manually, page157
>Station search, page158.
The lower status line indicates the program cur-
rently selected.
With some stations the digital signals are not
transmitted simultaneously with the analog sig-
nals. If you are in an area in which the selected
station is not continuously received digitally,
playback switches between analog and digital
reception. This can result in repetitions or inter-
ruptions. In this case it may be advisable to
deactivate digital radio reception.
Displaying additional information
With the digital stations, additional information
on the current track is displayed, e.g. the name
of the album or the artist.
Select the channel currently being played and
press the controller.
"HD" must appear in the status line and
the system must currently be receiving a
digital station.<
Page 165 of 254
Navigation
Entertainment
Driving tips
163Reference
At a glance
Controls
Communications
Mobility
CD player
Listening to CDs
1.Switch Entertainment sound output on,
refer to page153.
2.Insert the CD with the labeled side up.
The CD is automatically pulled in.
To start playback when a CD is already in
the player:
iDrive, for principle details, refer to page16.
1.Press the button to open the start
menu.
2.Move the controller toward "Entertain-
ment".
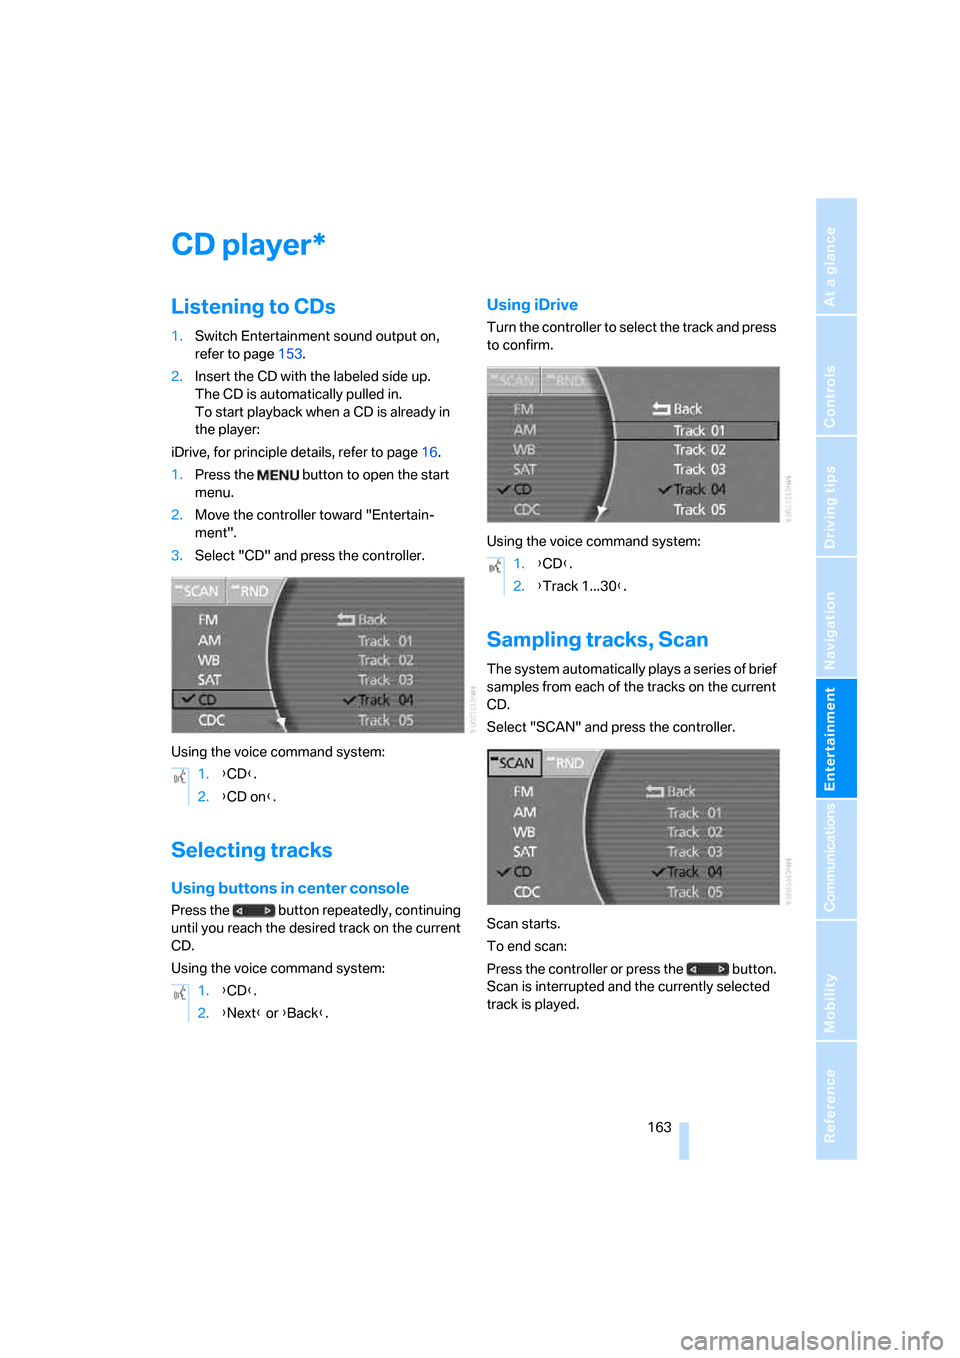
3.Select "CD" and press the controller.
Using the voice command system:
Selecting tracks
Using buttons in center console
Press the button repeatedly, continuing
until you reach the desired track on the current
CD.
Using the voice command system:
Using iDrive
Turn the controller to select the track and press
to confirm.
Using the voice command system:
Sampling tracks, Scan
The system automatically plays a series of brief
samples from each of the tracks on the current
CD.
Select "SCAN" and press the controller.
Scan starts.
To end scan:
Press the controller or press the button.
Scan is interrupted and the currently selected
track is played.
*
1.{CD}.
2.{CD on}.
1.{CD}.
2.{Next} or {Back}.
1.{CD}.
2.{Track 1...30}.
Page 167 of 254
Navigation
Entertainment
Driving tips
165Reference
At a glance
Controls
Communications
Mobility
CD changer
Installation location
The BMW CD changer for six CDs is installed
above the glove compartment.
Compressed audio files
The CD changer can play CDs with compressed
audio files, such as MP3s.
Removing CD magazine
To insert CDs into the CD magazine or remove
them from it, you must first remove the maga-
zine from the CD changer:
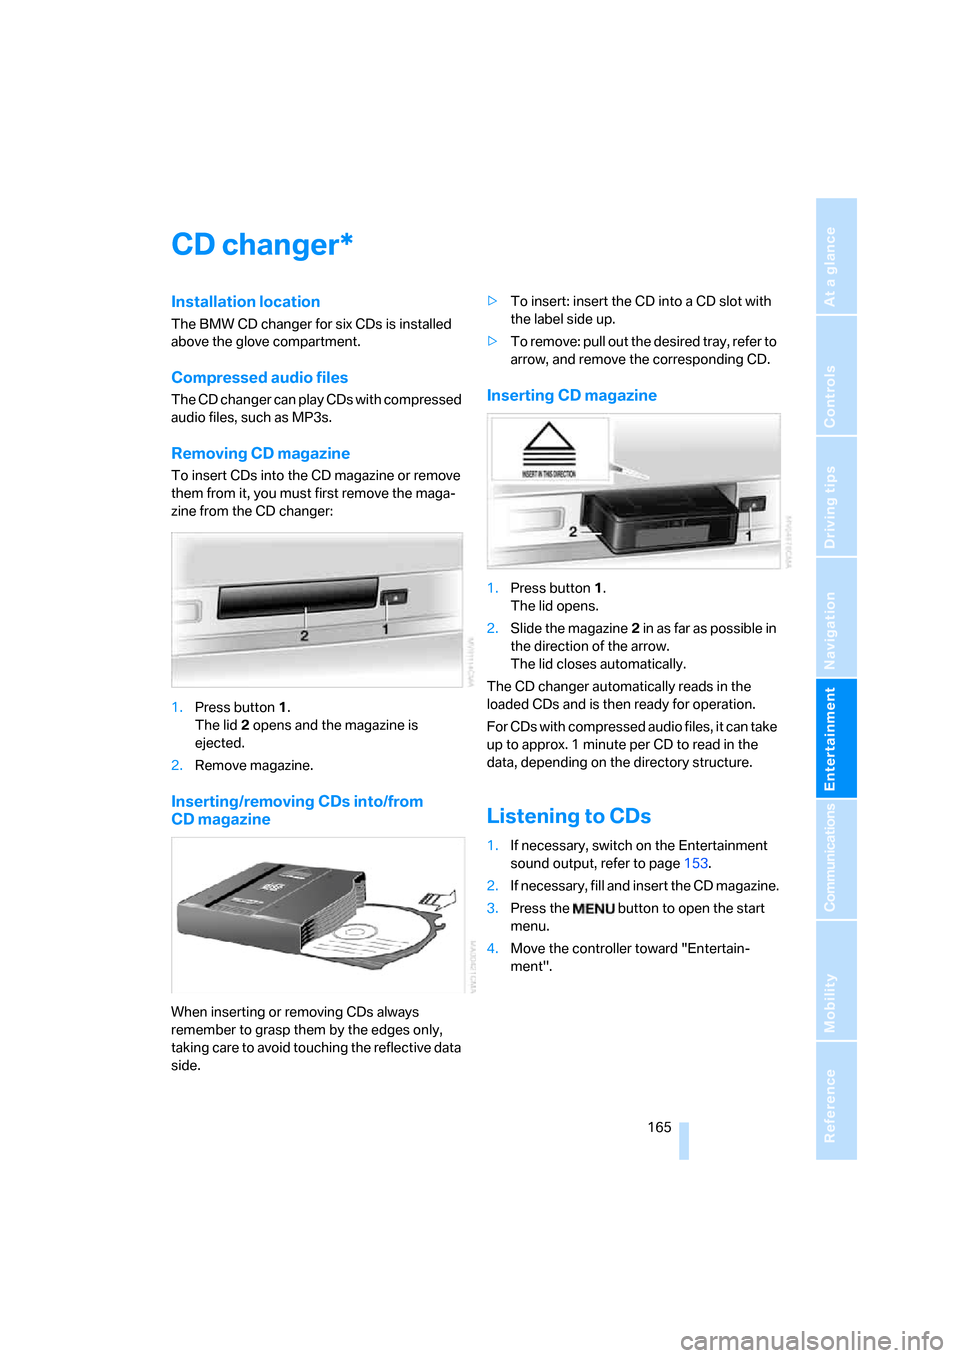
1.Press button1.
The lid2 opens and the magazine is
ejected.
2.Remove magazine.
Inserting/removing CDs into/from
CD magazine
When inserting or removing CDs always
remember to grasp them by the edges only,
taking care to avoid touching the reflective data
side.>To insert: insert the CD into a CD slot with
the label side up.
>To remove: pull out the desired tray, refer to
arrow, and remove the corresponding CD.
Inserting CD magazine
1.Press button1.
The lid opens.
2.Slide the magazine2 in as far as possible in
the direction of the arrow.
The lid closes automatically.
The CD changer automatically reads in the
loaded CDs and is then ready for operation.
For CDs with compressed audio files, it can take
up to approx. 1 minute per CD to read in the
data, depending on the directory structure.
Listening to CDs
1.If necessary, switch on the Entertainment
sound output, refer to page153.
2.I f n ec e s s a r y, f il l a n d i n s e r t t h e C D m a g a z in e .
3.Press the button to open the start
menu.
4.Move the controller toward "Entertain-
ment".
*
Page 171 of 254
Navigation
Entertainment
Driving tips
169Reference
At a glance
Controls
Communications
Mobility
External audio device
You can connect an external audio device, for
instance an MP3 player, and output the sound
to vehicle's speaker system. You can adjust the
tone using iDrive.
It is recommended that the external audio
device be set to a mid-level volume and neutral
tone settings. The tone may depend on the
quality of the audio data.
Connecting
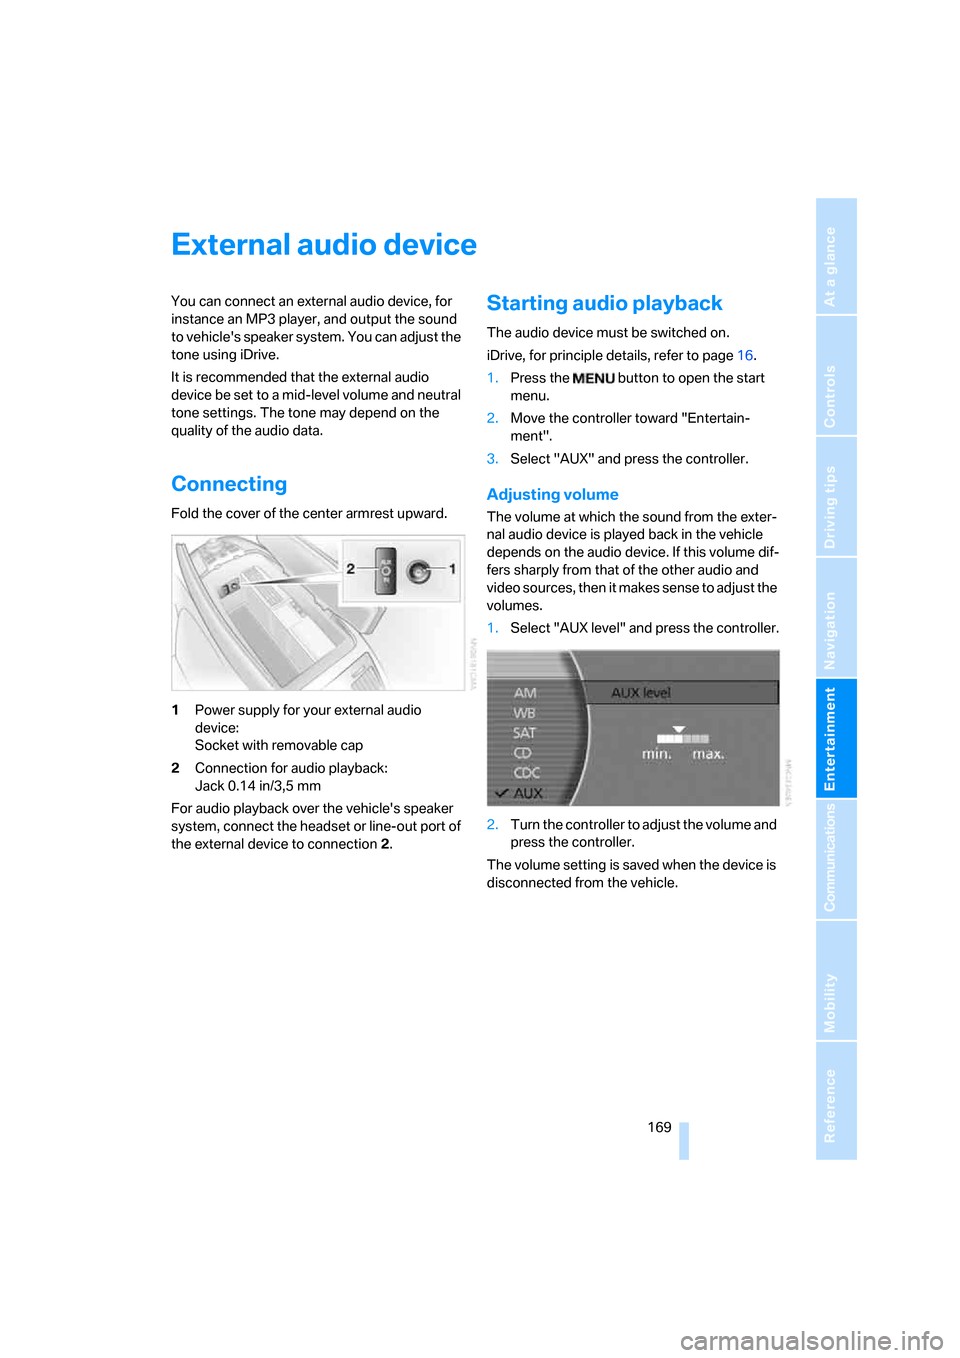
Fold the cover of the center armrest upward.
1Power supply for your external audio
device:
Socket with removable cap
2Connection for audio playback:
Jack 0.14 in/3,5 mm
For audio playback over the vehicle's speaker
system, connect the headset or line-out port of
the external device to connection 2.
Starting audio playback
The audio device must be switched on.
iDrive, for principle details, refer to page16.
1.Press the button to open the start
menu.
2.Move the controller toward "Entertain-
ment".
3.Select "AUX" and press the controller.
Adjusting volume
The volume at which the sound from the exter-
nal audio device is played back in the vehicle
depends on the audio device. If this volume dif-
fers sharply from that of the other audio and
video sources, then it makes sense to adjust the
volumes.
1.Select "AUX level" and press the controller.
2.Turn the controller to adjust the volume and
press the controller.
The volume setting is saved when the device is
disconnected from the vehicle.
Page 173 of 254
Navigation
Entertainment
Driving tips
171Reference
At a glance
Controls
Communications
Mobility
DVD country codes
Your DVD changer will only play back DVDs
coded for your home region, e.g. USA,
Canada = 1. The country code supported by
your DVD is indicated in the information sup-
plied with the DVD. This coding cannot be
changed. An overview of the six coding zones:
DVDs with the Code 0 can be played on
all devices.<
Playing DVDs
Playback is only possible on the rear seat
screen, refer to Rear seat screen
* on page21.
1.If necessary, switch on the Entertainment
sound output, refer to page153.
2.If necessary, fill and insert the DVD maga-
zine.
3.Press the button to open the start
menu.
4.Move the controller toward "Entertain-
ment".
5.Select "DVD" and press the controller.After a few seconds, play will resume at the
point where playback was previously inter-
rupted.
The DVD magazine's load status is indicated on
the Control Display.
If the display fails to detect a DVD that you
have loaded into the magazine, make sure
that the DVD has been inserted correctly and
inspect it for signs of defects.
If there are audio CDs in the DVD magazine,
these will not be displayed in the DVD menu,
but instead in the CD changer menu.<
Using the voice command system:
DVD control
With the DVD controller, you can select the
track and chapter, open the DVD-specific menu
and operate functions such as Language, Fast
forward and Reverse or Freeze frame.
A DVD can briefly deactivate functions of the
DVD control, under certain circumstances even
during playback of the entire DVD. It is not pos-
sible to operate the DVD control under these
circumstances. In this case, try to make the
selection using the DVD-specific menu.
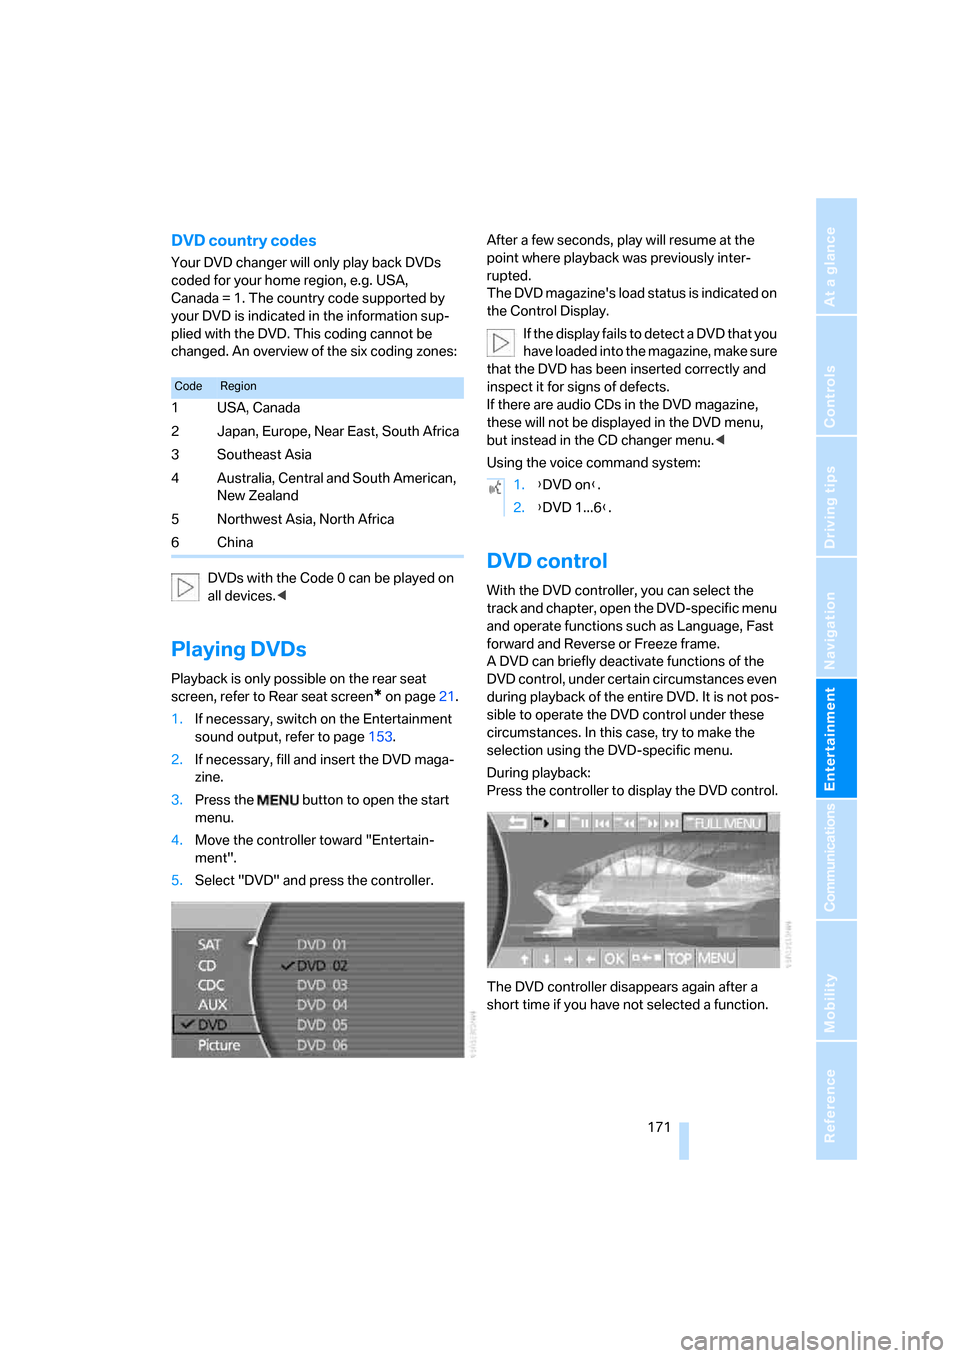
During playback:
Press the controller to display the DVD control.
The DVD controller disappears again after a
short time if you have not selected a function.
CodeRegion
1USA, Canada
2 Japan, Europe, Near East, South Africa
3Southeast Asia
4 Australia, Central and South American,
New Zealand
5Northwest Asia, North Africa
6China
1.{DVD on}.
2.{DVD 1...6}.
Page 184 of 254

Getting started
182 2.Remove the protective cap from the mobile
phone's antenna connector if necessary, so
that the mobile phone can engage in the
snap-in adapter.
3.Push the mobile phone downward toward
the electrical connections, arrow1, and
press forward, arrow2, until it engages.
The battery is charged starting from radio ready
state of the vehicle, refer to charge indicator on
mobile phone.
Removing mobile phone
To remove mobile phone, depending on model:
>Press the button.
>Push the button upward.
Pairing mobile phone with
vehicle
To pair your mobile phone with the vehicle, you
need a special Bluetooth passkey. This is
included in the information kit.
The following prerequisites must be met:
>The ignition is switched on.
>The mobile phone is ready for operation.>The Bluetooth connections in the vehicle
and the mobile phone are activated.
>Depending on the mobile phone model,
certain presets are required on the mobile
phone, e.g. detecting, connecting or pairing
Bluetooth unit, refer to the operating
instructions of your mobile phone.
Only pair the mobile phone with the vehi-
cle stopped; otherwise, the passengers
and other road user can be endangered due to a
lack of attentiveness on the part of the driver.<
Preparation via iDrive
iDrive, for principle details, refer to page16.
1.Press the button to open the start
menu.
2.Move the controller toward "Settings".
3.Select "Phone" and press the controller.
4.Select "PAIRING" and press the controller.
The three LEDs in the status line flash, refer
to page20.
The mobile phone can also be paired
with the vehicle via "Communica-
tion". When pairing, follow the instructions
that appear in the Control Display.<
Establishing connection between
mobile phone and vehicle
5.Additional operations must be carried out
on the mobile phone and differ depending
on the model, refer to the operating instruc-
tions of your mobile phone, e.g. under
searching for, connecting to, or linking to a
Bluetooth device.
6.Enter and confirm Bluetooth passkey using
your mobile phone keypad.
Following successful logon, the name of
Page 185 of 254

183
Entertainment
Reference
At a glance
Controls
Driving tips Communications
Navigation
Mobility
your mobile phone will appear on the Con-
trol Display.
The next time you use the mobile phone within
Bluetooth range of the vehicle, it will be
detected within a short time with the ignition
switched on.
As soon as the vehicle detects a mobile phone,
the phone book entries stored on the SIM card
and/or in your mobile phone are transmitted to
your vehicle. This transfer is dependent on your
mobile phone, refer to the operating instruc-
tions of your mobile phone if necessary, and
can take several minutes.
During each connection, the phone book
entries present in the vehicle are calibrated with
the phone book entries currently stored in the
mobile phone. The entries in the vehicle are
added to or deleted as needed in the process of
this.
Up to four mobile phones can be paired one
after the other. If you want to pair a fifth mobile
phone, the logon data of one mobile phone
must first be deleted, refer to Unpairing mobile
phone from vehicle.
Unpairing mobile phone from
vehicle
If you no longer want to operate a particular
mobile phone via the vehicle, you can delete the
pairing data of the mobile phone.
iDrive, for principle details, refer to page16.
1.Press the button to open the start
menu.
2.Move the controller toward "Settings".
3.Select "Phone" and press the controller.
4.Select the desired mobile phone and press
the controller.
5.Select "YES" and press the controller.
The unpaired mobile phone is deleted from
the list. The phone book entries for this
phone stored in the vehicle will also be deleted in the process of unpairing the
phone.
Activating/deactivating
Bluetooth link
Bluetooth technology is not approved in
all countries. Observe the applicable local
regulations. Temporarily deactivate the Blue-
tooth link between the vehicle and the mobile
phone if necessary.<
1.Press the button to open the start
menu.
2.Move the controller toward "Settings".
3.Select "Phone" and press the controller.
4.Select "BLUETOOTH" and press the con-
troller.
>The LED next to "BLUETOOTH" lights up
in green:
The Bluetooth connection is activated.
>The LED next to "BLUETOOTH" does not
light up:
The Bluetooth connection is deactivated.