Page 109 of 254

Controls
107Reference
At a glance
Driving tips
Communications
Navigation
Entertainment
Mobility
The interior temperature, air volume, and air
distribution can be set starting from the radio
ready state.
Switching cooling function on and off
manually
When activated, the air conditioner
mode cools and dehumidifies the
incoming air, reheating it as
required, depending on the temperature set-
ting. Depending on the weather, the windshield
may fog over briefly when the engine is started.
The cooling function is switched on automati-
cally with the AUTO program. The passenger
compartment can only be cooled with the
engine running.
Rear window defroster
The rear window defroster
switches off automatically after a
while. Depending on your equip-
ment package, the upper wires are used as an
antenna and are not part of the rear window
defroster.
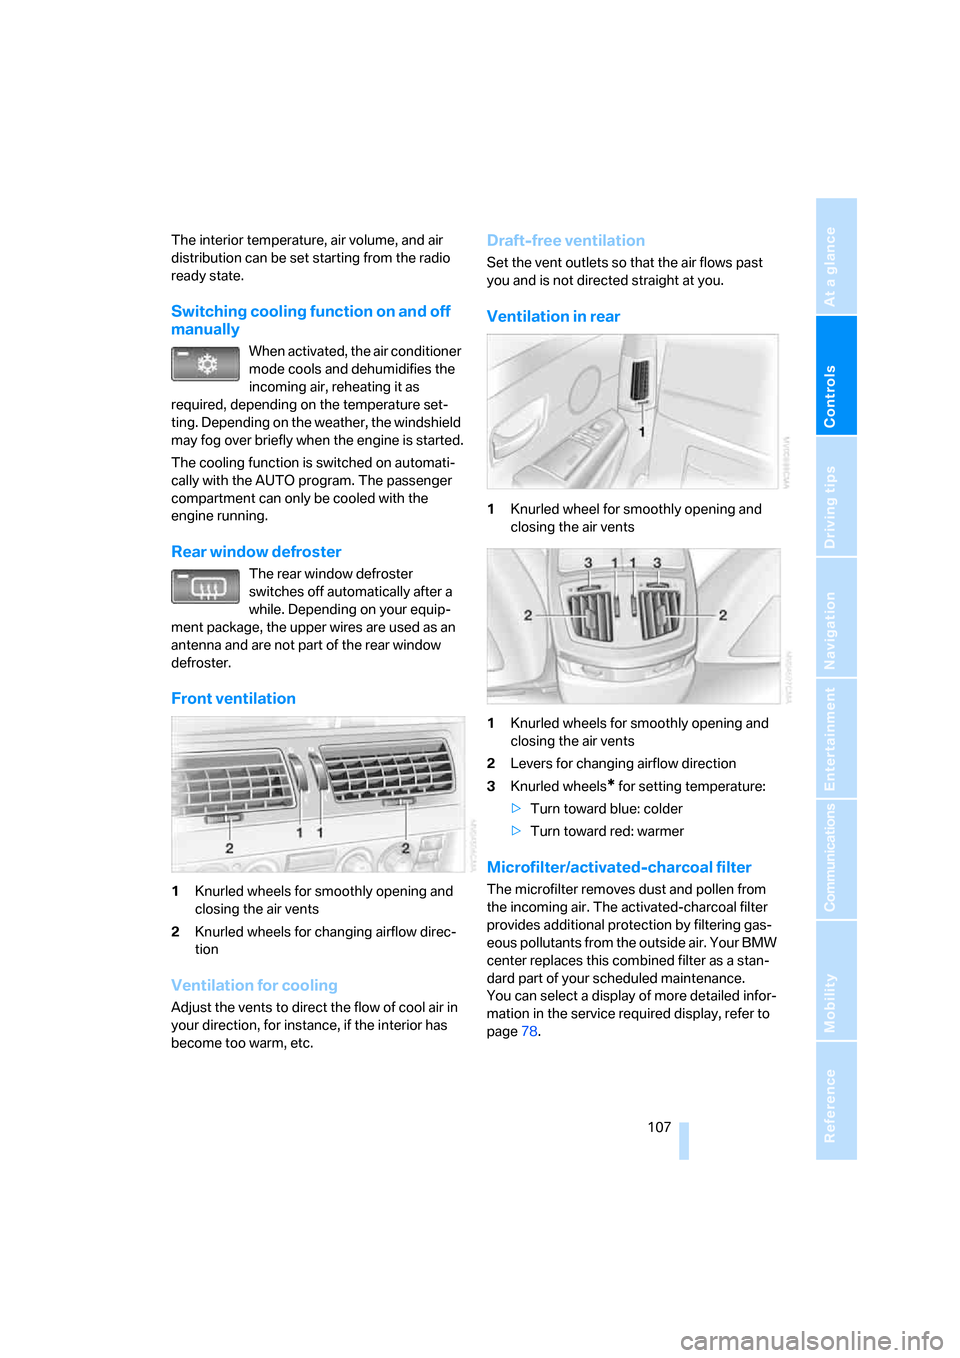
Front ventilation
1Knurled wheels for smoothly opening and
closing the air vents
2Knurled wheels for changing airflow direc-
tion
Ventilation for cooling
Adjust the vents to direct the flow of cool air in
your direction, for instance, if the interior has
become too warm, etc.
Draft-free ventilation
Set the vent outlets so that the air flows past
you and is not directed straight at you.
Ventilation in rear
1Knurled wheel for smoothly opening and
closing the air vents
1Knurled wheels for smoothly opening and
closing the air vents
2Levers for changing airflow direction
3Knurled wheels
* for setting temperature:
>Turn toward blue: colder
>Turn toward red: warmer
Microfilter/activated-charcoal filter
The microfilter removes dust and pollen from
the incoming air. The activated-charcoal filter
provides additional protection by filtering gas-
eous pollutants from the outside air. Your BMW
center replaces this combined filter as a stan-
dard part of your scheduled maintenance.
You can select a display of more detailed infor-
mation in the service required display, refer to
page78.
Page 110 of 254

Climate
108
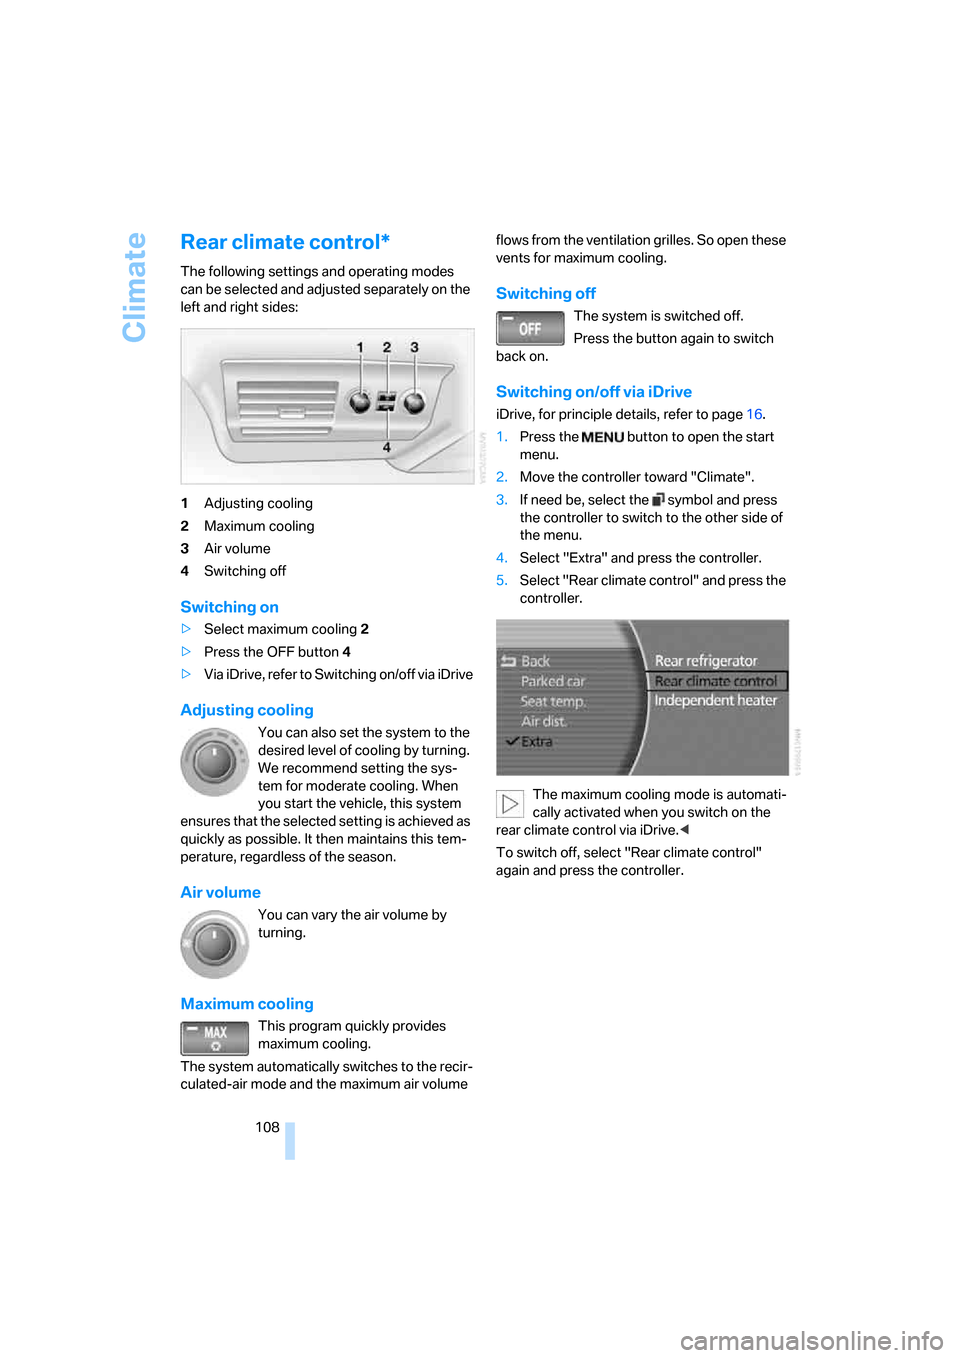
Rear climate control*
The following settings and operating modes
can be selected and adjusted separately on the
left and right sides:
1Adjusting cooling
2Maximum cooling
3Air volume
4Switching off
Switching on
>Select maximum cooling2
>Press the OFF button 4
>Via iDrive, refer to Switching on/off via iDrive
Adjusting cooling
You can also set the system to the
desired level of cooling by turning.
We recommend setting the sys-
tem for moderate cooling. When
you start the vehicle, this system
ensures that the selected setting is achieved as
quickly as possible. It then maintains this tem-
perature, regardless of the season.
Air volume
You can vary the air volume by
turning.
Maximum cooling
This program quickly provides
maximum cooling.
The system automatically switches to the recir-
culated-air mode and the maximum air volume flows from the ventilation grilles. So open these
vents for maximum cooling.
Switching off
The system is switched off.
Press the button again to switch
back on.
Switching on/off via iDrive
iDrive, for principle details, refer to page16.
1.Press the button to open the start
menu.
2.Move the controller toward "Climate".
3.If need be, select the symbol and press
the controller to switch to the other side of
the menu.
4.Select "Extra" and press the controller.
5.Select "Rear climate control" and press the
controller.
The maximum cooling mode is automati-
cally activated when you switch on the
rear climate control via iDrive.<
To switch off, select "Rear climate control"
again and press the controller.
Page 111 of 254

Controls
109Reference
At a glance
Driving tips
Communications
Navigation
Entertainment
Mobility
Ventilation in rear
Use the lever1 to vary the airflow direction.
For additional information on rear ventilation
options, refer to page107.
Parked car ventilation
The parked car ventilation blows air into the
passenger compartment to reduce interior tem-
peratures.
You can set two different times for the system
to start. The system is operated via iDrive.
It remains switched on for 30 minutes.
Since the system uses a substantial amount of
electrical current, you should refrain from acti-
vating it twice in succession without allowing
the battery to be recharged in normal operation
between uses.
With a preselected switch-on time, the parked
car ventilation is switched on at an outside tem-
perature of 597/156 or greater. When oper-
ated manually, it is ready for use at any outside
temperature, but not during driving.
The air enters the passenger compartment
through the air vents for the upper body in the
dashboard, which can be adjusted for both
direction and airflow. These vents must be
open for the system to operate.
Switching on and off directly
iDrive, for principle details, refer to page16.
1.Press the button to open the start
menu.
2.Move the controller toward "Climate".
3.If need be, select the symbol and press
the controller to switch to the other side of
the menu.
4.Select "Parked car " and press the control-
ler.
5.Select "Indep. ventil. " and press the con-
troller.
The parked car ventilation is switched
on.
LED on the automatic climate control
flashes.
6.Select "Indep. ventil." again and press the
controller to switch off.
Preselecting activation time
iDrive, for principle details, refer to page16.
1.Press the button to open the start
menu.
2.Move the controller toward "Climate".
3.If need be, select the symbol and press
the controller to switch to the other side of
the menu.
4.Select "Parked car" and press the control-
ler.
5.Select "Set time 1" or "Set time 2" and
press the controller.
Page 112 of 254
Climate
110 6.Enter the desired time:
>Turn to change the setting.
>Press the controller to adopt the setting.
Activating timer
iDrive, for principle details, refer to page16.
1.Press the button to open the start
menu.
2.Move the controller toward "Climate".
3.If need be, select the symbol and press
the controller to switch to the other side of
the menu.
4.Select "Parked car" and press the control-
ler.
5.Select "Time 1" or "Time 2" and press the
controller.
The activation time is activated.
LED on the automatic climate control lights
up.
LED on the automatic climate control flashes
when the system has switched on.
The parked car ventilation is only avail-
able for activation within the next
24 hours. After this, the time will have to be
reconfirmed.<
Page 117 of 254
Controls
115Reference
At a glance
Driving tips
Communications
Navigation
Entertainment
Mobility
Glasses compartment
Briefly press the button to open.
You can remove the insert tray for cleaning.
Storage compartment in center
console
Briefly press the button to open.
Cup holders
Front
Below the sliding covers.
Do not place glass containers in the cup
holders; otherwise, there is a danger of
injury in an accident.<
Rear
In the front of the rear seat cushion's center.
Briefly press to open; slide back to close.
Ashtray, front
Opening
Push cover on recess toward front.
To extinguish a cigarette, tap off the ash and
gently press the tip into the funnel.
Emptying
Press the button, refer to arrow. The ashtray
lifts up and can be removed.
Page 119 of 254

Controls
117Reference
At a glance
Driving tips
Communications
Navigation
Entertainment
Mobility
Rear refrigerator*
The rear refrigerator is located behind the rear
seats' center armrest.
Switching on/off
1.Switch on the ignition.
2.Press button.
The LED in the button lights up.
3.Press the button again to switch off the rear
refrigerator.
When the ignition is switched off, this also
switches off the rear refrigerator.
When a low voltage is reached, it is automati-
cally switched off to protect the vehicle battery.
The LED in the button flashes.
High temperatures in the luggage com-
partment can affect the temperature in
the rear refrigerator.<
With rear climate control
When switched on, the rear refrigerator is con-
trolled by the rear climate control.
To adjust the cooling capacity and increase the
airflow volume, refer to page108.
Without rear climate control
When switched on, the rear refrigerator is con-
trolled by the automatic air conditioning sys-
tem.
To adjust the temperature and increase the air-
flow volume, refer to pages105, 106.
Releasing
Pull on the opener and fold the refrigerator for-
ward.
Switching on/off via iDrive*
iDrive, for principle details, refer to page16.
1.Press the button to open the start
menu.
2.Move the controller toward "Climate".
3.Select "Extra" and press the controller.
4.Select "Rear refrigerator" and press the
controller.
Select "Rear refrigerator" again and press the
controller to switch off.
Ski bag*
Designed for safe, convenient transport of up to
4 pairs of standard skis or up to 2 snowboards.
With the ski bag you can stow skis with a length
of up to 6ft 10in/2.10m. When skis of 6.9ft/
2.10 m in length are loaded, the ski bag will tend
to contract, reducing its overall capacity.
Page 120 of 254

Practical interior accessories
118
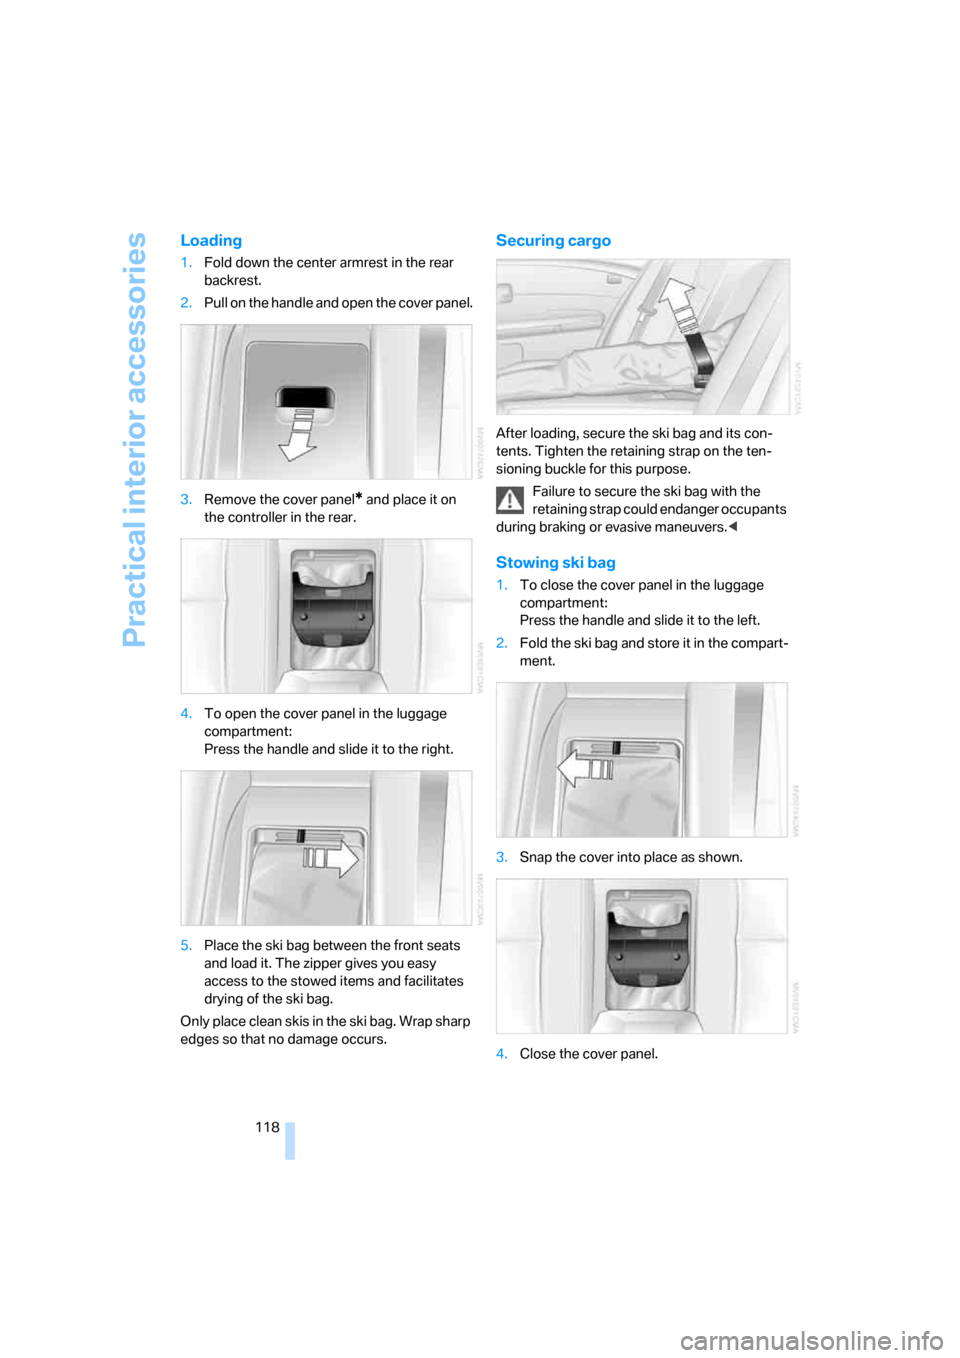
Loading
1.Fold down the center armrest in the rear
backrest.
2.Pull on the handle and open the cover panel.
3.Remove the cover panel
* and place it on
the controller in the rear.
4.To open the cover panel in the luggage
compartment:
Press the handle and slide it to the right.
5.Place the ski bag between the front seats
and load it. The zipper gives you easy
access to the stowed items and facilitates
drying of the ski bag.
Only place clean skis in the ski bag. Wrap sharp
edges so that no damage occurs.
Securing cargo
After loading, secure the ski bag and its con-
tents. Tighten the retaining strap on the ten-
sioning buckle for this purpose.
Failure to secure the ski bag with the
retaining strap could endanger occupants
during braking or evasive maneuvers.<
Stowing ski bag
1.To close the cover panel in the luggage
compartment:
Press the handle and slide it to the left.
2.Fold the ski bag and store it in the compart-
ment.
3.Snap the cover into place as shown.
4.Close the cover panel.
Page 121 of 254
Controls
119Reference
At a glance
Driving tips
Communications
Navigation
Entertainment
Mobility
Luggage compartment
Net*
You can use the net to stow smaller objects
against the bulkhead separating the luggage
compartment from the rear seats.
Do not stow objects behind the side trim
panels on the left and right in the luggage
compartment; otherwise, this could cause over-
heating and damage to the electrical parts
inside.<