2008 BMW 760I tow
[x] Cancel search: towPage 43 of 254

Controls
41Reference
At a glance
Driving tips
Communications
Navigation
Entertainment
Mobility
Press the safety switch when children
ride in the rear; otherwise, unsupervised
closing of the windows could lead to injuries.<
In order to deactivate the function again,
you must insert the remote control into
the ignition lock or, with Comfort Access, you
must switch into radio ready state.<
Glass sunroof, electric*
To prevent bodily injuries, watch the
glass sunroof as it closes.
Always take along the remote control when you
leave the vehicle; otherwise, children could, for
example, operate the roof and injure them-
selves.<
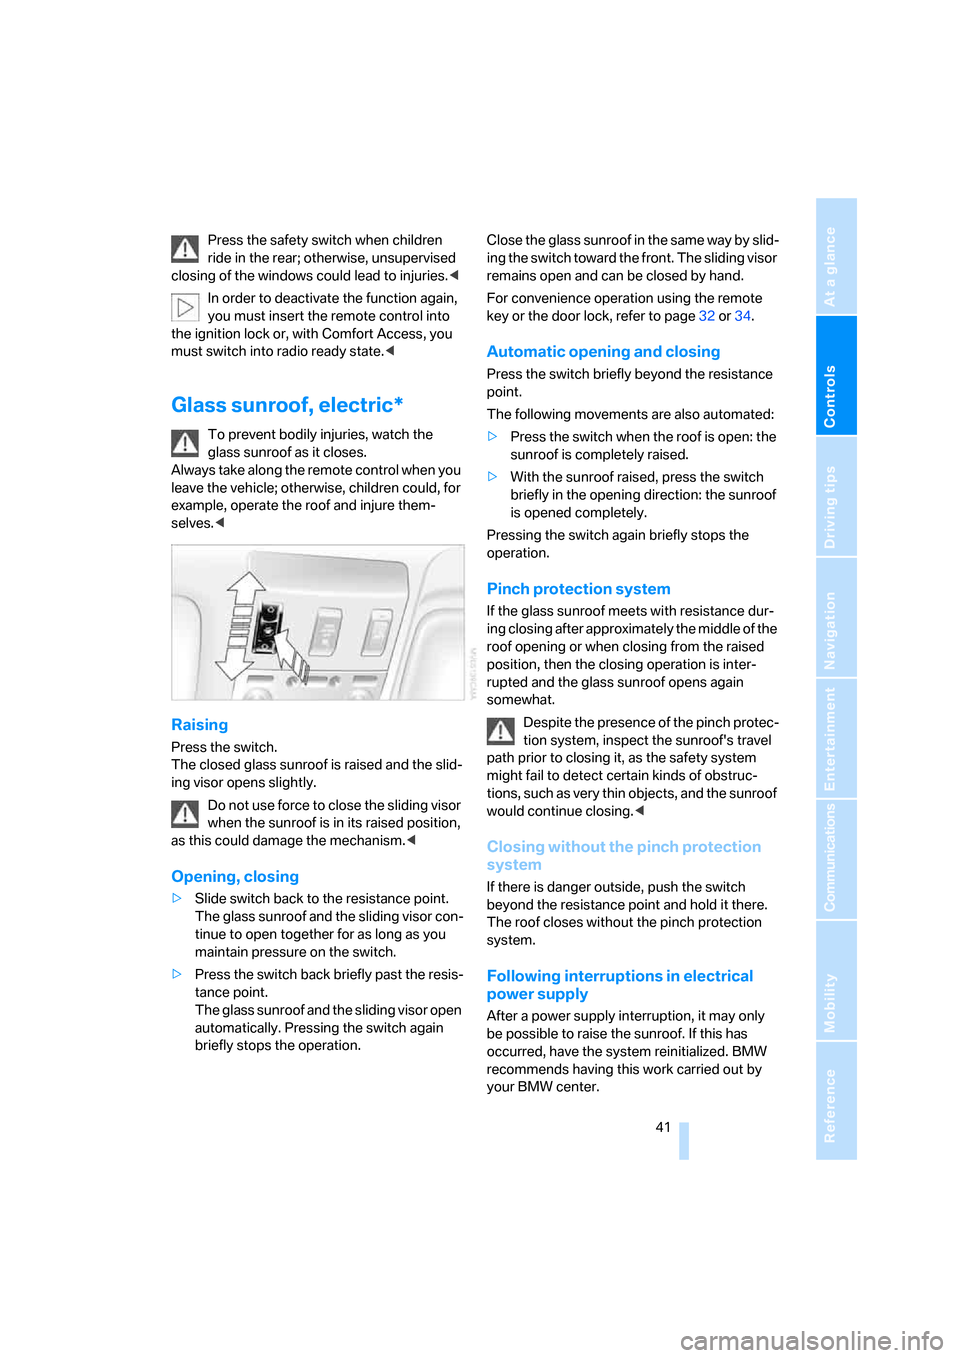
Raising
Press the switch.
The closed glass sunroof is raised and the slid-
ing visor opens slightly.
Do not use force to close the sliding visor
when the sunroof is in its raised position,
as this could damage the mechanism.<
Opening, closing
>Slide switch back to the resistance point.
The glass sunroof and the sliding visor con-
tinue to open together for as long as you
maintain pressure on the switch.
>Press the switch back briefly past the resis-
tance point.
The glass sunroof and the sliding visor open
automatically. Pressing the switch again
briefly stops the operation.Close the glass sunroof in the same way by slid-
ing the switch toward the front. The sliding visor
remains open and can be closed by hand.
For convenience operation using the remote
key or the door lock, refer to page32 or34.
Automatic opening and closing
Press the switch briefly beyond the resistance
point.
The following movements are also automated:
>Press the switch when the roof is open: the
sunroof is completely raised.
>With the sunroof raised, press the switch
briefly in the opening direction: the sunroof
is opened completely.
Pressing the switch again briefly stops the
operation.
Pinch protection system
If the glass sunroof meets with resistance dur-
ing closing after approximately the middle of the
roof opening or when closing from the raised
position, then the closing operation is inter-
rupted and the glass sunroof opens again
somewhat.
Despite the presence of the pinch protec-
tion system, inspect the sunroof's travel
path prior to closing it, as the safety system
might fail to detect certain kinds of obstruc-
tions, such as very thin objects, and the sunroof
would continue closing.<
Closing without the pinch protection
system
If there is danger outside, push the switch
beyond the resistance point and hold it there.
The roof closes without the pinch protection
system.
Following interruptions in electrical
power supply
After a power supply interruption, it may only
be possible to raise the sunroof. If this has
occurred, have the system reinitialized. BMW
recommends having this work carried out by
your BMW center.
Page 51 of 254

Controls
49Reference
At a glance
Driving tips
Communications
Navigation
Entertainment
Mobility
Damage to safety belts
In case of strain due to an accident or
damage, replace the belt system includ-
ing the safety belt tensioners and have the belt
anchor points checked. Have this work done
only by your BMW center or at a workshop that
works according to BMW repair procedures
with correspondingly trained personnel. Other-
wise, there can be no guarantee that the safety
devices will function properly.<
Seat heating*
Front
The temperature setting progresses one step
through its control sequence each time you
press the button.
The maximum temperature is supplied when
three lights are lit.
To switch off:
Press and hold the button.
Temperature distribution
The heating action in the seat cushion and
backrest can be distributed in different ways.
iDrive, for principle details, refer to page16.
1.Press the button to open the start
menu.
2.Move the controller toward "Climate".3.If need be, select the symbol and press
the controller to switch to the second page
of the menu.
4.Select "Seat temp." and press the control-
ler.
5.Select "Left" or "Right" and press the con-
troller.
6.Turn to adjust the temperature distribution
in the seat cushion and backrest and press
the controller.
The setting is stored for the remote control cur-
rently in use.
Rear
Operates the same as front seat heating, but
without temperature distribution.
Page 54 of 254

Adjusting
52 The steering wheel can be adjusted in four
directions.
To save steering wheel positions, refer to Seat,
mirror and steering wheel memory on page46.
Assistance getting in and out
To make it easier to enter and exit the vehicle,
the steering wheel temporarily moves into the
top and front position.
This automatic feature is governed by the
driver's door and the ignition switch.
Steering wheel heater*
Press the button.
When the steering wheel heater is operating,
the LED in the button lights up.
Programmable buttons
You can individually program the button on the
steering wheel and the button next to the con-
troller.
iDrive, for principle details, refer to page16.
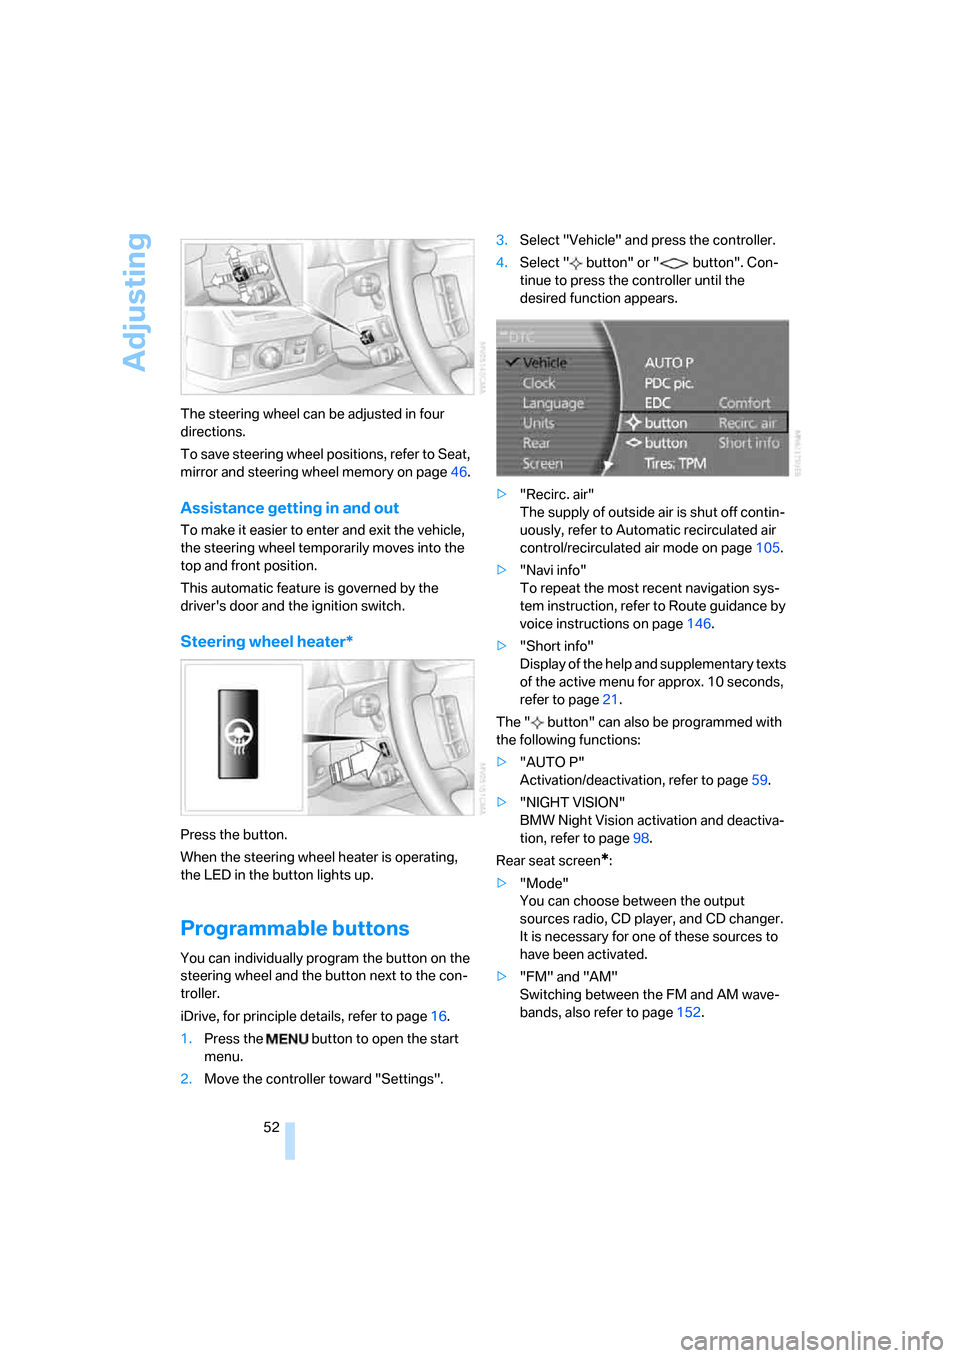
1.Press the button to open the start
menu.
2.Move the controller toward "Settings".3.Select "Vehicle" and press the controller.
4.Select " button" or " button". Con-
tinue to press the controller until the
desired function appears.
>"Recirc. air"
The supply of outside air is shut off contin-
uously, refer to Automatic recirculated air
control/recirculated air mode on page105.
>"Navi info"
To repeat the most recent navigation sys-
tem instruction, refer to Route guidance by
voice instructions on page146.
>"Short info"
Display of the help and supplementary texts
of the active menu for approx. 10 seconds,
refer to page21.
The " button" can also be programmed with
the following functions:
>"AUTO P"
Activation/deactivation, refer to page59.
>"NIGHT VISION"
BMW Night Vision activation and deactiva-
tion, refer to page98.
Rear seat screen
*:
>"Mode"
You can choose between the output
sources radio, CD player, and CD changer.
It is necessary for one of these sources to
have been activated.
>"FM" and "AM"
Switching between the FM and AM wave-
bands, also refer to page152.
Page 58 of 254

Transporting children safely
56
Routing of the tether strap
Make sure that the tether strap is not
routed over sharp edges and does not
twist on its way to the attachment point; other-
wise, the belt can fail to properly secure the
child restraint system in the event of an acci-
dent.<
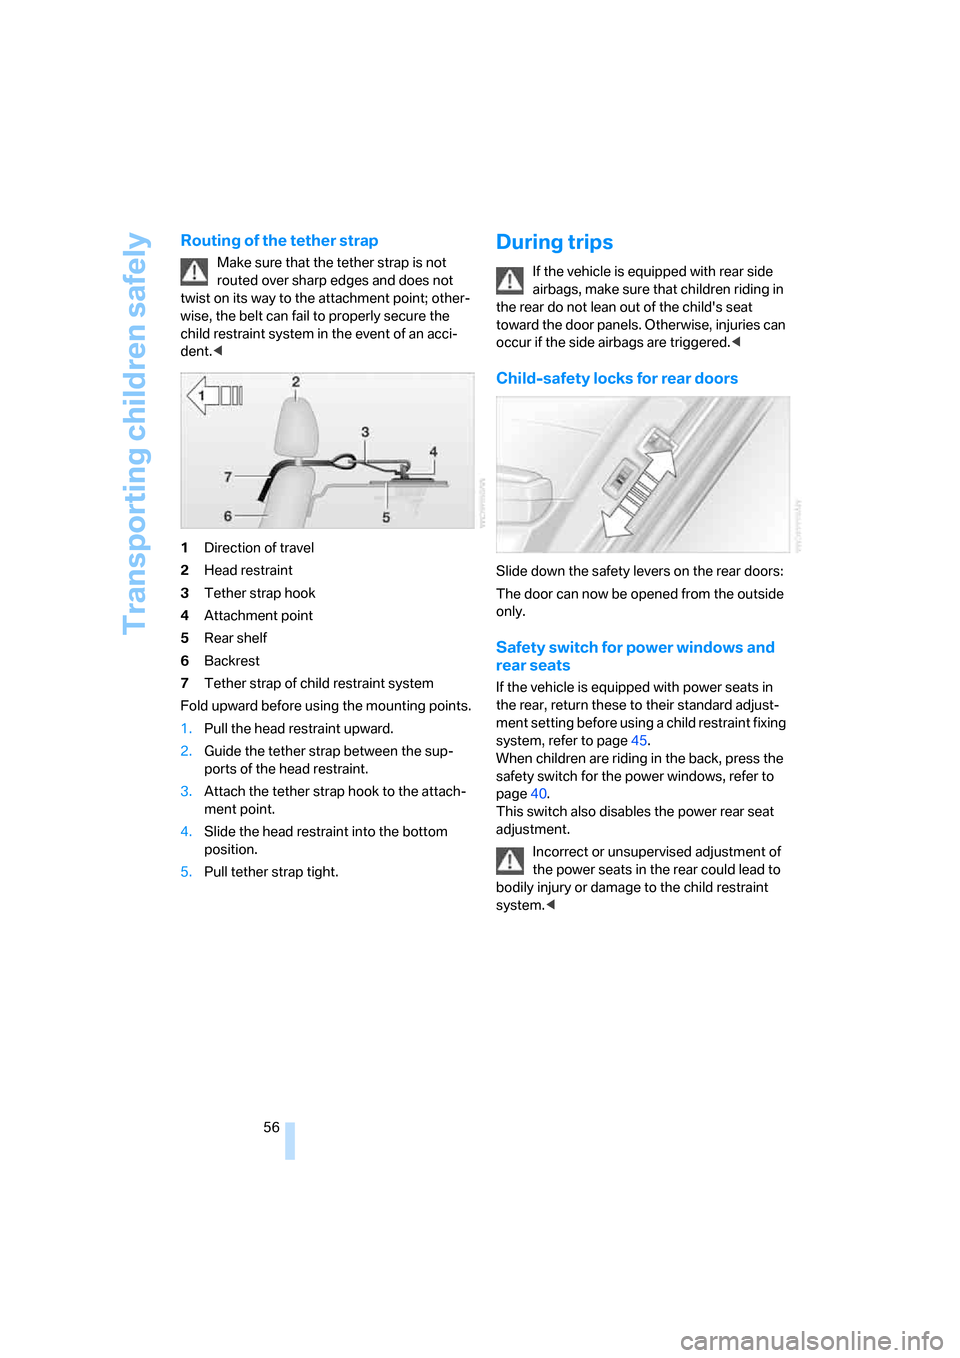
1Direction of travel
2Head restraint
3Tether strap hook
4Attachment point
5Rear shelf
6Backrest
7Tether strap of child restraint system
Fold upward before using the mounting points.
1.Pull the head restraint upward.
2.Guide the tether strap between the sup-
ports of the head restraint.
3.Attach the tether strap hook to the attach-
ment point.
4.Slide the head restraint into the bottom
position.
5.Pull tether strap tight.
During trips
If the vehicle is equipped with rear side
airbags, make sure that children riding in
the rear do not lean out of the child's seat
toward the door panels. Otherwise, injuries can
occur if the side airbags are triggered.<
Child-safety locks for rear doors
Slide down the safety levers on the rear doors:
The door can now be opened from the outside
only.
Safety switch for power windows and
rear seats
If the vehicle is equipped with power seats in
the rear, return these to their standard adjust-
ment setting before using a child restraint fixing
system, refer to page45.
When children are riding in the back, press the
safety switch for the power windows, refer to
page40.
This switch also disables the power rear seat
adjustment.
Incorrect or unsupervised adjustment of
the power seats in the rear could lead to
bodily injury or damage to the child restraint
system.<
Page 61 of 254

Controls
59Reference
At a glance
Driving tips
Communications
Navigation
Entertainment
Mobility
It is only possible to disengage the parking
brake with the ignition on.
If exceptional circumstances should make it
necessary to engage the parking brake while
the vehicle is in motion, maintain pressure on
the button.
The indicator lamp on the Info Display lights up
in red, a chime sounds, and the brake lamps
light up.
The vehicle continues to brake forcefully for as
long as you maintain pressure on the button.
When you brake the vehicle almost to a stop,
i.e., down to a speed of approximately 2 mph/
3 km/h or below, the parking brake remains
engaged.
Manual release
Briefly press the button with the ignition
switched on.
The indicator lamp on the Info Display goes
out.
As long as the remote control is inserted
into the ignition lock, you can also release
the parking brake after the engine has been
switched off. This function is useful, for exam-
ple, in automatic car washes, refer to
page123<
When leaving the vehicle, always bring
the remote control with you; this precau-
tion prevents children from disengaging the
parking brake, for example.<
Automatic Hold
You can activate the system after starting the
engine; it then remains operational until the
next time the engine is switched off.
This feature provides additional assistance dur-
ing vehicle operation by automatically engaging
and releasing the parking brake during stops at
traffic lights, in stop-and-go traffic, etc. The
vehicle is automatically held in place so as to
suppress the tendency to creep when the
transmission is in drive.
It also prevents the vehicle from rolling back-
ward during uphill starts.
The parking brake engages automatically when
you stop the vehicle and switch off the engine.You can activate or deactivate Automatic Hold
via the "Settings" menu in iDrive.
Activation/deactivation
iDrive, for principle details, refer to page16.
1.Press the button to open the start
menu.
2.Move the controller toward "Settings".
3.Select "Vehicle" and press the controller.
4.Select "AUTO P". Press the controller to
activate/deactivate the desired function.
>Automatic Hold is activated.
The green AUTO P status message on the
Info Display indicates that the system is
ready for operation.
>Automatic Hold is deactivated.
The green AUTO P status message disap-
pears from the Info Display.
You can program the programmable but-
ton on the steering wheel with the Auto-
matic Hold function, refer to page52. This gives
you the option of being able to quickly activate
or deactivate Automatic Hold without distract-
ing your attention from the road.<
Driving
The parking brake engages automatically when
the vehicle comes to a stop.
The indicator lamp on Info Display lights up
green.
To start off again, simply press the accelerator
pedal. The parking brake is released automati-
cally; the indicator lamp goes out.
Do not drive through an automatic car
wash with the Automatic Hold on and the
engine running. Otherwise, the system will
Page 62 of 254

Driving
60 engage the parking brake the moment the vehi-
cle comes to a stop.<
Parking
The parking brake engages automatically when
you stop the vehicle and switch off the engine.
The indicator lamp changes from green to
red.
You can also release the parking brake
manually after the engine is switched off,
as long as the remote control is in the ignition
lock, refer to page59. You can use this function,
for example, in a car wash.
Automatic Hold is deactivated.<
When leaving the vehicle, release the
remote control from the detent in the igni-
tion lock; this precaution prevents children from
disengaging the parking brake etc.<
For your safety
Automatic Hold is automatically deactivated
when:
>the engine is switched off
>the system detects that the driver's seat is
not occupied while the engine is running
>the hood is opened while the engine is run-
ning
>the luggage compartment is opened while
the engine is running and the transmission
is in reverse
>and when the parking brake is used to brake
the vehicle to a stop during driving
The indicator lamp changes from green to
red, and the indication AUTO P on the Info Dis-
play disappears.
Before starting off again, briefly press the but-
ton to disengage the parking brake manually,
refer to page59, or reactivate Automatic Hold,
refer to page59.
Before leaving the vehicle with the engine
running, always move the automatic
transmission's selector lever to position P and
make sure that the parking brake is engaged.
The vehicle could start to roll if you fail to take
these precautions.
tendency for the wheels to spin in response to
slippery road surfaces.
Pay attention to the messages on the Info Dis-
play. For additional information, refer to Check
Control on page80.<
Releasing parking brake manually
In the event of an electrical power loss or elec-
trical malfunction, you can release the parking
brake manually.
Before manually releasing the parking
brake and each time you park the vehicle
without engaging the parking brake, make sure
that the automatic transmission is in position P,
refer to page62. Be sure to pay attention to the
information on the Info Display.
If circumstances should force you to park on a
steeply inclined road surface, it is essential to
take additional precautions against inadvertent
rolling, e.g. by using the chock, refer to
page216. Otherwise, there is the danger of the
vehicle rolling, depending on the incline.<
If it becomes necessary to also unlock the
transmission lock of the automatic transmis-
sion, follow this sequence:
1.If necessary, start by releasing the parking
brake manually.
2.Then release the automatic transmission's
transmission lock manually, refer to
page64.
Jump starting and tow starting information,
refer to section starting on page220.
Page 66 of 254

Driving
64
Manually unlocking and locking the
transmission lock
In the event of a power supply interruption, e.g.
when the battery is dead or disconnected or
when there is an electrical malfunction, the
transmission lock must be released manually;
otherwise, the rear wheels are locked and the
vehicle cannot be towed.
Step on the brake when manually unlock-
ing the transmission lock; otherwise,
there is a danger of the vehicle rolling.<
The transmission lock should only be released
for towing. Reengage the transmission lock
after parking the vehicle at its destination.
If it also becomes necessary to manually
release the parking brake, follow this sequence:
1.Start by manually releasing the parking
brake, refer to page60.
2.Then proceed to manually releasing the
transmission lock.
Releasing
1.Use the vehicle key to release the cover
panel beneath the instrument panel by turn-
ing the lock counterclockwise, then fold
down the cover.2.Pull out the release lever with the loop1
until it locks into place: the transmission
lock is unlocked.
Reengage the transmission lock after
parking the vehicle at its destination. Oth-
erwise, there is a danger of the vehicle rolling.<
Engaging locks
1.Disengage the release lever by pressing it
together with the red locking lever, refer to
arrow.
2.Guide the release lever all the way back into
its original position – the transmission lock
is engaged once more.
3.Fold up and lock the cover panel again. Now
– and not before – the key may be removed.
Jump starting and tow starting information,
refer to section starting on page220.
Page 67 of 254

Controls
65Reference
At a glance
Driving tips
Communications
Navigation
Entertainment
Mobility
Turn signals/
headlamp flasher
1High beams
2Headlamp flasher
3Turn signals
Using turn signals
Move the lever beyond the resistance point.
If you wish to manually control the shut-off of
the turn signal, then only push the lever to the
resistance point.
Atypically rapid flashing of the indicator
lamps signals the failure of a turn signal
lamp, possibly in the trailer when towing.<
Temporarily signaling
Push the lever to the resistance point and hold it
there for as long as you wish to signal.
Triple turn signal activation
Press the lever to the resistance point and
release; the turn signal flashes three times.
Wiper system
1Switching on wipers
2Switching off wipers or for brief wipe
3Activating/deactivating rain sensor
4Cleaning windshield, headlamps and
BMW Night Vision camera
*
5Adjusting rain sensor sensitivity level
Switching on wipers
The lever automatically returns to its initial posi-
tion when released.
Normal wiper speed
Press once.
The system reverts to operation in the intermit-
tent mode when the vehicle is stationary.
Fast wiper speed
Press twice or press beyond the resistance
point.
The system reverts to normal speed when the
vehicle is stationary.
Rain sensor
The rain sensor controls the wiper operation as
a function of the rain intensity. It is located on
the windshield, directly in front of the inside
rearview mirror.