2008 BMW 760I iDrive
[x] Cancel search: iDrivePage 5 of 254

Reference
At a glance
Controls
Driving tips
Communications
Navigation
Entertainment
Mobility
Contents
The fastest way to find specific topics is to use
the index, refer to page232.
Using this Owner's Manual
4Notes
At a glance
10Cockpit
16iDrive
23Voice command system
Controls
30Opening and closing
43Adjusting
54Transporting children safely
57Driving
75Everything under control
86Technology for comfort, convenience
and safety
100Lamps
103Climate
111Practical interior accessories
Driving tips
122Things to remember when driving
Navigation
130Starting navigation system
131Destination input
144Route guidance
149What to do if …
Entertainment
152On/off and settings
156Radio
163CD player
165CD changer
169External audio device
170DVD changer
Communications
178Telephone overview
181Getting started
184Using the phone
189BMW Assist
Mobility
198Refueling
200Wheels and tires
207Under the hood
211Maintenance
213Replacing components
219Giving and receiving assistance
Reference
226Technical data
230Short commands of the voice command
system
232Everything from A to Z
Page 18 of 254

iDrive
16
iDrive
iDrive combines the functions of a multitude of
switches. This allows these functions to be
operated from a central position. The following
introduction illustrates how easy iDrive is to use. The control of individual functions is
described in connection with the relevant
equipment.
Controls
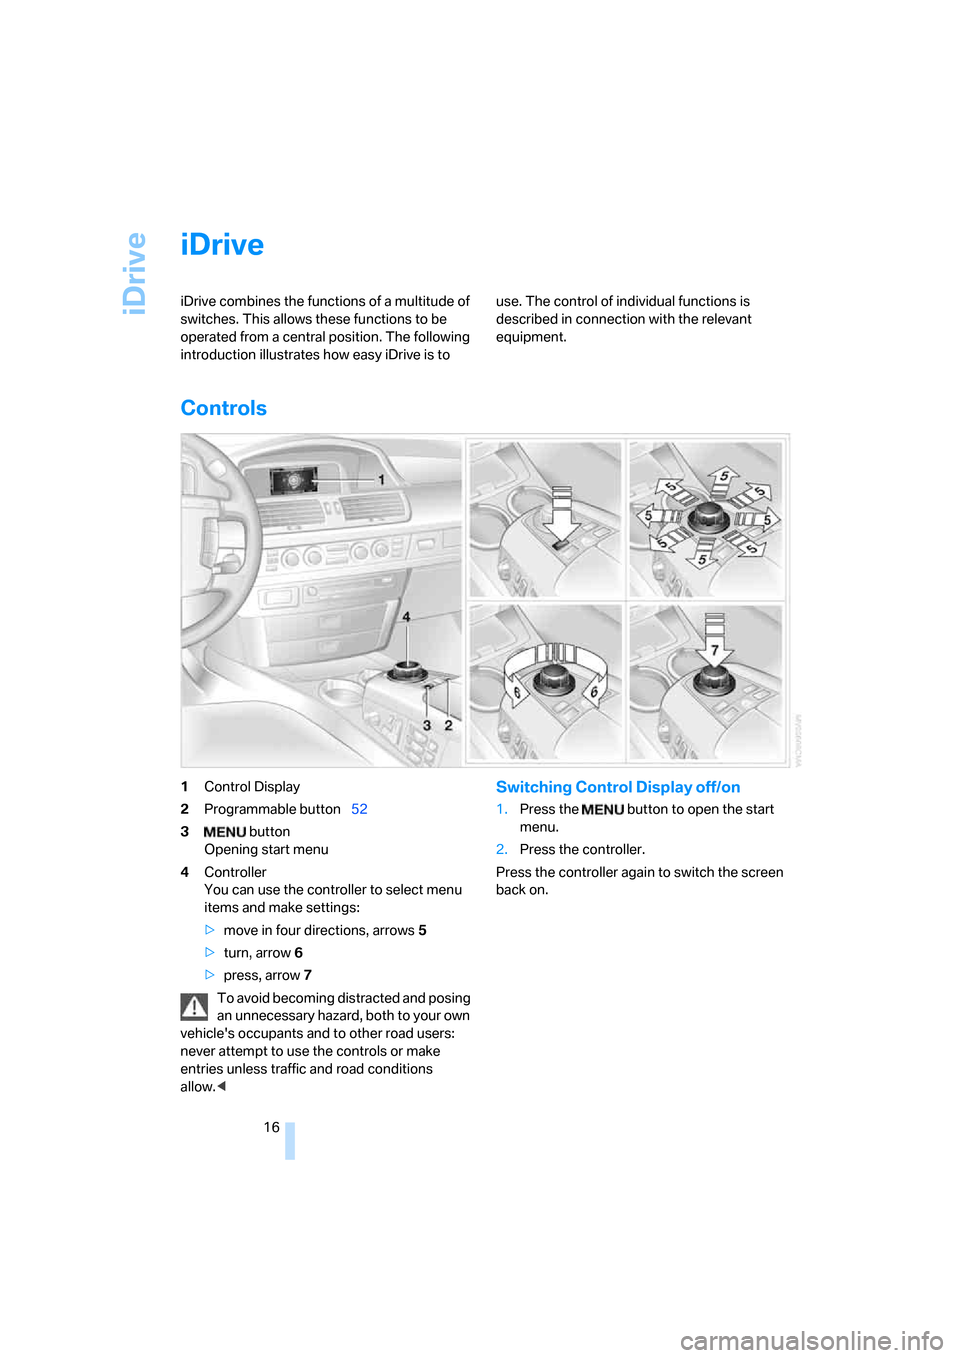
1Control Display
2Programmable button52
3 button
Opening start menu
4Controller
You can use the controller to select menu
items and make settings:
>move in four directions, arrows5
>turn, arrow6
>press, arrow7
To avoid becoming distracted and posing
an unnecessary hazard, both to your own
vehicle's occupants and to other road users:
never attempt to use the controls or make
entries unless traffic and road conditions
allow.
menu.
2.Press the controller.
Press the controller again to switch the screen
back on.
Page 20 of 254

iDrive
18 DVDs can only be played on the rear
seat screen, refer to Rear seat
screen
* on page21.<
7Settings
>Parking brake58
>PDC Park Distance Control86
>EDC Electronic Damping Control89
>Programmable buttons52
>FTM Flat Tire Monitor
*90
>TPM Tire Pressure Monitor
*91
>Time and date84
>Language84
>Units of measure and display format84
>Brightness85
>Rear seat screen
*21
>Pairing mobile phone with vehicle182
8Climate
>Intensity of AUTO program104
>Air volume106
>Heated seats
*49
>Parked car ventilation109
>Extra, e.g. rear air conditioner108
Basic operation
Once the radio ready position is reached, the
following message appears on the Control Dis-
play:
To clear the message:
Press the controller.
This displays the start menu.The message automatically disappears after
approx. 25 seconds.
Start menu
You can access all functions of iDrive via eight
menu items.
Opening start menu
Press the button.
Opening the start menu from a menu:
>Move the controller toward the currently
active menu.
>Move the controller twice in one direction.
Selecting menu
From the start menu, eight menus can be
accessed by moving the controller in the appro-
priate directions.
In a menu, you can change directly into a
new menu by moving in the correspond-
ing direction, without having to open the start
menu first.
Moving in the direction that corresponds to the
last menu used brings you back to the last item
used in this menu.<
Page 22 of 254

iDrive
20
Status lines
1Hands-free mode active
2A call has come in while you were away
3Signal strength, mobile radio network
*
4Here, you will see:
>the name of the paired mobile phone
>the entered/selected phone number
5Phone status:
>Green, yellow and red flashing:
Pairing of a mobile phone
>Green:
Incoming or outgoing call
>Red:
No network available
>Yellow:
Partner network
* active, the network of
another provider is being used
>Flashing yellow:
Visited network
* active, the network of
another provider is being used, visited
network
*
Roaming in a partner or external net-
work incurs higher call charges than
in your home network.<6There is a Check-Control message80
You can have the Control Display show
additional information using the menu "Car
Data" under "CHECK"81
Status service required78
Red:
At least one service interval has been
exceeded. You can have more precise infor-
mation about the maintenance procedure
displayed by using the "Car Data" menu
under 79
7Temperature selection and intensity of the
AUTO program, right side of passenger
compartment
8Air volume, right side of passenger com-
partment
9Entertainment
Display for radio, CD, and DVD
With compressed audio files, the track
information is displayed167
10Air volume, left side of passenger compart-
ment
11Temperature selection and intensity of the
AUTO program, left side of passenger com-
partment
Assistance window
Additional information appears in the assis-
tance window:
>Short help and supplementary information
texts about selected menu items.
>A function selected from the "Car Data"
menu, refer to page83.
>The route with a navigation system, refer to
page130.
Page 23 of 254

At a glance
21Reference
Controls
Driving tips
Communications
Navigation
Entertainment
Mobility
Showing/hiding help texts
You can display help texts and supplementary
information on selected menu items in the
assistance window.
1.Press the button to open the start
menu.
2.Move the controller toward "Help".
3.Select "Help text" and press the controller.
The symbol indicates the menu that is cur-
rently activated.
Status lines
1Outside temperature or town/city of desti-
nation of the navigation system
2Time
3Date
Rear seat screen*
Some of the functions of iDrive can also be
operated via the rear seat screen. Certain func-
tions are only available via iDrive. These func-
tions can only be operated to a limited degree
on the rear screen, e.g. the speed limit can only
be displayed. The settings are made via iDrive.
Deploying rear seat screen
1.Swing pivoting arm upward until it engages.
2.Fold rear seat screen upward.
The rear seat screen is ready for operation.
Stowing rear seat screen
1.Align rear seat screen so that it is straight.
2.Fold rear seat screen downward until pivot-
ing arm unlocks.
Pivoting arm swings downward.
The rear seat screen is switched off.
Pivot the rear seat screen completely
downward when the ski bag is being
used; otherwise, it could be damaged.
Do not pivot the rear seat screen up or down
with the cup holders open, as this can damage
it.<
Switching off rear seat screen
1.Press the button to open the start
menu.
2.Press the controller.
Press the controller again to switch the screen
back on.
Page 24 of 254

iDrive
22
Controller/buttons
The controller and buttons are located on the
center armrest.
Rear lock
The available functions are operated with the
respective controller.
You can use iDrive to restrict operation in the
rear or to switch off the rear seat screen.
iDrive, for principle details, refer to page16.
1.Press the button to open the start
menu.
2.Move the controller toward "Settings".
3.Select "Rear" and press the controller.
4.Select "Unlock" and press the controller
repeatedly until the desired enabling of the
rear iDrive is set.
>"menu"
You can switch the offered menus on or off
by turning and pressing the controller.
The symbol indicates the menus that
are currently activated.
>"None"
Switches the rear screen off.
>"Full"
Releases all function locks.
>"Limited"
You disable the functions that are used on
the front Control Display.
Headphones
1Headphone jack
2Adjusting volume
3Station scan/track search
>Station scan
>Search track for CD, search chapter for
DVD changer
With headphones connected, the sound
output for the Control Display and the rear
seat screen are played back separately. For
example, a radio station can be listened to while
a DVD is being played in the rear.<
Headphones are only intended for passengers
in the rear seats. Please check with local regu-
lations regarding use of headphones.
Page 25 of 254

At a glance
23Reference
Controls
Driving tips
Communications
Navigation
Entertainment
Mobility
Voice command system
The concept
The voice command system allows you to con-
trol operation of various vehicle systems with-
out ever removing your hands from the steering
wheel. The system operates on the basis of
voice commands that you will learn easily after
using them a few times. In many cases, the
voice command system assists you with
announcements or questions while you are
making your entries.
The voice command system transforms your
oral commands and dialog answers into control
signals for the selected systems.
Please take the time to acquaint yourself
with how a particular system operates
before proceeding to control it using the voice
command system.<
Note
Use iDrive to set the language that will be used
so that the voice command system will be able
to identify the commands spoken. Setting the
language of iDrive, refer to page84.
Symbols used
{...} Verbal instructions to use with the voice
command system.
{{...}} Identifies the answers generated by the
voice command system.
Systems available for use with voice
command
>{Navigation}, refer to page130
>{Radio}, refer to page156
>{Telephone}, refer to page184
>{CD}, refer to page163
>{CD changer}, refer to page165
>{Notepad}, refer to page25
>{DVD}, refer to page170The Info Display, refer to page24, will display
either the equipment that you are now operat-
ing or any current error messages.
Voice commands
Voice command system activation
Briefly press the button on the steering
wheel.
An acoustic signal and the display "SVS active"
on the Info Display, refer to page24, indicate
that the system is ready for operation. The sys-
tem automatically starts in the main menu.
From here, you can call up all the equipment
that can be operated.
Canceling voice command
Briefly press the button on the steering
wheel
or
In dialogs in which any text can be spoken, e.g.
names, notes, canceling is only possible using
the button.
The system automatically switches over
to its telephone mode if you receive a call
during voice input. "SVS active" appears on the
Info Display, refer to page24.<
Voice commands
The voice command system operates on the
basis of specific, predefined commands; these
commands should be spoken precisely as indi-
cated. You can have the possible commands
read aloud at any point. To do so, say the com-
mand {Options}.
In addition to the commands described, there
are often other commands that run the same
function. Instead of {Options}, you can, for
example, also say {What now}. In addition,
*
These sections contain information on
using the voice command system.
{Cancel}.
Page 51 of 254

Controls
49Reference
At a glance
Driving tips
Communications
Navigation
Entertainment
Mobility
Damage to safety belts
In case of strain due to an accident or
damage, replace the belt system includ-
ing the safety belt tensioners and have the belt
anchor points checked. Have this work done
only by your BMW center or at a workshop that
works according to BMW repair procedures
with correspondingly trained personnel. Other-
wise, there can be no guarantee that the safety
devices will function properly.<
Seat heating*
Front
The temperature setting progresses one step
through its control sequence each time you
press the button.
The maximum temperature is supplied when
three lights are lit.
To switch off:
Press and hold the button.
Temperature distribution
The heating action in the seat cushion and
backrest can be distributed in different ways.
iDrive, for principle details, refer to page16.
1.Press the button to open the start
menu.
2.Move the controller toward "Climate".3.If need be, select the symbol and press
the controller to switch to the second page
of the menu.
4.Select "Seat temp." and press the control-
ler.
5.Select "Left" or "Right" and press the con-
troller.
6.Turn to adjust the temperature distribution
in the seat cushion and backrest and press
the controller.
The setting is stored for the remote control cur-
rently in use.
Rear
Operates the same as front seat heating, but
without temperature distribution.