2008 BMW 760I iDrive
[x] Cancel search: iDrivePage 106 of 254

Climate
104
Automatic climate control
1AUTO program, left side of passenger
compartment, refer to section below
2Outside air/AUC Automatic recirculated-air
control/recirculated air105
3Switching off automatic climate
control105
4Temperature, left side of passenger
compartment105
5Maximum cooling106
6Air volume, left side of passenger
compartment106
7Defrosting windows and removing
condensation106
8Air volume, right side of passenger
compartment1069Temperature, right side of passenger
compartment105
10Residual heat mode106
11Rear window defroster107
12Switching cooling function on and off
manually107
13AUTO program, right side of passenger
compartment, refer to section below
14Air grille for interior temperature sensor –
please keep clear and unobstructed
15Parked car ventilation109
> lights up: activation time activated
> flashes: parked car ventilation
switched on
The current setting for air distribution appears
on the Control Display, refer to page106.
A congenial climate
For almost all conditions, the AUTO program1
offers the optimal air distribution and air vol-
ume. Select an interior temperature that you
find pleasant.
The following section contains more detailed
information on the available setting options.
The settings are stored for the remote key cur-
rently in use.
AUTO program
The AUTO program handles the
adjustment of air distribution to the
windshield and side windows, in
the direction of the upper body, and in the foot-
well, as well as the adjustment of the air volume. It also adapts your instructions for the tempera-
ture to outside influences throughout the year.
The cooling is switched on automatically with
the AUTO program. At the same time, a con-
densation sensor controls the program so as to
prevent window condensation as much as pos-
sible.
Intensity of AUTO program
You can adjust the intensity of the AUTO pro-
gram by repeatedly pressing the AUTO button.
Press the button to have the current setting
briefly displayed on the lower status line of the
Control Display.
You can also adjust the intensity of the AUTO
program via iDrive.
Page 107 of 254

Controls
105Reference
At a glance
Driving tips
Communications
Navigation
Entertainment
Mobility
iDrive, for principle details, refer to page16.
1.Press the button to open the start
menu.
2.Move the controller toward "Climate".
3.Turn the controller to select driver's side or
passenger side.
4.Turn the controller to select the field.
5.Press the controller repeatedly until the
desired program is displayed:
>"low"
>"medium"
>"high"
Automatic recirculated air control/
recirculated air mode
You can respond to unpleasant
odors or pollutants in the immedi-
ate environment by temporarily
suspending the supply of outside air. The sys-
tem then recirculates the air currently within the
vehicle. In AUC mode, a sensor detects pollut-
ants in the outside air and controls the shut-off
automatically.
Press the button repeatedly to run through the
following control sequence:
>LEDs off: outside air flows into the vehicle
continuously.
>Left LED on, AUC mode: the system
detects pollutants in the outside air and
responds by blocking the supply of outside
air when required.
>Right LED on, recirculated-air mode: the
supply of outside air into the vehicle is con-
tinuously blocked.If the windows fog over in recirculated-air
mode, then press the AUTO button or
switch off the recirculated-air mode and
increase the air quantity as needed.
The recirculated-air mode should not be used
over a longer period of time, as the air quality
inside the vehicle deteriorates continuously.<
Automatic climate control, switching
on and off
The air volume, the heater, and the
air conditioner mode are all
switched off.
You can restart the automatic climate control by
pressing any of its buttons except the REST
button.
Temperature adjustment
Adjust the desired temperature
individually on the driver's side and
passenger side. Your settings
appear on the status line of the
Control Display.
The automatic climate control achieves this
temperature as quickly as possible at any time
of year, if necessary with the maximum cooling
or heating capacity, and then keeps it constant.
When switching between different tem-
perature settings in rapid succession, the
automatic climate control does not have suffi-
cient time to achieve the set temperature.<
The highest setting switches on the maximum
heat output regardless of the outside tempera-
ture. The lowest setting activates maximum air
conditioning.
Using iDrive
1.Open the start menu.
2.Open "Climate".
3.Turn the controller to select driver's side or
passenger side.
4.Turn the controller to select the field and
press the controller.
Page 110 of 254

Climate
108
Rear climate control*
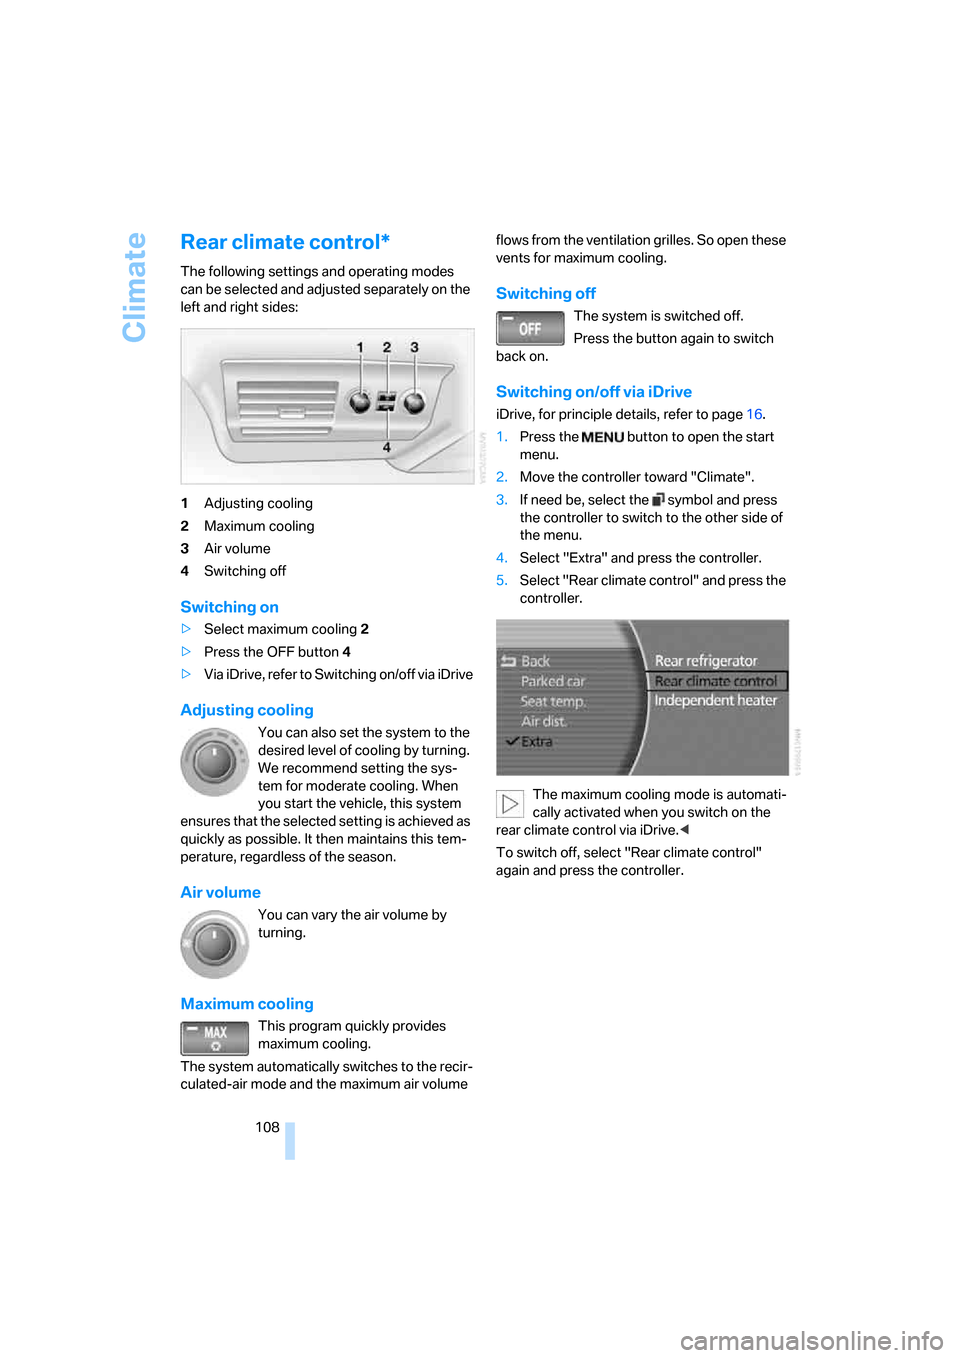
The following settings and operating modes
can be selected and adjusted separately on the
left and right sides:
1Adjusting cooling
2Maximum cooling
3Air volume
4Switching off
Switching on
>Select maximum cooling2
>Press the OFF button 4
>Via iDrive, refer to Switching on/off via iDrive
Adjusting cooling
You can also set the system to the
desired level of cooling by turning.
We recommend setting the sys-
tem for moderate cooling. When
you start the vehicle, this system
ensures that the selected setting is achieved as
quickly as possible. It then maintains this tem-
perature, regardless of the season.
Air volume
You can vary the air volume by
turning.
Maximum cooling
This program quickly provides
maximum cooling.
The system automatically switches to the recir-
culated-air mode and the maximum air volume flows from the ventilation grilles. So open these
vents for maximum cooling.
Switching off
The system is switched off.
Press the button again to switch
back on.
Switching on/off via iDrive
iDrive, for principle details, refer to page16.
1.Press the button to open the start
menu.
2.Move the controller toward "Climate".
3.If need be, select the symbol and press
the controller to switch to the other side of
the menu.
4.Select "Extra" and press the controller.
5.Select "Rear climate control" and press the
controller.
The maximum cooling mode is automati-
cally activated when you switch on the
rear climate control via iDrive.<
To switch off, select "Rear climate control"
again and press the controller.
Page 111 of 254

Controls
109Reference
At a glance
Driving tips
Communications
Navigation
Entertainment
Mobility
Ventilation in rear
Use the lever1 to vary the airflow direction.
For additional information on rear ventilation
options, refer to page107.
Parked car ventilation
The parked car ventilation blows air into the
passenger compartment to reduce interior tem-
peratures.
You can set two different times for the system
to start. The system is operated via iDrive.
It remains switched on for 30 minutes.
Since the system uses a substantial amount of
electrical current, you should refrain from acti-
vating it twice in succession without allowing
the battery to be recharged in normal operation
between uses.
With a preselected switch-on time, the parked
car ventilation is switched on at an outside tem-
perature of 597/156 or greater. When oper-
ated manually, it is ready for use at any outside
temperature, but not during driving.
The air enters the passenger compartment
through the air vents for the upper body in the
dashboard, which can be adjusted for both
direction and airflow. These vents must be
open for the system to operate.
Switching on and off directly
iDrive, for principle details, refer to page16.
1.Press the button to open the start
menu.
2.Move the controller toward "Climate".
3.If need be, select the symbol and press
the controller to switch to the other side of
the menu.
4.Select "Parked car " and press the control-
ler.
5.Select "Indep. ventil. " and press the con-
troller.
The parked car ventilation is switched
on.
LED on the automatic climate control
flashes.
6.Select "Indep. ventil." again and press the
controller to switch off.
Preselecting activation time
iDrive, for principle details, refer to page16.
1.Press the button to open the start
menu.
2.Move the controller toward "Climate".
3.If need be, select the symbol and press
the controller to switch to the other side of
the menu.
4.Select "Parked car" and press the control-
ler.
5.Select "Set time 1" or "Set time 2" and
press the controller.
Page 112 of 254

Climate
110 6.Enter the desired time:
>Turn to change the setting.
>Press the controller to adopt the setting.
Activating timer
iDrive, for principle details, refer to page16.
1.Press the button to open the start
menu.
2.Move the controller toward "Climate".
3.If need be, select the symbol and press
the controller to switch to the other side of
the menu.
4.Select "Parked car" and press the control-
ler.
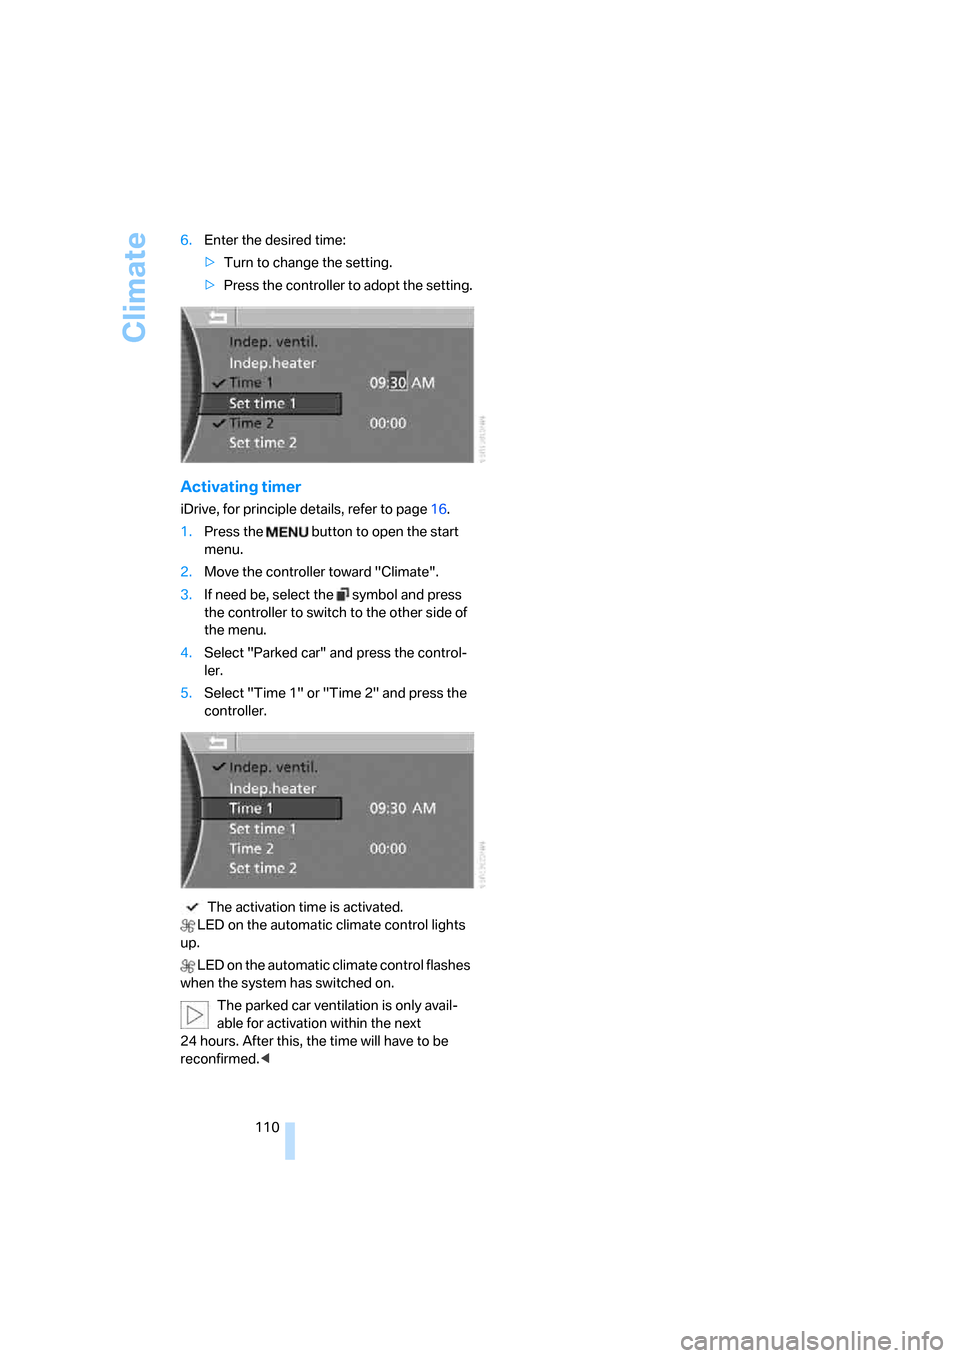
5.Select "Time 1" or "Time 2" and press the
controller.
The activation time is activated.
LED on the automatic climate control lights
up.
LED on the automatic climate control flashes
when the system has switched on.
The parked car ventilation is only avail-
able for activation within the next
24 hours. After this, the time will have to be
reconfirmed.<
Page 119 of 254

Controls
117Reference
At a glance
Driving tips
Communications
Navigation
Entertainment
Mobility
Rear refrigerator*
The rear refrigerator is located behind the rear
seats' center armrest.
Switching on/off
1.Switch on the ignition.
2.Press button.
The LED in the button lights up.
3.Press the button again to switch off the rear
refrigerator.
When the ignition is switched off, this also
switches off the rear refrigerator.
When a low voltage is reached, it is automati-
cally switched off to protect the vehicle battery.
The LED in the button flashes.
High temperatures in the luggage com-
partment can affect the temperature in
the rear refrigerator.<
With rear climate control
When switched on, the rear refrigerator is con-
trolled by the rear climate control.
To adjust the cooling capacity and increase the
airflow volume, refer to page108.
Without rear climate control
When switched on, the rear refrigerator is con-
trolled by the automatic air conditioning sys-
tem.
To adjust the temperature and increase the air-
flow volume, refer to pages105, 106.
Releasing
Pull on the opener and fold the refrigerator for-
ward.
Switching on/off via iDrive*
iDrive, for principle details, refer to page16.
1.Press the button to open the start
menu.
2.Move the controller toward "Climate".
3.Select "Extra" and press the controller.
4.Select "Rear refrigerator" and press the
controller.
Select "Rear refrigerator" again and press the
controller to switch off.
Ski bag*
Designed for safe, convenient transport of up to
4 pairs of standard skis or up to 2 snowboards.
With the ski bag you can stow skis with a length
of up to 6ft 10in/2.10m. When skis of 6.9ft/
2.10 m in length are loaded, the ski bag will tend
to contract, reducing its overall capacity.
Page 132 of 254

Starting navigation system
130
Starting navigation system
Your navigation system can use satellites to
ascertain the precise position of your vehicle
and guide you reliably to any destination you
enter.
Navigation CD/DVD
Installation location navigation drive
Behind the left side panel in the luggage com-
partment.
You can use navigation CDs, versions 2001-1
and later, and navigation DVDs in your naviga-
tion computer.
To ensure that your vehicle's navigation system
has access to the latest highway system infor-
mation, always load the most recent CD/DVD
version of the digital road map.
As is the case with conventional road maps, the
navigation CDs/DVDs are subject to periodic
updates to ensure that they reflect the latest
information and surveys.
Navigation CDs/DVDs are available at
your BMW center.<
Inserting navigation CDs/DVDs
Navigation CDs/DVDs are to be inserted into
the navigation player.
1.Insert the navigation CD/DVD with the
labeled side up.
2.Wait a few seconds until the CD/DVD con-
tents are read.
Removing navigation CD/DVD
1.Press the button.
2.Remove navigation CD/DVD.
Display in assistance
window*
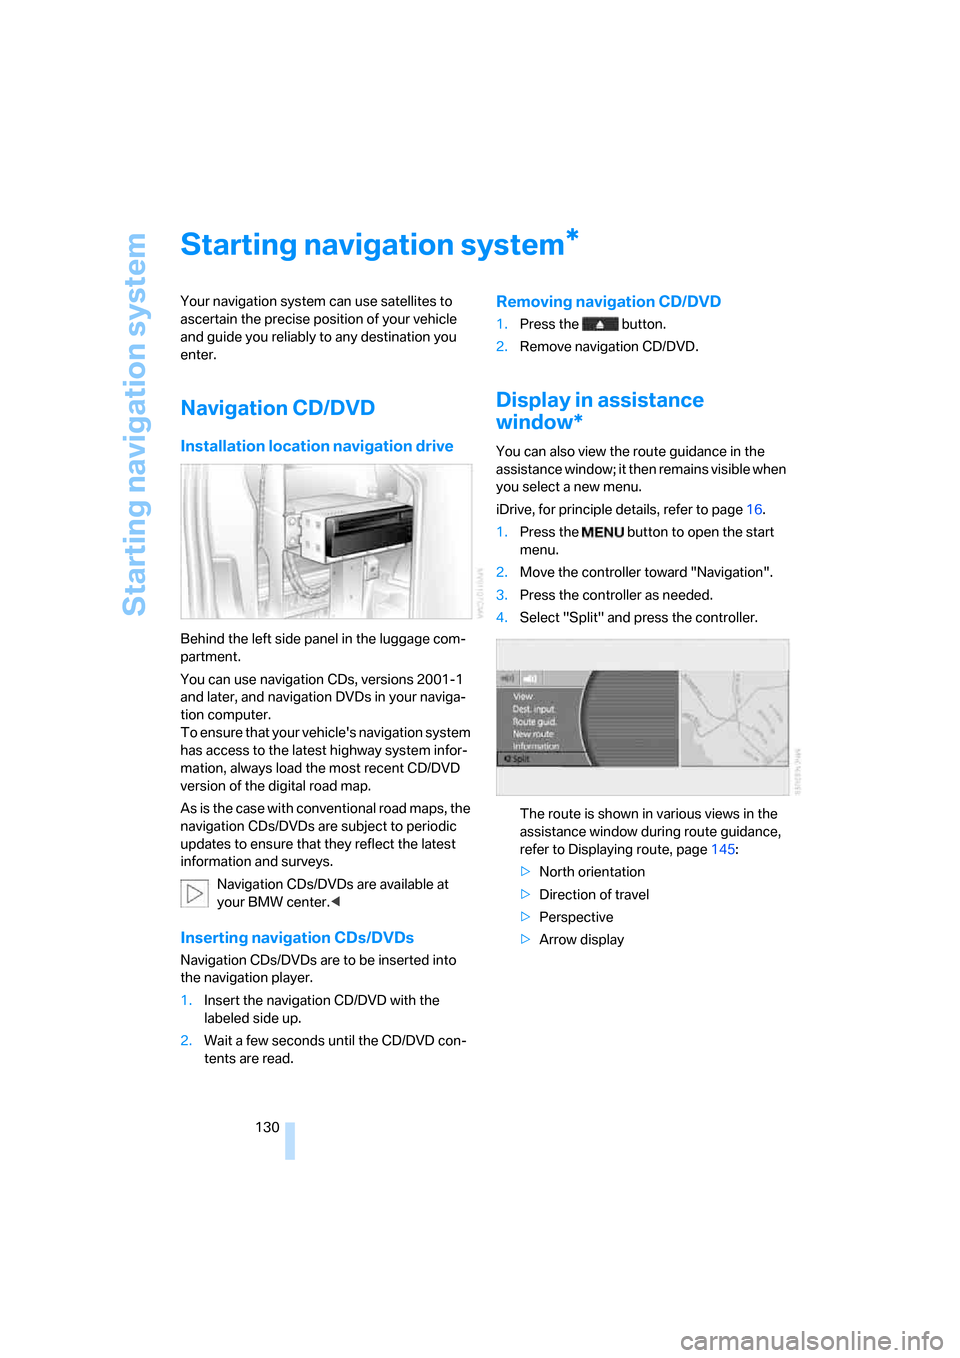
You can also view the route guidance in the
assistance window; it then remains visible when
you select a new menu.
iDrive, for principle details, refer to page16.
1.Press the button to open the start
menu.
2.Move the controller toward "Navigation".
3.Press the controller as needed.
4.Select "Split" and press the controller.
The route is shown in various views in the
assistance window during route guidance,
refer to Displaying route, page145:
>North orientation
>Direction of travel
>Perspective
>Arrow display
*
Page 133 of 254

Navigation
Driving tips
131Reference
At a glance
Controls
Communications
Entertainment
Mobility
Destination input
When entering your destination, you can select
from among the following options:
>Entering destination manually, see below.
>Selecting destination using a map, refer to
page135.
>Selecting destination using information,
refer to page135.
>Selecting from among recent destinations,
refer to page137.
>Selecting destination from address book,
refer to page139.
>Selecting home address, refer to page141.
After selecting your destination you can pro-
ceed to start the route guidance, refer to
page144.
Enter data only when the vehicle is sta-
tionary, and always give priority to the
applicable traffic regulations in the event of any
contradiction between traffic and road condi-
tions and the instructions issued by the naviga-
tion system. If you do not comply with this pre-
caution, you can endanger vehicle occupants
and other road users.<
iDrive, for principle details, refer to page16.
1.Press the button to open the start
menu.
2.Move the controller toward "Navigation".
Entering destination
manually
The system relies on a wordmatch principle to
make it easier for you to enter the names of
towns or streets. It supports various spellings
as well as automatic name completion, refer to
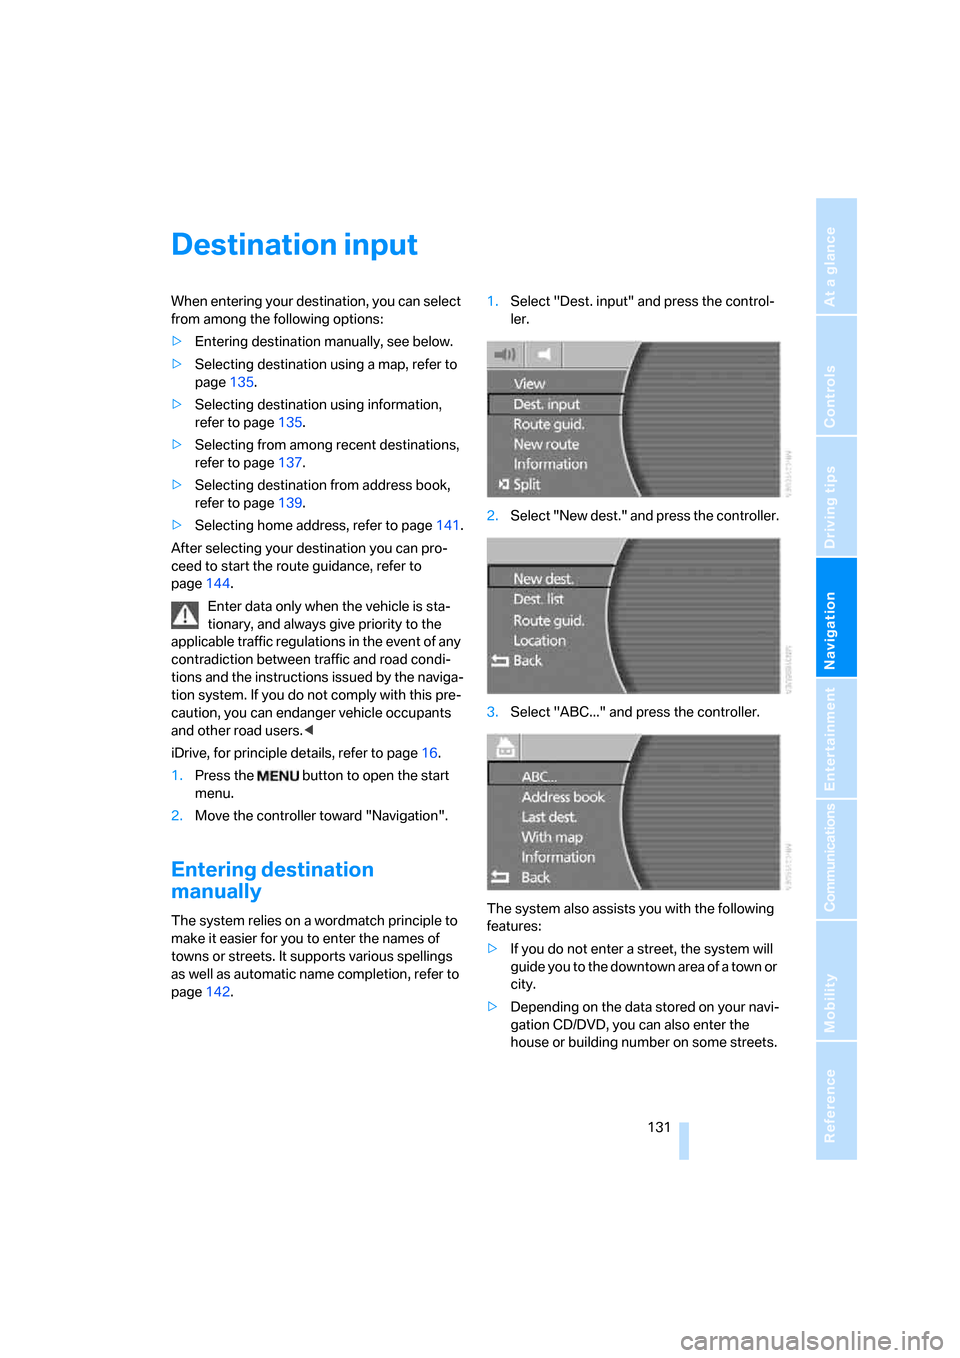
page142.1.Select "Dest. input" and press the control-
ler.
2.Select "New dest." and press the controller.
3.Select "ABC..." and press the controller.
The system also assists you with the following
features:
>If you do not enter a street, the system will
guide you to the downtown area of a town or
city.
>Depending on the data stored on your navi-
gation CD/DVD, you can also enter the
house or building number on some streets.