2008 AUDI TT ROADSTER engine
[x] Cancel search: enginePage 82 of 316
Clear vision
Service position The wiper blades can be changed more easily in the
service position .
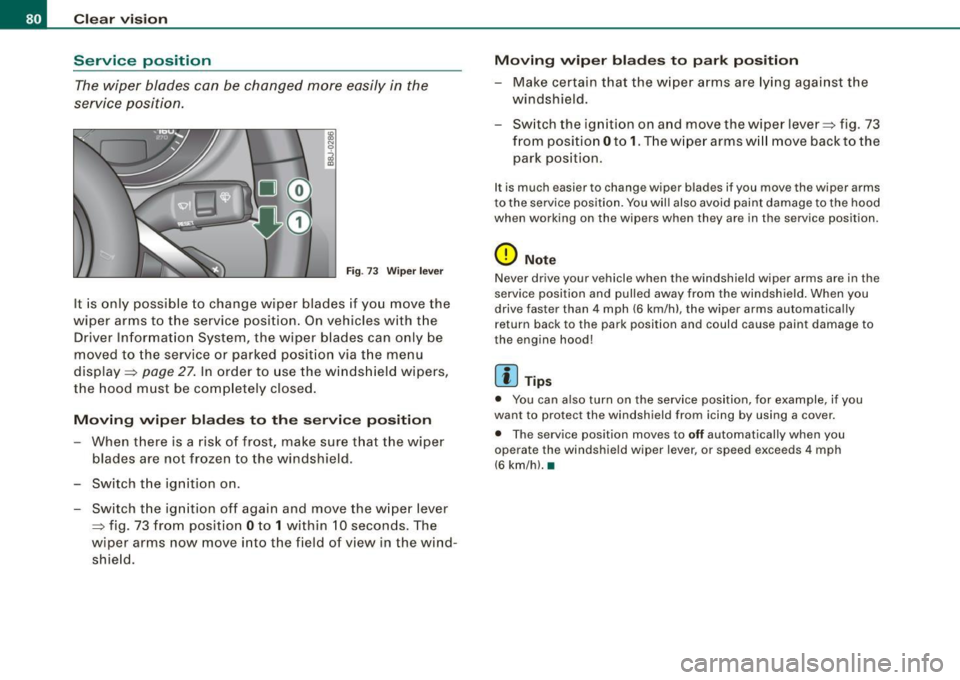
Fig . 73 Wiper lever
It is only possible to change wiper blades if you move the
w iper arms to the service position. On vehicles with the
Driver Information System , the wiper blades can only be
moved to the service or parked position via t he menu
display =>
page 27. In order to use the windshield wipers,
the hood must be completely closed.
Moving wiper blades to the service position
-When there is a risk of frost, make sure that the wiper
blades are not frozen to the windshield .
- Switch the ignition on .
- Switch the ignition off again and move the wiper lever
~ fig. 73 from position Oto 1 within 10 seconds . The
wiper arms now move into the field of view in the wind
shie ld.
Moving wiper blades to park position
-Make certain that the wiper arms are lying against the
windshield .
- Switch the ignition on and move the wiper lever~ fig . 73
from position Oto
1. The w iper arms w ill move back to the
park position.
I t is much easier to chang e wiper blad es if you mov e th e wiper arms
to the service position. You wil l also avoid paint damage to the hood
when working on the wip ers when they are in the service position .
0 Note
Never drive your vehicle when the windshield wiper arms are in the
service position and pulled away from the windshield . When you
drive faster than 4 mph (6 km/h) , the wiper arms automatica lly
return back to the park position and could cause paint damage to
the engine hood!
[ i ] Tips
• You can also turn on the service position, for example, if you
want to protect the windshield from icing by using a cover.
• The service position moves to
off automatically when you
operate the windshield wiper lever, or speed exceeds 4 mph
(6 km/hl. •
Page 97 of 316

Cigarette lighter/socket
Cigarette lighter
The socket of the cigarette lighter may be used for 12 volt
appliances.
Fig . 90 Open ashtray
with cigarette lighter
The cigarette lighter or socket only work with the ignition
on.
Using the cigarette lighter
- Slide the cover open to reach the c igarette lighter.
- Push the knob=> fig. 90 in .
- Wait until the cigarette lighter knob pops out.
- Remove the cigarette lighter immediately and use it.
- Reinsert cigarette lighter into the socket after use.
Connecting an appliance
- Slide the cover open to reach the cigarette lighter.
- Remove cigarette lighter.
- Plug in appliance to be used .
Contro ls and eq uip
ment
Seats and storage
The socket of the cigarette lighter may be used for 12-volt appli
ances with maximum consumption of up to 100 watts , such as a
flash ligh t, small vacuum cleaner, etc.
Before you purchase any accessories, always read and follow the
information in=>
page 296, "Additional accessories and parts
replacement" .
& WARNING
Improper use of the cigarette lighter can cause serious injury or
start a fire.
• Be careful when using the cigarette lighter. If you do not pay
attention to what you are doing when you are using the cigarette
lighter you can burn yourself.
0 Note
To avoid damaging the socket, only use plugs that fit properly.
[ i] Tips
• When the engine is off and accessories are still plugged in and
are on, the vehicle battery can still be drained.
• The vehicle battery must not be charged with a standard small
charger that plugs into the cigarette lighter or outlet .•
Storage
General
& WARNING
• Always remove objects from the instrument panel. Any items
not put away could slide around inside the vehicle while driving or
~
Vehicle care I I irechnical data
Page 100 of 316
Warm and cold
Warm and cold
Climate controls
Controls
The air conditioning automatically maintains the selected
temperature in the vehicleinterior throughout each
se aso n.
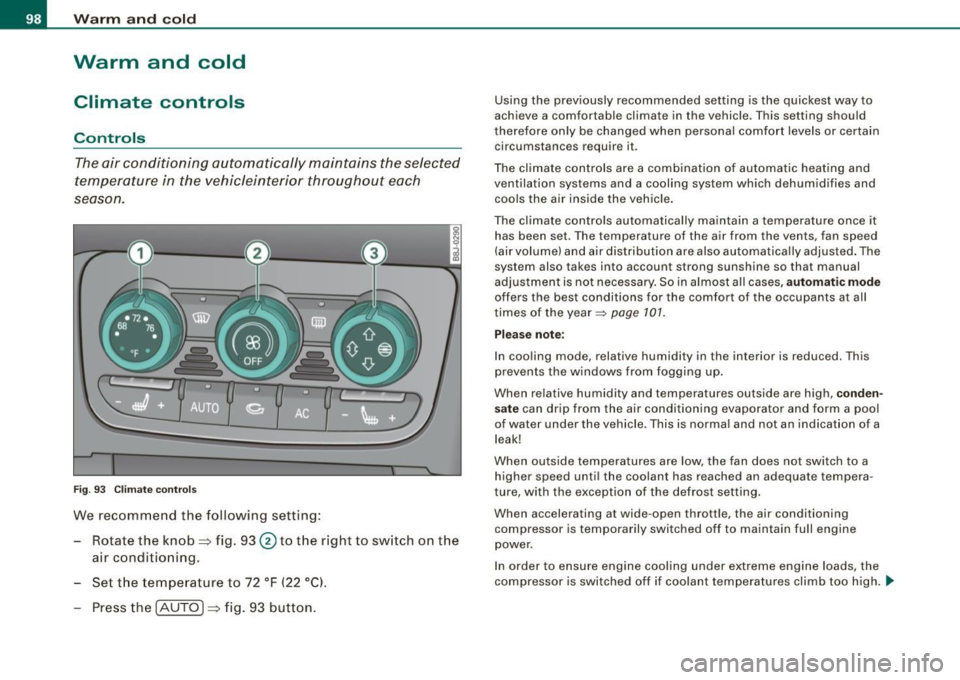
Fig . 93 C limate co ntro ls
We recomme nd the following setting:
Rotate the knob=> fig. 93 @to th e right to switch on the
air conditioning.
Set t he temperature to 72 °F ( 22 °Cl.
Press th e !AUTO ]=> fig . 93 button.
Using the previously recommended setting is the quickest way to
achieve a comfortable climate in the vehicle . T his setting should
therefore on ly be changed when persona l comfort levels or certain
circumstances require it .
The climate contr ols are a combination of automatic heating and
ventilation systems and a cooling system which dehumidifies and coo ls the a ir inside the veh ic le .
The climate controls automa tically ma intain a temperature once it
has been set . T he temperature of the air from the vents, fan speed
(air volume) and air dis tribution are also automa tica lly adjusted . The
system also takes into account strong sunshine so that manual
adjustment is no t necessary. So in al most a ll cases,
automatic mode
offers the best conditions for the comfort of the occupants at all
times of the year~
page 101.
Please note :
In cooling mode, relative humidity in the interior is reduced. This
prevents the w indows from fogging up.
When relative humidity and temperatures outside are high,
conden
sate
can drip from the air conditioning evaporator and form a poo l
of water under the vehicle . This is normal and not an indication of a
leak!
When outside temperatures are low, the fan does not switch to a
higher speed until the coolant has reached an adequate tempera
ture, with the exception of the defrost setting .
When accelerating at wide -open throttle, the air conditioning
compressor is temporarily switched off to maintain full engine
power .
I n order to ensure eng ine cooling under extreme engine loads, the
compressor is switched off if coolant temperatures climb too high. _,,,
Page 105 of 316

___________________________________________________ W_ a_ r_m _ a_ n_d_ c_ o_ ld _ __.11111
- To adjust the direction o f the airflow from the o utlet,
move the tab in the cen ter of the o utlet in the desired
direction . The direction of the air delivered from the
vents can be adjusted hor izontally and vertically .
G) Air flows to the windshield and the driver and front passenger
side windows
@ Air flows to the driver/fron t passeng er or to the driver and front
passenger side windows
© Air flows to the driver/front passenger
© Air flows to the footwe ll
Using the rotary knob, you can adjust air distribution=>
page 101 so
that air flows from specific vents=>
page 102, fig. 97.
Heated or unheated fresh air, or cooled air flows from the vents.
[ i ] Tip s
If climate control is running in cooling mode, air should flow mainly
from vents @ and
G). To achieve adequate coo ling, you should
never c lose the outlets completely .•
Using the climate controls economically
Economical use of the climate controls helps to save fuel.
When climate co ntrol is w orking in c ooling mode, engine
performa nce is reduced and fuel consum ption is affected .
To keep the t ime the air cond itioning is on as s hort as
poss ible, you s hould do the following :
- If yo u would like to save fue l, sw itch the air con ditioning
off .
- If you open t he windows while driving, switch the air
conditio ning off .
Contro ls and eq uip
ment
- If the ve hicle is extremely hot due to the heat of the sun,
br ie fl y open doors and windows .
c£> For the sake of the environment
When you save fuel, you reduce emissions from the vehicle .•
Rear window defogger [ffiJ
The rear window defogger clears the rear window of
condensation.
F ig . 9 8 Switc h for rear
w ind ow defo gg er
- Press the [ml button to turn t he rear window defogger on
and off.
The rear window defogger works only when the engine is running .
The indicator light in the button illuminates when the rear window
defogger is turned on .
The rear window defogger is switched off automatica lly after 10 to
20 m inutes, depending on the outside temperature .
At very low outside temperatures, the rear window defogger can be switched on continuously by pushing the
Qii) button for more than 2
seconds. This remains stored until the ignition is switched off . A ..,
Vehicle care I I Technical data
Page 108 of 316
• ..__O_ n_ t_h _ e_ r_ o_ a_ d ____________________________________________________ _
Ignition lock and ignition switch
Ignition lock
The igniti on key starts or s tops the eng ine.
Ignition off G)
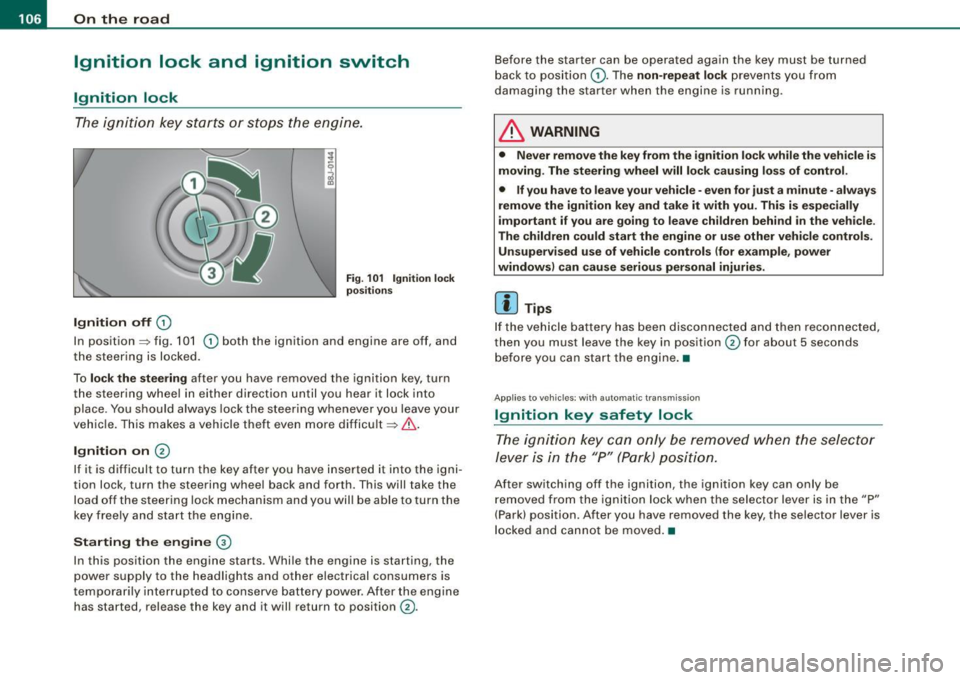
Fi g. 1 01 Ign it io n lock
po sition s
In posit ion => fig. 101 G) both the ignition and engine are off, and
t he steering is locked.
To
lo ck the steering after you have removed the ignition key, turn
the steering whee l in either direction until you hear it lock into
place . You should always lock the steering whenever you leave your
vehic le. This makes a vehicle theft even more difficult =>& .
Ignition on 0
If it is difficult to turn the key after you have inserted it into the igni
tion lock, turn the steering wheel back and forth. This will take the
load off the steering lock mechanism and you wil l be able to turn the
key freely and start the engine.
Starting the engine ®
In this position the engine starts . Whi le the engine is starting, the
power supply to the headlights and other electrical consumers is
temporari ly interrupted to conserve battery power . After the engine
has started, release the key and it will return to position
G) .
Before the starter can be operated again the key must be turned
back to posi tion
G) . The non -repeat lock prevents you from
damaging the starter when the engine is running.
& WARNING
• Never remove the key from the ignition lo ck while the veh icle is
moving. The steering wheel will lo ck causing lo ss of control .
• If you have to leave your vehicle -even for just a minute -always
remove the ign ition key and take it with you . This i s especially
i mportant if you are going to l eave children behind in the vehi cle .
The children could start the eng ine or u se other vehi cle control s.
Unsupe rv ised use of vehicle controls (for e xample , power
window s) can cau se serious per sonal injurie s.
[ i ] Tips
If the veh icle ba ttery has been disconnected a nd then reconnected,
then you must leave the key in position
G) for about 5 seconds
bef ore you can start the engine .•
Appl ies to vehicles: with automat ic trans miss io n
Ignition key safety lock
The ig nition ke y can only be rem oved when the selec tor
le ver i s in the "P" (Par k) p osition.
After switching off the ignition, the ignition key can only be
r emoved from the igni tio n lock w hen the se lector leve r is in the "P"
(Park) position . After you have removed the key, the selector lever is
l ocked and cannot be moved. •
Page 109 of 316
___________________________________________________ O _n_ t_h _ e_ r_ o _ a_ d __ ,n
Starting and stopping the engine
Starting the engine
The engine can only be started with on original Audi key
and the clutch pedal* depressed.
- Set the parking brake.
Move the selector lever to the neutral position (automatic
transmission: selector lever in P or N)
~ & .
- On vehicles with manual transmission, fully depress the
clutch pedal.
- Turn the ignition key to position
G) ~ page 106, fig. 101
- do not depress the gas pedal when starting the engine!
- Let go of the key as soon as the engine starts.
A cold engine may at first be loud after it has been started. This is
due to the hydraulic valves building up the oil pressure . This normal
and no need for concern.
If the engine does not star t immediately, stop trying after 10
seconds and then try to restart the engine about 30 seconds later.
& WARNING
Never start or let the engine run in a confined or enclosed area.
Exhaust fumes from the engine contain carbon monoxide, a color
less and odorless gas. Carbon monoxide can be fatal if inhaled .
• Never leave the engine idling unattended. An unattended
vehicle with a running engine poses a danger of personal injury or
theft.
Controls and equip
ment
0 Note
• Avoid high engine speeds, fast acceleration or heavy engine
loads while the engine is still cold. This could damage the engine.
• The engine cannot be started by pushing o r towing the vehicle.
~ For the sake of the environment
To avoid unnecessary engine wear and to reduce exhaust emis
sions, do not let your vehicle stand and warm up. Be ready to drive
off immediately after starting your vehicle. Maintain moderate
speed until the engine is completely warm. Remember, the engine
performs best at operating temperature. •
Stopping the engine
-Turn the ignition key to position G) ~ page 106 , fig. 101.
& WARNING
• Never turn off the engine until the vehicle has come to a
complete stop.
• The brake booster and servotronic only work when the engine
is running . With the ignition turned off, you have to apply more
force when steering or braking. Since you cannot steer and stop
normally, this can lead to accidents and serious injuries.
• The radiator fan can continue to run for up to 10 minutes even
after you have turned off the engine and removed the ignition key.
The radiator fan can also turn on again if the engine coolant heats
up because of intense sunlight or heat build-up in the engine
compartment. .,
I • •
Page 110 of 316
• ..__O_ n_ t_h _ e_ r_ o_ a_ d ____________________________________________________ _
0 Note
Do not stop the engine immediately after hard or extended driving.
Keep the engine running for approximately two minutes to prevent
excessive heat build-up. •
Parking brake
Parking brake
When the parking brake is set, it prevents the vehicle from
rolling away unintentionally.
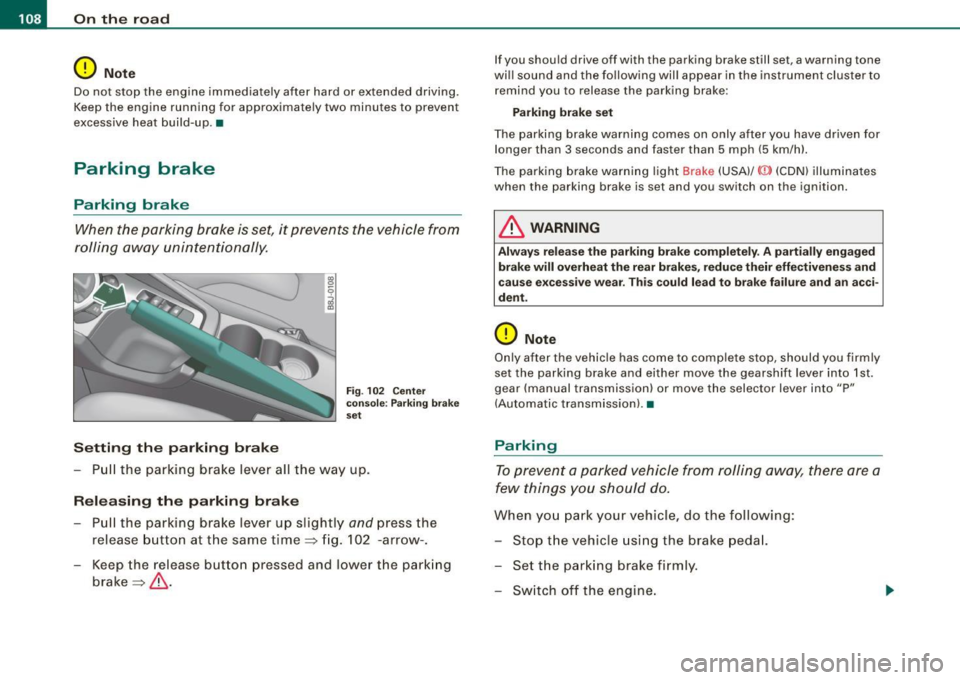
Setting the parking brake
Fig . 102 Center
console: Parking brake
set
- Pull the parking brake lever all the way up.
Releasing the parking brake Pull the parking brake lever up slightly
and press the
release button at the same time=> fig. 102 -arrow-.
Keep the release button pressed and lower the parking
brake=>
& -
If you should drive off with the parking brake still set, a warning tone
will sound and the following will appear in the instrument cluster to remind you to release the parking brake:
Parking brake set
The parking brake warning comes on only after you have driven for longer than 3 seconds and faster than 5 mph (5 km/h).
The parking brake warning light Brake (USA)/
{CD) (CON) illuminates
when the parking brake is set and you switch on the ignition.
& WARNING
Always release the parking brake completely . A partially engaged
brake will overheat the rear brakes, reduce their effectiveness and
cause excessive wear. This could lead to brake failure and an acci
dent.
0 Note
Only after the vehicle has come to complete stop, should you firmly
set the parking brake and either move the gearshift lever into 1st .
gear (manual transmission) or move the selector lever into "P"
(Automatic transmission). •
Parking
To prevent a parked vehicle from rolling away, there are a
few things you should do.
When you park your vehicle, do the following:
- Stop the vehicle using the brake pedal.
- Set the parking brake firmly.
- Switch off the engine.
Page 113 of 316
On the road -
----------------
CRUISE (US mod ell/ f-f (Canadian mod ell will a lso light up in the
instrument cluster .
& WARNING
• Always pay att enti on to traffic ev en whe n the c rui se control is
swi tched o n. Yo u are alway s resp onsi ble for your spe ed and the
di stanc e betw een your veh icle and other ve hic le s.
• Fo r sa fet y re as on s, th e c ruise control shou ld not be u sed in the
c it y, in stop -and -go traffic , on twi sting road s and when road condi
t ion s a re poor (such as ice, fog, gra vel, hea vy ra in and hydro
planing ) - risk of accid ent.
• Turn off the cr uis e control t empor arily when e nte ring turn
lane s, highwa y ex it lane s or in con stru ctio n z one s.
• Please note that inad vertentl y "re sting " your foot on the a ccel
er ato r ped al ca use s t he crui se control not to br ake . Thi s is because
the cru ise control i s overridden b y the dri ve r's acc eleration .
[ i] Tip s
• Vehicles w ith manua l transmission : You can at tain the set speed
only if the currently engaged gear allows it and the engine is not
stressed. Shifting to a higher or lower gear promptly will allow the
engine to run smooth ly .
• The cruise control cannot maintain a constant speed when
driving downhi ll. The vehicle will acce lerate under its own weight .
Downshift to a lower gear or use the brakes to s low down. •
Changing speed
-Press lever © in the 0 or O direction ~ page 110,
fig. 103 to increase or dec rease your speed.
- Release the lever to save that speed .
Controls and equip
ment
Change speed in increments of 1 mph (1 km/h) by lightly pressing
the lever . If you keep the lever pressed down, you will a lter your
speed in 5 mph (10 km /h) increments .
You can a lso press the acce lerator pedal down to increase your
speed, e.g. if you want to pass someone. The speed you saved
earlier will resume as soon as you release the accelerator pedal.
I f , however, you exceed your saved speed by 5 mph (10 km/h) for
longer than 5 minutes, the cruise control will turn off temporarily .
The symbol will go ou t but the saved speed will be retained. •
Presetting your sp eed
You can preset your desired speed while the vehicle is not
moving.
Turn on the ignition.
P ull lever @into position
0 ~ page 110, fig. 103.
Press the lever in the
0 or O direction to increase or
decrease your speed.
- Release the lever to save that speed .
This function makes it possible, for example, to save the speed you
want before driving on the highway . Once on the highway, activate
the cruise contro l by pulling the lever toward
(D . •
Switching the system off
Tempor ary d ea ctiv ati o n
Press the brake pedal, or
- Keep the c lutch pedal pressed down
longer, or
- Press t he lever © into positio n
0 (n ot c licked i nto pla ce)
~ page 110 , fig. 1 03 , or ~
I • •