Page 57 of 208
Press the button to resume the previously set speed.
Disengaging cruise control
Cruise control can also be disengaged by:
Pressing the CRUISE button (CRUISE ON will no longer be shown in the function display).
Putting the gear selector in Neutral ( N).
WARNING
Cruise control should not be used in heavy traffic or when driving on wet or slippery roads. Cruise control may not
maintain set speed on steep downgrades.
64 02 Instruments and controls
Right-side steering wheel lever
Windshield wipers
A. Windshield/headlight washers
B. Rain sensor (option) - on/off, see page 65
C. Thumb wheel
D. Used on wagon models only
Windshield wipers off
The windshield wipers are off when the lever is in position 0.
Manual wiper function
From position 0, move the lever upward. The windshield wipers will sweep one stroke at a time for as long as the lever
is held up.
ProCarManuals.com
Page 60 of 208
when the this function is activated.
66 02 Instruments and controls
Steering wheel adjustment, Hazard warning flashers
Steering wheel adjustment
Both the height and the reach of the steering wheel can be adjusted to a comfortable position for the driver.
1. Pull down the lever on the steering column to release the steering wheel.
2. Adjust the steering wheel to a suitable position
3. Press the lever back into place to lock the steering wheel in the new position. If necessary, press the steering wheel
slightly while pressing the lever into the locked position.
Check that the steering wheel is locked in the new position.
WARNING
Never adjust the steering wheel while driving.
Hazard warning flashers
The four-way flasher should be used to indicate that the vehicle has become a traffic hazard. To activate the flashers,
press the triangular button in the center dash. Press the button again to turn off the flashers.
ProCarManuals.com
Page 61 of 208

NOTE
Regulations regarding the use of the hazard warning flasher may vary, depending on where you live.
67 02 Instruments and controls
Parking brake
Parking brake (hand brake)
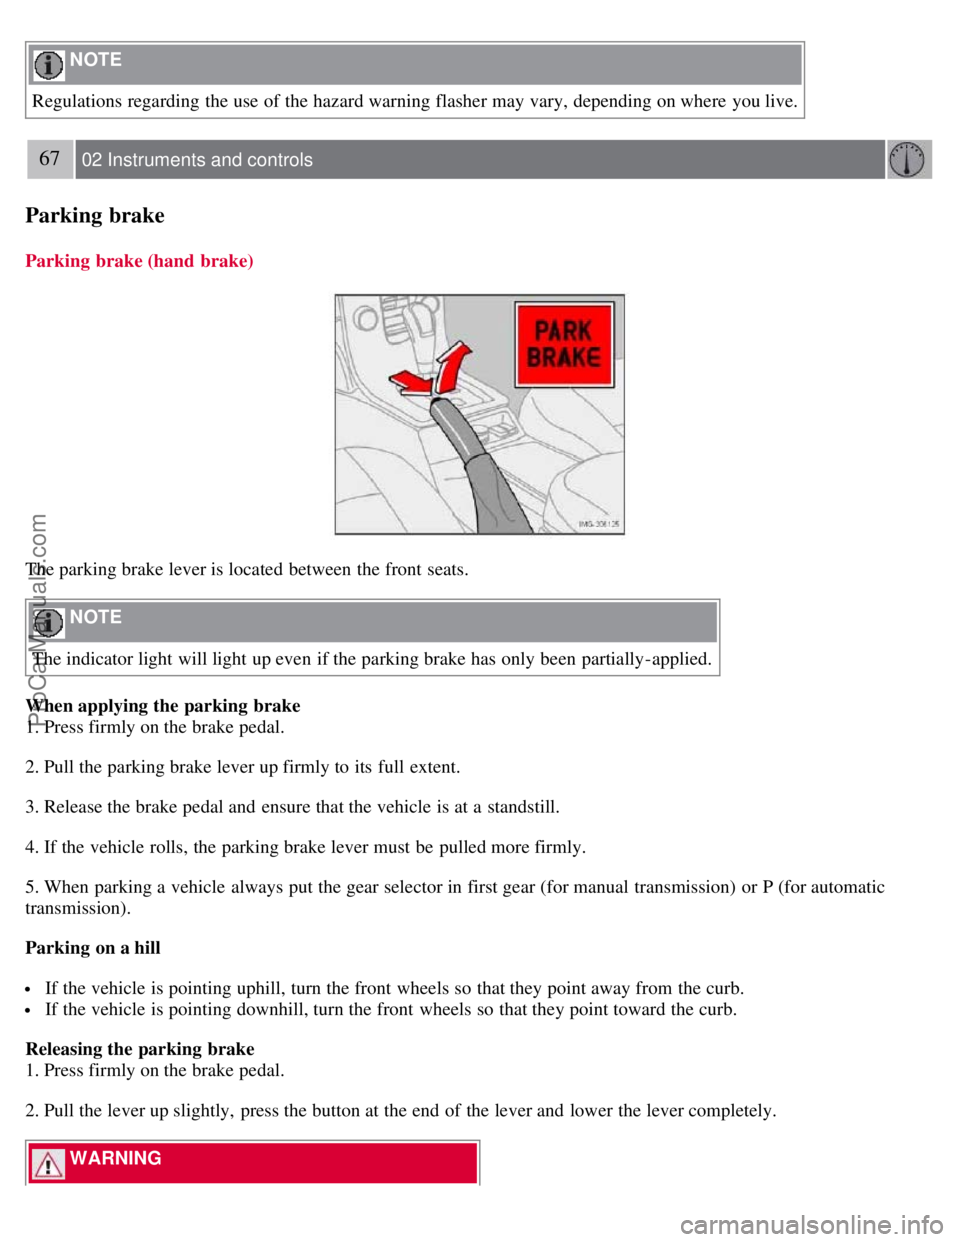
The parking brake lever is located between the front seats.
NOTE
The indicator light will light up even if the parking brake has only been partially-applied.
When applying the parking brake
1. Press firmly on the brake pedal.
2. Pull the parking brake lever up firmly to its full extent.
3. Release the brake pedal and ensure that the vehicle is at a standstill.
4. If the vehicle rolls, the parking brake lever must be pulled more firmly.
5. When parking a vehicle always put the gear selector in first gear (for manual transmission) or P (for automatic
transmission).
Parking on a hill
If the vehicle is pointing uphill, turn the front wheels so that they point away from the curb.
If the vehicle is pointing downhill, turn the front wheels so that they point toward the curb.
Releasing the parking brake
1. Press firmly on the brake pedal.
2. Pull the lever up slightly, press the button at the end of the lever and lower the lever completely.
WARNING
ProCarManuals.com
Page 62 of 208

Pull up the parking brake lever up firmly to its full extent.
Ashtrays/cigarette lighter
The auxiliary sockets can also be used for cigarette lighters. Ashtrays and lighters are available as accessories. Please
contact your Volvo retailer.
68 02 Instruments and controls
Power windows
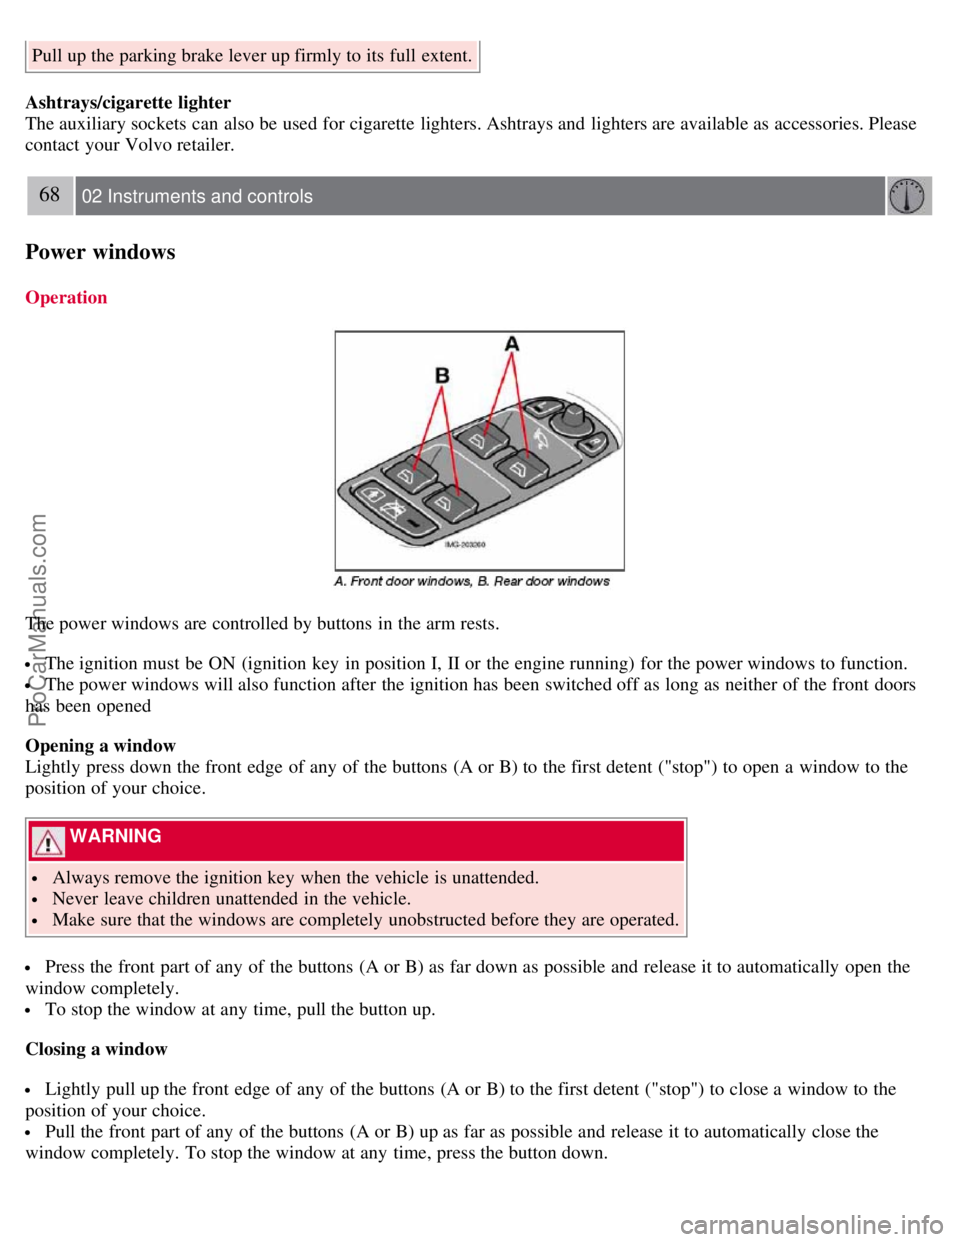
Operation
The power windows are controlled by buttons in the arm rests.
The ignition must be ON (ignition key in position I, II or the engine running) for the power windows to function.
The power windows will also function after the ignition has been switched off as long as neither of the front doors
has been opened
Opening a window
Lightly press down the front edge of any of the buttons (A or B) to the first detent ("stop") to open a window to the
position of your choice.
WARNING
Always remove the ignition key when the vehicle is unattended.
Never leave children unattended in the vehicle.
Make sure that the windows are completely unobstructed before they are operated.
Press the front part of any of the buttons (A or B) as far down as possible and release it to automatically open the
window completely.
To stop the window at any time, pull the button up.
Closing a window
Lightly pull up the front edge of any of the buttons (A or B) to the first detent ("stop") to close a window to the
position of your choice.
Pull the front part of any of the buttons (A or B) up as far as possible and release it to automatically close the
window completely. To stop the window at any time, press the button down.
ProCarManuals.com
Page 67 of 208
mirrors will automatically move to the position that they were in when the doors were most recently locked with the
same remote control.
WARNING
The mirrors should always be adjusted prior to driving. Objects seen in the passenger's side wide -angle door mirror
are closer than they appear to be.
72 02 Instruments and controls
Power moonroof (option)
Operating the moonroof
To operate the moonroof, the ignition key must first be turned to the intermediate or drive position (position I, II or the
engine running). The moonroof can be opened in two ways:
A. Tilt position
B. Sliding moonroof
1. Auto open
2. Manual open
3. Manual close
ProCarManuals.com
Page 68 of 208

4. Auto close
5. Tilt open
6. Tilt close
Tilt position
Open: Press the rear edge of the control upward to position 5.
Close: Pull the rear edge of the control down to position 6.
Sliding moonroof
Auto open/close
Open: Pull the switch as far back as possible (to position 1) and release it to automatically slide open the moonroof.
Close: Push the switch as far forward as possible (to position 4) and release it to automatically close the moonroof.
Manual open/close
Open: Pull the switch back to the first stop (position 2) and hold it until the moonroof has opened to the position of
your choice.
Close: Push the switch forward to the first stop (position 3) and hold it until the moonroof has closed to the position of
your choice, or has closed completely.
WARNING
If the moonroof is obstructed during auto-close operation, it will automatically reverse direction and return to its
starting position.
During manual closing, if the moonroof is obstructed, immediately open it again.
73 02 Instruments and controls
Power moonroof (option)
NOTE
If the moonroof is repeatedly obstructed during auto-close operation, an overload circuit breaker will temporarily halt
moonroof function. The moonroof will return to normal function after a brief cool-down period.
WARNING
Never open or close the moonroof if it is obstructed in any way.
Never allow a child to operate the moonroof.
Never extend any object or body part though the open moonroof, even if the vehicle's ignition is completely
switched off.
Never leave a child alone in a vehicle.
CAUTION
Remove ice and snow before opening the moonroof.
ProCarManuals.com
Page 72 of 208

NOTE
For your security, the HomeLink Universal Transceiver is designed to not function if you lock your car from the
outside.
Retain the original transmitter(s) for future programming procedures (for example, if you purchase a new vehicle).
For your own security, erase all programmed buttons on the HomeLink Universal Transceiver when you sell your
vehicle.
Metallic sun protection films should not be used on any windows in a vehicle equipped with HomeLink Universal
Transceiver. This could interfere with the transceivers function.
Operating the HomeLink Universal Transceiver
Once programmed, the HomeLink Universal Transceiver can be used in place of your handheld transmitters.
NOTE
The HomeLink universal transceiver will function for 30 minutes after the driver's door has been opened without
switching on the vehicle's ignition.
Press the programmed HomeLink button to activate the garage door, driveway gate, security lightning, home security
system etc.
Your original hand -held transmitters may, of course, be used at any time.
WARNING
If you use HomeLink to open a garage door or gate, be sure no one is near the gate or door while it is in motion.
Do not use the HomeLink Universal Transceiver with any garage door opener that lacks safety "stop" and
"reverse" features as required by federal safety standards. (This includes any garage door opener model manufactured
before April 1, 1982). A garage door opener that cannot "detect" an object, signalling the door to "stop" and
"reverse" does not meet current federal safety standards. Using a garage door opener without these features increases
the risk of serious injury or death. For more information on this matter, call toll-free 1-800-355-3515. (Internet:
www.HomeLink.com
).
Programming the transceiver for the first time (U.S. residents)
1. For first time training, press and hold the two outer HomeLink buttons, releasing only when the HomeLink indicator
light begins to flash after 20 seconds. (Do not perform this step when training the additional HomeLink buttons.)
2. Position the hand -held transmitter 1-3 inches away from the HomeLink surface
77 02 Instruments and controls
Home Link® Universal Transceiver (option)
(located on your sun visor), keeping the HomeLink indicator light in view.
3. Using both hands, simultaneously press and hold both the desired HomeLink button and hand held transmitter
button. DO NOT release until the HomeLink indicator light flashes slowly and then rapidly. When the indicator light
flashes rapidly, both buttons may be released. (The rapid flashing indicates successful training.)
NOTE
ProCarManuals.com
Page 86 of 208

2. Use this control to raise or lower the front edge of the seat cushion.
3. Use this control to raise or lower the rear edge of the seat cushion.
4. Turn this knob (option on some passenger's seats) to adjust the firmness of the lumbar support
1.
5. Turn this knob to adjust the backrest tilt.
6. Control panel for the optional power seat.
WARNING
Do not adjust the seat while driving.
The seat should be adjusted so that the brake pedal can be depressed fully.
Position the seat as far rearward as comfort and control allow.
1 Also applies to the optional power seat.
Folding down the front seat backrests
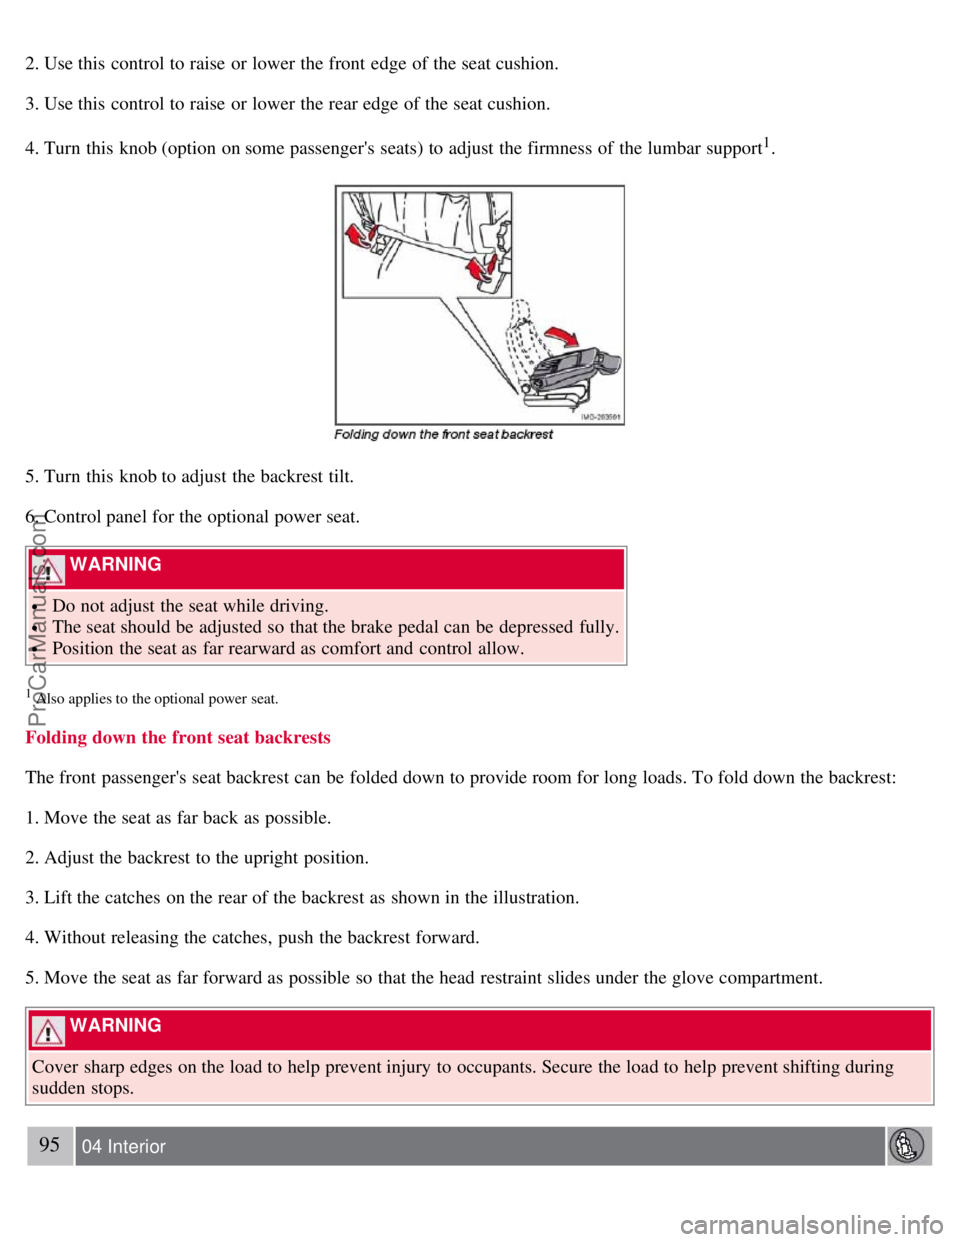
The front passenger's seat backrest can be folded down to provide room for long loads. To fold down the backrest:
1. Move the seat as far back as possible.
2. Adjust the backrest to the upright position.
3. Lift the catches on the rear of the backrest as shown in the illustration.
4. Without releasing the catches, push the backrest forward.
5. Move the seat as far forward as possible so that the head restraint slides under the glove compartment.
WARNING
Cover sharp edges on the load to help prevent injury to occupants. Secure the load to help prevent shifting during
sudden stops.
95 04 Interior
ProCarManuals.com