2007 VOLVO S40 fog light
[x] Cancel search: fog lightPage 46 of 208

Even so, an uncorrected condition could hurt fuel economy, emission controls, and drivability. Extended driving
without correcting the cause could even damage other components in your car.
NOTE
Canadian models are equipped with the second symbol.
2. Anti-lock Brake system (ABS)
If the warning light comes on, there is a malfunction of the ABS system (the standard braking system will still
function).
The vehicle should be driven to a trained and qualified Volvo service technician for inspection. See page 140
for
additional information.
NOTE
Canadian models are equipped with the second symbol.
3. Rear fog light
This symbol indicates that the rear fog light (located in the driver's side taillight cluster) is on.
4. Stability system STC or DSTC
This indicator symbol flashes when the STC (Stability and Traction control system) or the DSTC (Dynamic Stability
and Traction control system) is actively working to stabilize the car. See page 142
for more detailed information.
5. Not in use
6. Fuel level warning light
When this light comes on, there are approximately 2.1 US gallons (8 liters) of fuel remaining in the tank.
53 02 Instruments and controls
Symbols - instrument panel
Symbols - right side
ProCarManuals.com
Page 51 of 208

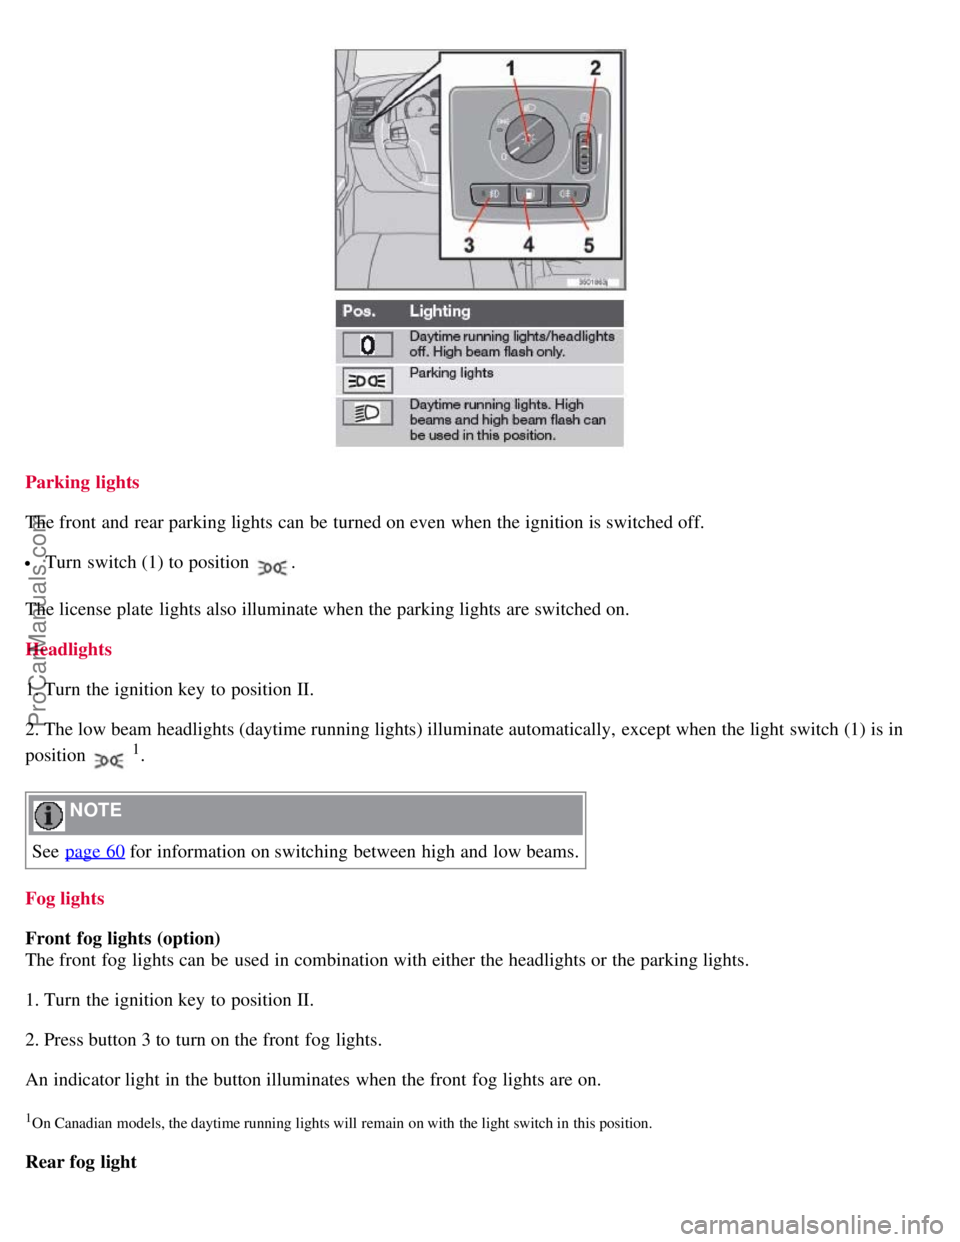
Parking lights
The front and rear parking lights can be turned on even when the ignition is switched off.
Turn switch (1) to position .
The license plate lights also illuminate when the parking lights are switched on.
Headlights
1. Turn the ignition key to position II.
2. The low beam headlights (daytime running lights) illuminate automatically, except when the light switch (1) is in
position
1.
NOTE
See page 60
for information on switching between high and low beams.
Fog lights
Front fog lights (option)
The front fog lights can be used in combination with either the headlights or the parking lights.
1. Turn the ignition key to position II.
2. Press button 3 to turn on the front fog lights.
An indicator light in the button illuminates when the front fog lights are on.
1On Canadian models, the daytime running lights will remain on with the light switch in this position.
Rear fog light
ProCarManuals.com
Page 52 of 208

The single rear fog light is located in the driver's side taillight cluster.
The rear fog light will only function in combination with the high/low beam headlights or the optional front fog lights.
1. Turn the ignition key to position II.
2. Press button 5 to turn on the rear fog light.
An indicator light in the button illuminates when the rear fog light is on.
NOTE
The rear fog light is considerably brighter than the normal taillights and should be used only when conditions such as
fog, rain, snow, smoke or dust reduce visibility for other vehicles to less than 500 ft. (150 meters).
59 02 Instruments and controls
Lighting panel
Instrument panel lighting
The instrument panel lighting illuminates when the ignition is in position II and the light switch (1) is in either position
or .
NOTE
To make it easier to read the odometer, trip odometer, clock, and ambient temperature, these gauges illuminate when
the vehicle is unlocked and when the key has been removed from the ignition switch. The lighting will go out when
the vehicle is locked.
Move the thumb wheel (2) up to increase brightness or down to decrease brightness.
Unlocking the fuel filler door
With the ignition switched off, press button 4 to unlock the fuel filler door. Please note that the fuel filler door will
remain unlocked until the car begins to move forward.
An audible click will be heard when the fuel filler door re-locks.
60 02 Instruments and controls
Left-side steering wheel lever
Lever positions
ProCarManuals.com
Page 82 of 208

Electronic Climate Control (ECC) - option
automatically if AUTO is selected. The previously set blower speed is disconnected.
NOTE
If the knob is turned counterclockwise and the blower indication in the display goes out, the blower and the air
conditioning are switched off. The display shows the blower symbol and OFF.
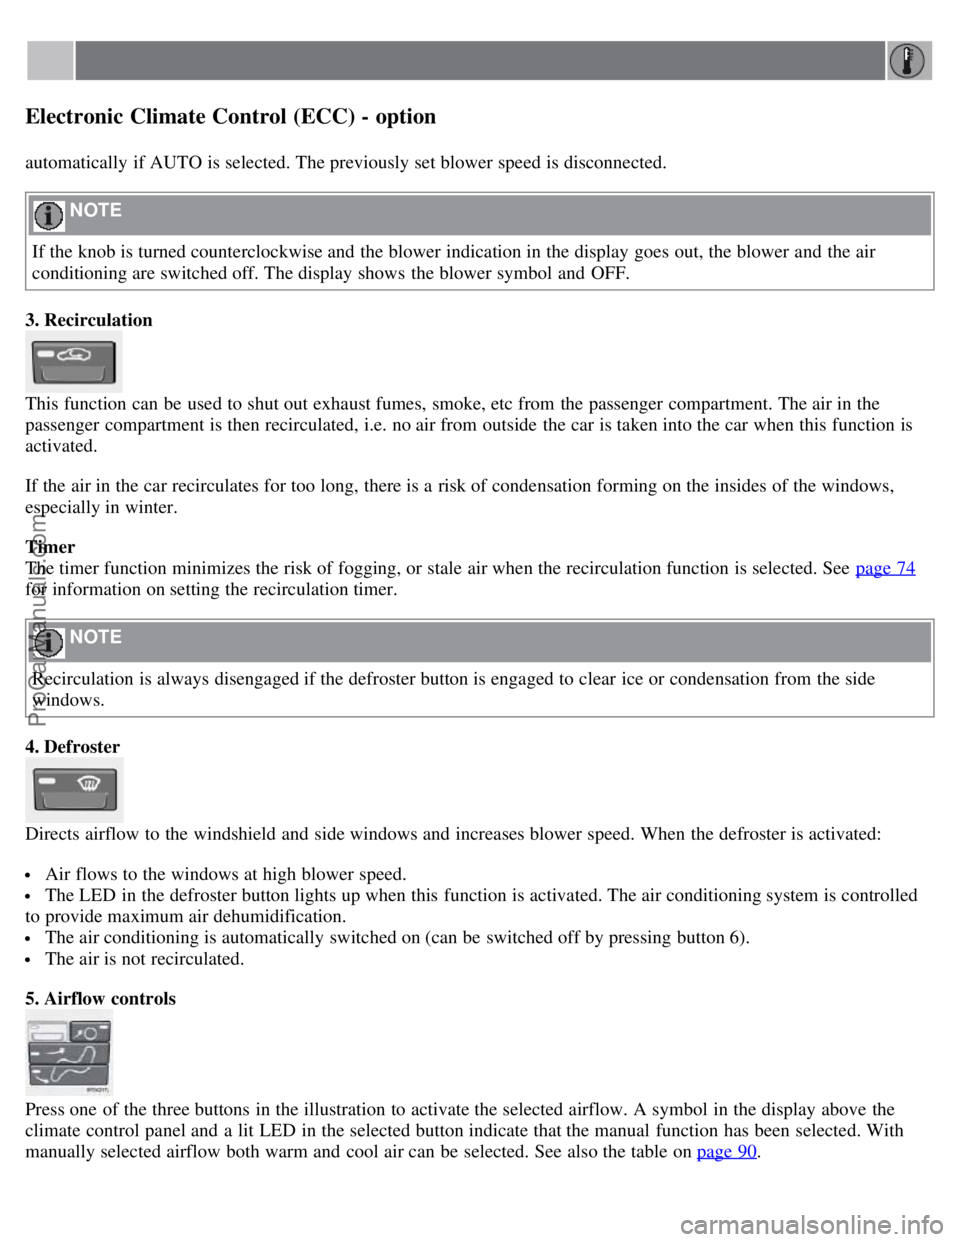
3. Recirculation
This function can be used to shut out exhaust fumes, smoke, etc from the passenger compartment. The air in the
passenger compartment is then recirculated, i.e. no air from outside the car is taken into the car when this function is
activated.
If the air in the car recirculates for too long, there is a risk of condensation forming on the insides of the windows,
especially in winter.
Timer
The timer function minimizes the risk of fogging, or stale air when the recirculation function is selected. See page 74
for information on setting the recirculation timer.
NOTE
Recirculation is always disengaged if the defroster button is engaged to clear ice or condensation from the side
windows.
4. Defroster
Directs airflow to the windshield and side windows and increases blower speed. When the defroster is activated:
Air flows to the windows at high blower speed.
The LED in the defroster button lights up when this function is activated. The air conditioning system is controlled
to provide maximum air dehumidification.
The air conditioning is automatically switched on (can be switched off by pressing button 6).
The air is not recirculated.
5. Airflow controls
Press one of the three buttons in the illustration to activate the selected airflow. A symbol in the display above the
climate control panel and a lit LED in the selected button indicate that the manual function has been selected. With
manually selected airflow both warm and cool air can be selected. See also the table on page 90
.
ProCarManuals.com
Page 156 of 208

Exterior plastic components
Cleaning exterior plastic components should be done with a cleaning agent specially designed for this purpose.
Solvents or stain removers should not be used. Consult your Volvo retailer.
NOTE
When washing the car, remember to remove dirt from the drain holes in the doors and sills.
NOTE
During high pressure washing, the spray mouthpiece must never be closer to the vehicle than 13" (30 cm). Do not
spray into the locks.
When washing or steam cleaning the engine, avoid spraying water or steam directly on the electrical components
or toward the rear side of the engine. Special moonroof cautions:
Always close the moonroof and sun shade before washing your vehicle.
Never use abrasive cleaning agents on the moonroof.
Never use wax on the rubber seals around the moonroof
Automatic washing - simple and quick
We do NOT recommend washing your car in an automatic wash during the first six months (because the paint will not
have hardened sufficiently).
An automatic wash is a simple and quick way to clean your car, but it is worth remembering that it may not be as
thorough as when you yourself go over the car with sponge and water. Keeping the underbody clean is most important,
especially in the winter. Some
177 08 Car care
Washing and cleaning the car
automatic washers do not have facilities for washing the underbody.
CAUTION
Before driving into an automatic car wash, turn off the optional rain sensor to avoid damaging the windshield
wipers.
Make sure that side view mirrors, auxiliary lamps, etc, are secure, and that any antenna(s) are retracted or
removed. Otherwise there is risk of the machine dislodging them.
Chromed wheels : Clean chrome-plated wheels using the same detergents used for the body of the vehicle.
Aggressive wheel-cleaning agents can permanently stain chrome-plated wheels
WARNING
When the car is driven immediately after being washed, apply the brakes several times in order to remove any
moisture from the brake linings.
Engine cleaning agents should not be used when the engine is warm. This constitutes a fire risk.
Exterior lighting
Condensation may form temporarily on the inside of the lenses of exterior lights such as headlights, fog lights, or
taillights. This is normal and the lights are designed to withstand moisture. Normally, condensation will dissipate after
the lights have been on for a short time.
ProCarManuals.com
Page 175 of 208

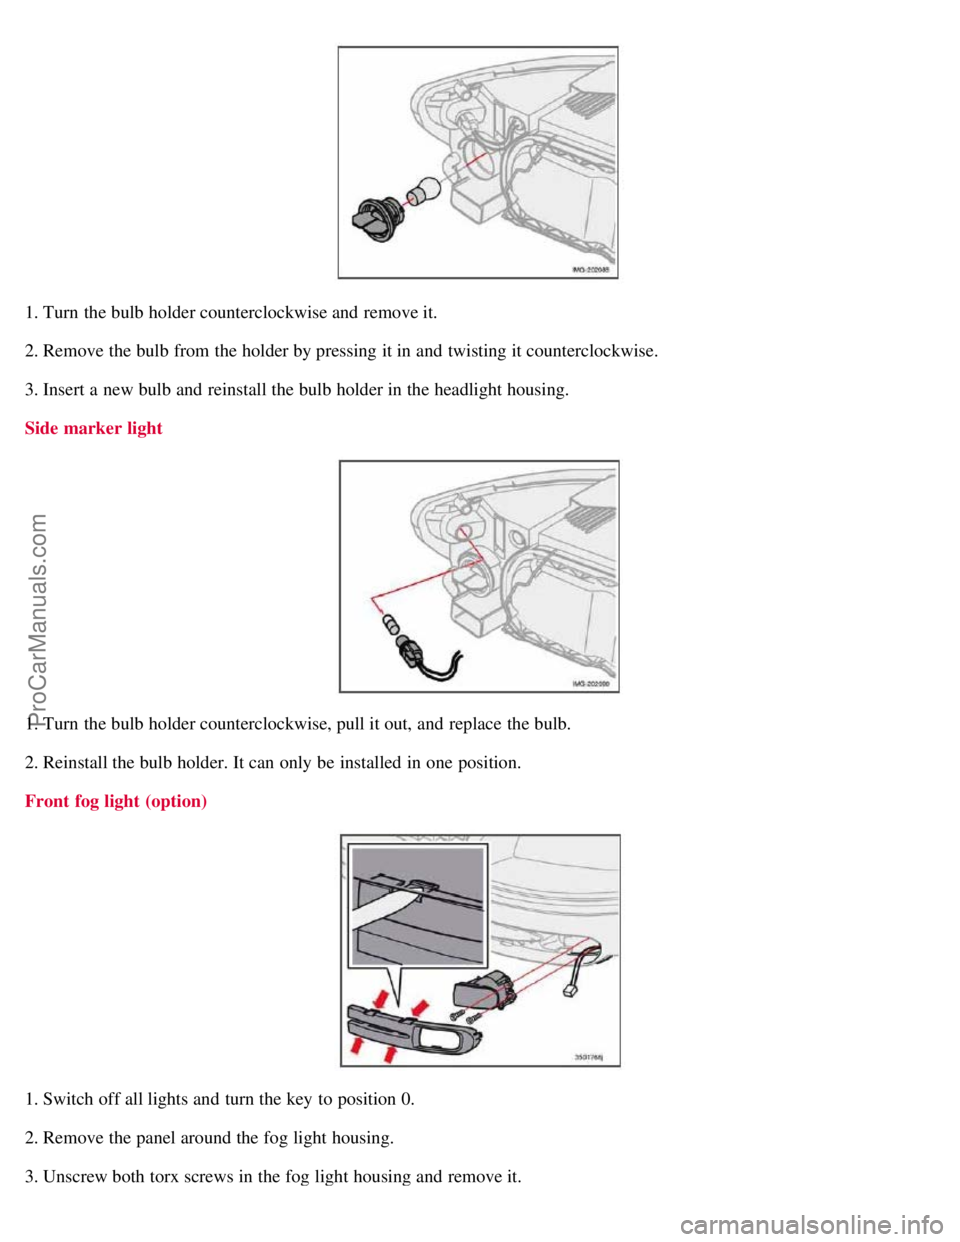
1. Turn the bulb holder counterclockwise and remove it.
2. Remove the bulb from the holder by pressing it in and twisting it counterclockwise.
3. Insert a new bulb and reinstall the bulb holder in the headlight housing.
Side marker light
1. Turn the bulb holder counterclockwise, pull it out, and replace the bulb.
2. Reinstall the bulb holder. It can only be installed in one position.
Front fog light (option)
1. Switch off all lights and turn the key to position 0.
2. Remove the panel around the fog light housing.
3. Unscrew both torx screws in the fog light housing and remove it.
ProCarManuals.com
Page 176 of 208

4. Disconnect the connector from the bulb.
5. Turn the bulb counterclockwise and pull it out.
6. Install the new bulb in its seat and turn it clockwise.
7. Reconnect the connector to the bulb.
199 09 Maintenance and servicing
Replacing front bulbs
8. Secure the fog light housing with the screws and press the panel back into place.
200 09 Maintenance and servicing
Replacing taillight bulbs
Removing the taillight bulb holder
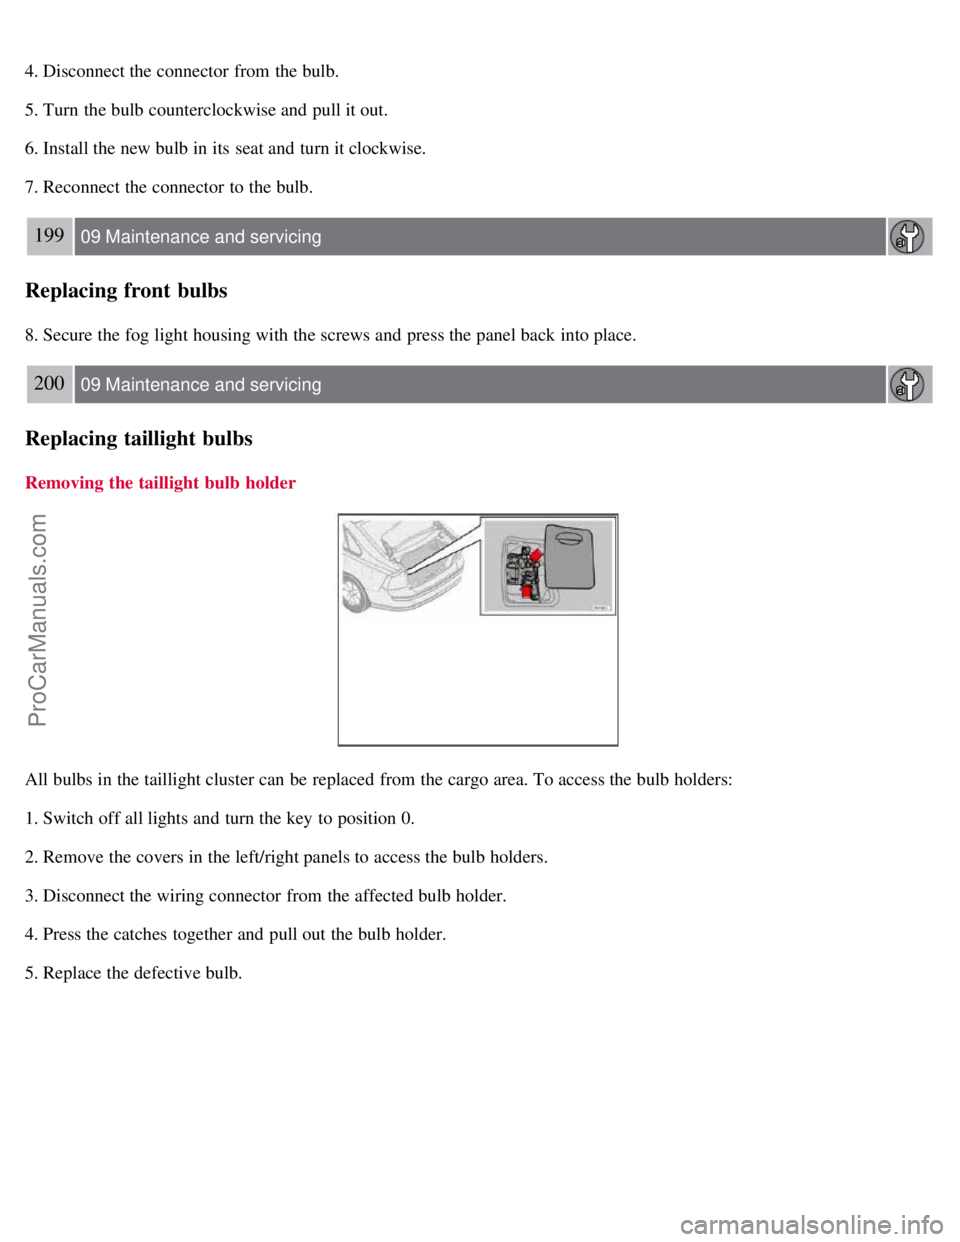
All bulbs in the taillight cluster can be replaced from the cargo area. To access the bulb holders:
1. Switch off all lights and turn the key to position 0.
2. Remove the covers in the left/right panels to access the bulb holders.
3. Disconnect the wiring connector from the affected bulb holder.
4. Press the catches together and pull out the bulb holder.
5. Replace the defective bulb.
ProCarManuals.com