2007 VOLVO S40 change wheel
[x] Cancel search: change wheelPage 53 of 208

1. Turn signals, lane change position
2. Turn signals, position for normal turns
3. High beam flash
4. Toggle between high and low beams, Home Safe lighting
Turn signals
When turning
Move the lever as far up or down as possible (to position 2) to start the turn signals. The turn signals will be cancelled
automatically by the movement of the steering wheel, or the lever can be returned to its initial position by hand.
When changing lanes
The driver can automatically flash the turn signals 3 times by:
Moving the turn signal lever up or down to position 1 and releasing it.
Moving the lever up or down to position 2 and immediately back to its original position.
NOTE
This automatic flashing sequence can be interrupted by immediately moving the lever in the opposite direction.
If the turn signal indicator flashes faster than normal, check for a burned-out turn signal bulb.
High/low beam headlights
Continuous high beams
1. Turn the ignition key to position II.
2. With the light switch (1) in position
, (see page 58) pull the turn signal lever toward the steering wheel (position
4) to toggle between high and low beams.
High beam flash
1. Turn the ignition key to position II.
2. Pull the turn signal lever to position
3. The high beams will remain on until the lever is released.
Home safe lighting
ProCarManuals.com
Page 54 of 208
When you leave your car at night, you can make use of the home safe lighting function to illuminate the area in front
of the car.
1. Remove the key from the ignition switch.
2. Pull the direction indicator lever as far as possible towards the steering wheel (to position 4) and release it.
3. Exit the car and lock the doors.
The headlights and parking lights will illuminate and remain on for 30
1, 60 or 90 seconds. The time interval can be
changed according to your preferences by using the Personal Settings function, see page 74
for more information.
1 Factory setting
61 02 Instruments and controls
Trip computer
Trip computer (option)
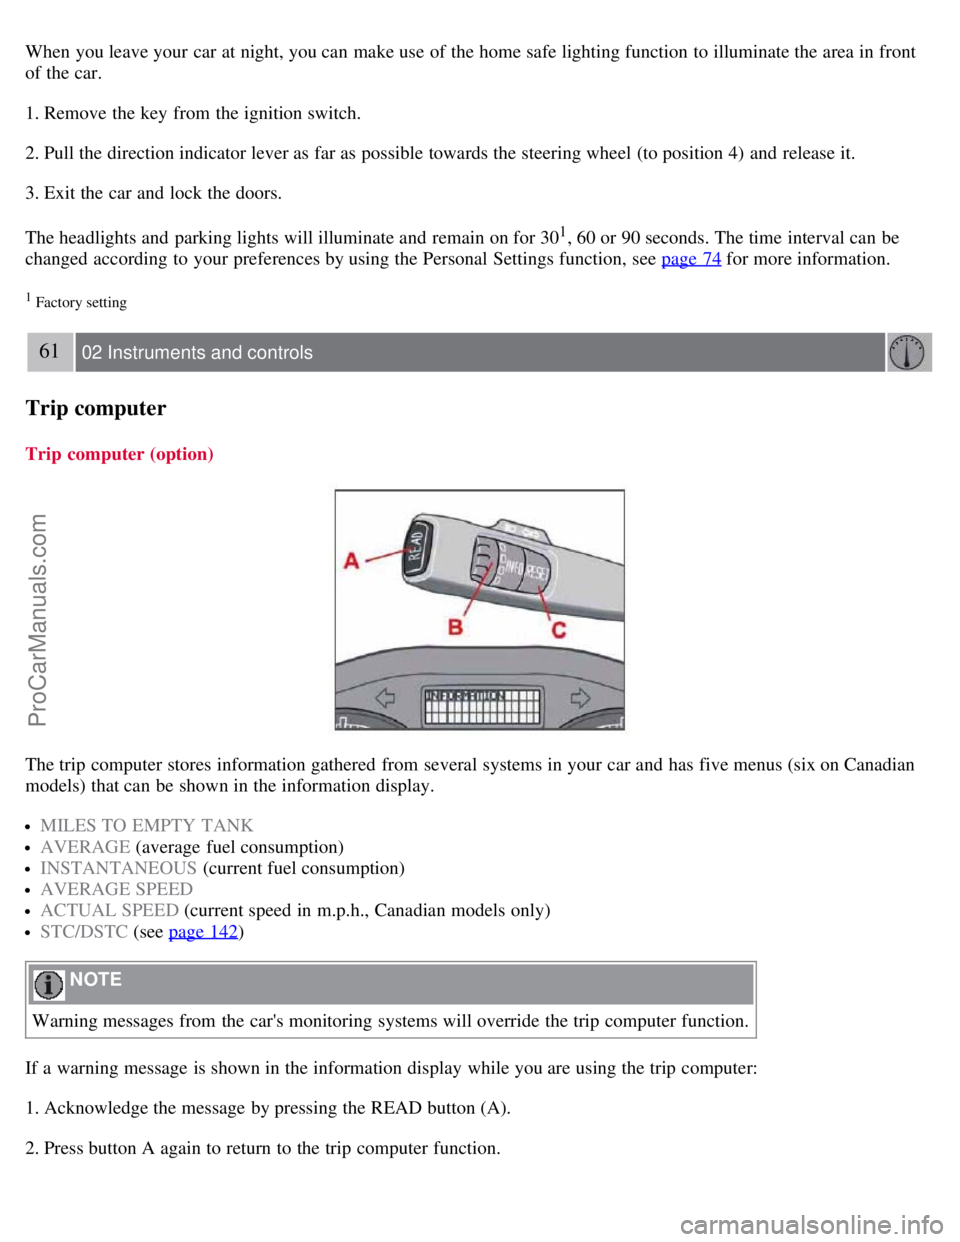
The trip computer stores information gathered from several systems in your car and has five menus (six on Canadian
models) that can be shown in the information display.
MILES TO EMPTY TANK
AVERAGE (average fuel consumption)
INSTANTANEOUS (current fuel consumption)
AVERAGE SPEED
ACTUAL SPEED (current speed in m.p.h., Canadian models only)
STC/DSTC (see page 142)
NOTE
Warning messages from the car's monitoring systems will override the trip computer function.
If a warning message is shown in the information display while you are using the trip computer:
1. Acknowledge the message by pressing the READ button (A).
2. Press button A again to return to the trip computer function.
ProCarManuals.com
Page 137 of 208

the amount of cargo
See the chapter "Wheels and tires" for more detailed information.
Before loading the car, turn off the engine, and apply the parking brake when loading or unloading long objects. The
gear selector can be inadvertently knocked out of position by long cargo, causing the car to move.
Keep the following in mind when loading the vehicle:
Load the cargo in the cargo area against the rear seat backrest.
Load heavy cargo as low as possible.
Center wide loads.
Secure all cargo with restraining straps anchored to the load securing eyelets.
Cover sharp edges on the load.
Seats can be folded down and head restraints removed to extend the cargo compartment. See page 101.
WARNING
Remember that an object weighing 44 lbs (20 kg) produces a force of 2,200 lbs (1,000 kg) in a head-on collision
at 30 m.p.h. (50 km/h)!
When the rear backrest(s) are folded down, the vehicle should not be loaded to a level higher than 2 in. (5 cm)
below the upper edge of the rear side windows. Objects placed higher than this level could impede the function of
the Volvo Inflatable Curtain.
Load carriers (accessory)
Load carriers are available as Volvo accessories. Follow the installation instructions supplied with the load carriers.
Observe the following points when using load carriers:
To avoid damaging your car and to achieve maximum safety when driving, we recommend using the load carriers
that Volvo has developed especially for your car.
Volvo-approved removable roof racks are designed to carry the maximum allowable roof load for this vehicle: 165
lbs (75 kg).
For Non-Volvo roof racks, check the manufacturer's weight limits for the rack.
Never exceed the rack manufacturer's weigh limits and never exceed the maximum rated roof load of 165 lbs (75
kg).
Avoid single-point loads. Distribute loads evenly.
Place heavier cargo at the bottom of the load.
Secure the cargo correctly with appropriate tie-down equipment.
Check periodically that the load carriers and load are properly secured.
Remember that the car's center of gravity and handling change when you carry a load on the roof.
The car's wind resistance and fuel consumption will increase with the size of the load.
Drive smoothly. Avoid rapid starts, fast cornering and hard braking.
151 06 Starting and driving
This page left intentionally blank.
ProCarManuals.com
Page 142 of 208
NOTE
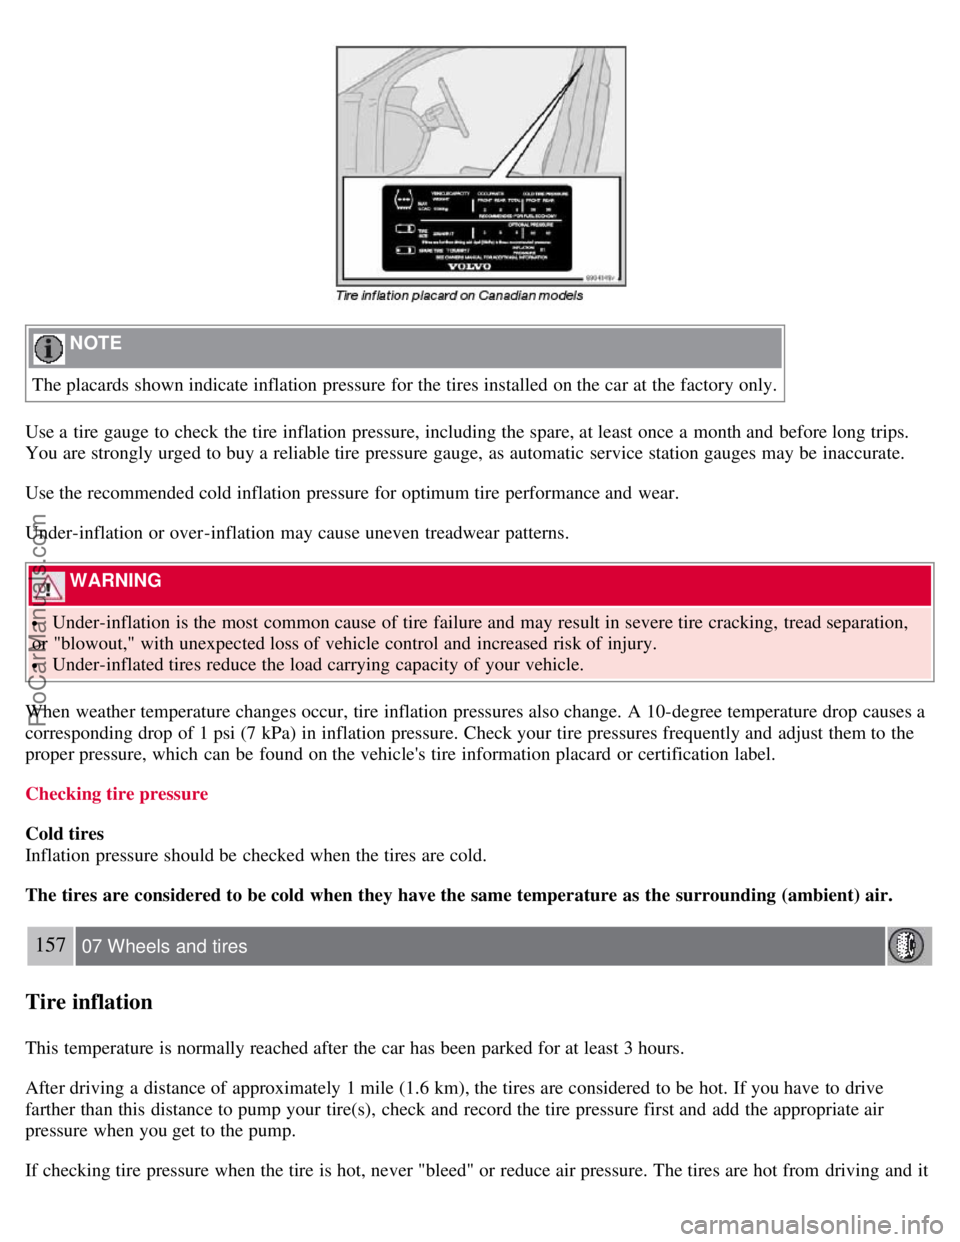
The placards shown indicate inflation pressure for the tires installed on the car at the factory only.
Use a tire gauge to check the tire inflation pressure, including the spare, at least once a month and before long trips.
You are strongly urged to buy a reliable tire pressure gauge, as automatic service station gauges may be inaccurate.
Use the recommended cold inflation pressure for optimum tire performance and wear.
Under-inflation or over-inflation may cause uneven treadwear patterns.
WARNING
Under-inflation is the most common cause of tire failure and may result in severe tire cracking, tread separation,
or "blowout," with unexpected loss of vehicle control and increased risk of injury.
Under-inflated tires reduce the load carrying capacity of your vehicle.
When weather temperature changes occur, tire inflation pressures also change. A 10-degree temperature drop causes a
corresponding drop of 1 psi (7 kPa) in inflation pressure. Check your tire pressures frequently and adjust them to the
proper pressure, which can be found on the vehicle's tire information placard or certification label.
Checking tire pressure
Cold tires
Inflation pressure should be checked when the tires are cold.
The tires are considered to be cold when they have the same temperature as the surrounding (ambient) air.
157 07 Wheels and tires
Tire inflation
This temperature is normally reached after the car has been parked for at least 3 hours.
After driving a distance of approximately 1 mile (1.6 km), the tires are considered to be hot. If you have to drive
farther than this distance to pump your tire(s), check and record the tire pressure first and add the appropriate air
pressure when you get to the pump.
If checking tire pressure when the tire is hot, never "bleed" or reduce air pressure. The tires are hot from driving and it
ProCarManuals.com
Page 151 of 208
NOTE
This nut can also be used on steel wheels.
Lockable wheel nut
If steel wheels with lockable wheel nuts are used in combination with wheel covers, the lockable wheel nut must be
fitted to the stud nearest the air valve. The wheel cover cannot otherwise be installed on the wheel.
169 07 Wheels and tires
Tire rotation
Summer and winter tires
When switching between summer and winter tires, mark the tires to indicate where they were mounted on the car,
e.g. LF = left front, RR = right rear
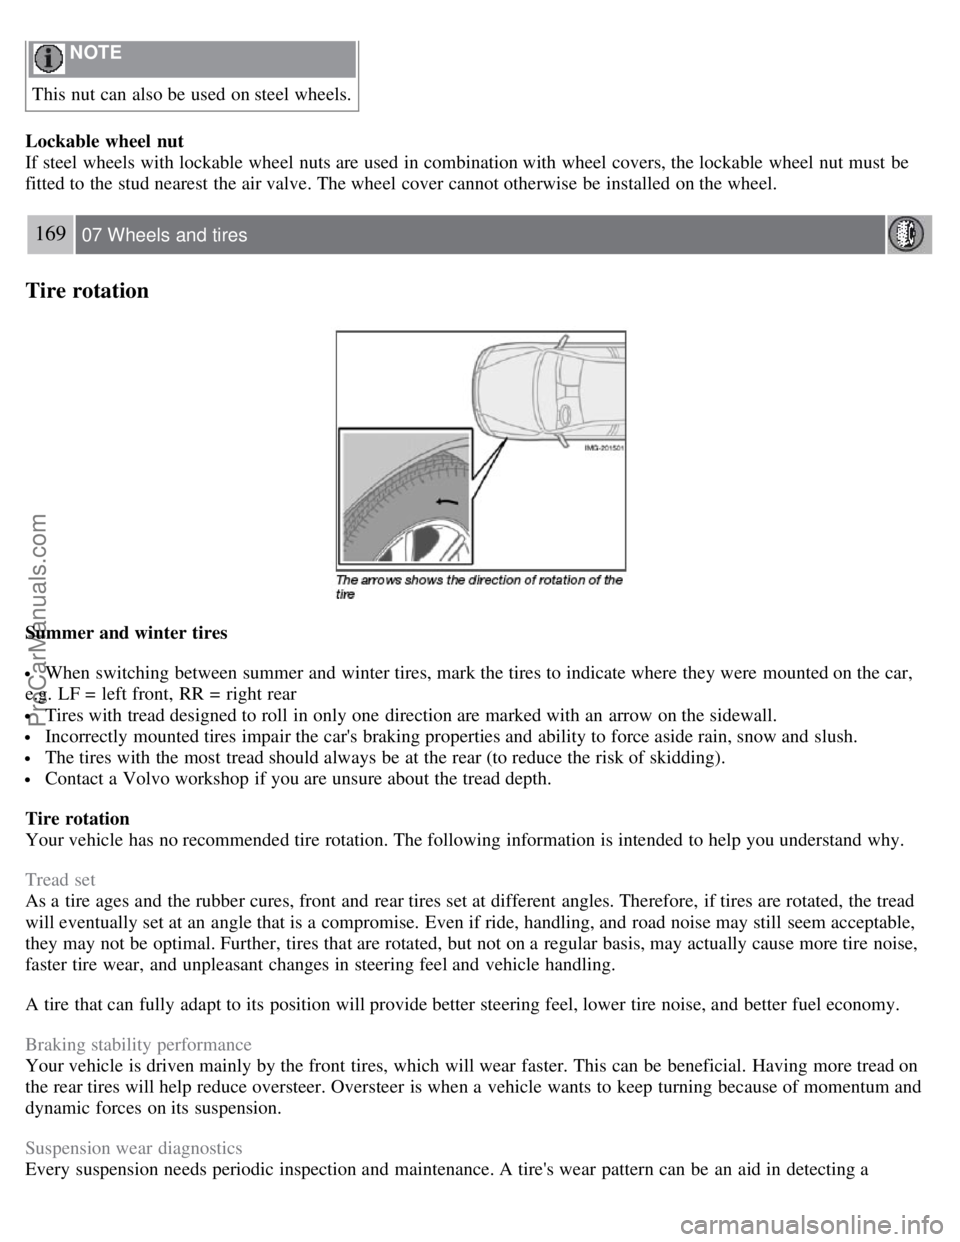
Tires with tread designed to roll in only one direction are marked with an arrow on the sidewall.
Incorrectly mounted tires impair the car's braking properties and ability to force aside rain, snow and slush.
The tires with the most tread should always be at the rear (to reduce the risk of skidding).
Contact a Volvo workshop if you are unsure about the tread depth.
Tire rotation
Your vehicle has no recommended tire rotation. The following information is intended to help you understand why.
Tread set
As a tire ages and the rubber cures, front and rear tires set at different angles. Therefore, if tires are rotated, the tread
will eventually set at an angle that is a compromise. Even if ride, handling, and road noise may still seem acceptable,
they may not be optimal. Further, tires that are rotated, but not on a regular basis, may actually cause more tire noise,
faster tire wear, and unpleasant changes in steering feel and vehicle handling.
A tire that can fully adapt to its position will provide better steering feel, lower tire noise, and better fuel economy.
Braking stability performance
Your vehicle is driven mainly by the front tires, which will wear faster. This can be beneficial. Having more tread on
the rear tires will help reduce oversteer. Oversteer is when a vehicle wants to keep turning because of momentum and
dynamic forces on its suspension.
Suspension wear diagnostics
Every suspension needs periodic inspection and maintenance. A tire's wear pattern can be an aid in detecting a
ProCarManuals.com
Page 152 of 208
suspension problem. Each tire, if left in place, tells a story about the suspension. Tire rotation, on the other hand, could
make suspension wear harder to detect. Early detection is very important, because suspension problems can make tire
wear worse.
If you do rotate your tires...
Please follow the tire manufacturer's recommendations, as outlined in the tire manufacturers tire warranty pamphlet.
170 07 Wheels and tires
Changing a wheel
Changing a wheel
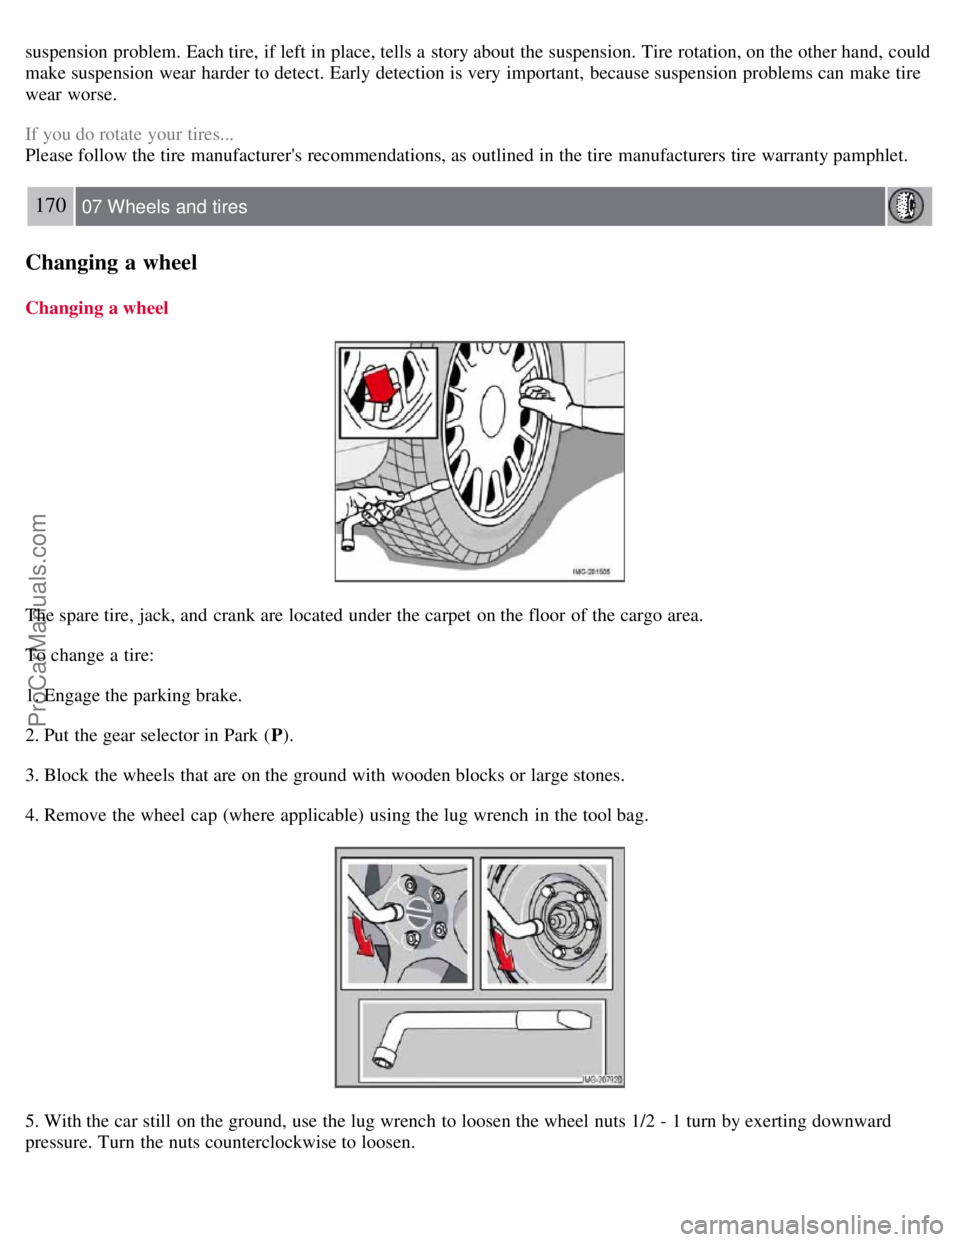
The spare tire, jack, and crank are located under the carpet on the floor of the cargo area.
To change a tire:
1. Engage the parking brake.
2. Put the gear selector in Park (P).
3. Block the wheels that are on the ground with wooden blocks or large stones.
4. Remove the wheel cap (where applicable) using the lug wrench in the tool bag.
5. With the car still on the ground, use the lug wrench to loosen the wheel nuts 1/2 - 1 turn by exerting downward
pressure. Turn the nuts counterclockwise to loosen.
ProCarManuals.com
Page 153 of 208
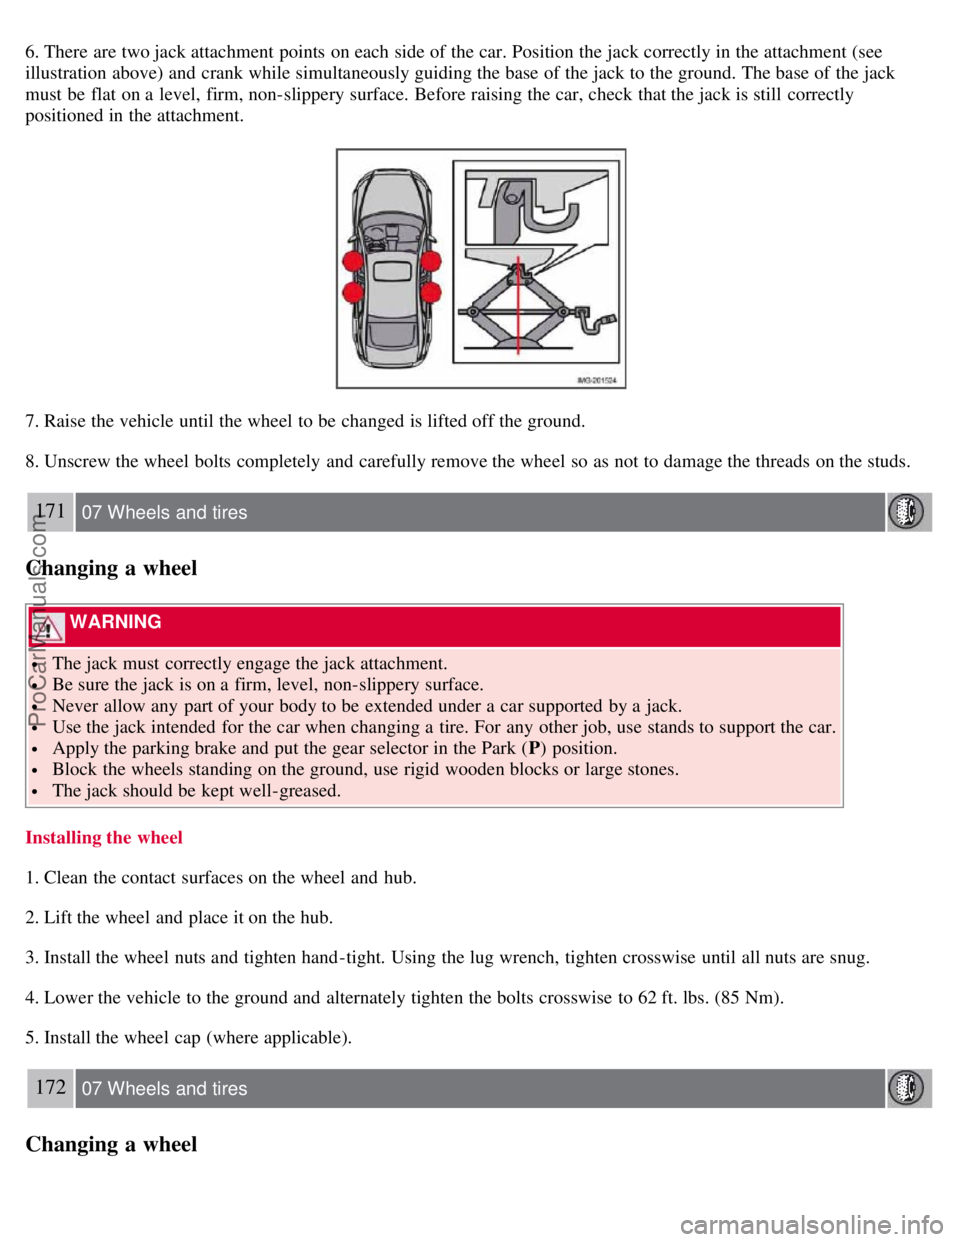
6. There are two jack attachment points on each side of the car. Position the jack correctly in the attachment (see
illustration above) and crank while simultaneously guiding the base of the jack to the ground. The base of the jack
must be flat on a level, firm, non-slippery surface. Before raising the car, check that the jack is still correctly
positioned in the attachment.
7. Raise the vehicle until the wheel to be changed is lifted off the ground.
8. Unscrew the wheel bolts completely and carefully remove the wheel so as not to damage the threads on the studs.
171 07 Wheels and tires
Changing a wheel
WARNING
The jack must correctly engage the jack attachment.
Be sure the jack is on a firm, level, non-slippery surface.
Never allow any part of your body to be extended under a car supported by a jack.
Use the jack intended for the car when changing a tire. For any other job, use stands to support the car.
Apply the parking brake and put the gear selector in the Park (P) position.
Block the wheels standing on the ground, use rigid wooden blocks or large stones.
The jack should be kept well-greased.
Installing the wheel
1. Clean the contact surfaces on the wheel and hub.
2. Lift the wheel and place it on the hub.
3. Install the wheel nuts and tighten hand -tight. Using the lug wrench, tighten crosswise until all nuts are snug.
4. Lower the vehicle to the ground and alternately tighten the bolts crosswise to 62 ft. lbs. (85 Nm).
5. Install the wheel cap (where applicable).
172 07 Wheels and tires
Changing a wheel
ProCarManuals.com
Page 167 of 208

The cooling system must always be kept filled to the correct level, and the level must be between the MIN and MAX
marks. If it is not kept filled, there can be high local temperatures in the engine which could result in damage. Different
types of antifreeze/coolant may not be mixed. Check coolant regularly!
WARNING
Never remove the radiator cap while the engine is warm. Wait until the vehicle cools. If it is necessary to top off the
coolant when the engine is warm, unscrew the expansion tank cap slowly so that the overpressure dissipates.
Brake fluid
The brake fluid should always be between the MIN and MAX marks on the side of the reservoir. Check, without removing
the cap, that there is sufficient fluid in the reservoir.
Fluid type : DOT 4+ boiling point >536°F (280°C), P/N 9437433
Replace : The fluid should be replaced according to the intervals specified in the Warranty and Service Records
Information booklet. When driving under extremely hard conditions (mountain driving, etc), it may be necessary to replace
the fluid more often. Consult your Volvo retailer. Always entrust brake fluid changing to an authorized Volvo retailer.
Power steering fluid
The fluid level is checked at each service interval.
Fluid type : Volvo power steering fluid or equivalent.
Replace : No fluid change required.
WARNING
If a problem should occur in the power steering system or if the vehicle has no electrical current and must be towed, it is
still possible to steer the vehicle. However, keep in mind that greater effort will be required to turn the steering wheel.
192 09 Maintenance and servicing
Wiper blades
Replacing windshield wiper blades
ProCarManuals.com