Page 1 of 43
ŠkodaAuto
SIMPLY CLEVER
www.skoda-auto.comRadionavigační systém SatCompass
Škoda Auto anglicky 05.06 S00.5610.45.20
3U0 012 151 CM
RADIO NAVIGATION SYSTEM SatCompass
22-06_SatC_obal.indd 1
22-06_SatC_obal.indd 1 18.4.2006 13:27:01
18.4.2006 13:27:01
Page 2 of 43
Introduction
You have opted for a Škoda vehicle, which is fitted with a radio navigation system SatCompass, (designated
in the following as navigation system ) - we thank you for your confidence in us.
We recommend that you read this Owner's Manual attentivel y to enable you to become familiar with your naviga-
tion system and all that it offers as quickly as possible.
Please do not hesitate to contact your Škoda Service Pa rtner or importer should you have any further questions
regarding any problems with your navigation system which may arise.
Any national legal provisions which vary from the inform ation contained in this Owner's Manual take precedence
over the information contained herein.
We wish you much pleasure with your navigati on system and pleasant motoring at all times.
Yo u r Škoda Auto
s2ck.7.book Page 1 Friday, April 20, 2007 12:38 PM
Page 3 of 43
 Sat Compass Navigation System Manual Contents
2
Contents
Layout of this Owners Manual
(explanations)
. . . . . . . . . . . . . . . . . . . . . . . . . .
General comments. . . . . . . . . . . . . . . . . . .
General view . . . . . . .")
Contents
2
Contents
Layout of this Owner's Manual
(explanations)
. . . . . . . . . . . . . . . . . . . . . . . . . .
General comments. . . . . . . . . . . . . . . . . . .
General view . . . . . . . . . . . . . . . . . . . . . . . . . . . . . . . . . .
Radio navigation system SatCompass. . . . . . . .
Important information. . . . . . . . . . . . . . . . . . . . . . . .
Changing the navigation CD. . . . . . . . . . . . . . . . . .
Functional description of the buttons. . . . . . . .
Display . . . . . . . . . . . . . . . . . . . . . . . . . . . . . . . . . . . . . . . .
Basic settings of the navigation system. . . . . . .
Anti-theft protection. . . . . . . . . . . . . . . . . . . . . . . . . .
Audio. . . . . . . . . . . . . . . . . . . . . . . . . . . . . . . . . . . . . . .
Radio mode. . . . . . . . . . . . . . . . . . . . . . . . . . . . . . . . . . .
Radio mode with RDS. . . . . . . . . . . . . . . . . . . . . . . . .
Switch on radio mode . . . . . . . . . . . . . . . . . . . . . . . .
Set and store station . . . . . . . . . . . . . . . . . . . . . . . . . .
Retrieving the stored stations. . . . . . . . . . . . . . . . .
Replay recorded traffic information . . . . . . . . . .
CD mode. . . . . . . . . . . . . . . . . . . . . . . . . . . . . . . . . . . . . .
Navigation . . . . . . . . . . . . . . . . . . . . . . . . . . . . . . .
Overview of navigation basic menu. . . . . . . . . .
Enter . . . . . . . . . . . . . . . . . . . . . . . . . . . . . . . . . . . . . . . . . .
Enter destination - Town. . . . . . . . . . . . . . . . . . . . . .
Enter destination - Street - Intersection. . . . . .
Enter destination - Town centre . . . . . . . . . . . . . .
Destination entry - Special destination. . . . . . .
Enter destination - From destination memory
Enter destination - Flagged destination
. . . . . .
Route options. . . . . . . . . . . . . . . . . . . . . . . . . . . . . . . . .
Route guidance . . . . . . . . . . . . . . . . . . . . . . . . . . . . . . .
Destination memory. . . . . . . . . . . . . . . . . . . . . . . . . .
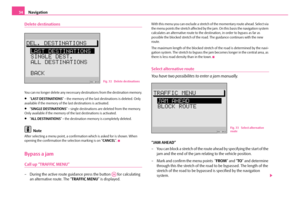
Bypass a jam . . . . . . . . . . . . . . . . . . . . . . . . . . . . . . . . . .
TOURLIST . . . . . . . . . . . . . . . . . . . . . . . . . . . . . . . . . . . . .
Tr a v e l g u i d e . . . . . . . . . . . . . . . . . . . . . . . . . . . . . . . . . . .
Glossary. . . . . . . . . . . . . . . . . . . . . . . . . . . . . . . . . . .
Description . . . . . . . . . . . . . . . . . . . . . . . . . . . . . . . . . . .
Index . . . . . . . . . . . . . . . . . . . . . . . . . . . . . . . . . . . . . . .
3
4
4
5
6
7
7
9
11
15
16
16
16
16
16
17
17
18 20
20
21
21
23
24
25
26
27
29
31
32
34
35
35
37
37
39
s2ck.7.book Page 2 Friday, April 20, 2007 12:38 PM
Page 4 of 43
 Sat Compass Navigation System Manual Layout of this Owners Manual (explanations)3
Layout of this Owners Manual (explanations)
The Owners Manual has been systematically designed, in order to make it easy for
you to find and absorb the")
Layout of this Owner's Manual (explanations)3
Layout of this Owner's Manual (explanations)
The Owner's Manual has been systematically designed, in order to make it easy for
you to find and absorb the information you require.
Chapters, table of contents and subject index
The text of the booklet are divided into short sections which are combined into
easy-to-read chapters.
The Table of contents is arranged according to th e chapters and the detailed
Subject index at the end of this booklet helps you to rapidly find the information
you are looking for.
Brief information and instructions
Each section has a Heading.
This is followed by Brief information (in large italic lettering), which tells you the
subject which is dealt with in this section.
Most of the illustrations are accompanied by an Instruction (in large letters) which
explains to you in a straightforward way the action you have to take. Work steps
which have to be carried out begin with a hyphen.
Special equipment
Equipment which is marked * is only standa rd on certain vehicle model versions or
only suppliable as special equipment for certain models.
Notes
All three kinds of notes (WARNING! Caution! and Note), which are contained in the
text, are stated at the end of the respective section.
WARNING
The most important notes are marked with the heading WARNING!. These
Warning notes draw your attention to a serious risk of accident or injury.
Caution
A Caution! note draws your attention to the possibility of damage to your vehicle
or points out general risks of an accident.
Note
A normal Note draws your attention in a general way to important information for
the operation of your unit.
s2ck.7.book Page 3 Friday, April 20, 2007 12:38 PM
Page 5 of 43
General comments
4
General comments
General view
Button for manual station tuning FM, AM, TIM and TMC and to select the track
in the CD mode
Button to activate the FM radio mode
Button (Traffic Information Memo) to quickly retrieve the stored traffic
announcements
CD - eject button Button (Traffic Message Channel)
to activate the TMC radio mode
Button AM to activate the AM radio mode
CD-case
Display - screen
Button for setting the display contrast
Fig. 1 General view
A1
A2FM
A3TIM
A4
A5TMC
A6
A7
A8
A9DSP
s2ck.7.book Page 4 Friday, April 20, 2007 12:38 PM
Page 6 of 43
 Sat Compass Navigation System Manual General comments5
Button to activate the CD and CD changer mode*
Button for manual switch over between day and night display
Button calls up the na vigation basic menu
Button displays the traf")
General comments5
Button to activate the CD and CD changer mode*
Button for manual switch over between day and night display
Button calls up the na vigation basic menu
Button displays the traffic reports received via TMC
Radio mode
− retrieving the stored station
− automatic station finding in AM waveband
− fast station finding (audible) TIM
− fast station finding in CD mode
Button for switching on/off the mute function of the audio sources
radio, CD und CD changer*
Button
− for a brief playing (ten seconds) of a ll stored stations (TP,FM and AM) - in
radio mode
− Playing all tracks on a CD one after the other
Button displays continuous information
Button plays the tracks on a CD in random order
Rotary/push knob for switching on an d off (press) the navigation system,
volume control (turn)
Button automatically stores the station
Button for storing the current vehicle position as flagged destination
Station selection buttons in radio mode and CD direct selection buttons in CD
changer mode*
Delete button for deleting entries in the editing field
Button sound for adjusting the sound and volume distribution
Menu knob for selecting and confirming the menu points
Button for calculating an alternative route in case of traffic congestion
Button to exit a menu.
Button calls up the SETUP menu
Macro button, programmable function key Radio navigation system SatCompass
Special equipment
The navigation system SatCompass offers yo u an easy handling of the convenience
equipment radio, CD player and navigation system in the vehicle. The system can
be equipped with an original 6-compartment CD changer*.
Navigation
The navigation system is your “intelligent front passenger ”. You can reach the
desired destination quickly, easily and reliably without time-consuming map
searching from the starting point of your trip. In unknown locations it saves you
time by guiding you to the next filling stat ion. You can make an intermittent stop on
the road, in order e.g. to go and eat in a restaurant or to visit a sight. The system uses
the data stored on the navigation CD for the calculation of the trip destination.
During the guidance you will receive via different screen displays information about
vehicle position; notes regarding turns (direction and distance until the turn) and
the arrival time at the trip destination.
Announcement of the ŠkodaAuto navigation system
Under certain requirements the system must be announced, as it is equipped with
a radio unit.
How does the navigation system function?
The current vehicle position is determined using satellites. The distance travelled is
measured by the ABS. The direction of travel is determined using a gyroscope. The
navigation system is provided with this information and compared with the stored
data.
Outside the densely populated areas it is possible that this type of locating does not
permit exact position definition. In this case the locating is performed via satellites.
This type of locating is referred to as Global Positioning System (GPS ) - global satel-
lite locating system.
A10CD
A11
A12NAVI
A13TELE
A14
A15MUTE
A16SCAN
A17INFO
A18MIX
A19
A20AS
A21
A22
A23
A24
A25
A26
A27
A28SET
A29
s2ck.7.book Page 5 Friday, April 20, 2007 12:38 PM
Page 7 of 43
 Sat Compass Navigation System Manual General comments
6
Important information
Warranty
The same warranty terms apply for the equipment as for new vehicles.
Note
A damage in the sense of the warranty must not be the result from improper")
General comments
6
Important information
Warranty
The same warranty terms apply for the equipment as for new vehicles.
Note
A damage in the sense of the warranty must not be the result from improper
handling of the system or from unprofe ssional repair attempts. In addition, no
external damage must be present.
Replacement possibility
After the expiration of the warranty, a unit in need of repair will be replaced inex-
pensively with a reconditioned, original unit with spare part warranty. However it is
required that there is no housing damage and no unauthorised repair attempts
have been made.
Note
In the case of a warranty or a replacement service, the Škoda Service Partner must
be presented with the unit card wi th code number and serial number! The unit
card can be found at the back of the operating instructions.
Information on how to operate the navigation system
The requirements of today's street traffic demand from the driver that he always
concentrates fully when driving.
The extensive and fastidious equipment details of this system offer - besides the
possibilites of entertainment - also a wide range of information which will help you
reach the trip destination quickly and reliably.
Only if the traffic situation allows it, should you operate the navigation system
with its wide range of possibilites. The volume settings must be selected in su
ch a way that acoustic signals from the
outside, such as e.g. a Martins horn from utility vehicles (police cars, ambulances
and fire brigade), can be heard at any time.
WARNING
Please always pay full attention to the traffic situation around you! As the
driver you are fully responsible for the traffic safety. Only use the functions
in such a way that you always maintain the control over your vehicle in all
traffic situations!
Anti-theft coding
After removing the unit, the anti-theft coding prevents electronically the use of the
unit by an unauthorised person.
If the information “SAFE ” appears in the display after switching on the unit, it can
only be operated again by entering the correct code ⇒page 15.
Before using the navigation system
•Please observe the respective traffic regulations when driving.
•Street and location names can be changed. There are exceptional cases in
which the names stored on the CD migh t not correspond to the changed names.
•The route calculated by the navigation system is a recommendation for
reaching the trip destination. While driving please pay attention to stopping restric-
tions, traffic lights, one-way streets, toe change restrictions, channels and ferries.
WARNING
The road traffic legislation (StVO) is always applicable, also if a driving
recommendation does not comply with the StVO.
s2ck.7.book Page 6 Friday, April 20, 2007 12:38 PM
Page 8 of 43
 Sat Compass Navigation System Manual General comments7
Calibration after tyre change
After a tyre change it may be necessary to calibrate the navigation
system again.
– Mark and confirm the menu point “ TYRE CHANGE” in the menu
�")
General comments7
Calibration after tyre change
After a tyre change it may be necessary to calibrate the navigation
system again.
– Mark and confirm the menu point “ TYRE CHANGE” in the menu
“ SETUP-NAVIGATION ” with the menu knob .
After confirming the safety question the calibration is automatically started. An
information for the calibration procedure is shown in the display.
Note
During the calibration other functions of the navigation are not possible.
Care of the display
Carefully handle the display because dents and scratches can occur through pres-
sure of the finger or contact with sharp objects.
The display can be cleaned with a soft cl oth and finger marks can be wiped away
with pure alcohol.
Note
Do not use solvent such as turpentine or petrol as they will corrode the display
surface.
Changing the navigation CD
Description
– Press the CD eject button to change the CD. The navigation CD is ejected. – Carefully insert the new navigation
CD with the inscription upwards as
far as possible into the CD case until it can be drawn in automatically
by the unit.
Caution
Only clean CDs without scratches and dama ges should be used, in order to guar-
antee a proper functioning of the navigation system.
•Store the non-used navigation CD in the bag provided for this.
•Never expose CDs to direct sun rays!
•Please never write or affix the CDs!
Functional description of the buttons
Switching the system on and off
– The system is switched on or off by pressing the rotary/push knob .
The audio source or the navigation status (if the last route guidance dates back
more than 30 minutes) which was active before switching the system off is acti-
vated.
If the key is pulled out of the ignition lo ck when the system is switched on, the
system switches off autmatically. You can switch on the system again by pressing
the rotary/push knob . If the engine is switched off, the system (protection of the
vehicle battery before discharging) swit ches off automatically after approx. one
hour. This process can be re peated as often as desired.
If the system is switched off and the ignition key is withdrawn, a flashing LED indi-
cates that this is a system with an active anti-theft coding.
Note
•Change the volume to the right or to the left by turning the rotary/push knob
.
A25
A4
A19
A19
A19
s2ck.7.book Page 7 Friday, April 20, 2007 12:38 PM


 Sat Compass Navigation System Manual ŠkodaAuto
SIMPLY CLEVER
www.skoda-auto.comRadionavigační systém SatCompass
Škoda Auto anglicky 05.06 S00.5610.45.20
3U0 012 151 CM
RADIO NAVIGATION SYSTEM SatCompass
22-06_SatC_obal.indd 1
22-0")
 Sat Compass Navigation System Manual Introduction
You have opted for a Škoda vehicle, which is fitted with a radio navigation system SatCompass, (designated
in the following as navigation system ) - we thank you for your confidence in")
 Sat Compass Navigation System Manual General comments
4
General comments
General view
Button for manual station tuning FM, AM, TIM and TMC and to select the track
in the CD mode
Button to activate the FM radio mode
Button (Traffic I")