Page 17 of 43
 Sat Compass Navigation System Manual Audio
16
Audio
Radio mode
Radio mode with RDS
The function RDS is always active for the navigation system.
More and more USW broadcasting companies transmit RDS information in addi-
tion to the progr")
Audio
16
Audio
Radio mode
Radio mode with RDS
The function RDS is always active for the navigation system.
More and more USW broadcasting companies transmit RDS information in addi-
tion to the program. E.g the station name and the traffic status of the set station
belong to this information.
Alternative frequency AF
The function alternative frequency ensures that the best receivable frequency of
the selected station is automatically and precisely set.
The replay of the broadcast can be mu ted briefly during the search process
according to the best receivable frequency.
If no alternative freq uency of the set station can be found and the station no longer
offers a satisfactory quality, then please select another station.
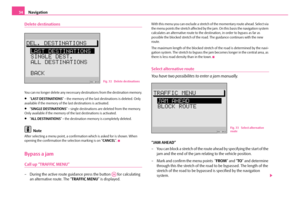
TMC (Traffic Message Channel)
Certain radio stations transmit digital tr affic announcements in addition to their
programme. The announcements are received by your navigation system and used
for a dynamic route guidance ⇒page 29. If a station has TMC at its disposal, “ TMC”
is shown in the standard field - status range - of the display. These stations can be
stored on two memory levels TC1 and TC2.
RDS regional
Certain programs of the broadcasting companies are divided into regional
programs at specific times.
First of all the unit attempts to set only alternative frequencies of the selected
station.
If the quality is however so low, that there is a risk of a “program loss”, the navigation
system accepts also frequencies, which are “related” to the station. As this station emits temporarily different programs and due to such a change in frequency also
the programme from one of the “related” stations can be heard
⇒page 12.
Switch on radio mode
Press the button , or in order to switch on the
radio mode. After pressing the button the last set station, if receiveable, is
selected.
Note
If FM is changed to TMC or vice versa, th e set station is taken over in the selected
level.
Set and store station
Manual station tuning
– Press one of the buttons in orde r to manually tune a station. At
every press the frequency changes to fixed, defined steps upwards or
downward.
Automatic station tuning
– Press one of the buttons for a station finding, in a frequency range, upwards or downwards. The next or the previous station is automati-
cally set and selected.
– If you hold the button pressed, the station continues quickly to the
next station.
FMA2TMCA5AMA6
A1
A14
A14
s2ck.7.book Page 16 Friday, April 20, 2007 12:38 PM
Page 18 of 43
 Sat Compass Navigation System Manual Audio17
Store station
– Select the desired range and the level using the button , or
–Set a station.
– Hold the station selection button pressed on the station which
should be store")
Audio17
Store station
– Select the desired range and the level using the button , or
–Set a station.
– Hold the station selection button pressed on the station which
should be stored, until the station is switched to mute.
Automatically store station
– Select the memory level (FM, TMC or AM), in which the stations
should automatically be stored.
– Hold the button pressed until the automatic storing begins and “ A-STORE ” is shown in the standard field - status range - of the
display. Additionally a progress display in percentage is shown in the
standard field - foreground - of the display.
– The stations with the strongest reception are stored automatically on level 2 (FM2, TC2 or. AM2) of the set range. The order of the stored
stations depends on their station code.
Note
•In the current range you can select up to six stations with the strongest recep-
tion using the button .
•An Autostore for TMC stations can take 10 minutes, as all receiveable stations
are checked for their TMC compatibility. At this time no radio mode is possible.
Retrieving the stored stations
– Select the desired range and the level using the button ,
or
– Briefly press the station selectio n button under which you have
stored the station.
You can also call up the stored st ations by pressing the button .
Note
•If a stored FM station is no longer receivable and the TA function is activated in
the “ SETUP AUDIO ”, “TP-SEEK ” is shown in the display after pressing the station
selection button , a finding is started and the radio play function is switched to
mute. If no TP station is receiv able, a signal tone sounds and “ NO TP” is shown in
the display In such a case th e function TA switches off ⇒page 13.
•If a stored TMC station is no longer receivable, “TMC-SEEK” is shown in the
display. If no TMC stations are receivable, “ NO TMC” is shown in the display. In such
a case select an FM station.
•If no TMC stations are received, a dy namic route guidance is not possible.
Replay recorded traffic information
After pressing the button , “TRACK” and the number of the last
recorded information is shown in the standard field - foreground - of the
display. In the standard field - status range - of the display the time of the
recording is shown next to the source display. If no information was
recorded, “ NO MESSAGE ” is shown in the standard field - foreground - of
the display.
Select recorded traffic information
– Press one of the buttons while replaying a recorded traffic infor- mation, in order to listen to the previous or the next one.
Fast station finding (audible)
– In order to play the information faster, press one of the buttons while replaying.
FMA2TMC
A5AMA6
A22
ASA20
ASA20
FMA2TMC
A5AMA6
A22
A14
A22
TIMA3
A1
A14
s2ck.7.book Page 17 Friday, April 20, 2007 12:38 PM
Page 19 of 43
 Sat Compass Navigation System Manual Audio
18
Deleting traffic information
– Trafffic information is automaticall y deleted six seconds after end of
readiness.
Ending TIM function
– Press again the button to end the TIM function")
Audio
18
Deleting traffic information
– Trafffic information is automaticall y deleted six seconds after end of
readiness.
Ending TIM function
– Press again the button to end the TIM function.
Note
•The TIM function is automatically en ded after replaying all information.
•If the TIM function was called up from the menu “ ROUTE GUIDANCE”, it can be
shown again by pressing the button .
CD mode
Internal CD drive
Your navigation system gives you the possibility to play audio CDs in the
internal drive. In addition a CD changer * can be connected.
Inserting the CD
– Slide the CD with the written side fa c in g u p in t o t h e C D c a s e. I n s e r t th e
CD as far as possible until it can be drawn in automatically by the navi-
gation system.
– After the CD was drawn in, the navigation system automatically
switches over to CD play function . The play function begins, system
oriented after a few seconds with the first track of the CD.
–“ TRACK ” and the current track number are shown in the standard field
- foreground - of the display. Starting CD mode
– If a CD has already been inserted, press the button . The play
function begins at the point where it was last interrupted. If the CD is
ready to play, the play function starts from the beginning.
Note
•The CD mode in the internal drive is possible if an audio CD for the navigation
CD was inserted. If no navigation CD has been inserted, only a “ NO MAP” route
guidance is possible ⇒page 31.
•Do not make an attempt to insert the CD with force.
•If a CD changer * is connected, this one is selected first by pressing the button
.
CD functions (internal drive)
Select track
– For selecting a track, press the right or left button upwards or downwards.
Fast station finding (audible)
– Press the right or left button for a fast station finding upwards or downards.
Playing all tracks on a CD (SCAN)
– Press the button . All tracks on a CD are briefly played in
ascending order (10 seconds). “ SCAN” is shown in the standard field -
background - of the display.
– Press once again the button to interrupt this function.
Listening to all tracks of a CD in the random sequence
– Press the button .
TIMA3
TIMA3
CDA10
CDA10
A1
A14
SCANA16
MIXA18
s2ck.7.book Page 18 Friday, April 20, 2007 12:38 PM
Page 20 of 43
 Sat Compass Navigation System Manual Audio19
– Press the button once again to interrupt this function.
Taking out the CD
– Press the button , the CD is driv en to the initial position. Care-
fully remove the CD.
End CD mode
�")
Audio19
– Press the button once again to interrupt this function.
Taking out the CD
– Press the button , the CD is driv en to the initial position. Care-
fully remove the CD.
End CD mode
– Select the desired range or allow th e CD to eject with the button
, or
Information on how to use a CD
CD to jump
Uneven road surfaces and strong vibrations may cause the CD to jump. In such
cases wait with the CD mode until there is a better road surface to drive on.
Formation of condensation
When it is cold and after rain showers, moisture can deposit in the CD drive
(condensation). This can effect the CD ju mp or impair the play function. In such
cases wait until the moisture has dissipated.
Notes for the care of the CDs
If a CD is soiled, please never clean the CD in the direction of a circle but rather with
a soft fluffly cloth from inside to outside. In case of severe layers of dirt we recom-
mend to clean the CD with a commercially available CD cleaner. Also in this case do
not clean the CD in the direction of a circ le but rather from inside to outside and
then let it dry off.
Caution
•Never use liquids such as gasoline, paint thinner or disk cleaner, otherwise the
surface of the CD could get damaged.
•Never expose CDs to direct sun rays!
•Please never write or affix the CD!
Note
Di r t o r d amag e of a CD can le ad to d if ficulti es when “ reading” the information. The
difficulty in reading the error depends on th e dirt or on the severity of the mechan-
ical damage. Severe scratches cause reading errors which can make the CD jump or
“ get stuck ”. All CDs must be treated carefully and always be stored in a protective
case.
Audio settings
The treble and the bass as well as the volume distribution left/right
(balance) and front/rear (fader) can be set in the sound menu.
– Press the button , to call up the sound menu.
– You can select the menu points to be selected one after each other with the menu knob .
– Set and confirm the new values with the menu knob .
– The setting is reset by pressing the button .
– After all settings have been carried out, exit the sound menu by pressing the button or a an audio source button CD, FM, AM
or TMC.
Note
•The settings for treble and bass can be carried out and stored individually for
each audio source, the settings for balance and fader apply to all audio sources.
•The fader setting is only available if loudspeakers are installed in the vehicle
tailgate.
MIXA18
CDA10
FM
A2TMCA5AMA6
A24
A25
A25
A27
A27
s2ck.7.book Page 19 Friday, April 20, 2007 12:38 PM
Page 21 of 43
 Sat Compass Navigation System Manual Navigation
20
Navigation
Overview of navigation basic menu
Call up navigation basic menu
– Press the button .
If still no destination is entered, the selection marking is on the menu point “ SH")
Navigation
20
Navigation
Overview of navigation basic menu
Call up navigation basic menu
– Press the button .
If still no destination is entered, the selection marking is on the menu point “ SHOW
LO C AT I O N ”.
If a destination has already been entered, the selection marking is on the menu
point “ ROUTE GUIDANCE ” ⇒ fig. 10 .
In the navigation basic menu the following menus can be called up:
•“ ROUTE GUIDANCE ” ⇒ page 31
•“STOP GUIDANCE ” ⇒ page 32
•“ENTER DESTINATION ” - carry out via entry of destination address or from the
destination memory ⇒page 21
•“ROUTE OPTIONS ” - select the dynamic route guidance or display the route
list ⇒ page 29
•“ROUTE LIST ” - calculate or display the route list ⇒page 30
•“SHOW LOCATION ” - display location determinat ion, North and if necessary
the name of the driven road
•“ DEST. MEMORY ” - store, edit or delete destinations in the destination
memory
•“ TOURLIST ” ⇒ page 35
•“TRAVEL GUIDE ” - Provide travel information (e.g. overnight price for hotels) to
destinations ⇒page 35
•“GPS STATUS ” - shows the number of current GPS satellite receptions and the
geographic position.
Note
•Select and confirm the menu points with the menu knob .
•You can return from the sub-menus, lists and types of display to the navigation
basic menu by pressing the button .
•If you press the button during an active route guidance, you can
change between the route guidance and the navigation basic menu.
•Unavailable menu points are marked with a lock.
Fig. 10 Navigation basic
menu
NAVIA12
A25
NAVIA12
NAVIA12
s2ck.7.book Page 20 Friday, April 20, 2007 12:38 PM
Page 22 of 43
Navigation21
Enter
Overview
Call up the destination entry menu directly in the navigation basic
menu.
You can select via the menu points between the following possibilities of the
destination entry:
•“DEST. FROM MEMORY ”
•“SPECIAL DESTINATION ”
•“FLAG DEST. ”
•“TOWN ”
•“STREET ”
•“TOWN CENTRE ”
Enter destination - Town
Select a town as destination
You can first of all enter the desired town and then determine the
destination with the menu point “ TOWN”
– Select the menu point “ TOWN” from ⇒fig. 12 in the destination entry
menu with the menu knob .
– If you confirm the menu point “ TOWN”, first of all you can enter the
desired village and then determine the destination in the sub-menu
“ ADDRESS ENTRY ”, to do so use one of the menu points “ STREET”,
“ TOWN CENTRE ” or “CLOSE TO ADDRESS ”.
Fig. 11 Enter destinationFig. 12 Town as destination
A25
s2ck.7.book Page 21 Friday, April 20, 2007 12:38 PM
Page 23 of 43
 Sat Compass Navigation System Manual Navigation
22
Editor
Carry out with the editor all entrie s of names and numbers, which are
required for the navigation.
•Destination entry of e.g. town and street names
•Entry of a short name wh")
Navigation
22
Editor
Carry out with the editor all entrie s of names and numbers, which are
required for the navigation.
•Destination entry of e.g. town and street names
•Entry of a short name when storing a destination in the destination memory
•Entry of a short name for a flagged destination
The editing menu consists of:
•a register with letters, characters and digits ,
•the control field ,
•the editing field with standard names or the cursor ,
•the area with a list entry (editing list) ,
•the magnifying glass , here the currently marked letter is enlarged.
Entering a town name
Enter the initial letters of the name of the desired village in the editing
field . With each new letter the next suitable entry is called up from the
list and shown in the editing list . You have the possibility to quickly
select the desired village without entering the complete name.
– To do so mark and confirm the desired characters with the menu knob .
The character is entered into the editing fi eld. Simultaneously the cursor jumps to
a point towards the right. The next suitable entry is shown in the editing list .
Note
•In case of an incorrect entry, you can delete the entered character with the
button .
•Only names stored on the CD can be entered. Characters are faded out and
indicated accordingly in the register .
Fig. 13 Editing menu
AA
AB
AC
AD
AE
Fig. 14 Entering a town
name
AC
AD
A25
AD
A23
AA
s2ck.7.book Page 22 Friday, April 20, 2007 12:38 PM
Page 24 of 43
 Sat Compass Navigation System Manual Navigation23
Call up list
The desired town is selected as destination with the aid of a list.
You have two possibilities to call up the list via the editing menu.
– Press the menu knob more than")
Navigation23
Call up list
The desired town is selected as destination with the aid of a list.
You have two possibilities to call up the list via the editing menu.
– Press the menu knob more than two seconds or
– mark and confirm the control field with the menu knob .
Select street names from the list
Select and confirm the desired entry with the menu knob .
Note
•Scroll the list: by turning the menu knob first move the selection marking
onto the arrow and then over the first or last entry.
•Scroll line by line by moving the selection marking onto the arrow and then
press the menu knob .
•With the button you can complete ly display a shortened list entry
with ...
Determine the destination exactly
The sub-menu “ ADDRESS ENTRY ” is displayed, if the destination town is deter-
mined.
In this sub-menu you can determine your destination:
•“ STREET ” - allows the selection of a street and an intersection stated below,
•“TOWN CENTRE ” - allows the selection of a town centre of the selected village,
•“CLOSE TO ADDRESS ” - allows the selection of a destination close to the last
entered destination. The selection is performed via columns, e.g. motorway
connection point or shopping centre. The requirement is that the corresponding
data is available on the navigation CD.
Enter destination - Street - Intersection
Select a street as destination
– Mark and confirm the menu point “ STREET” in the menu “ ENTER
DESTINATION ” or in the following menu “ ADDRESS ENTRY” with the
menu knob .
Enter the street name in the editing menu:
– Enter the street names in the editing field.
– Then call up the list by pressing on the menu knob or
– mark and confirm the control field with the menu knob .
Select street name from the list
– To do so mark and confirm the de sired entry with the menu knob .
The street sub-menu is called up.
A25
A25
A25
A25
A25
INFOA17
Fig. 15 Select street as desti-
nation
A25
A25
A25
A25
s2ck.7.book Page 23 Friday, April 20, 2007 12:38 PM


 Sat Compass Navigation System Manual Navigation21
Enter
Overview
Call up the destination entry menu directly in the navigation basic
menu.
You can select via the menu points between the following possibilities of the
destination entry:")