2007 SKODA OCTAVIA wheel
[x] Cancel search: wheelPage 238 of 288
Breakdown assistance237
Using the systemSafetyDriving TipsGeneral MaintenanceBreakdown assistanceTechnical Data
Raise vehicle
You have to raise the vehicle with a lifting jack in order to be able to
take off the wheel.
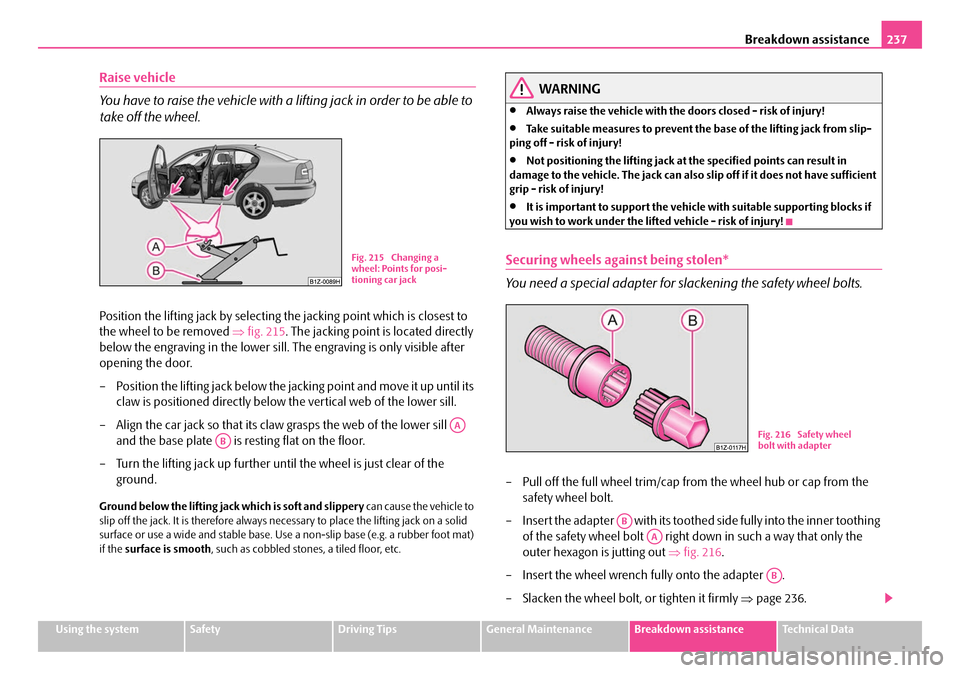
Position the lifting jack by selecting the jacking point which is closest to
the wheel to be removed ⇒fig. 215 . The jacking point is located directly
below the engraving in the lower sill. The engraving is only visible after
opening the door.
– Position the lifting jack below the jacking point and move it up until its claw is positioned directly below the vertical web of the lower sill.
– Align the car jack so that its claw grasps the web of the lower sill and the base plate is resting flat on the floor.
– Turn the lifting jack up further until the wheel is just clear of the ground.
Ground below the lifting jack which is soft and slippery can cause the vehicle to
slip off the jack. It is therefore always ne cessary to place the lifting jack on a solid
surface or use a wide and stable base. Use a non-slip base (e.g. a rubber foot mat)
if the surface is smooth, such as cobbled stones, a tiled floor, etc.
WARNING
•Always raise the vehicle with the doors closed - risk of injury!
•Take suitable measures to prevent the base of the lifting jack from slip-
ping off - risk of injury!
•Not positioning the lifting jack at the specified points can result in
damage to the vehicle. The jack can also sl ip off if it does not have sufficient
grip - risk of injury!
•It is important to support the vehicle with suitable supporting blocks if
you wish to work under the lifted vehicle - risk of injury!
Securing wheels against being stolen*
You need a special adapter for slackening the safety wheel bolts.
– Pull off the full wheel trim/cap from the wheel hub or cap from the safety wheel bolt.
– Insert the adapter with its toothed side fully into the inner toothing of the safety wheel bolt right down in such a way that only the
outer hexagon is jutting out ⇒fig. 216 .
– Insert the wheel wrench fully onto the adapter .
– Slacken the wheel bolt, or tighten it firmly ⇒page 236.
Fig. 215 Changing a
wheel: Points for posi-
tioning car jack
AA
ABFig. 216 Safety wheel
bolt with adapter
AB
AA
AB
NKO A5 20 MR08.book Page 237 Wednesday, April 11, 2007 2:54 PM
Page 239 of 288

Breakdown assistance
238
– Reinstall the full wheel trim/wheel cap after removing the adapter or place the cap onto the safety wheel bolt.
– Have the tightening torque checked w i t h a t o rq u e w re n c h a s s o o n a s
possible. Steel and light alloy wheels must be tightened to a tightening
torque of 120 Nm.
The safety wheel bolts on vehicles fitted with them (one safety wheel bolt per
wheel) can only be loosened or tigh ten up by using the adapter provided.
It is meaningful to note the code numbe r hammered into the rear side of the
adapter or the rear side of the safety wheel bolts. You can obtain a replacement
adapter from a Škoda Service Partner, if necessary, by quoting this number.
We recommend that you always carry the adapter for the wheel bolts with you in
the vehicle. It should be st owed in the vehicle tool kit.
Caution
Damage can occur to the adapter and safety wheel bolt if the safety wheel bolt is
tightened up too much.
Note
The set of safety wheel bolts can be obtained from a Škoda Service Partner.
Jump-starting
Initial steps
You can use the battery of another vehicl e for jump-starting yours if the engine
does not start because the battery on your vehicle is flat. You will require jump-start
cables for this purpose.
Both batteries must have a rated voltage of 12 V. The capacity (Ah) of the battery
supplying the power must not be significa ntly less than the capacity of the
discharged battery in your vehicle. Jump-start cables
Only use jump-start cables which have an
adequately large cross-section and insu-
lated terminal clamps. Please pay attent ion to the manufacturer's instructions.
Positive cable - colour coding in the majority of cases red.
Negative cable - colour coding in the majority of cases black.
WARNING
•A discharged battery may already freeze at temperatures just below 0°C.
In case of frozen battery carry out no jump-starting - risk of explosion!
•Please pay attention to the warning instructions relating to working in
the engine compartment ⇒page 210.
Note
•There must not be any contact between the two vehicles otherwise current may
flow as soon as the negative terminals are connected.
•The discharged battery must be properly connected to the system of the
vehicle.
•Switch off any mobile phone, pay attent ion to the instructions for use of the
mobile phone in such a situation.
•We recommend purchasing jump-start cabl es from Škoda Service Partners as a
Škoda original accessory or from retailers who sell branded batteries.
NKO A5 20 MR08.book Page 238 Wednesday, April 11, 2007 2:54 PM
Page 241 of 288

Breakdown assistance
240
– Release the clutch particularly gent ly when starting off or depress the
accelerator particularly gently if yo ur vehicle is fitted with an auto-
matic gearbox.
Driver of the towed vehicle
– Switch the ignition on so that the steering wheel is not blocked and you can also operate the turn signal lights, the headlight flasher, the
windscreen wipers and wi ndscreen washer system.
– Take the vehicle out of gear or move the selector lever into position N
if your vehicle is fitted with an automatic gearbox.
– Note that the brake servo unit and power steering only operate if the engine is running. You will require si gnificantly greater physical force
to depress the brake pedal and to steer the vehicle if the engine is not
running.
– Ensure that the tow rope is always kept taught.
Tow rope or tow bar
A tow bar is safest way of towing a vehicle and also minimizes any shocks. You can
use a tow rope only if a suitable tow bar is not available.
The tow rope must be elastic to protect the vehicle. Thus one should only use
plastic fibre rope or a rope made out of a similarly elastic material.
Only attach the tow rope to the towing eyes provided for this purpose ⇒page 241,
“Front towing eye” and ⇒page 241, “Rear towing eye”.
Driving style
Towing another vehicle requires a certain amount of practice. Both drivers should
be familiar with the particular points about towing a vehicle. Unskilled drivers
should not attempt to tow in another vehicle or to be towed in.
One should be constantly vigilant not to allow impermissibly high towing forces or
jerky loadings. There is always a risk of excessive stresses and damage resulting at
the points to which you attach the tow ro pe or tow bar when you attempt to tow a
vehicle which is not standing on a paved road.
Caution
If the gearbox of your vehicle no longer contains any oil because of a defect, your
vehicle must only be towed in with the driven wheels raised clear of the ground, or
on a special vehicle transporter or trailer.
Note
•Please comply with any legal requirements particularly regarding the switched
on signal systems, when towing in or tow-starting another vehicle.
•The tow rope must not be twisted as it may in certain circumstances result in the
front towing eye being unscrewed out of your vehicle.
NKO A5 20 MR08.book Page 240 Wednesday, April 11, 2007 2:54 PM
Page 242 of 288

Breakdown assistance241
Using the systemSafetyDriving TipsGeneral MaintenanceBreakdown assistanceTechnical Data
Front towing eye
The towing eye is stored in th e box for the vehicle tool kit.
Remove the protective grille carefully as follows:
– Press the grille together with the hand at the top and bottom close to
the licence plate and swivel out in the direction of arrow ⇒page 241,
fig. 218 .
– Screw in the towing eye anticlockwise down to the stop ⇒fig. 219 and
tighten up using the wheel wrench (push the wheel wrench through
eye). – Put the protective grille in plac
e after screwing out the towing eye
again and press into place. The prot ective grille must engage firmly.
Rear towing eye
– Take the cover out of the bumper ⇒fig. 220 .
– Screw in the towing eye anticlockwise down to the stop ⇒fig. 221 and
tighten up using the wheel wrench (push the wheel wrench through
eye).
– Put the cover in place after screwing out the towing eye again and press into place. The cover must engage firmly.
Fig. 218 Front bumper:
Protective grille
Fig. 219 Front bumper:
Installing the towing eye
Fig. 220 Rear bumper:
Removing cover
Fig. 221 Rear bumper:
Installing the towing eye
NKO A5 20 MR08.book Page 241 Wednesday, April 11, 2007 2:54 PM
Page 243 of 288

Breakdown assistance
242
Tow-starting a vehicle
If the engine does not start, we generally do not recommend to tow-start
your vehicle. One should attempt to start the engine using jump start
cables ⇒page 238 or call on the servic es of the SERVICE mobile.
If your vehicle has to be towed:
– Engage 2nd or 3rd gear wi th the vehicle stationary.
– Depress the clutch pedal fully and keep it depressed.
– Switch on the ignition.
– Wait until both vehicles are movi ng then release the clutch pedal
slowly.
– Depress the clutch pedal fully when the engine fires and take the vehicle out of gear.
For technical reasons it is not possibl e to tow-start a car fitted with an automatic
gearbox .
WARNING
There is high risk of having an accide nt when tow-starting a vehicle, when
for example the towed vehicle r uns into the towing vehicle.
Caution
Vehicles which are fitted with a catalytic converter should not be tow-started over
a distance of more than 50 metres. Unburnt fuel may get into the catalytic converter
and damage it.
Towing in a vehicle fitted with a manual gearbox
Please refer to the notes ⇒page 239. The car can be towed in with a tow bar or a
tow rope or with the front or rear wheels
raised. The maximum towing speed is 50 km/h.
Towing of a vehicle with an automatic gearbox
Please refer to the notes ⇒ page 239.
The car can be towed in with a tow bar or a tow rope. Refer at the same time to the
following guidelines:
•Move selector lever into N .
•The maximum towing speed is 50 km/h.
•The maximum permissible towing distance is 50 km. The gear oil pump does
not operate when the engine is not runni ng; the gearbox would not be adequately
lubricated at higher speeds an d over longer towing distance.
Caution
If the vehicle is towed in by a recovery vehi cle, it should only be towed in with the
front wheels raised. If the vehicle is ra ised at rear, the automatic gearbox is
damaged! (Does not apply to the automatic gearbox DSG).
Note
The vehicle must be transported on a special vehicle or trailer if it is not possible to
tow in the vehicle in the way described or if the towing distance is greater than
50 km.
NKO A5 20 MR08.book Page 242 Wednesday, April 11, 2007 2:54 PM
Page 249 of 288

Fuses and light bulbs
248
Electrically adjustable seats are protected by automatic circuit breakers, which
switch on again automatically after a few seconds after the overload has been
eliminated.
Bulbs
Changing bulbs
The relevant lamp must always be switch ed off before a light bulb is replaced. Defect light bulbs should only be replaced
with light bulbs of the same type. The
designation is located on the li ght socket or the glass bulb.
Changing certain bulbs is not something wh ich you can do yourself, but requires to
be done by a specialist. Other parts of the vehicle must be removed in order to
change the light bulbs. This applies, in particular, to bulbs which can only be
reached from the engine compartment.
We therefore recommend that you have any bulbs changed by a Škoda Service
Partner or, in exceptional cases, by ca lling on other professional assistance.
Please note that the engine compartment is a hazardous area ⇒page 210.
We recommend that you carry the set of light bulbs with you which was delivered
in your vehicle. Replacement light bulbs
13) are available at specialist garages.
The set of light bulbs can be stowed in the locable box in the spare wheel.
Fitted with a xenon headlight
Change of light bulbs on Xenon lights (low beam lights, parking lights and main
beam lights) should be undertaken by a specialist garage.
Overview of bulbs
33Electric sliding/tilting roof25
34Control unit for convenience functions20
35Anti-theft alarm system5
36Headlight cleaning system20
37Front seat heating30
38Heated rear seats30
39Not assigned
40Air blower for heating and air conditioning40
41Rear window wiper15
42Wipe wash pump for windscreen15
43Towing device15
44Towing device20
45Towing device15
46Heated windscreen washer nozzles5
47Relay for auxiliary heating5
48Not assigned
49Light switch5
No.Power consumerAmperes
13)Replacement light bulbs are, on the other hand, part of the basic equipping of the vehicle in
some countries.
Front headlightHalogen headlightXenon headlight
Low beamH7D1S
Main beamH1
Parking lightsW5W
Tu r n s i g n a l sPY21W
Fog lightsH8/H1a)
a)Octavia RS
NKO A5 20 MR08.book Page 248 Wednesday, April 11, 2007 2:54 PM
Page 258 of 288

Technical Data257
Using the systemSafetyDriving TipsGeneral MaintenanceBreakdown assistanceTechnical Data
Dimensions
Dimensions (mm)
OCTAVIAOCTAVIA RSESTATE CARCOMBI 4x4COM B I R SSCOUT
Length457245784572457245794581
Width176917691769176917691784
Width including exterior mirror197319731973197319731973
Height1462/1485a)/
1449b)
a)The value is valid for vehicles with rough road package.b)The value corresponds to the status with SPORT package.
14471468/1490a)/
1455b)1495/1520a)14511533
Wheel base257825772578257825772578
Tr a c k g a u g e f r o n t / r e a r1539/15281526/15141539/15281533/15221526/15141534/1515
NKO A5 20 MR08.book Page 257 Wednesday, April 11, 2007 2:54 PM
Page 280 of 288

Index279
Index
A
Abroad . . . . . . . . . . . . . . . . . . . . . . . . . . . . . . . . . . . . . 194
ABS . . . . . . . . . . . . . . . . . . . . . . . . . . . . . . . . . . . . . . . . . 185
Warning light . . . . . . . . . . . . . . . . . . . . . . . . . . . . . 31
Accessories . . . . . . . . . . . . . . . . . . . . . . . . . . . . . . . . . 229
Adjusting seats . . . . . . . . . . . . . . . . . . . . . . . . . . . 67, 155 electrically . . . . . . . . . . . . . . . . . . . . . . . . . . . . . . . . 68
Adjusting the steering wheel . . . . . . . . . . . . . . . . . . 116
Air conditioning system . . . . . . . . . . . . . . . . . . . . . . 103 Air outlet vents . . . . . . . . . . . . . . . . . . . . . . . . . . . 107
Defrosting windows . . . . . . . . . . . . . . . . . . . . . . 105
Recirculated air mode . . . . . . . . . . . . . . . . . . . . 106
Airbag . . . . . . . . . . . . . . . . . . . . . . . . . . . . . . . . . . . . . . 163 Deployment . . . . . . . . . . . . . . . . . . . . . . . . . . . . . 164
Front airbag . . . . . . . . . . . . . . . . . . . . . . . . . . . . . 165
Head airbag . . . . . . . . . . . . . . . . . . . . . . . . . . . . . 169
Side airbag . . . . . . . . . . . . . . . . . . . . . . . . . . . . . . 167
Warning light . . . . . . . . . . . . . . . . . . . . . . . . . . . . . 28
Airbag system . . . . . . . . . . . . . . . . . . . . . . . . . . . . . . . 163 Warning light . . . . . . . . . . . . . . . . . . . . . . . . . . . . . 28
Airbags . . . . . . . . . . . . . . . . . . . . . . . . . . . . . . . . . . . . . 163
Alarm . . . . . . . . . . . . . . . . . . . . . . . . . . . . . . . . . . . . . . . . 43
Alternator Warning light . . . . . . . . . . . . . . . . . . . . . . . . . . . . . 32
Antilock brake system . . . . . . . . . . . . . . . . . . . . . . . . 185
Antilock brake system (ABS) Warning light . . . . . . . . . . . . . . . . . . . . . . . . . . . . . 31 Anti-theft alarm system . . . . . . . . . . . . . . . . . . . . . . . 43
Ashtray . . . . . . . . . . . . . . . . . . . . . . . . . . . . . . . . . . . . . . 87
Auto Check Control . . . . . . . . . . . . . . . . . . . . . . . . . . . 21
Auto Computer . . . . . . . . . . . . . . . . . . . . . . . . . . . . . . 14
Automatic driving lamp control . . . . . . . . . . . . . . . . 52
Automatic gearbox . . . . . . . . . . . . . . . . . . . . . . . . . . 126
Emergency programme . . . . . . . . . . . . . . 130, 136
Kickdown . . . . . . . . . . . . . . . . . . . . . . . . . . . . . . . 128
Selector lever-emergency unlocking . . . . . . . 130
Tiptronic . . . . . . . . . . . . . . . . . . . . . . . . . . . . . . . . 129
Automatic gearbox DSG . . . . . . . . . . . . . . . . . . . . . . 132 Kickdown . . . . . . . . . . . . . . . . . . . . . . . . . . . . . . . 135
Selector lever-emergency unlocking . . . . . . . 137
Tiptronic . . . . . . . . . . . . . . . . . . . . . . . . . . . . . . . . 136
Automatic seat adjustment . . . . . . . . . . . . . . . . . . . . 69
Automatic vehicle wash systems . . . . . . . . . . . . . . 200
Automatic wiper/washer system . . . . . . . . . . . . . . . 61
Avoiding damage to your vehicle . . . . . . . . . . . . . 195
B
Battery . . . . . . . . . . . . . . . . . . . . . . . . . . . . . . . . . . 32, 218 change . . . . . . . . . . . . . . . . . . . . . . . . . . . . . . . . . . 221
Charge . . . . . . . . . . . . . . . . . . . . . . . . . . . . . . . . . . 220
Inspecting the electrolyte level . . . . . . . . . . . . 220
Operation in winter . . . . . . . . . . . . . . . . . . . . . . 220
Before setting off . . . . . . . . . . . . . . . . . . . . . . . . . . . . 154 Belt
Warning light . . . . . . . . . . . . . . . . . . . . . . . . . . . . . 33
Belt tensioners . . . . . . . . . . . . . . . . . . . . . . . . . . . . . . 162
Belts . . . . . . . . . . . . . . . . . . . . . . . . . . . . . . . . . . . . . . . . 158
Bluetooth™ . . . . . . . . . . . . . . . . . . . . . . . . . . . . . . . . . 148
Bonnet . . . . . . . . . . . . . . . . . . . . . . . . . . . . . . . . . . . . . 209 Warning light . . . . . . . . . . . . . . . . . . . . . . . . . . . . . 30
Boot lid . . . . . . . . . . . . . . . . . . . . . . . . . . . . . . . . . . . . . . 40
Brake Handbrake . . . . . . . . . . . . . . . . . . . . . . . . . . . . . . 120
Warning light . . . . . . . . . . . . . . . . . . . . . . . . . . . . . 32
Brake Assist . . . . . . . . . . . . . . . . . . . . . . . . . . . . . . . . . 185
Brake booster . . . . . . . . . . . . . . . . . . . . . . . . . . . . . . . 185
Brake fluid . . . . . . . . . . . . . . . . . . . . . . . . . . . . . . . . . . 217
Brake pads Warning light . . . . . . . . . . . . . . . . . . . . . . . . . . . . . 29
Brakes . . . . . . . . . . . . . . . . . . . . . . . . . . . . . . . . . . . . . . 184
Buttons for the central locking system . . . . . . . . . . 39
Buttons on the driver's door Power windows . . . . . . . . . . . . . . . . . . . . . . . . . . . 45C
Car jack . . . . . . . . . . . . . . . . . . . . . . . . . . . . . . . . . 232, 237
Car state . . . . . . . . . . . . . . . . . . . . . . . . . . . . . . . . . . . . . 21
Catalytic converter . . . . . . . . . . . . . . . . . . . . . . . . . . 190
CD changer . . . . . . . . . . . . . . . . . . . . . . . . . . . . . . . . . 150
NKO A5 20 MR08.book Page 279 Wednesday, April 11, 2007 2:54 PM