2007 NISSAN TIIDA Brake Tube and Hose
[x] Cancel search: Brake Tube and HosePage 193 of 5883

BR-1
BRAKES
C
D
E
G
H
I
J
K
L
M
SECTION BR
A
B
BR
N
O
P
CONTENTS
BRAKE SYSTEM
PRECAUTION ...............................................3
PRECAUTIONS ...................................................3
Precaution for Supplemental Restraint System
(SRS) "AIR BAG" and "SEAT BELT PRE-TEN-
SIONER" ...................................................................
3
Precaution for Brake System ....................................3
PREPARATION ............................................4
PREPARATION ...................................................4
Commercial Service Tool ..........................................4
SYMPTOM DIAGNOSIS ...............................5
NOISE, VIBRATION AND HARSHNESS
(NVH) TROUBLESHOOTING .............................
5
NVH Troubleshooting Chart ......................................5
ON-VEHICLE MAINTENANCE .....................6
BRAKE PEDAL ...................................................6
Inspection and Adjustment ........................................6
BRAKE FLUID .....................................................8
On Board Inspection .................................................8
Drain and Refill ..........................................................8
Bleeding Brake System .............................................8
FRONT DISC BRAKE ........................................10
Inspection ................................................................10
REAR DISC BRAKE ..........................................11
Inspection ................................................................11
ON-VEHICLE REPAIR .................................12
BRAKE PEDAL ..................................................12
Removal and Installation .........................................12
BRAKE TUBE AND HOSE ................................14
Hydraulic Circuit ......................................................14
Front Brake Tube and Hose ....................................14
Rear Brake Tube and Hose .....................................15
Inspection After Installation .....................................15
DUAL PROPORTIONING VALVE ....................17
Removal and Installation .........................................17
Inspection ................................................................17
BRAKE MASTER CYLINDER ..........................18
On-Board Inspection ................................................18
Removal and Installation .........................................18
BRAKE BOOSTER ...........................................19
On Board Inspection ................................................19
Removal and Installation .........................................19
VACUUM LINES ...............................................22
Component ..............................................................22
Removal and Installation .........................................22
Inspection ................................................................22
FRONT DISC BRAKE .......................................24
Component ..............................................................24
Removal and Installation of Brake Pad ...................24
Removal and Installation of Brake Caliper Assem-
bly ............................................................................
25
Brake Burnishing .....................................................26
REAR DISC BRAKE .........................................27
Component ..............................................................27
Removal and Installation of Brake Pad ...................28
Removal and Installation of Brake Caliper Assem-
bly ............................................................................
28
Brake Burnishing .....................................................29
DISASSEMBLY AND ASSEMBLY ..............30
BRAKE MASTER CYLINDER ..........................30
Disassembly and Assembly .....................................30
FRONT DISC BRAKE .......................................34
Disassembly and Assembly of Brake Caliper As-
sembly .....................................................................
34
Page 195 of 5883

PRECAUTIONS
BR-3
< PRECAUTION >
C
D
E
G
H
I
J
K
L
MA
B
BR
N
O
P
PRECAUTION
PRECAUTIONS
Precaution for Supplemental Restraint System (SRS) "AIR BAG" and "SEAT BELT
PRE-TENSIONER"
INFOID:0000000001716907
The Supplemental Restraint System such as “AIR BAG” and “SEAT BELT PRE-TENSIONER”, used along
with a front seat belt, helps to reduce the risk or severity of injury to the driver and front passenger for certain
types of collision. This system includes seat belt switch inputs and dual stage front air bag modules. The SRS
system uses the seat belt switches to determine the front air bag deployment, and may only deploy one front
air bag, depending on the severity of a collision and whether the front occupants are belted or unbelted.
Information necessary to service the system safely is included in the SR and SB section of this Service Man-
ual.
WARNING:
• To avoid rendering the SRS inoperative, which could increase the risk of personal injury or death in
the event of a collision which would result in air bag inflation, all maintenance must be performed by
an authorized NISSAN/INFINITI dealer.
Improper maintenance, including incorrect removal and installation of the SRS, can lead to personal
injury caused by unintentional activation of the system. For removal of Spiral Cable and Air Bag
Module, see the SR section.
Do not use electrical test equipment on any circuit related to the SRS unless instructed to in this
Service Manual. SRS wiring harnesses can be identified by yellow and/or orange harnesses or har-
ness connectors.
Precaution for Brake SystemINFOID:0000000001716908
Refill using recommended brake fluid. Refer to MA-19, "Fluids and Lubricants".
Never reuse drained brake fluid.
Be careful not to splash brake fluid on painted surface of body. If brake fluid is splashed on painted surfaces
of body immediately wipe it off with cloth and then wash it away with water.
To clean or wash all parts of master cylinder, disc brake caliper and wheel cylinder, use new brake fluid.
Never use mineral oils such as gasoline or kerosene. They will ruin rubber parts of the hydraulic system.
Use a flare nut wrench when removing a brake tube and use a
flare nut torque wrench when installing a brake tube.
When installing brake tubes and hoses, be sure to check torque.
Before working, turn ignition switch OFF and disconnect connec-
tors of ABS actuator and electric unit (control unit) or the battery
cable from the negative terminal.
Burnish the new braking surfaces after refinishing or replacing
drums or rotors, after replacing pads or linings, or if a soft pedal
occurs at very low mileage. Refer toBR-26, "
Brake Burnishing" .
SBR686C
Page 206 of 5883

BR-14
< ON-VEHICLE REPAIR >
BRAKE TUBE AND HOSE
BRAKE TUBE AND HOSE
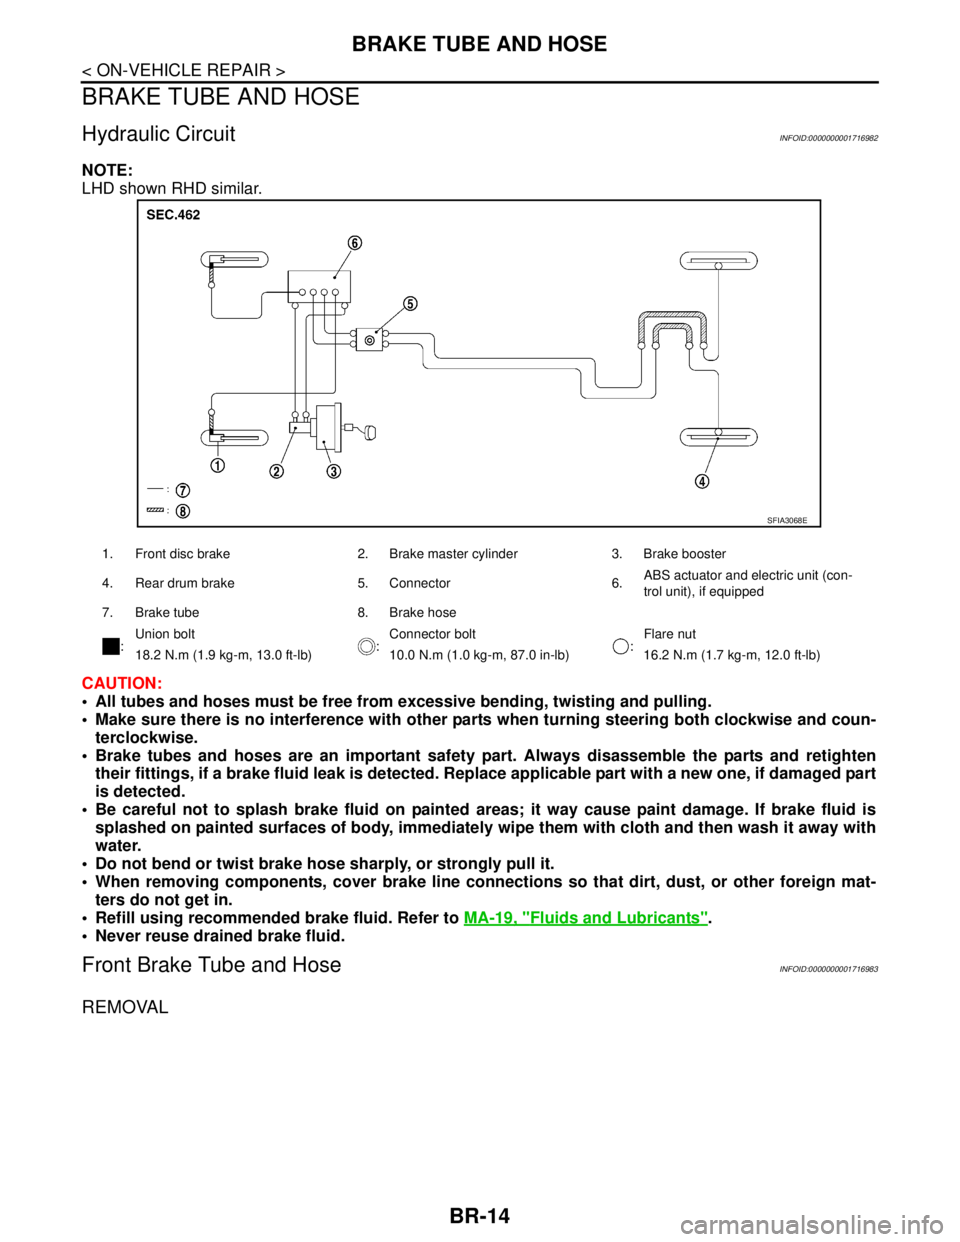
Hydraulic CircuitINFOID:0000000001716982
NOTE:
LHD shown RHD similar.
CAUTION:
All tubes and hoses must be free from excessive bending, twisting and pulling.
Make sure there is no interference with other parts when turning steering both clockwise and coun-
terclockwise.
Brake tubes and hoses are an important safety part. Always disassemble the parts and retighten
their fittings, if a brake fluid leak is detected. Replace applicable part with a new one, if damaged part
is detected.
Be careful not to splash brake fluid on painted areas; it way cause paint damage. If brake fluid is
splashed on painted surfaces of body, immediately wipe them with cloth and then wash it away with
water.
Do not bend or twist brake hose sharply, or strongly pull it.
When removing components, cover brake line connections so that dirt, dust, or other foreign mat-
ters do not get in.
Refill using recommended brake fluid. Refer to MA-19, "
Fluids and Lubricants".
Never reuse drained brake fluid.
Front Brake Tube and HoseINFOID:0000000001716983
REMOVAL
1. Front disc brake 2. Brake master cylinder 3. Brake booster
4. Rear drum brake 5. Connector 6.ABS actuator and electric unit (con-
trol unit), if equipped
7. Brake tube 8. Brake hose
:Union bolt
:Connector bolt
:Flare nut
18.2 N.m (1.9 kg-m, 13.0 ft-lb) 10.0 N.m (1.0 kg-m, 87.0 in-lb) 16.2 N.m (1.7 kg-m, 12.0 ft-lb)
SFIA3068E
Page 207 of 5883

BRAKE TUBE AND HOSE
BR-15
< ON-VEHICLE REPAIR >
C
D
E
G
H
I
J
K
L
MA
B
BR
N
O
P
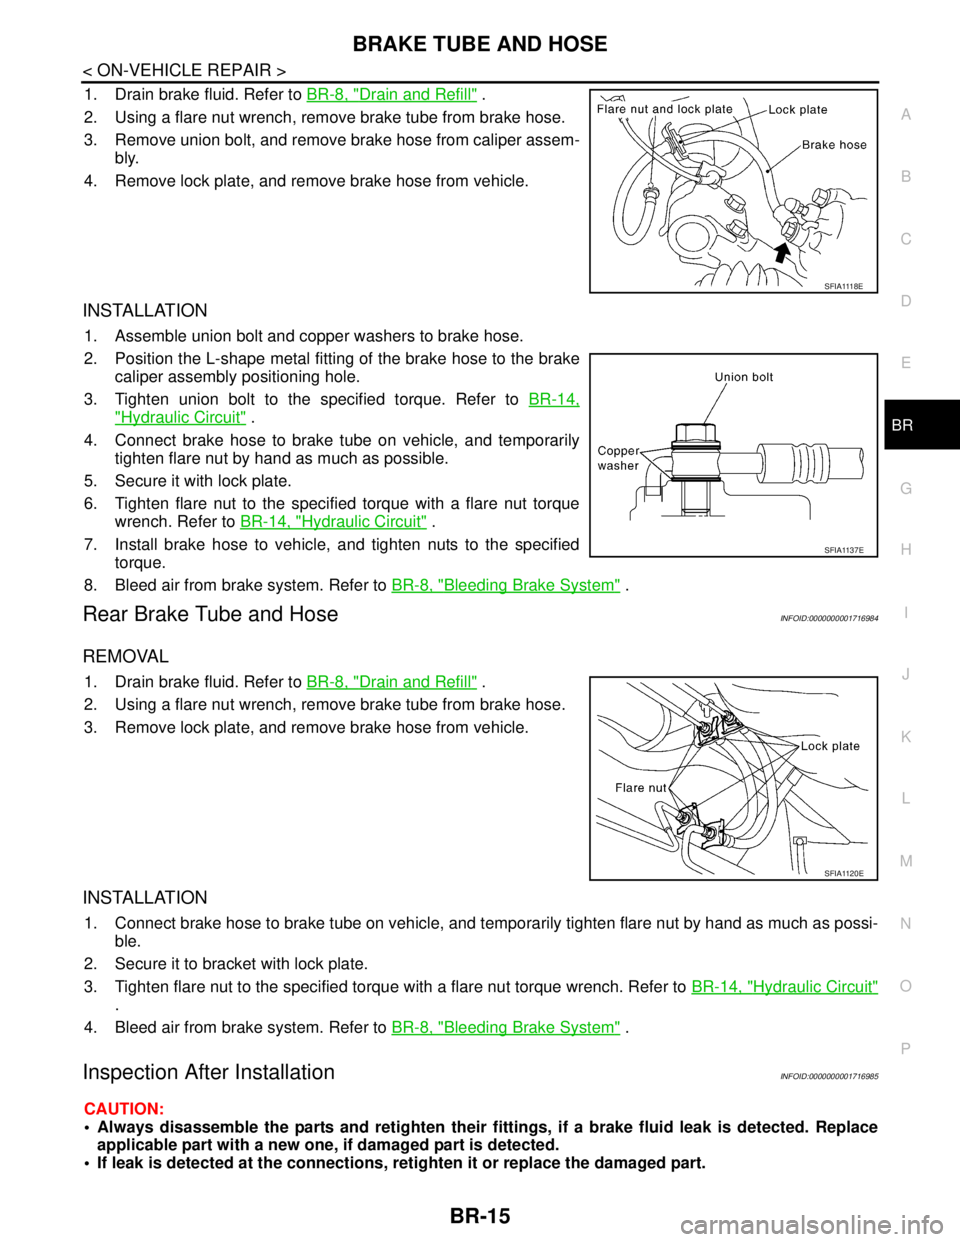
1. Drain brake fluid. Refer to BR-8, "Drain and Refill" .
2. Using a flare nut wrench, remove brake tube from brake hose.
3. Remove union bolt, and remove brake hose from caliper assem-
bly.
4. Remove lock plate, and remove brake hose from vehicle.
INSTALLATION
1. Assemble union bolt and copper washers to brake hose.
2. Position the L-shape metal fitting of the brake hose to the brake
caliper assembly positioning hole.
3. Tighten union bolt to the specified torque. Refer to BR-14,
"Hydraulic Circuit" .
4. Connect brake hose to brake tube on vehicle, and temporarily
tighten flare nut by hand as much as possible.
5. Secure it with lock plate.
6. Tighten flare nut to the specified torque with a flare nut torque
wrench. Refer to BR-14, "
Hydraulic Circuit" .
7. Install brake hose to vehicle, and tighten nuts to the specified
torque.
8. Bleed air from brake system. Refer to BR-8, "
Bleeding Brake System" .
Rear Brake Tube and HoseINFOID:0000000001716984
REMOVAL
1. Drain brake fluid. Refer to BR-8, "Drain and Refill" .
2. Using a flare nut wrench, remove brake tube from brake hose.
3. Remove lock plate, and remove brake hose from vehicle.
INSTALLATION
1. Connect brake hose to brake tube on vehicle, and temporarily tighten flare nut by hand as much as possi-
ble.
2. Secure it to bracket with lock plate.
3. Tighten flare nut to the specified torque with a flare nut torque wrench. Refer to BR-14, "
Hydraulic Circuit"
.
4. Bleed air from brake system. Refer to BR-8, "
Bleeding Brake System" .
Inspection After InstallationINFOID:0000000001716985
CAUTION:
Always disassemble the parts and retighten their fittings, if a brake fluid leak is detected. Replace
applicable part with a new one, if damaged part is detected.
If leak is detected at the connections, retighten it or replace the damaged part.
S F I A 111 8 E
SFIA1137E
SFIA1120E
Page 208 of 5883

BR-16
< ON-VEHICLE REPAIR >
BRAKE TUBE AND HOSE
1. Check brake hose, tube, and connections for fluid leaks, damage, twist, deformation, contact with other
parts, and loose connections.
2. While depressing pedal under a force of 785 N (80 kg-f, 177 lb-f) with the engine running for approxi-
mately 5 seconds, check for fluid leak from each part.
Page 210 of 5883

BR-18
< ON-VEHICLE REPAIR >
BRAKE MASTER CYLINDER
BRAKE MASTER CYLINDER
On-Board InspectionINFOID:0000000001716996
LEAK INSPECTION
Check for leaking in a master cylinder installation surface, a reservoir tank installation surface, and brake
tube connections.
Removal and InstallationINFOID:0000000001716997
CAUTION:
Be careful not to splash brake fluid on painted areas; it may cause paint damage. If brake fluid is
splashed on painted areas, immediately wipe them with cloth and wash it away with water.
REMOVAL
1. Drain brake fluid. Refer to BR-8, "Drain and Refill" .
2. Remove battery. Refer to PG-6, "
Removal and Installation" .
3. Remove air duct and air cleaner. Refer to EM-27, "
Removal and Installation" (HR16DE), EM-154,
"Removal and Installation" (MR18DE), EM-269, "Removal and Installation" (K9K).
4. Disconnect brake fluid level switch harness connector.
5. Using a flare nut wrench, remove brake tube from master cylinder.
6. Remove master cylinder assembly nuts, and remove master cylinder assembly from vehicle..
INSTALLATION
CAUTION:
Refill using recommended brake fluid. Refer to MA-19, "
Fluids and Lubricants".
Never reuse drained brake fluid.
Check if the rod of primary piston has dust or scratches.
1. Install master cylinder to brake booster assembly, and tighten nuts to the specified torque. Refer to BR-19,
"Removal and Installation".
CAUTION:
Do not damage or strain rod of primary piston.
Apply silicone grease for O-ring, primary piston rod and
to inside of booster.
2. Install brake tube to master cylinder, and temporarily tighten the flare nuts on the brake tube to master cyl-
inder by hand.
3. Install brake tube to brake hose, then tighten flare nut to the specified torque using a flare nut torque
wrench. Refer to BR-14, "
Hydraulic Circuit" .
4. Connect brake fluid level switch harness connector.
5. Refill new brake fluid and bleed air. Refer toBR-8, "
Bleeding Brake System" .
SFIA2614E
Page 212 of 5883

BR-20
< ON-VEHICLE REPAIR >
BRAKE BOOSTER
LHD shown RHD similar.
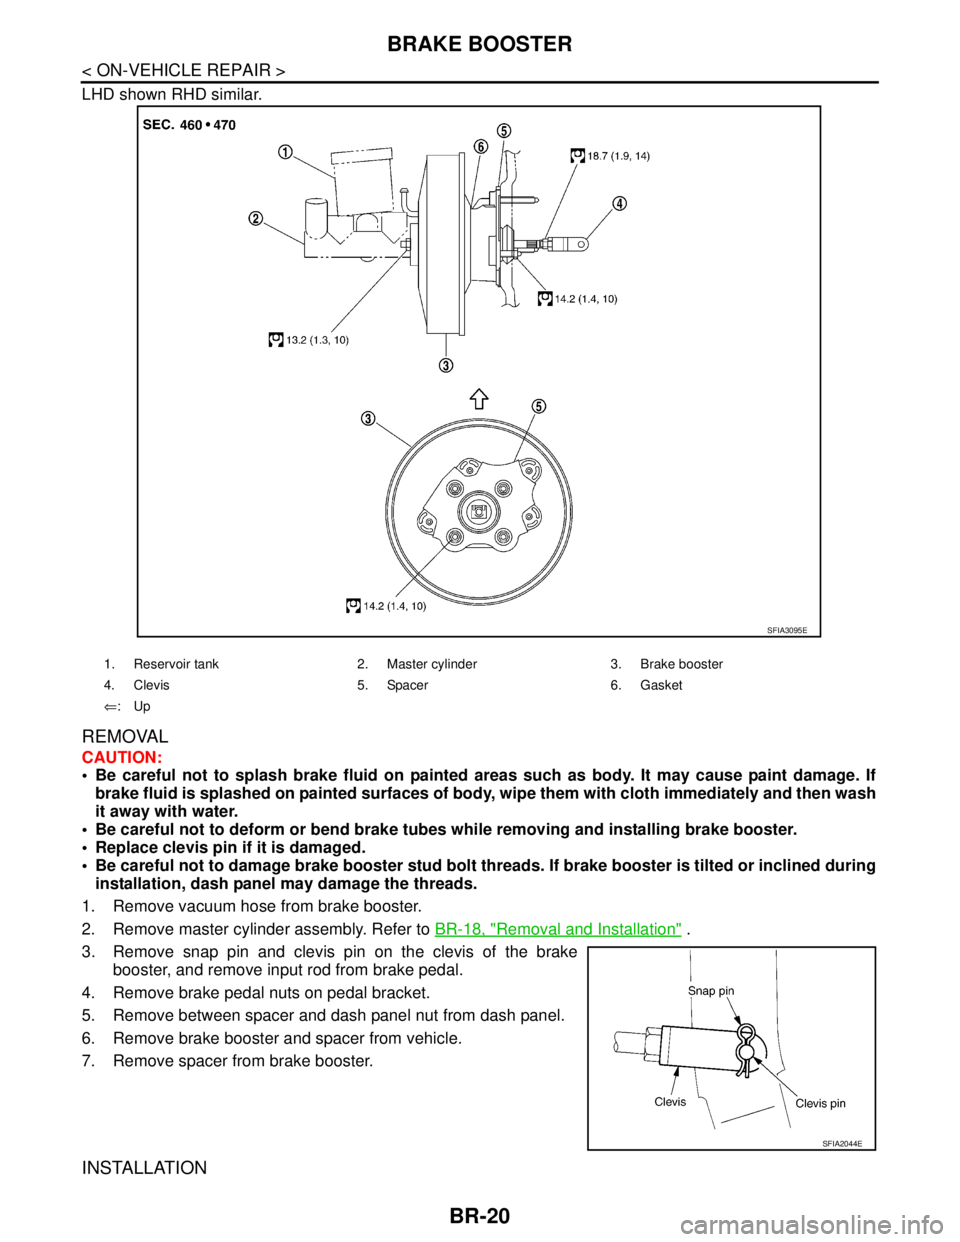
REMOVAL
CAUTION:
Be careful not to splash brake fluid on painted areas such as body. It may cause paint damage. If
brake fluid is splashed on painted surfaces of body, wipe them with cloth immediately and then wash
it away with water.
Be careful not to deform or bend brake tubes while removing and installing brake booster.
Replace clevis pin if it is damaged.
Be careful not to damage brake booster stud bolt threads. If brake booster is tilted or inclined during
installation, dash panel may damage the threads.
1. Remove vacuum hose from brake booster.
2. Remove master cylinder assembly. Refer to BR-18, "
Removal and Installation" .
3. Remove snap pin and clevis pin on the clevis of the brake
booster, and remove input rod from brake pedal.
4. Remove brake pedal nuts on pedal bracket.
5. Remove between spacer and dash panel nut from dash panel.
6. Remove brake booster and spacer from vehicle.
7. Remove spacer from brake booster.
INSTALLATION
1. Reservoir tank 2. Master cylinder 3. Brake booster
4. Clevis 5. Spacer 6. Gasket
⇐:Up
SFIA3095E
SFIA2044E
Page 214 of 5883

BR-22
< ON-VEHICLE REPAIR >
VACUUM LINES
VACUUM LINES
ComponentINFOID:0000000001717001
NOTE:
LHD shown RHD similar.
Removal and InstallationINFOID:0000000001717002
CAUTION:
Because vacuum hose contains a check valve, it must be installed in the correct orientation. Refer to
the stamp or label to confirm correct installation. Brake booster will not operate normally if hose is
installed in the wrong direction.
Insert vacuum hose at least 24 mm (0.94 in).
Never use lubricating oil during assembly.
InspectionINFOID:0000000001717003
VISUAL INSPECTION
Check for improper assembly, damage and aging.
CHECK VALVE INSPECTION
Airtightness Inspection
1. Clamp 2. Engine side indicator stamp (built-in
check valve)3. Vacuum hose
4. Clip 5. Clip position stamp 6. Vacuum tube
7. To brake booster A. To intake manifold B. To brake booster
WFIA0541E
SBR225B