2007 NISSAN TIIDA Brake Tube and Hose
[x] Cancel search: Brake Tube and HosePage 308 of 5883
![NISSAN TIIDA 2007 Service Repair Manual UNEXPECTED PEDAL REACTION
BRC-75
< SYMPTOM DIAGNOSIS >[ABS]
C
D
E
G
H
I
J
K
L
MA
B
BRC
N
O
P
UNEXPECTED PEDAL REACTION
Diagnosis ProcedureINFOID:0000000001731345
1.CHECK BRAKE PEDAL STROKE
Check brake NISSAN TIIDA 2007 Service Repair Manual UNEXPECTED PEDAL REACTION
BRC-75
< SYMPTOM DIAGNOSIS >[ABS]
C
D
E
G
H
I
J
K
L
MA
B
BRC
N
O
P
UNEXPECTED PEDAL REACTION
Diagnosis ProcedureINFOID:0000000001731345
1.CHECK BRAKE PEDAL STROKE
Check brake](/manual-img/5/57395/w960_57395-307.png)
UNEXPECTED PEDAL REACTION
BRC-75
< SYMPTOM DIAGNOSIS >[ABS]
C
D
E
G
H
I
J
K
L
MA
B
BRC
N
O
P
UNEXPECTED PEDAL REACTION
Diagnosis ProcedureINFOID:0000000001731345
1.CHECK BRAKE PEDAL STROKE
Check brake pedal stroke. Refer to BR-6, "
Inspection and Adjustment".
Is the stroke too large?
YES >> Bleed air from brake tube and hose. Refer to BR-8, "Bleeding Brake System".
Check brake pedal, brake booster, and master cylinder for mount play, looseness, brake system
fluid leakage, etc. Refer to BR-18, "
On-Board Inspection" (master cylinder), BR-19, "On Board
Inspection" (brake booster).
NO >> GO TO 2
2.CHECK FUNCTION
Disconnect ABS actuator and electric unit (control unit) connector to deactivate ABS. Check if braking force is
normal in this condition. Connect connector after inspection.
Is the inspection result normal?
YES >> Normal
NO >> Check brake system.
Page 406 of 5883
![NISSAN TIIDA 2007 Service Repair Manual UNEXPECTED PEDAL REACTION
BRC-173
< SYMPTOM DIAGNOSIS >[ESP/TCS/ABS]
C
D
E
G
H
I
J
K
L
MA
B
BRC
N
O
P
UNEXPECTED PEDAL REACTION
Diagnosis ProcedureINFOID:0000000001731202
1.CHECK BRAKE PEDAL STROKE
Ch NISSAN TIIDA 2007 Service Repair Manual UNEXPECTED PEDAL REACTION
BRC-173
< SYMPTOM DIAGNOSIS >[ESP/TCS/ABS]
C
D
E
G
H
I
J
K
L
MA
B
BRC
N
O
P
UNEXPECTED PEDAL REACTION
Diagnosis ProcedureINFOID:0000000001731202
1.CHECK BRAKE PEDAL STROKE
Ch](/manual-img/5/57395/w960_57395-405.png)
UNEXPECTED PEDAL REACTION
BRC-173
< SYMPTOM DIAGNOSIS >[ESP/TCS/ABS]
C
D
E
G
H
I
J
K
L
MA
B
BRC
N
O
P
UNEXPECTED PEDAL REACTION
Diagnosis ProcedureINFOID:0000000001731202
1.CHECK BRAKE PEDAL STROKE
Check brake pedal stroke. Refer to BR-6, "
Inspection and Adjustment".
Is the stroke too large?
YES >> Bleed air from brake tube and hose. Refer to BR-8, "Bleeding Brake System".
Check brake pedal, brake booster, and master cylinder for mount play, looseness, brake system
fluid leakage, etc. Refer to BR-6, "
Inspection and Adjustment" (brake pedal), BR-18, "On-Board
Inspection" (master cylinder), BR-19, "On Board Inspection" (brake booster).
NO >> GO TO 2
2.CHECK FUNCTION
Disconnect ABS actuator and electric unit (control unit) connector to deactivate ABS. Check if braking force is
normal in this condition. Connect connector after inspection.
Is the inspection result normal?
YES >> Normal
NO >> Check brake system.
Page 2737 of 5883
![NISSAN TIIDA 2007 Service Repair Manual EM-90
< REMOVAL AND INSTALLATION >[HR16DE]
ENGINE ASSEMBLY
If items or work required are not covered by the engine section, follow the procedures in the applica-
ble sections.
Always use the suppo NISSAN TIIDA 2007 Service Repair Manual EM-90
< REMOVAL AND INSTALLATION >[HR16DE]
ENGINE ASSEMBLY
If items or work required are not covered by the engine section, follow the procedures in the applica-
ble sections.
Always use the suppo](/manual-img/5/57395/w960_57395-2736.png)
EM-90
< REMOVAL AND INSTALLATION >[HR16DE]
ENGINE ASSEMBLY
If items or work required are not covered by the engine section, follow the procedures in the applica-
ble sections.
Always use the support point specified for lifting.
Use either 2-pole lift type or separate type lift as best you can. If board-on type is used for unavoid-
able reasons, support at the rear axle jacking point with a transmission jack or similar tool before
starting work, in preparation for the backward shift of center of gravity.
For supporting points for lifting and jacking point at rear axle, refer to GI-48, "
Garage Jack and
Safety Stand and 2-Pole Lift".
REMOVAL
Outline
Remove the engine and the transaxle assembly from the vehicle downward. Separate the engine and the tran-
saxle.
Preparation
1. Remove the hood assembly. Refer to DLK-214, "Removal and Installation".
2. Remove the cowl top cover and cowl top extension assembly. Refer to EXT-20, "
Removal and Installa-
tion".
3. Release fuel pressure. Refer to EC-377, "
Inspection" (EURO-OBD), EC-681, "Inspection" (WITHOUT
EURO-OBD).
4. Drain engine coolant from radiator. Refer to CO-11, "
Changing Engine Coolant".
CAUTION:
Perform this step when the engine is cold.
Never spill engine coolant on drive belt.
5. Drain the transmission fluid. Refer to TM-628, "
Draining" (M/T models), TM-171, "Changing A/T Fluid" (A/
T models).
6. Remove the following parts.
Engine undercover
Front road wheels and tires: Refer to WT-6, "
Rotation".
Front fender protector (RH and LH): Refer to EXT-22, "
Removal and Installation".
Battery and battery tray: Refer to PG-6, "
Removal and Installation".
Drive belt: Refer to EM-16, "
Removal and Installation".
Air duct and air cleaner case assembly: Refer to EM-27, "
Exploded View".
Radiator hose (upper and lower): Refer to CO-16, "
Component".
Disconnect cooling fan controller wiring harness.
Remove coolant reservoir tank.
Remove fan shroud and cooling fan assembly. Refer to CO-16, "
Component".
Engine Room LH
1. Disconnect all connections of engine harness around the engine mounting insulator (LH), and then tem-
porarily secure the engine harness into the engine side.
CAUTION:
Protect connectors using a resin bag against foreign materials.
2. Remove ground cable at transaxle side.
3. Disconnect fuel feed hose at engine side. Refer to EM-35, "
Exploded View".
4. Disconnect EVAP purge hose and brake booster vacuum hose.
5. Disconnect heater hoses, and install plugs them to prevent engine coolant from draining. Refer to CO-24,
"Exploded View".
6. Disconnect control linkage from transaxle. Refer to TM-189, "
Exploded View" (A/T), TM-630, "Exploded
View" (M/T).
7. Disconnect the clutch tube at transmission side. Refer to CL-12, "
Removal and Installation".
Engine Room RH
1. Remove ground cable between front cover and vehicle.
2. Remove generator and generator bracket; Refer to CHG-15, "
Removal and Installation".
3. Remove A/C compressor with piping connected from the engine. Temporarily secure it on the vehicle side
with a rope to avoid putting load on it. (with A/C models) Refer to HA-34, "
Removal and Installation of
Compressor - HR16DE".
Page 2738 of 5883
![NISSAN TIIDA 2007 Service Repair Manual ENGINE ASSEMBLY
EM-91
< REMOVAL AND INSTALLATION >[HR16DE]
C
D
E
F
G
H
I
J
K
L
MA
EM
N
P O Vehicle Underbody
1. Remove front wheel sensor (LH and RH) for ABS from steering knuckle. Refer to BRC-83, "R NISSAN TIIDA 2007 Service Repair Manual ENGINE ASSEMBLY
EM-91
< REMOVAL AND INSTALLATION >[HR16DE]
C
D
E
F
G
H
I
J
K
L
MA
EM
N
P O Vehicle Underbody
1. Remove front wheel sensor (LH and RH) for ABS from steering knuckle. Refer to BRC-83, "R](/manual-img/5/57395/w960_57395-2737.png)
ENGINE ASSEMBLY
EM-91
< REMOVAL AND INSTALLATION >[HR16DE]
C
D
E
F
G
H
I
J
K
L
MA
EM
N
P O Vehicle Underbody
1. Remove front wheel sensor (LH and RH) for ABS from steering knuckle. Refer to BRC-83, "Removal and
Installation".
2. Remove brake caliper assembly with piping connected from steering knuckle. Temporarily secure it on the
vehicle side with a rope to avoid load on it. Refer to BR-24, "
Component".
3. Remove drive shafts (LH and RH) from steering knuckle. Refer to FAX-7, "
Removal and Installation".
4. Remove exhaust front tube. Refer to EX-5, "
Component".
5. Remove rear torque rod.
NOTE:
A/T models shown.
6. Remove A/T cooler hoses from transmission (A/T models).
7. Preparation for the separation work of transaxle is as follows:
Remove transaxle joint bolts which pierce at oil pan (upper) lower rear side. Refer to EM-89, "
Exploded
View".
Removal
1. Install engine slinger to cylinder head front left side (A) and rear
right side (B) and support the engine with a hoist.
2. Lift with a hoist and secure the engine in appropriate position.
3. Use a suitable tool to securely support bottom of the engine and
the transaxle assembly and simultaneously adjust hoist tension.
CAUTION:
Put a piece of wood or something similar as the supporting
surface, secure a completely stable condition.
PBIC3737E
PBIC3738E
PBIC3223J
Page 2857 of 5883
![NISSAN TIIDA 2007 Service Repair Manual EM-210
< REMOVAL AND INSTALLATION >[MR18DE]
ENGINE ASSEMBLY
When installation directions are specified, install parts according to the directions. Refer to EM-207, "Com-
ponent".
Prior to installi NISSAN TIIDA 2007 Service Repair Manual EM-210
< REMOVAL AND INSTALLATION >[MR18DE]
ENGINE ASSEMBLY
When installation directions are specified, install parts according to the directions. Refer to EM-207, "Com-
ponent".
Prior to installi](/manual-img/5/57395/w960_57395-2856.png)
EM-210
< REMOVAL AND INSTALLATION >[MR18DE]
ENGINE ASSEMBLY
When installation directions are specified, install parts according to the directions. Refer to EM-207, "Com-
ponent".
Prior to installing the upper torque rod, apply a light coat of silicone
lubricant (A) to the washer facing side of the bushing inner tube as
shown.
NOTE:
Apply silicone lubricant (A) by dabbing the outward facing tube
surface with a sponge or suitable tool.
Do not apply excess lubricant.
Make sure that each mounting insulator is seated properly, and tighten nuts and bolts.
Tighten engine mounting insulator (RH) bolts in the numerical
order shown.
INSPECTION AFTER INSTALLATION
Inspection for Leaks
The following are procedures for checking fluids leak, lubricates leak and exhaust gases leak.
Before starting engine, check oil/fluid levels including engine coolant and engine oil. If less than required
quantity, fill to the specified level. Refer to LU-15, "
Inspection", CO-35, "Inspection".
Use procedure below to check for fuel leakage.
- Turn ignition switch “ON” (with engine stopped). With fuel pressure applied to fuel piping, check for fuel leak-
age at connection points.
- Start engine. With engine speed increased, check again for fuel leakage at connection points.
Run engine to check for unusual noise and vibration.
Warm up engine thoroughly to make sure there is no leakage of fuel, exhaust gases, or any oil/fluids includ-
ing engine oil and engine coolant.
Bleed air from lines and hoses of applicable lines, such as in cooling system.
After cooling down engine, again check oil/fluid levels including engine oil and engine coolant. Refill to the
specified level, if necessary.
Summary of the inspection items:
* Transmission/transaxle fluid, power steering fluid, brake fluid, etc.: Vehicle front
LBIA0470E
: Vehicle front
WBIA0785E
Item Before starting engine Engine running After engine stopped
Engine coolant Level Leakage Level
Engine oil Level Leakage Level
Other oils and fluid* Level Leakage Level
Fuel Leakage Leakage Leakage
Exhaust gases — Leakage —
Page 3173 of 5883

FUEL TANK
FL-13
< ON-VEHICLE REPAIR >
C
D
E
F
G
H
I
J
K
L
MA
FL
N
P O
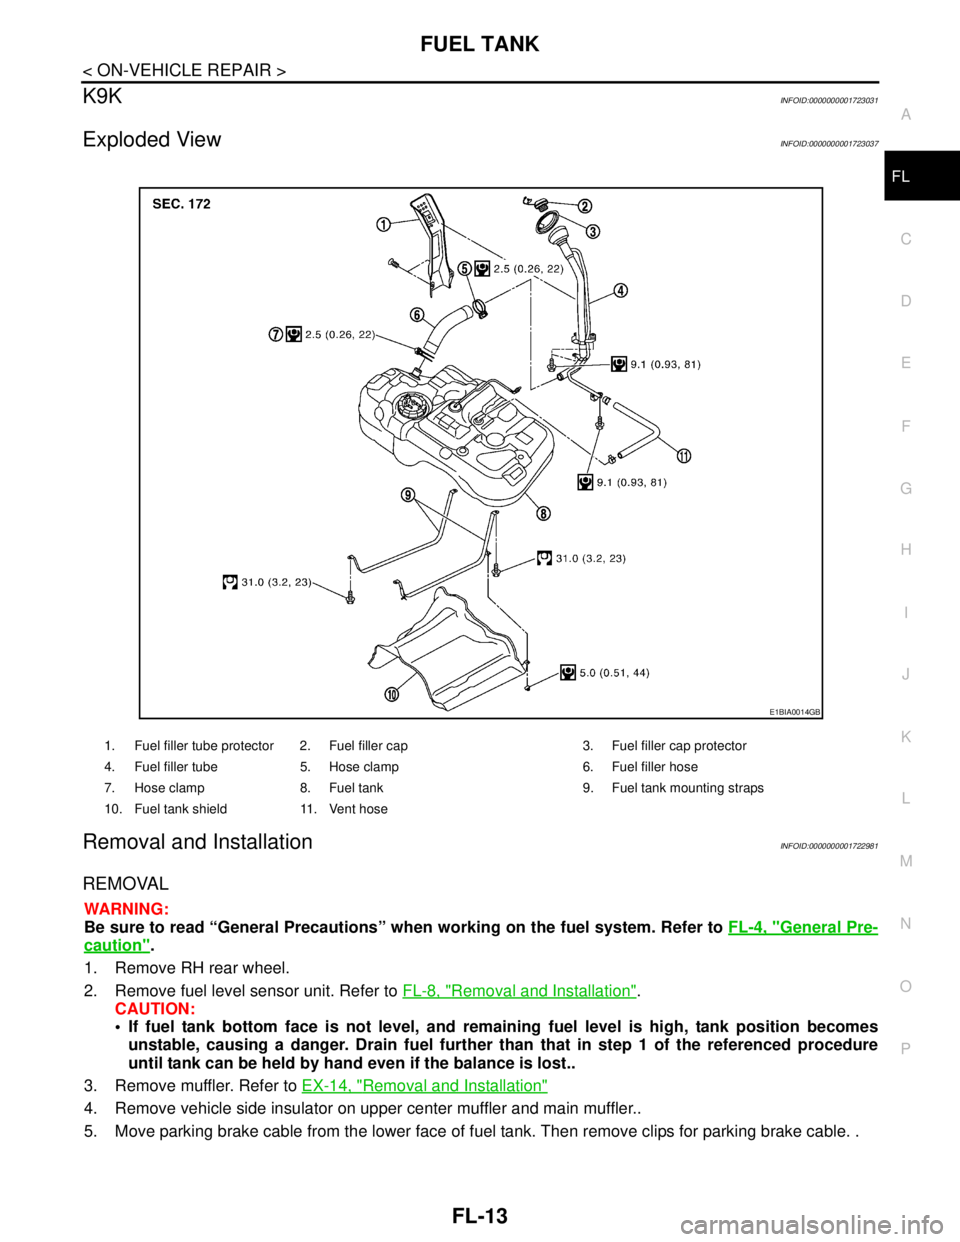
K9KINFOID:0000000001723031
Exploded ViewINFOID:0000000001723037
Removal and InstallationINFOID:0000000001722981
REMOVAL
WARNING:
Be sure to read “General Precautions” when working on the fuel system. Refer to FL-4, "
General Pre-
caution".
1. Remove RH rear wheel.
2. Remove fuel level sensor unit. Refer to FL-8, "
Removal and Installation".
CAUTION:
If fuel tank bottom face is not level, and remaining fuel level is high, tank position becomes
unstable, causing a danger. Drain fuel further than that in step 1 of the referenced procedure
until tank can be held by hand even if the balance is lost..
3. Remove muffler. Refer to EX-14, "
Removal and Installation"
4. Remove vehicle side insulator on upper center muffler and main muffler..
5. Move parking brake cable from the lower face of fuel tank. Then remove clips for parking brake cable. .
1. Fuel filler tube protector 2. Fuel filler cap 3. Fuel filler cap protector
4. Fuel filler tube 5. Hose clamp 6. Fuel filler hose
7. Hose clamp 8. Fuel tank 9. Fuel tank mounting straps
10. Fuel tank shield 11. Vent hose
E1BIA0014GB
Page 3175 of 5883

FUEL TANK
FL-15
< ON-VEHICLE REPAIR >
C
D
E
F
G
H
I
J
K
L
MA
FL
N
P O
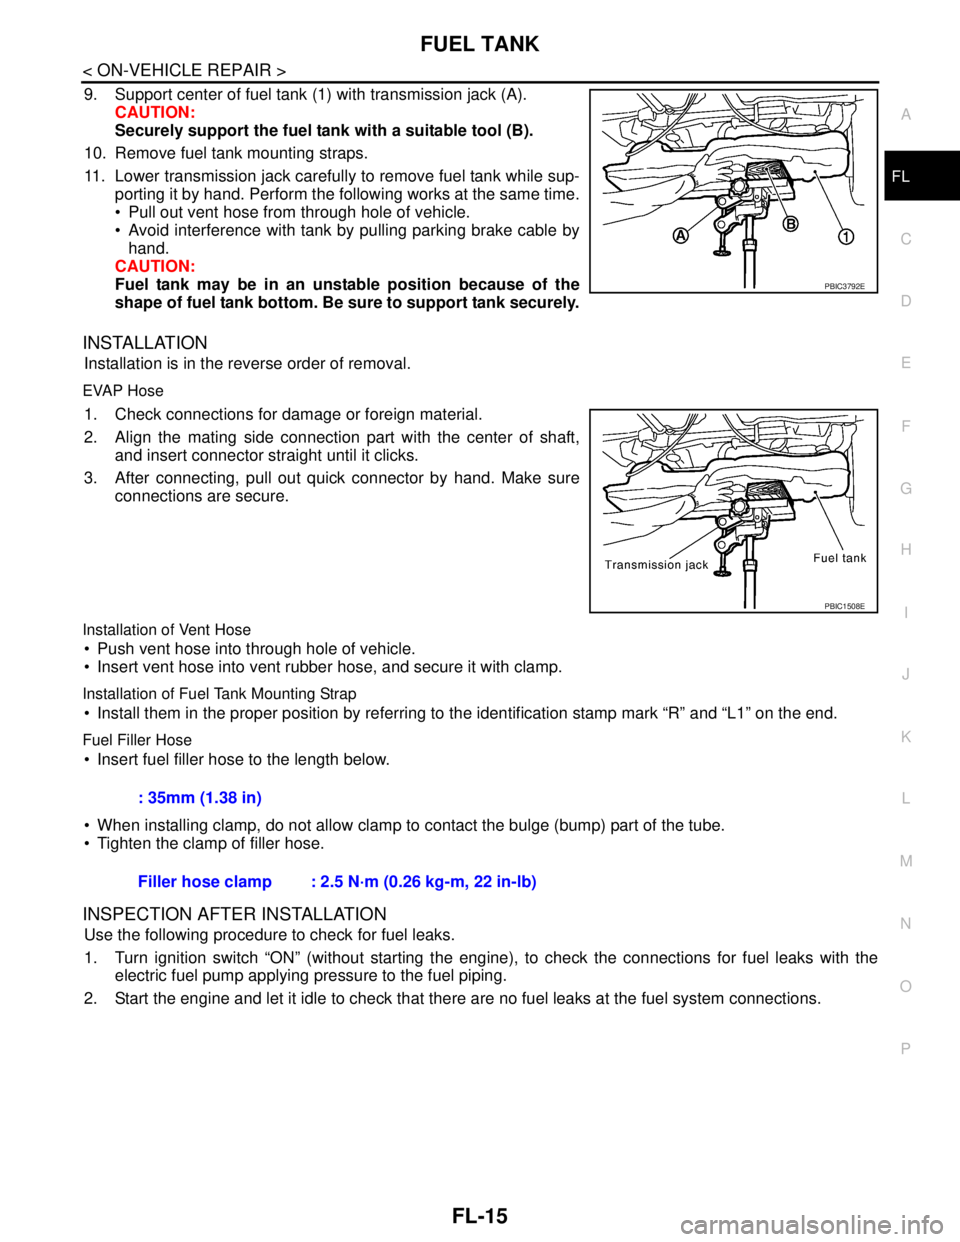
9. Support center of fuel tank (1) with transmission jack (A).
CAUTION:
Securely support the fuel tank with a suitable tool (B).
10. Remove fuel tank mounting straps.
11. Lower transmission jack carefully to remove fuel tank while sup-
porting it by hand. Perform the following works at the same time.
Pull out vent hose from through hole of vehicle.
Avoid interference with tank by pulling parking brake cable by
hand.
CAUTION:
Fuel tank may be in an unstable position because of the
shape of fuel tank bottom. Be sure to support tank securely.
INSTALLATION
Installation is in the reverse order of removal.
EVAP Hose
1. Check connections for damage or foreign material.
2. Align the mating side connection part with the center of shaft,
and insert connector straight until it clicks.
3. After connecting, pull out quick connector by hand. Make sure
connections are secure.
Installation of Vent Hose
Push vent hose into through hole of vehicle.
Insert vent hose into vent rubber hose, and secure it with clamp.
Installation of Fuel Tank Mounting Strap
Install them in the proper position by referring to the identification stamp mark “R” and “L1” on the end.
Fuel Filler Hose
Insert fuel filler hose to the length below.
When installing clamp, do not allow clamp to contact the bulge (bump) part of the tube.
Tighten the clamp of filler hose.
INSPECTION AFTER INSTALLATION
Use the following procedure to check for fuel leaks.
1. Turn ignition switch “ON” (without starting the engine), to check the connections for fuel leaks with the
electric fuel pump applying pressure to the fuel piping.
2. Start the engine and let it idle to check that there are no fuel leaks at the fuel system connections.
PBIC3792E
PBIC1508E
: 35mm (1.38 in)
Filler hose clamp : 2.5 N·m (0.26 kg-m, 22 in-lb)
Page 3188 of 5883

FSU-12
< REMOVAL AND INSTALLATION >
COIL SPRING AND STRUT
COIL SPRING AND STRUT
Removal and InstallationINFOID:0000000001716888
REMOVAL
1. Remove cowl top panel. Refer to EXT-20, "Removal and Installation" .
2. Remove front tires using power tool.
3. Remove harness of wheel sensor from strut assembly. Refer to BRC-182, "
Removal and Installation" .
CAUTION:
Do not pull on wheel sensor harness.
4. Remove brake hose lock plate. Refer to BR-14, "
Front Brake Tube and Hose" .
5. Remove the nut on the upper side of stabilizer connecting rod using power tool, and then remove stabi-
lizer connecting rod from strut assembly.
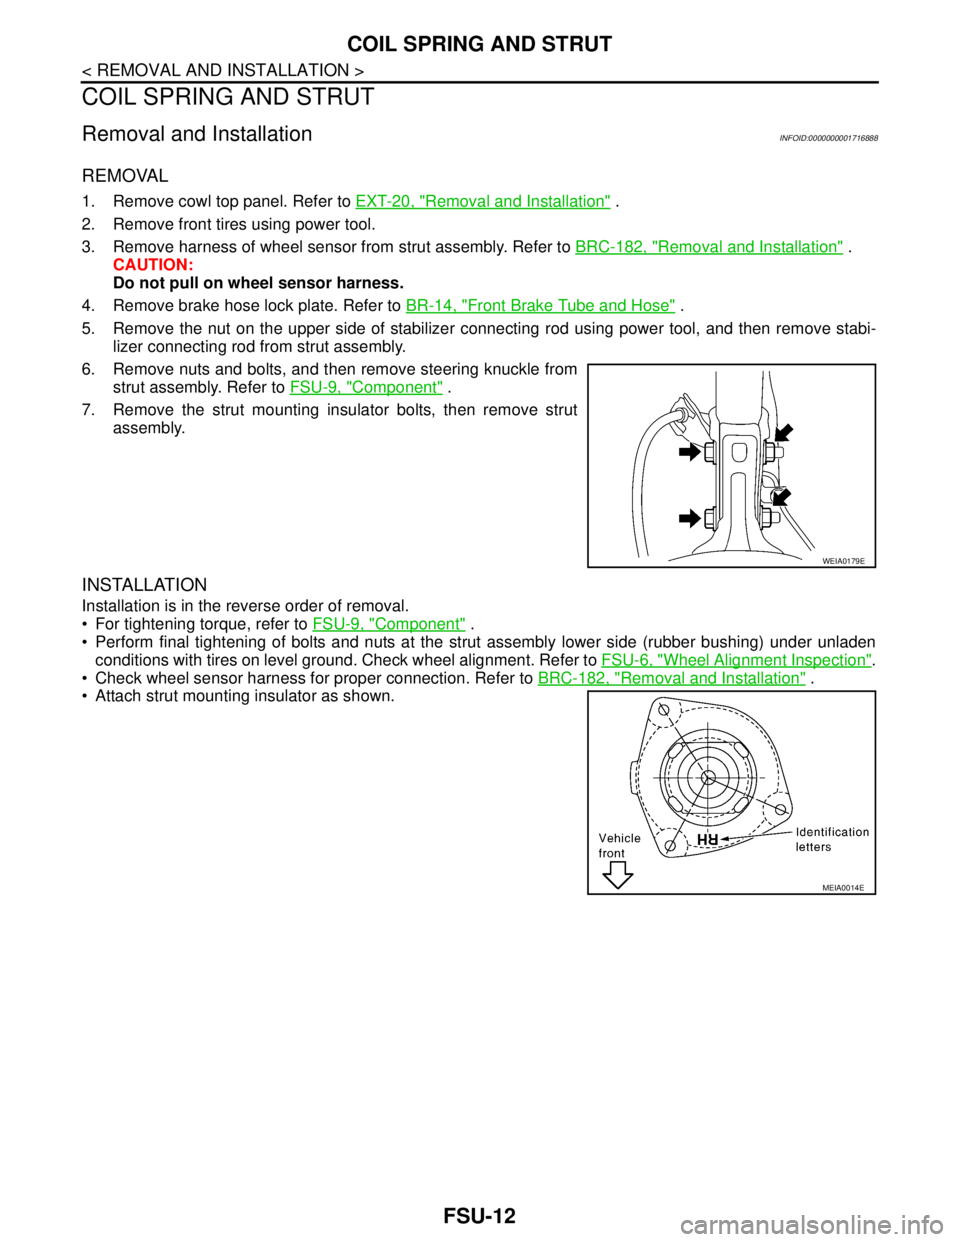
6. Remove nuts and bolts, and then remove steering knuckle from
strut assembly. Refer to FSU-9, "
Component" .
7. Remove the strut mounting insulator bolts, then remove strut
assembly.
INSTALLATION
Installation is in the reverse order of removal.
For tightening torque, refer to FSU-9, "
Component" .
Perform final tightening of bolts and nuts at the strut assembly lower side (rubber bushing) under unladen
conditions with tires on level ground. Check wheel alignment. Refer to FSU-6, "
Wheel Alignment Inspection".
Check wheel sensor harness for proper connection. Refer to BRC-182, "
Removal and Installation" .
Attach strut mounting insulator as shown.
WEIA0179E
MEIA0014E