2007 NISSAN TIIDA parking brake
[x] Cancel search: parking brakePage 4343 of 5883
MWI-36
< ECU DIAGNOSIS >
COMBINATION METER
ECU DIAGNOSIS
COMBINATION METER
Reference ValueINFOID:0000000001374706
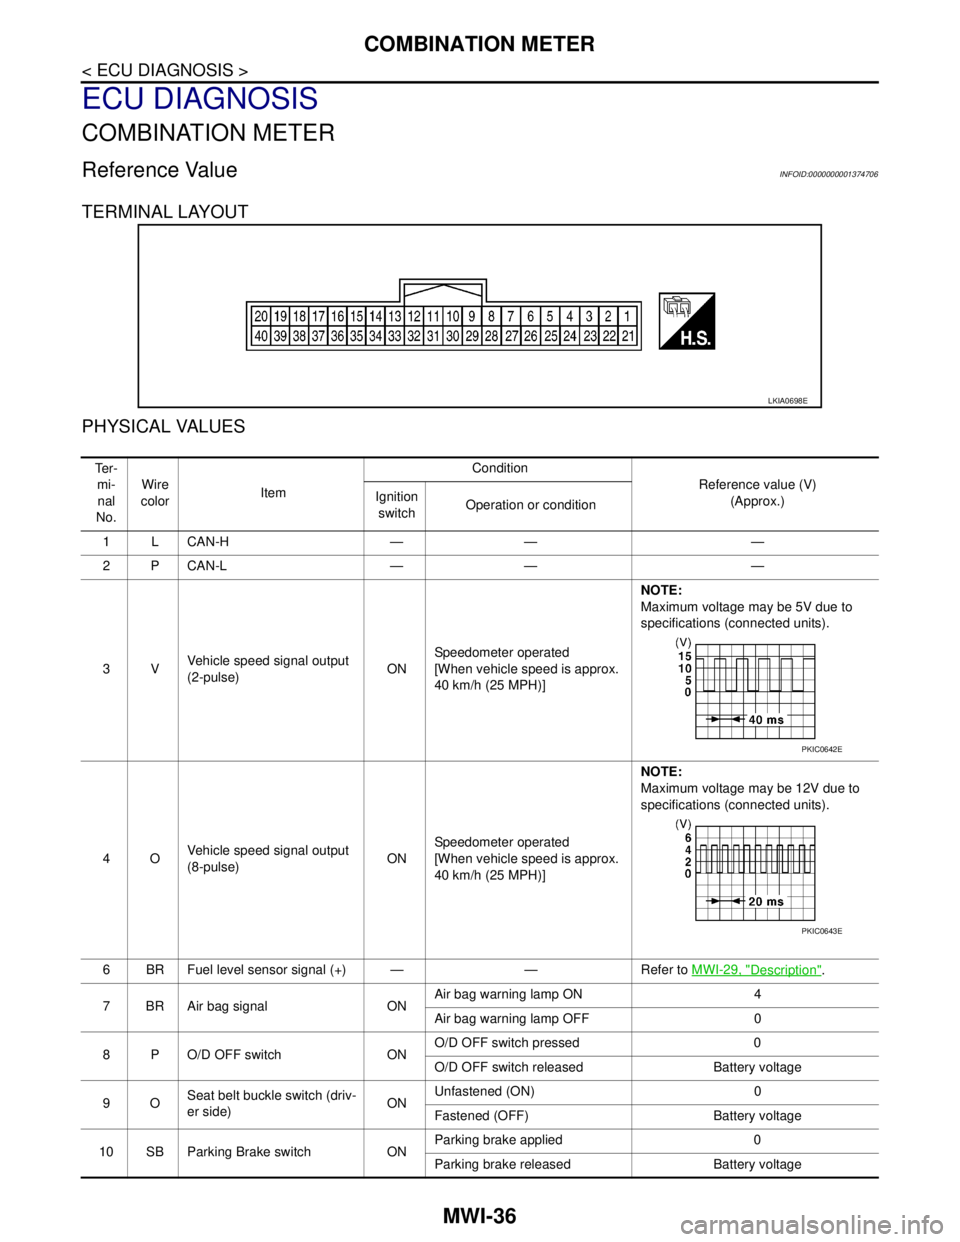
TERMINAL LAYOUT
PHYSICAL VALUES
LKIA0698E
Te r -
mi-
nal
No.Wire
colorItemCondition
Reference value (V)
(Approx.) Ignition
switchOperation or condition
1LCAN-H — — —
2PCAN-L — — —
3VVehicle speed signal output
(2-pulse)ONSpeedometer operated
[When vehicle speed is approx.
40 km/h (25 MPH)] NOTE:
Maximum voltage may be 5V due to
specifications (connected units).
4OVehicle speed signal output
(8-pulse)ONSpeedometer operated
[When vehicle speed is approx.
40 km/h (25 MPH)]NOTE:
Maximum voltage may be 12V due to
specifications (connected units).
6 BR Fuel level sensor signal (+) — — Refer to MWI-29, "
Description".
7 BR Air bag signal ONAir bag warning lamp ON 4
Air bag warning lamp OFF 0
8 P O/D OFF switch ONO/D OFF switch pressed 0
O/D OFF switch released Battery voltage
9OSeat belt buckle switch (driv-
er side)ONUnfastened (ON) 0
Fastened (OFF) Battery voltage
10 SB Parking Brake switch ONParking brake applied 0
Parking brake released Battery voltage
PKIC0642E
PKIC0643E
Page 4405 of 5883

PB-1
BRAKES
C
D
E
G
H
I
J
K
L
M
SECTION PB
A
B
PB
N
O
P
CONTENTS
PARKING BRAKE SYSTEM
PRECAUTION ...............................................2
PRECAUTIONS ...................................................2
Precaution for Supplemental Restraint System
(SRS) "AIR BAG" and "SEAT BELT PRE-TEN-
SIONER" ...................................................................
2
PREPARATION ............................................3
PREPARATION ...................................................3
Commercial Service Tool ..........................................3
ON-VEHICLE MAINTENANCE .....................4
PARKING BRAKE CONTROL ............................4
On-Vehicle Service ...................................................4
REMOVAL AND INSTALLATION ................5
PARKING BRAKE CONTROL ...........................5
Component ...............................................................5
Removal and Installation ..........................................5
PARKING BRAKE SHOE ..................................7
Exploded View ..........................................................7
Removal and Installation ..........................................7
Drum and Lining Break-in .........................................9
SERVICE DATA AND SPECIFICATIONS
(SDS) ............................................................
10
SERVICE DATA AND SPECIFICATIONS
(SDS) .................................................................
10
Parking Brake Control .............................................10
Parking Drum Brake ................................................10
Page 4408 of 5883
PB-4
< ON-VEHICLE MAINTENANCE >
PARKING BRAKE CONTROL
ON-VEHICLE MAINTENANCE
PARKING BRAKE CONTROL
On-Vehicle ServiceINFOID:0000000001716774
INSPECTION
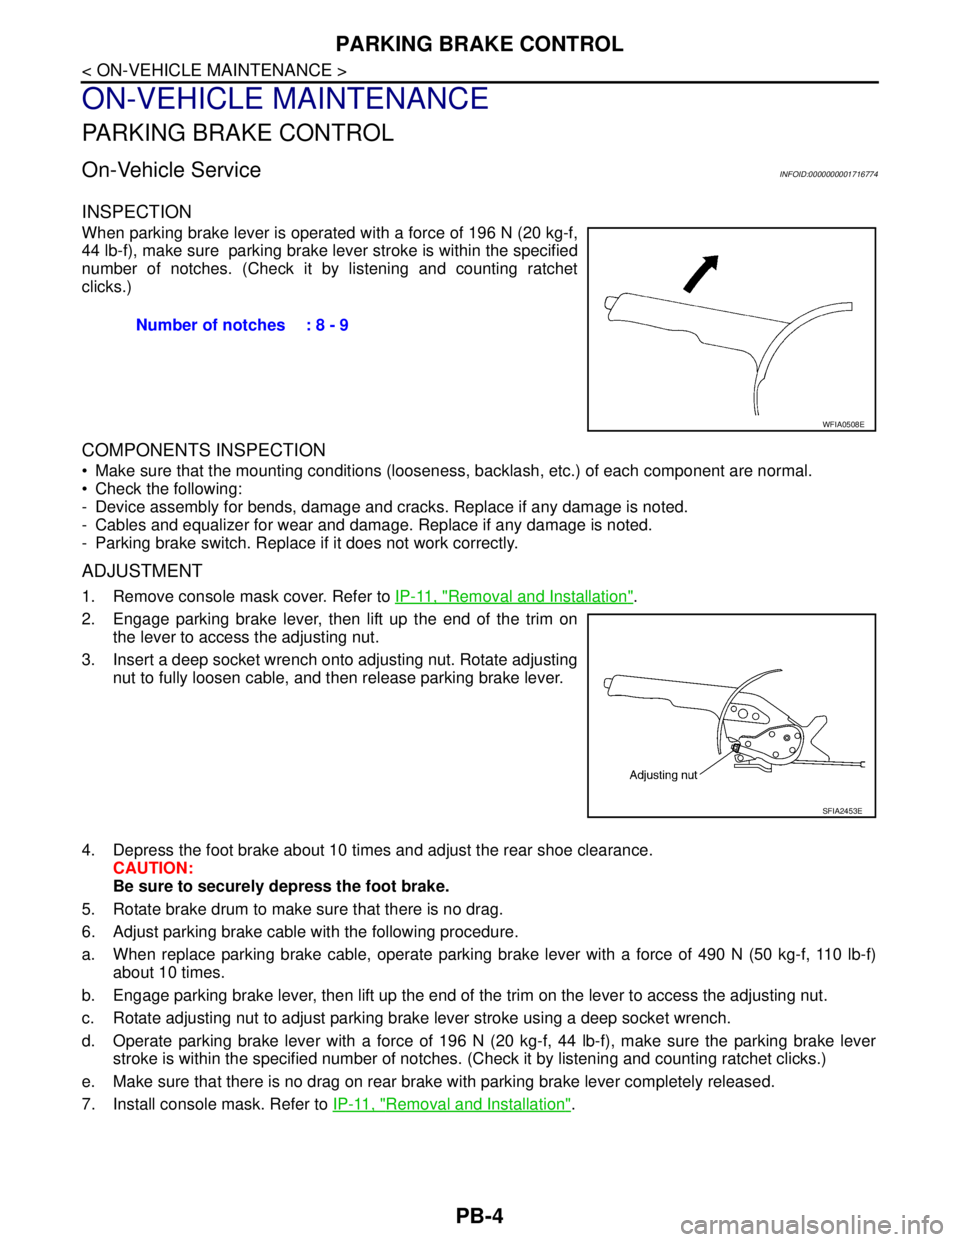
When parking brake lever is operated with a force of 196 N (20 kg-f,
44 lb-f), make sure parking brake lever stroke is within the specified
number of notches. (Check it by listening and counting ratchet
clicks.)
COMPONENTS INSPECTION
Make sure that the mounting conditions (looseness, backlash, etc.) of each component are normal.
Check the following:
- Device assembly for bends, damage and cracks. Replace if any damage is noted.
- Cables and equalizer for wear and damage. Replace if any damage is noted.
- Parking brake switch. Replace if it does not work correctly.
ADJUSTMENT
1. Remove console mask cover. Refer to IP-11, "Removal and Installation".
2. Engage parking brake lever, then lift up the end of the trim on
the lever to access the adjusting nut.
3. Insert a deep socket wrench onto adjusting nut. Rotate adjusting
nut to fully loosen cable, and then release parking brake lever.
4. Depress the foot brake about 10 times and adjust the rear shoe clearance.
CAUTION:
Be sure to securely depress the foot brake.
5. Rotate brake drum to make sure that there is no drag.
6. Adjust parking brake cable with the following procedure.
a. When replace parking brake cable, operate parking brake lever with a force of 490 N (50 kg-f, 110 lb-f)
about 10 times.
b. Engage parking brake lever, then lift up the end of the trim on the lever to access the adjusting nut.
c. Rotate adjusting nut to adjust parking brake lever stroke using a deep socket wrench.
d. Operate parking brake lever with a force of 196 N (20 kg-f, 44 lb-f), make sure the parking brake lever
stroke is within the specified number of notches. (Check it by listening and counting ratchet clicks.)
e. Make sure that there is no drag on rear brake with parking brake lever completely released.
7. Install console mask. Refer to IP-11, "
Removal and Installation". Number of notches : 8 - 9
WFIA0508E
SFIA2453E
Page 4409 of 5883
PARKING BRAKE CONTROL
PB-5
< REMOVAL AND INSTALLATION >
C
D
E
G
H
I
J
K
L
MA
B
PB
N
O
P
REMOVAL AND INSTALLATION
PARKING BRAKE CONTROL
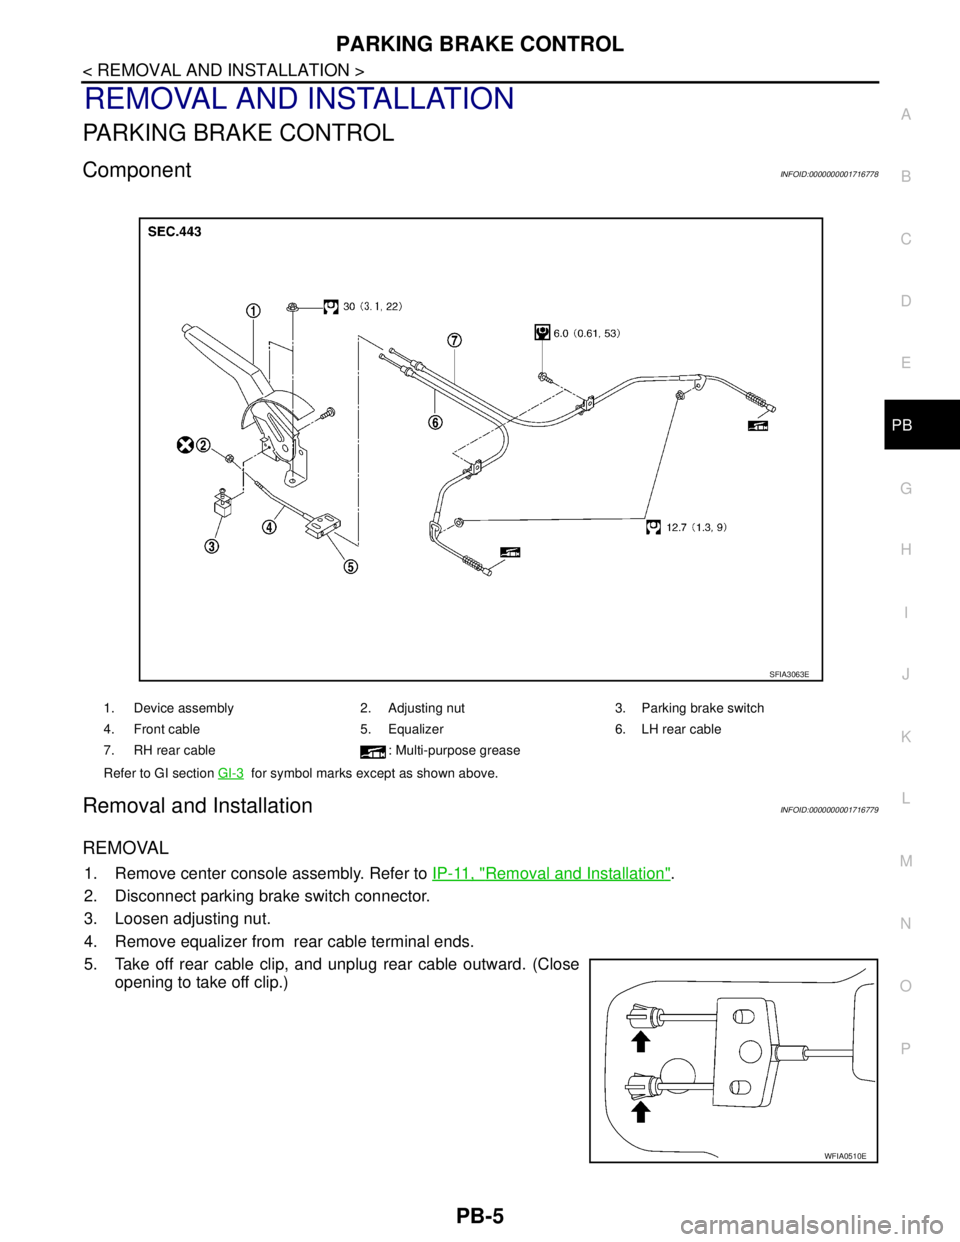
ComponentINFOID:0000000001716778
Removal and InstallationINFOID:0000000001716779
REMOVAL
1. Remove center console assembly. Refer to IP-11, "Removal and Installation".
2. Disconnect parking brake switch connector.
3. Loosen adjusting nut.
4. Remove equalizer from rear cable terminal ends.
5. Take off rear cable clip, and unplug rear cable outward. (Close
opening to take off clip.)
1. Device assembly 2. Adjusting nut 3. Parking brake switch
4. Front cable 5. Equalizer 6. LH rear cable
7. RH rear cable : Multi-purpose grease
Refer to GI section GI-3
for symbol marks except as shown above.
SFIA3063E
WFIA0510E
Page 4410 of 5883

PB-6
< REMOVAL AND INSTALLATION >
PARKING BRAKE CONTROL
6. Remove device assembly mounting nuts, and remove device assembly from vehicle.
7. Remove rear disc rotor and remove rear cable from the operating lever. Refer to PB-7, "
Removal and
Installation" .
8. Remove the exhaust center tube and heat plate. Refer to EX-5, "
Removal and Installation" (HR16DE),
EX-10, "
Removal and Installation" (MR18DE), EX-14, "Removal and Installation" (K9K).
9. Remove rear cable mounting bolt and nut, and then remove rear cable from the vehicle.
10. Remove adjusting nut and front cable from device assembly.
INSTALLATION
1. Installation is in the reverse order of the removal. Tighten mounting bolts and nuts to the specified torque.
2. Adjust clearance of parking brake shoes. Refer to PB-4, "
On-Vehicle Service" .
Page 4411 of 5883
PARKING BRAKE SHOE
PB-7
< REMOVAL AND INSTALLATION >
C
D
E
G
H
I
J
K
L
MA
B
PB
N
O
P
PARKING BRAKE SHOE
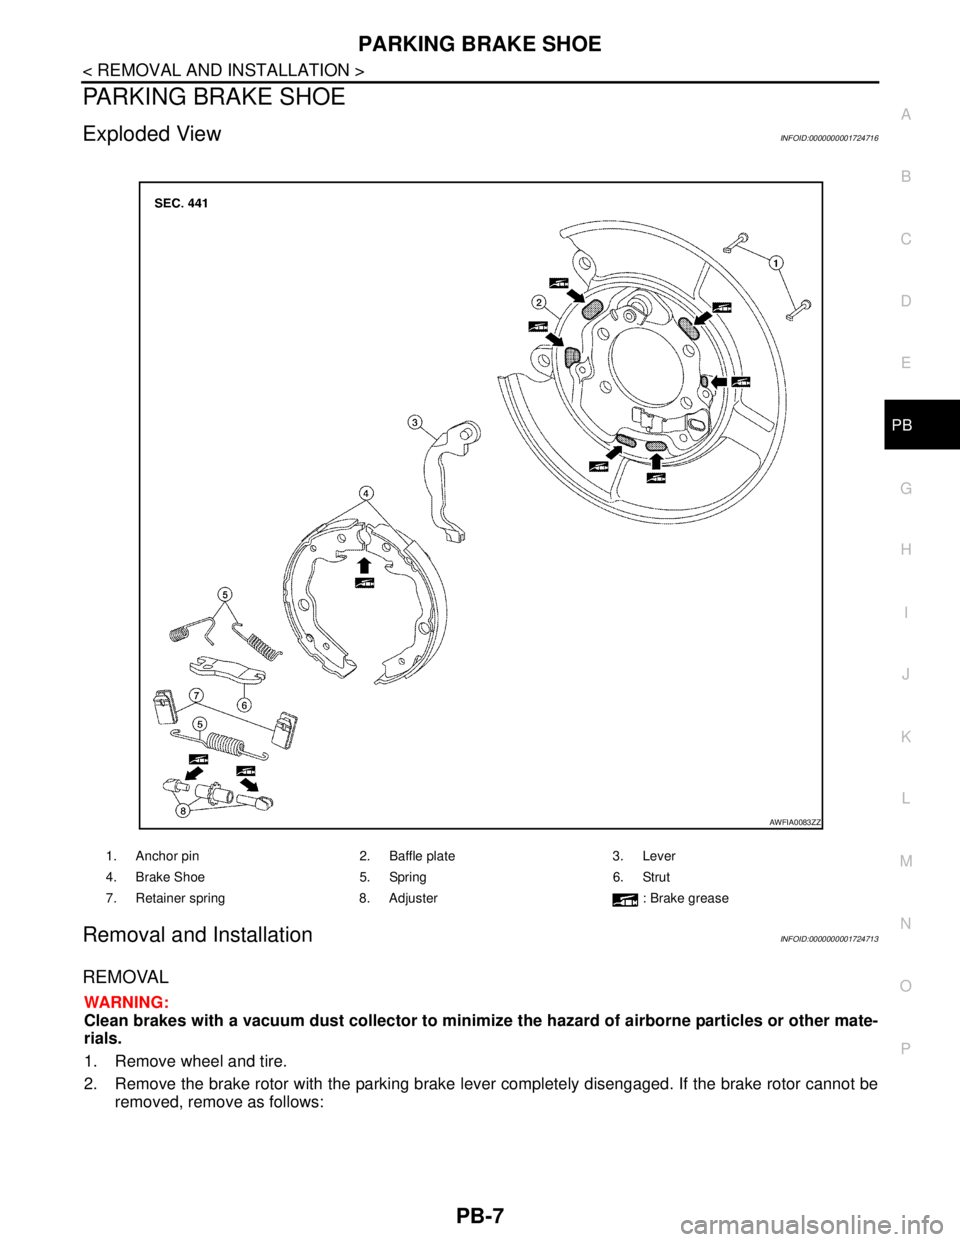
Exploded ViewINFOID:0000000001724716
Removal and InstallationINFOID:0000000001724713
REMOVAL
WARNING:
Clean brakes with a vacuum dust collector to minimize the hazard of airborne particles or other mate-
rials.
1. Remove wheel and tire.
2. Remove the brake rotor with the parking brake lever completely disengaged. If the brake rotor cannot be
removed, remove as follows:
1. Anchor pin 2. Baffle plate 3. Lever
4. Brake Shoe 5. Spring 6. Strut
7. Retainer spring 8. Adjuster : Brake grease
AWFIA0083ZZ
Page 4412 of 5883
PB-8
< REMOVAL AND INSTALLATION >
PARKING BRAKE SHOE
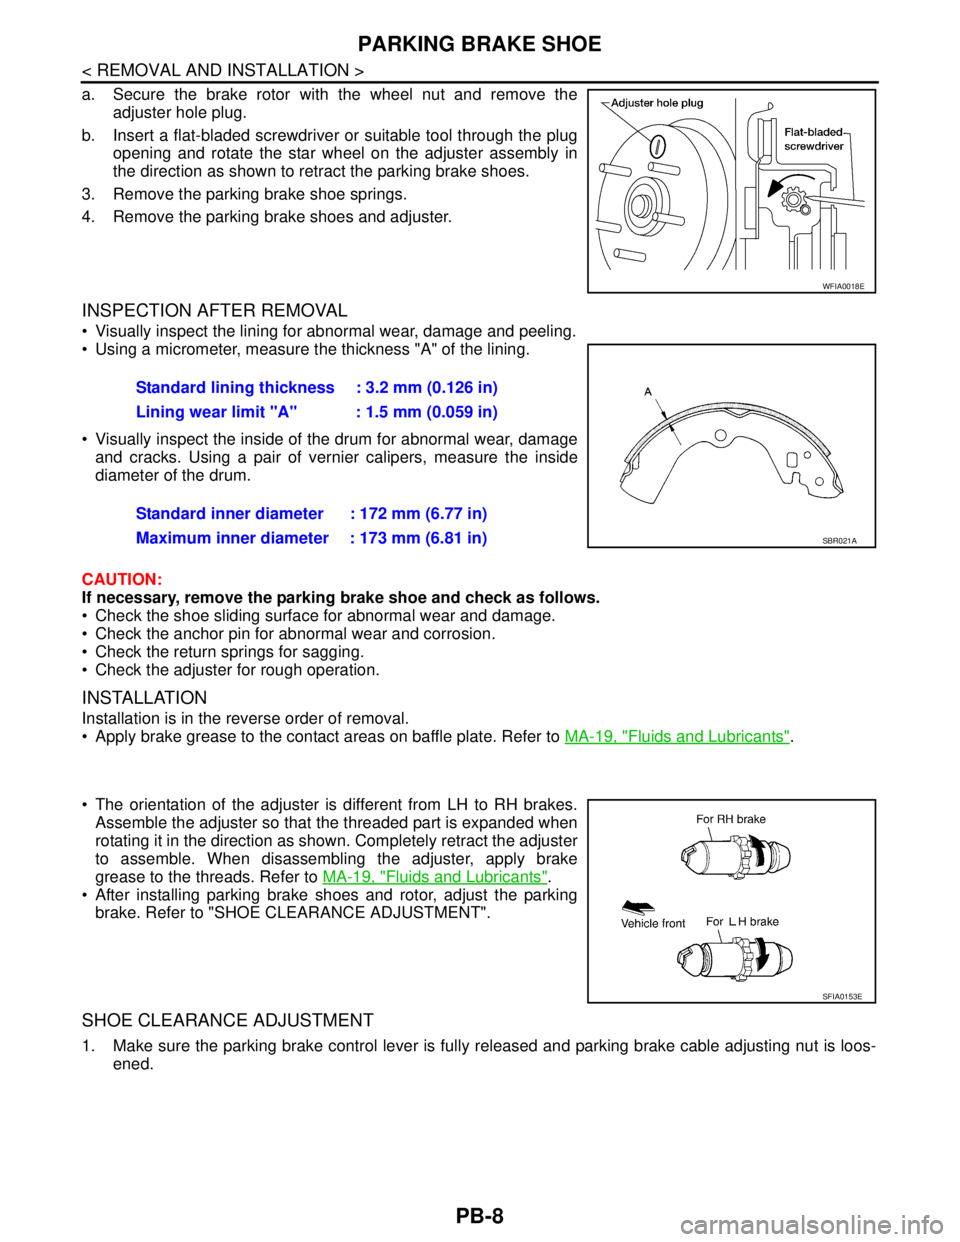
a. Secure the brake rotor with the wheel nut and remove the
adjuster hole plug.
b. Insert a flat-bladed screwdriver or suitable tool through the plug
opening and rotate the star wheel on the adjuster assembly in
the direction as shown to retract the parking brake shoes.
3. Remove the parking brake shoe springs.
4. Remove the parking brake shoes and adjuster.
INSPECTION AFTER REMOVAL
Visually inspect the lining for abnormal wear, damage and peeling.
Using a micrometer, measure the thickness "A" of the lining.
Visually inspect the inside of the drum for abnormal wear, damage
and cracks. Using a pair of vernier calipers, measure the inside
diameter of the drum.
CAUTION:
If necessary, remove the parking brake shoe and check as follows.
Check the shoe sliding surface for abnormal wear and damage.
Check the anchor pin for abnormal wear and corrosion.
Check the return springs for sagging.
Check the adjuster for rough operation.
INSTALLATION
Installation is in the reverse order of removal.
Apply brake grease to the contact areas on baffle plate. Refer to MA-19, "
Fluids and Lubricants".
The orientation of the adjuster is different from LH to RH brakes.
Assemble the adjuster so that the threaded part is expanded when
rotating it in the direction as shown. Completely retract the adjuster
to assemble. When disassembling the adjuster, apply brake
grease to the threads. Refer to MA-19, "
Fluids and Lubricants".
After installing parking brake shoes and rotor, adjust the parking
brake. Refer to "SHOE CLEARANCE ADJUSTMENT".
SHOE CLEARANCE ADJUSTMENT
1. Make sure the parking brake control lever is fully released and parking brake cable adjusting nut is loos-
ened.
WFIA0018E
Standard lining thickness : 3.2 mm (0.126 in)
Lining wear limit "A" : 1.5 mm (0.059 in)
Standard inner diameter : 172 mm (6.77 in)
Maximum inner diameter : 173 mm (6.81 in)
SBR021A
SFIA0153E
Page 4413 of 5883
PARKING BRAKE SHOE
PB-9
< REMOVAL AND INSTALLATION >
C
D
E
G
H
I
J
K
L
MA
B
PB
N
O
P
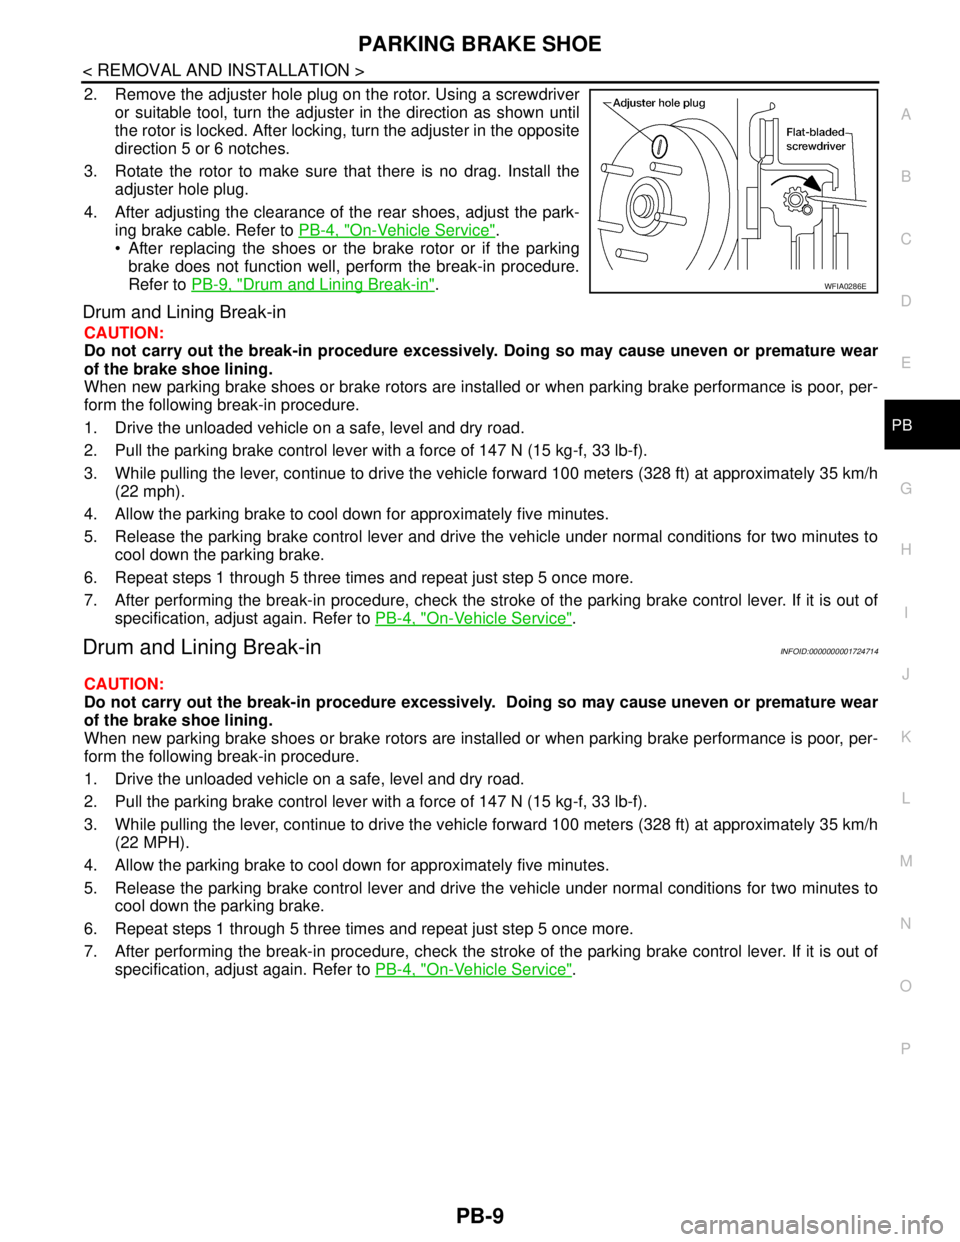
2. Remove the adjuster hole plug on the rotor. Using a screwdriver
or suitable tool, turn the adjuster in the direction as shown until
the rotor is locked. After locking, turn the adjuster in the opposite
direction 5 or 6 notches.
3. Rotate the rotor to make sure that there is no drag. Install the
adjuster hole plug.
4. After adjusting the clearance of the rear shoes, adjust the park-
ing brake cable. Refer to PB-4, "
On-Vehicle Service".
After replacing the shoes or the brake rotor or if the parking
brake does not function well, perform the break-in procedure.
Refer to PB-9, "
Drum and Lining Break-in".
Drum and Lining Break-in
CAUTION:
Do not carry out the break-in procedure excessively. Doing so may cause uneven or premature wear
of the brake shoe lining.
When new parking brake shoes or brake rotors are installed or when parking brake performance is poor, per-
form the following break-in procedure.
1. Drive the unloaded vehicle on a safe, level and dry road.
2. Pull the parking brake control lever with a force of 147 N (15 kg-f, 33 lb-f).
3. While pulling the lever, continue to drive the vehicle forward 100 meters (328 ft) at approximately 35 km/h
(22 mph).
4. Allow the parking brake to cool down for approximately five minutes.
5. Release the parking brake control lever and drive the vehicle under normal conditions for two minutes to
cool down the parking brake.
6. Repeat steps 1 through 5 three times and repeat just step 5 once more.
7. After performing the break-in procedure, check the stroke of the parking brake control lever. If it is out of
specification, adjust again. Refer to PB-4, "
On-Vehicle Service".
Drum and Lining Break-inINFOID:0000000001724714
CAUTION:
Do not carry out the break-in procedure excessively. Doing so may cause uneven or premature wear
of the brake shoe lining.
When new parking brake shoes or brake rotors are installed or when parking brake performance is poor, per-
form the following break-in procedure.
1. Drive the unloaded vehicle on a safe, level and dry road.
2. Pull the parking brake control lever with a force of 147 N (15 kg-f, 33 lb-f).
3. While pulling the lever, continue to drive the vehicle forward 100 meters (328 ft) at approximately 35 km/h
(22 MPH).
4. Allow the parking brake to cool down for approximately five minutes.
5. Release the parking brake control lever and drive the vehicle under normal conditions for two minutes to
cool down the parking brake.
6. Repeat steps 1 through 5 three times and repeat just step 5 once more.
7. After performing the break-in procedure, check the stroke of the parking brake control lever. If it is out of
specification, adjust again. Refer to PB-4, "
On-Vehicle Service".
WFIA0286E