2007 NISSAN TIIDA oil capacity
[x] Cancel search: oil capacityPage 4224 of 5883
![NISSAN TIIDA 2007 Service Repair Manual ENGINE OIL
LU-17
< ON-VEHICLE MAINTENANCE >[MR18DE]
C
D
E
F
G
H
I
J
K
L
MA
LU
N
P O
3. Loosen oil filler cap (1) and then remove drain plug (2).
Oil filter (3)
⇐ Engine front
4. Drain engine oil. NISSAN TIIDA 2007 Service Repair Manual ENGINE OIL
LU-17
< ON-VEHICLE MAINTENANCE >[MR18DE]
C
D
E
F
G
H
I
J
K
L
MA
LU
N
P O
3. Loosen oil filler cap (1) and then remove drain plug (2).
Oil filter (3)
⇐ Engine front
4. Drain engine oil.](/manual-img/5/57395/w960_57395-4223.png)
ENGINE OIL
LU-17
< ON-VEHICLE MAINTENANCE >[MR18DE]
C
D
E
F
G
H
I
J
K
L
MA
LU
N
P O
3. Loosen oil filler cap (1) and then remove drain plug (2).
Oil filter (3)
⇐ Engine front
4. Drain engine oil.
5. Install drain plug (2) with new washer. Refer to EM-211, "
Com-
ponent".
CAUTION:
Be sure to clean drain plug (2) and install with new washer.
6. Refill with new engine oil.
Refer to MA-19, "
Fluids and Lubricants".
CAUTION:
The refill capacity depends on the engine oil temperature
and drain time. Use these specifications for reference
only.
Always use oil level gauge to determine the proper
amount of engine oil in the engine.
7. Warm up engine and check area around drain plug (2) and oil fil-
ter (3) for engine oil leakage.
8. Stop engine and wait for 10 minutes.
9. Check the engine oil level. Refer to LU-15, "
Inspection".
PBIC3915E
Page 4229 of 5883
![NISSAN TIIDA 2007 Service Repair Manual LU-22
< SERVICE DATA AND SPECIFICATIONS (SDS) [MR18DE]
SERVICE DATA AND SPECIFICATIONS (SDS)
SERVICE DATA AND SPECIFICATIONS (SDS)
SERVICE DATA AND SPECIFICATIONS (SDS)
Standard and LimitINFOID:000000 NISSAN TIIDA 2007 Service Repair Manual LU-22
< SERVICE DATA AND SPECIFICATIONS (SDS) [MR18DE]
SERVICE DATA AND SPECIFICATIONS (SDS)
SERVICE DATA AND SPECIFICATIONS (SDS)
SERVICE DATA AND SPECIFICATIONS (SDS)
Standard and LimitINFOID:000000](/manual-img/5/57395/w960_57395-4228.png)
LU-22
< SERVICE DATA AND SPECIFICATIONS (SDS) [MR18DE]
SERVICE DATA AND SPECIFICATIONS (SDS)
SERVICE DATA AND SPECIFICATIONS (SDS)
SERVICE DATA AND SPECIFICATIONS (SDS)
Standard and LimitINFOID:0000000001337830
OIL PRESSURE
Oil Capacity
Unit: (Imp qt)
Engine speed rpm
Approximate discharge pressure kPa (bar, kg/cm2, psi)
Idle speed
2,00071.5 (0.70, 0.70, 10)
200 (2.0, 2.0, 29)
Drain and refillWith oil filter change Approximately 4.4 (3 7/8)
Without oil filter change Approximately 4.2 (3 3/4)
Dry engine (engine overhaul) Approximately 5.5 (4 7/8)
Page 4234 of 5883
![NISSAN TIIDA 2007 Service Repair Manual ENGINE OIL
LU-27
< ON-VEHICLE MAINTENANCE >[K9K]
C
D
E
F
G
H
I
J
K
L
MA
LU
N
P O
DrainingINFOID:0000000001381538
WARNING:
Be careful not to burn yourself, as the engine oil is hot.
Prolonged and r NISSAN TIIDA 2007 Service Repair Manual ENGINE OIL
LU-27
< ON-VEHICLE MAINTENANCE >[K9K]
C
D
E
F
G
H
I
J
K
L
MA
LU
N
P O
DrainingINFOID:0000000001381538
WARNING:
Be careful not to burn yourself, as the engine oil is hot.
Prolonged and r](/manual-img/5/57395/w960_57395-4233.png)
ENGINE OIL
LU-27
< ON-VEHICLE MAINTENANCE >[K9K]
C
D
E
F
G
H
I
J
K
L
MA
LU
N
P O
DrainingINFOID:0000000001381538
WARNING:
Be careful not to burn yourself, as the engine oil is hot.
Prolonged and repeated contact with used engine oil may cause skin cancer: try to avoid direct skin
contact with used oil. If skin contact is made, wash thoroughly with soap or hand cleaner as soon as
possible.
1. Put the vehicle on a level surface.
2. Warm up engine, and check for oil leakage from engine components.
3. Stop engine and wait for 10 minutes.
4. Loosen oil filler cap.
5. Remove drain plug and then drain engine oil.
RefillingINFOID:0000000001381539
1. Refill with new engine oil.
The refill capacity depends on the oil temperature and drain time.
Use these specifications for reference only.
Always use the dipstick to determine when the proper amount of oil
is in the engine.
CAUTION:
Be sure to clean drain plug and install with new washer.
The refill capacity depends on the oil temperature and drain
time. Use these specifications for reference only.
Always use the dipstick to determine when the proper amount of oil is in the engine.
2. Warm up engine and check area around drain plug and oil filter for oil leakage.
3. Stop engine and wait for 10 minutes.
4. Check oil level and add engine oil as necessary. Refer to LU-26, "
Inspection". Oil capacity
(Approximate): Refer to MA-19, "
Fluids and
Lubricants".
MBIB0548E
Page 4240 of 5883
![NISSAN TIIDA 2007 Service Repair Manual SERVICE DATA AND SPECIFICATIONS (SDS)
LU-33
< SERVICE DATA AND SPECIFICATIONS (SDS) [K9K]
C
D
E
F
G
H
I
J
K
L
MA
LU
N
P O
SERVICE DATA AND SPECIFICATIONS (SDS)
SERVICE DATA AND SPECIFICATIONS (SDS)
Pe NISSAN TIIDA 2007 Service Repair Manual SERVICE DATA AND SPECIFICATIONS (SDS)
LU-33
< SERVICE DATA AND SPECIFICATIONS (SDS) [K9K]
C
D
E
F
G
H
I
J
K
L
MA
LU
N
P O
SERVICE DATA AND SPECIFICATIONS (SDS)
SERVICE DATA AND SPECIFICATIONS (SDS)
Pe](/manual-img/5/57395/w960_57395-4239.png)
SERVICE DATA AND SPECIFICATIONS (SDS)
LU-33
< SERVICE DATA AND SPECIFICATIONS (SDS) [K9K]
C
D
E
F
G
H
I
J
K
L
MA
LU
N
P O
SERVICE DATA AND SPECIFICATIONS (SDS)
SERVICE DATA AND SPECIFICATIONS (SDS)
Periodical Maintenance SpecificationINFOID:0000000001381548
ENGINE OIL CAPACITY (APPROXIMATE)
Unit: ·(Imp qt)
Engine Oil PressureINFOID:0000000001381549
kPa (bar, kg/cm2, psi)
With oil filter change4.55 (4)
Without oil filter change 4.39 (3-7/8)
Dry engine (overhaul)4.71 (4-1/8)
Engine speed Approximate discharge pressure
Idle speed 120 (1.2, 1.22, 17.4)
3,000 rpm 350 (3.5, 5.57, 50.8)
Page 4259 of 5883

RECOMMENDED FLUIDS AND LUBRICANTS
MA-19
< ON-VEHICLE MAINTENANCE >
C
D
E
F
G
H
I
J
K
L
MB
MAN
OA
RECOMMENDED FLUIDS AND LUBRICANTS
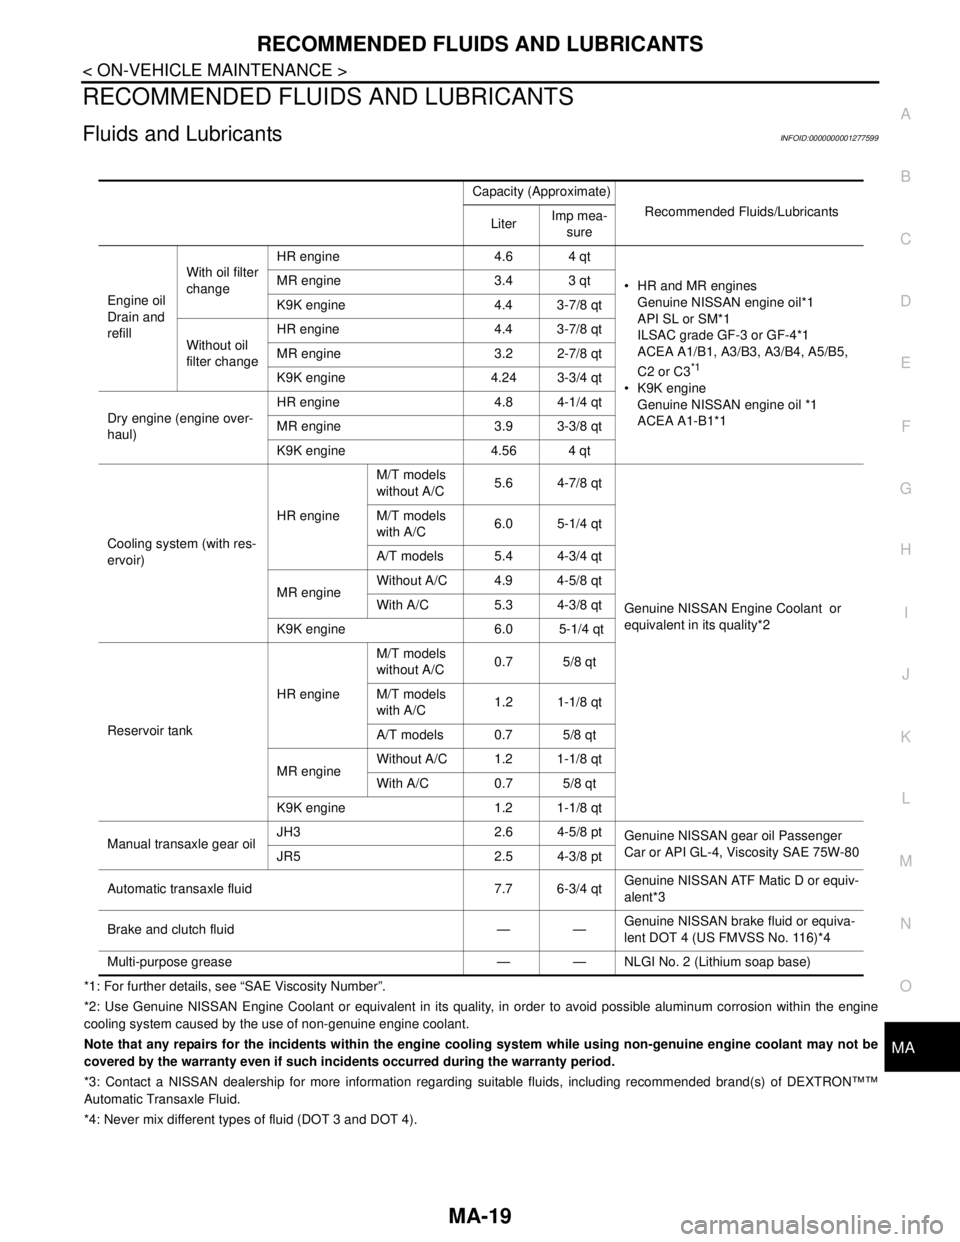
Fluids and LubricantsINFOID:0000000001277599
*1: For further details, see “SAE Viscosity Number”.
*2: Use Genuine NISSAN Engine Coolant or equivalent in its quality, in order to avoid possible aluminum corrosion within the engine
cooling system caused by the use of non-genuine engine coolant.
Note that any repairs for the incidents within the engine cooling system while using non-genuine engine coolant may not be
covered by the warranty even if such incidents occurred during the warranty period.
*3: Contact a NISSAN dealership for more information regarding suitable fluids, including recommended brand(s) of DEXTRON™™
Automatic Transaxle Fluid.
*4: Never mix different types of fluid (DOT 3 and DOT 4).Capacity (Approximate)
Recommended Fluids/Lubricants
LiterImp mea-
sure
Engine oil
Drain and
refillWith oil filter
changeHR engine 4.6 4 qt
HR and MR engines
Genuine NISSAN engine oil*1
API SL or SM*1
ILSAC grade GF-3 or GF-4*1
ACEA A1/B1, A3/B3, A3/B4, A5/B5,
C2 or C3
*1
K9K engine
Genuine NISSAN engine oil *1
ACEA A1-B1*1 MR engine 3.4 3 qt
K9K engine 4.4 3-7/8 qt
Without oil
filter changeHR engine 4.4 3-7/8 qt
MR engine 3.2 2-7/8 qt
K9K engine 4.24 3-3/4 qt
Dry engine (engine over-
haul)HR engine 4.8 4-1/4 qt
MR engine 3.9 3-3/8 qt
K9K engine 4.56 4 qt
Cooling system (with res-
ervoir)HR engineM/T models
without A/C5.6 4-7/8 qt
Genuine NISSAN Engine Coolant or
equivalent in its quality*2 M/T models
with A/C6.0 5-1/4 qt
A/T models 5.4 4-3/4 qt
MR engineWithout A/C 4.9 4-5/8 qt
With A/C 5.3 4-3/8 qt
K9K engine 6.0 5-1/4 qt
Reservoir tankHR engineM/T models
without A/C0.7 5/8 qt
M/T models
with A/C1.2 1-1/8 qt
A/T models 0.7 5/8 qt
MR engineWithout A/C 1.2 1-1/8 qt
With A/C 0.7 5/8 qt
K9K engine 1.2 1-1/8 qt
Manual transaxle gear oilJH3 2.6 4-5/8 pt
Genuine NISSAN gear oil Passenger
Car or API GL-4, Viscosity SAE 75W-80
JR5 2.5 4-3/8 pt
Automatic transaxle fluid 7.7 6-3/4 qtGenuine NISSAN ATF Matic D or equiv-
alent*3
Brake and clutch fluid — —Genuine NISSAN brake fluid or equiva-
lent DOT 4 (US FMVSS No. 116)*4
Multi-purpose grease — — NLGI No. 2 (Lithium soap base)
Page 4267 of 5883

ENGINE MAINTENANCE (HR16DE)
MA-27
< ON-VEHICLE MAINTENANCE >
C
D
E
F
G
H
I
J
K
L
MB
MAN
OA
ENGINE OIL : DrainingINFOID:0000000001730852
WARNING:
Be careful not to get burned, as engine oil may be hot.
Prolonged and repeated contact with used engine oil may cause skin cancer. Try to avoid direct skin
contact with used engine oil. If skin contact is made, wash thoroughly with soap or hand cleaner as
soon as possible.
1. Warm up the engine, and check for engine oil leakage from engine components. Refer to LU-6, "
Inspec-
tion".
2. Stop the engine and wait for 10 minutes.
3. Loosen oil filler cap.
4. Remove drain plug and then drain engine oil.
ENGINE OIL : RefillingINFOID:0000000001730853
1. Install drain plug with new washer. Refer to EM-100, "Exploded View".
CAUTION:
Be sure to clean drain plug and install with new washer.
2. Refill with new engine oil.
Engine oil specification and viscosity: Refer to MA-19, "
Fluids and Lubricants".
CAUTION:
The refill capacity depends on the engine oil temperature and drain time. Use these specifica-
tions for reference only.
Always use oil level gauge to determine the proper amount of engine oil in the engine.
3. Warm up engine and check area around drain plug and oil filter for engine oil leakage.
4. Stop engine and wait for 10 minutes.
5. Check the engine oil level. Refer to LU-6, "
Inspection".
OIL FILTER
OIL FILTER : Removal and InstallationINFOID:0000000001730854
REMOVAL
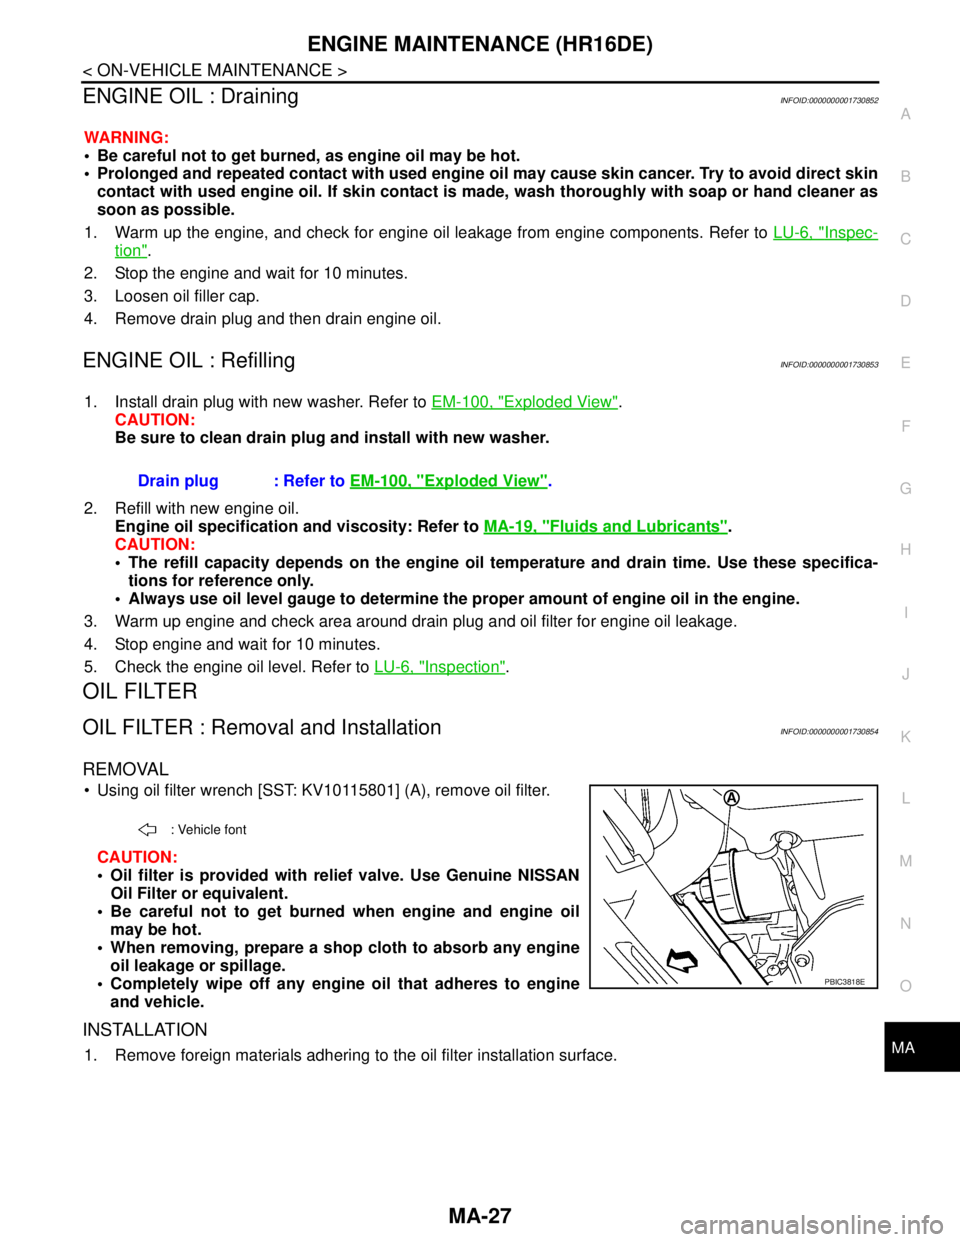
Using oil filter wrench [SST: KV10115801] (A), remove oil filter.
CAUTION:
Oil filter is provided with relief valve. Use Genuine NISSAN
Oil Filter or equivalent.
Be careful not to get burned when engine and engine oil
may be hot.
When removing, prepare a shop cloth to absorb any engine
oil leakage or spillage.
Completely wipe off any engine oil that adheres to engine
and vehicle.
INSTALLATION
1. Remove foreign materials adhering to the oil filter installation surface.Drain plug : Refer to EM-100, "
Exploded View".
: Vehicle font
PBIC3818E
Page 4278 of 5883

MA-38
< ON-VEHICLE MAINTENANCE >
ENGINE MAINTENANCE (MR18DE)
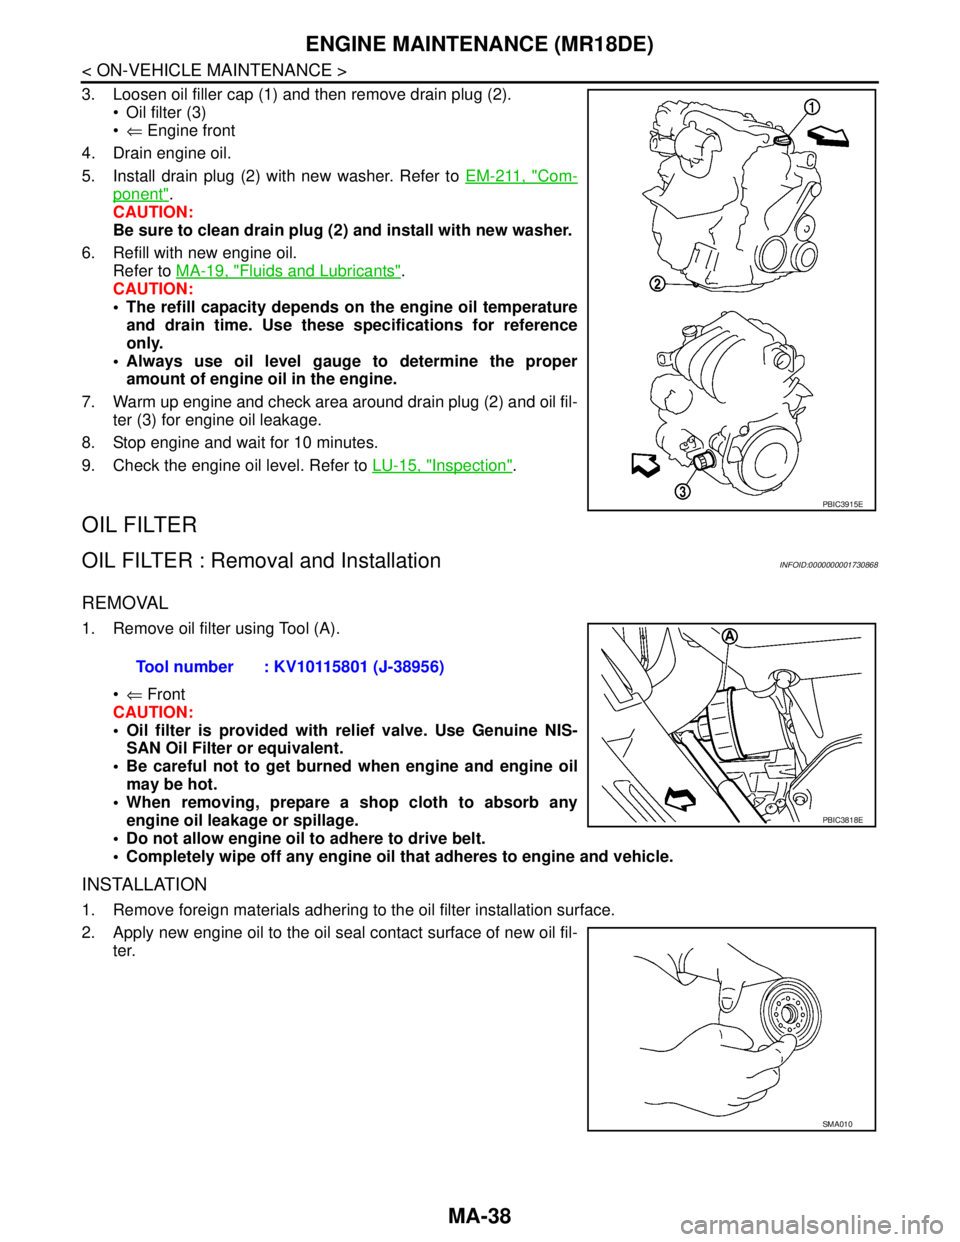
3. Loosen oil filler cap (1) and then remove drain plug (2).
Oil filter (3)
⇐ Engine front
4. Drain engine oil.
5. Install drain plug (2) with new washer. Refer to EM-211, "
Com-
ponent".
CAUTION:
Be sure to clean drain plug (2) and install with new washer.
6. Refill with new engine oil.
Refer to MA-19, "
Fluids and Lubricants".
CAUTION:
The refill capacity depends on the engine oil temperature
and drain time. Use these specifications for reference
only.
Always use oil level gauge to determine the proper
amount of engine oil in the engine.
7. Warm up engine and check area around drain plug (2) and oil fil-
ter (3) for engine oil leakage.
8. Stop engine and wait for 10 minutes.
9. Check the engine oil level. Refer to LU-15, "
Inspection".
OIL FILTER
OIL FILTER : Removal and InstallationINFOID:0000000001730868
REMOVAL
1. Remove oil filter using Tool (A).
⇐ Front
CAUTION:
Oil filter is provided with relief valve. Use Genuine NIS-
SAN Oil Filter or equivalent.
Be careful not to get burned when engine and engine oil
may be hot.
When removing, prepare a shop cloth to absorb any
engine oil leakage or spillage.
Do not allow engine oil to adhere to drive belt.
Completely wipe off any engine oil that adheres to engine and vehicle.
INSTALLATION
1. Remove foreign materials adhering to the oil filter installation surface.
2. Apply new engine oil to the oil seal contact surface of new oil fil-
ter.
PBIC3915E
Tool number : KV10115801 (J-38956)
PBIC3818E
SMA010
Page 4288 of 5883

MA-48
< ON-VEHICLE MAINTENANCE >
ENGINE MAINTENANCE (K9K)
Prolonged and repeated contact with used engine oil may cause skin cancer: try to avoid direct skin
contact with used oil. If skin contact is made, wash thoroughly with soap or hand cleaner as soon as
possible.
1. Put the vehicle on a level surface.
2. Warm up engine, and check for oil leakage from engine components.
3. Stop engine and wait for 10 minutes.
4. Loosen oil filler cap.
5. Remove drain plug and then drain engine oil.
ENGINE OIL : RefillingINFOID:0000000001730877
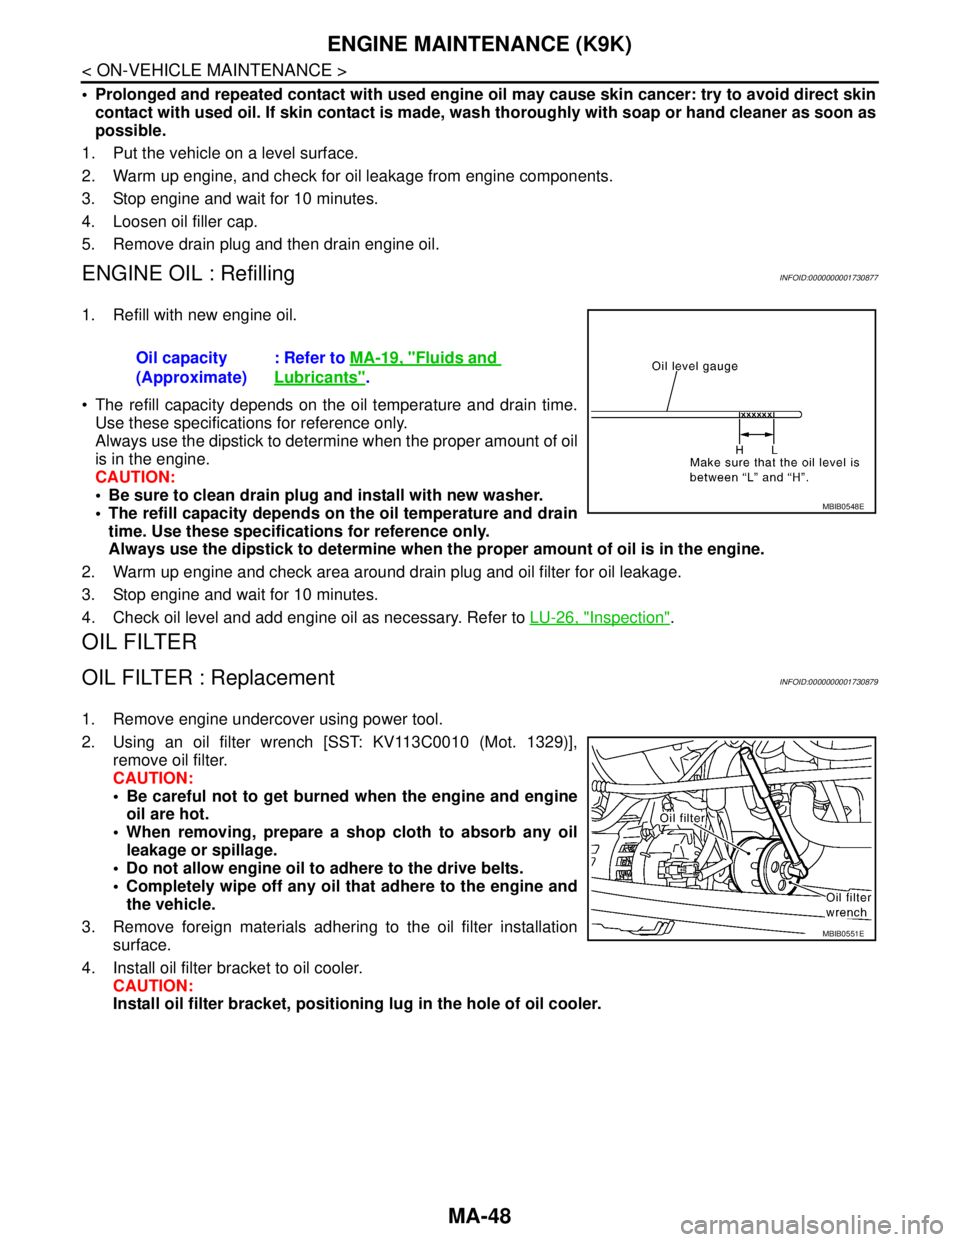
1. Refill with new engine oil.
The refill capacity depends on the oil temperature and drain time.
Use these specifications for reference only.
Always use the dipstick to determine when the proper amount of oil
is in the engine.
CAUTION:
Be sure to clean drain plug and install with new washer.
The refill capacity depends on the oil temperature and drain
time. Use these specifications for reference only.
Always use the dipstick to determine when the proper amount of oil is in the engine.
2. Warm up engine and check area around drain plug and oil filter for oil leakage.
3. Stop engine and wait for 10 minutes.
4. Check oil level and add engine oil as necessary. Refer to LU-26, "
Inspection".
OIL FILTER
OIL FILTER : ReplacementINFOID:0000000001730879
1. Remove engine undercover using power tool.
2. Using an oil filter wrench [SST: KV113C0010 (Mot. 1329)],
remove oil filter.
CAUTION:
Be careful not to get burned when the engine and engine
oil are hot.
When removing, prepare a shop cloth to absorb any oil
leakage or spillage.
Do not allow engine oil to adhere to the drive belts.
Completely wipe off any oil that adhere to the engine and
the vehicle.
3. Remove foreign materials adhering to the oil filter installation
surface.
4. Install oil filter bracket to oil cooler.
CAUTION:
Install oil filter bracket, positioning lug in the hole of oil cooler. Oil capacity
(Approximate): Refer to MA-19, "
Fluids and
Lubricants".
MBIB0548E
MBIB0551E