Page 106 of 130
RF-106
SOFT TOP
Revision: 2006 November2007 350Z
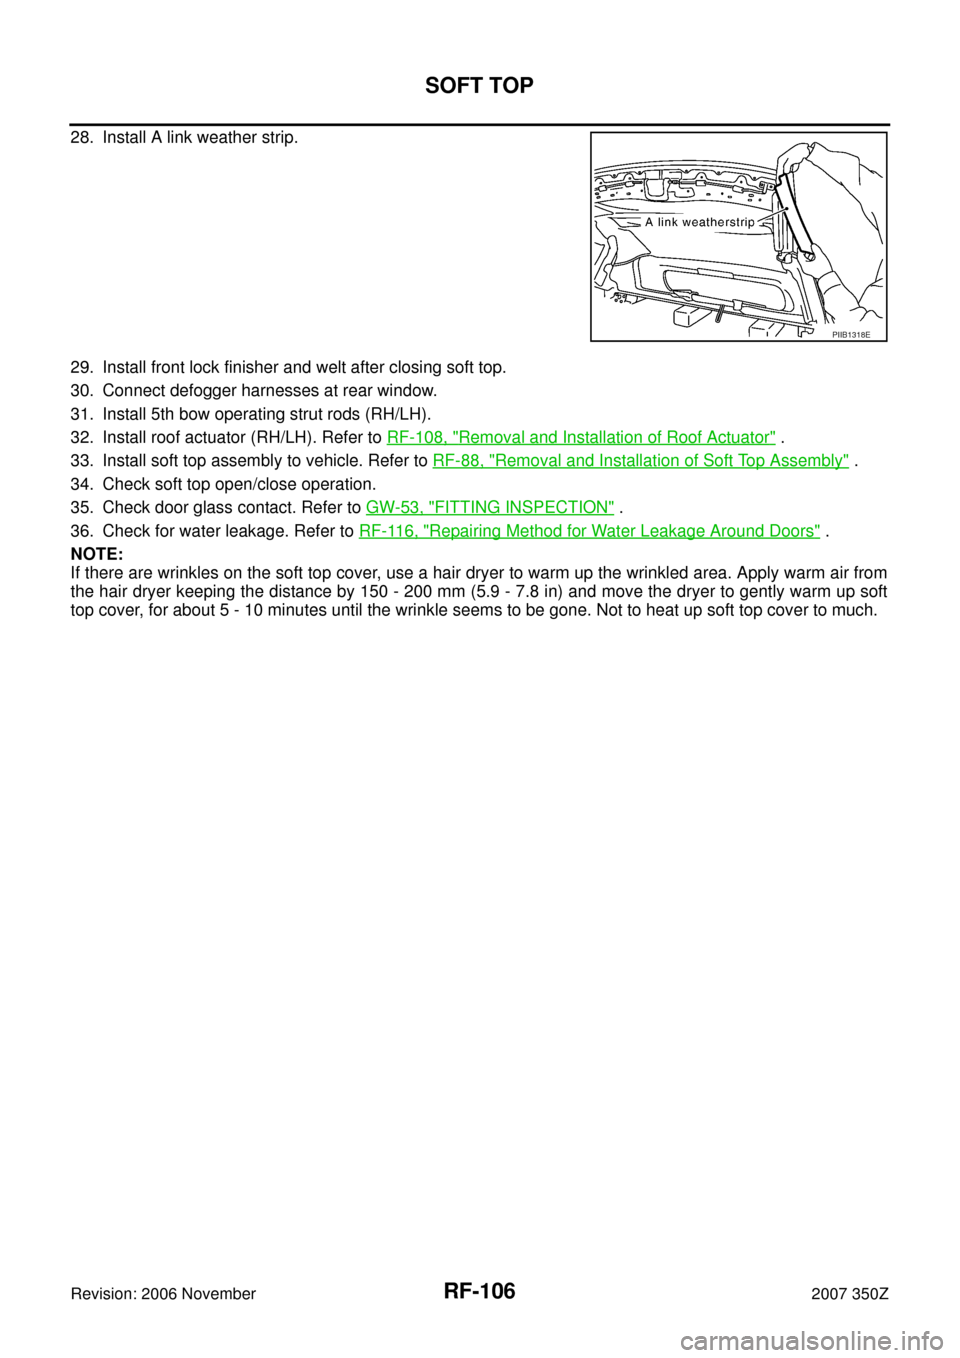
28. Install A link weather strip.
29. Install front lock finisher and welt after closing soft top.
30. Connect defogger harnesses at rear window.
31. Install 5th bow operating strut rods (RH/LH).
32. Install roof actuator (RH/LH). Refer to RF-108, "
Removal and Installation of Roof Actuator" .
33. Install soft top assembly to vehicle. Refer to RF-88, "
Removal and Installation of Soft Top Assembly" .
34. Check soft top open/close operation.
35. Check door glass contact. Refer to GW-53, "
FITTING INSPECTION" .
36. Check for water leakage. Refer to RF-116, "
Repairing Method for Water Leakage Around Doors" .
NOTE:
If there are wrinkles on the soft top cover, use a hair dryer to warm up the wrinkled area. Apply warm air from
the hair dryer keeping the distance by 150 - 200 mm (5.9 - 7.8 in) and move the dryer to gently warm up soft
top cover, for about 5 - 10 minutes until the wrinkle seems to be gone. Not to heat up soft top cover to much.
PIIB1318E
Page 107 of 130
SOFT TOP
RF-107
C
D
E
F
G
H
J
K
L
MA
B
RF
Revision: 2006 November2007 350Z
Removal and Installation of SwitchesNIS0007T
REMOVAL
1. Uninstall soft top assembly from the vehicle. Remove roof actuator (RH/LH) from the soft top.
2. Remove harness tie wrap band at the left side of the soft top.
3. Remove limit switches with plate rail RR bracket by removing
bolt.
4. Remove limit switches with soft top switch bracket1 by removing
bolt.
5. Remove limit switches with soft top switch bracket 2 by remov-
ing bolt.
INSTALLATION
Install in the reverse order of removal.
NOTE:
Wire harnesses correctly to avoid following situation.
�Pinching harnesses by frame.
�Tangling harnesses by frame and links.
�Pulling harnesses between fixing point by harness clips.
PIIA9750E
PIIA9752E
PIIA9751E
Page 108 of 130
RF-108
SOFT TOP
Revision: 2006 November2007 350Z
Removal and Installation of Roof ActuatorNIS0007U
REMOVAL
1. Remove soft top assembly. Refer to RF-88, "Removal and Installation of Soft Top Assembly" .
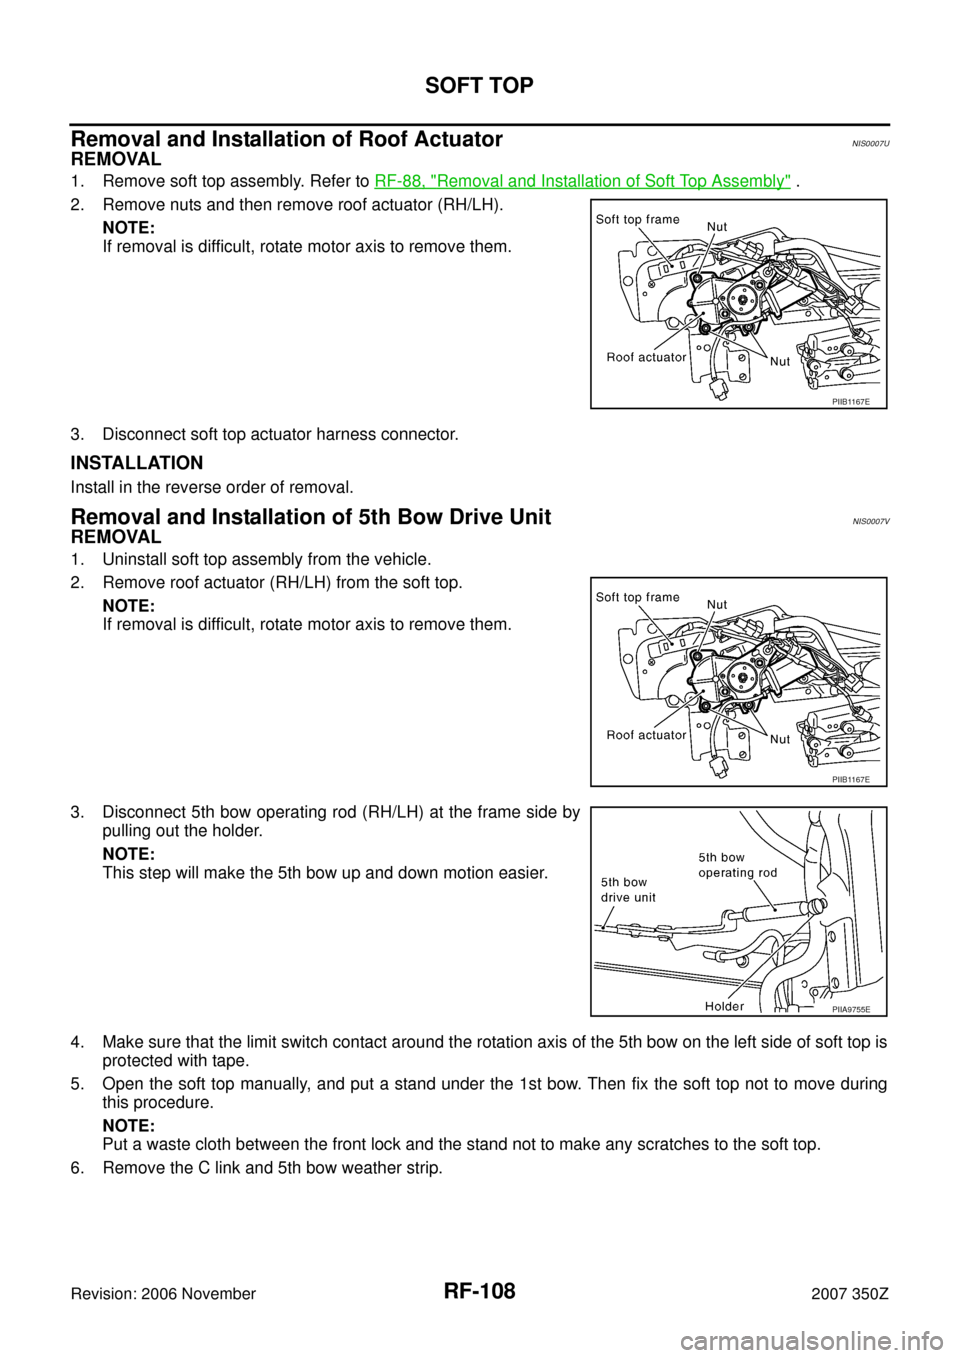
2. Remove nuts and then remove roof actuator (RH/LH).
NOTE:
If removal is difficult, rotate motor axis to remove them.
3. Disconnect soft top actuator harness connector.
INSTALLATION
Install in the reverse order of removal.
Removal and Installation of 5th Bow Drive UnitNIS0007V
REMOVAL
1. Uninstall soft top assembly from the vehicle.
2. Remove roof actuator (RH/LH) from the soft top.
NOTE:
If removal is difficult, rotate motor axis to remove them.
3. Disconnect 5th bow operating rod (RH/LH) at the frame side by
pulling out the holder.
NOTE:
This step will make the 5th bow up and down motion easier.
4. Make sure that the limit switch contact around the rotation axis of the 5th bow on the left side of soft top is
protected with tape.
5. Open the soft top manually, and put a stand under the 1st bow. Then fix the soft top not to move during
this procedure.
NOTE:
Put a waste cloth between the front lock and the stand not to make any scratches to the soft top.
6. Remove the C link and 5th bow weather strip.
PIIB1167E
PIIB1167E
PIIA9755E
Page 115 of 130
SOFT TOP
RF-115
C
D
E
F
G
H
J
K
L
MA
B
RF
Revision: 2006 November2007 350Z
Removal and Installation of Front LockNIS0007W
REMOVAL
1. Remove welt and front finisher.
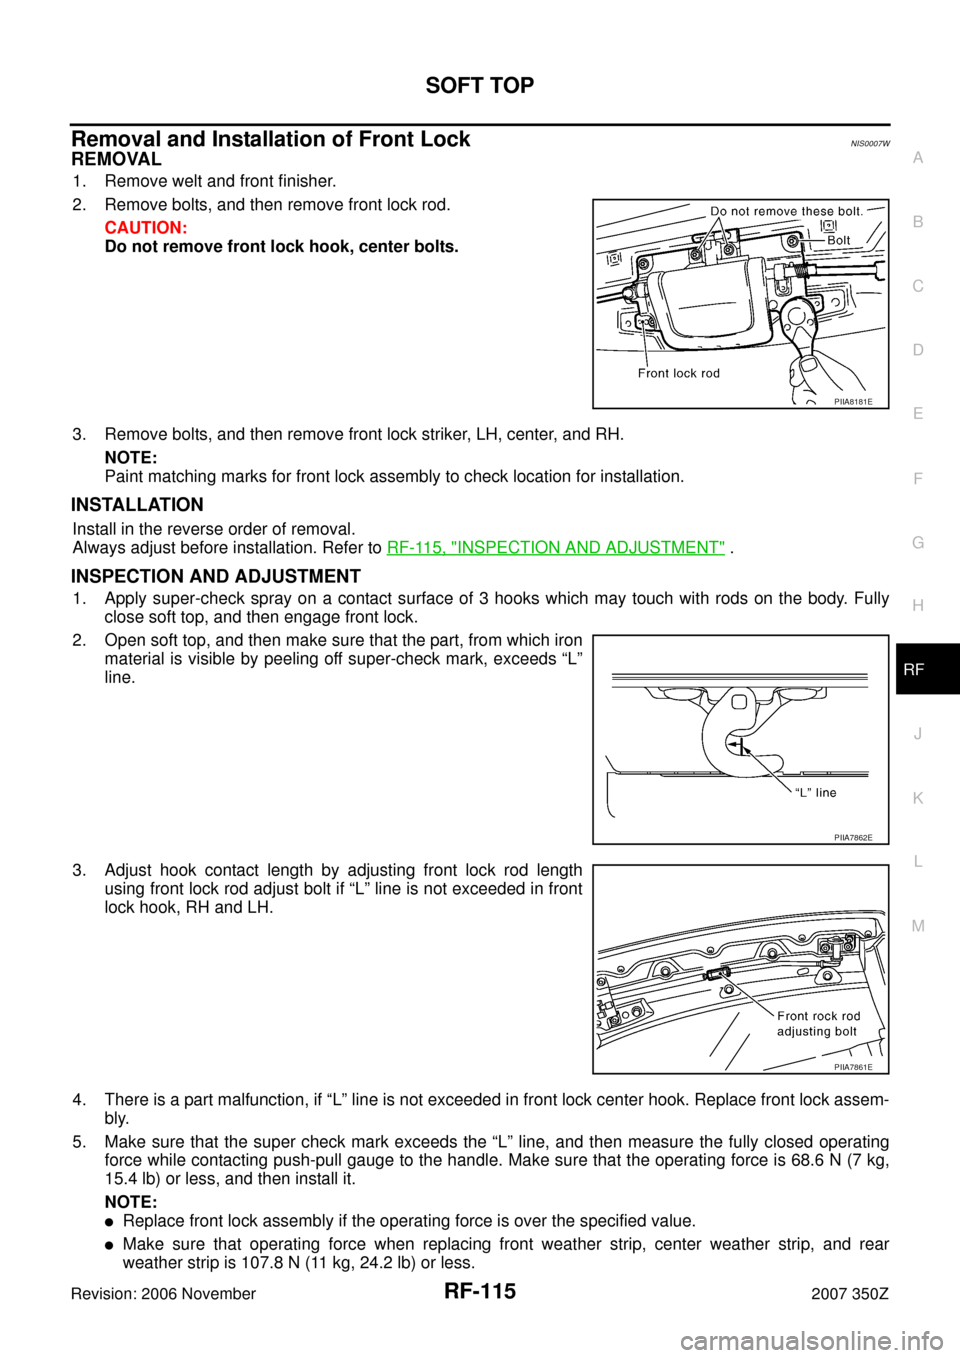
2. Remove bolts, and then remove front lock rod.
CAUTION:
Do not remove front lock hook, center bolts.
3. Remove bolts, and then remove front lock striker, LH, center, and RH.
NOTE:
Paint matching marks for front lock assembly to check location for installation.
INSTALLATION
Install in the reverse order of removal.
Always adjust before installation. Refer to RF-115, "
INSPECTION AND ADJUSTMENT" .
INSPECTION AND ADJUSTMENT
1. Apply super-check spray on a contact surface of 3 hooks which may touch with rods on the body. Fully
close soft top, and then engage front lock.
2. Open soft top, and then make sure that the part, from which iron
material is visible by peeling off super-check mark, exceeds “L”
line.
3. Adjust hook contact length by adjusting front lock rod length
using front lock rod adjust bolt if “L” line is not exceeded in front
lock hook, RH and LH.
4. There is a part malfunction, if “L” line is not exceeded in front lock center hook. Replace front lock assem-
bly.
5. Make sure that the super check mark exceeds the “L” line, and then measure the fully closed operating
force while contacting push-pull gauge to the handle. Make sure that the operating force is 68.6 N (7 kg,
15.4 lb) or less, and then install it.
NOTE:
�Replace front lock assembly if the operating force is over the specified value.
�Make sure that operating force when replacing front weather strip, center weather strip, and rear
weather strip is 107.8 N (11 kg, 24.2 lb) or less.
PIIA8181E
PIIA7862E
PIIA7861E
Page 116 of 130
RF-116
SOFT TOP
Revision: 2006 November2007 350Z
Repairing Method for Water Leakage Around DoorsNIS0007X
WATER LEAKAGE FROM A
Water may be entering passenger room through back of front pillar.
Cause: Butyl tape on back of glass run assembly may be separating from roof panel.
Repair Procedure 1
Apply butyl tape on back of glass run assembly again, and correct
installing position.
Water may be entering through connection between front pillar and front edge of soft top.
Cause: There may be a gap between glass run assembly and weather strip of soft top.
1. Soft top assembly 2. Windshield glass 3. Door glass
4. Glass run assembly 5. A link weather strip 6. B link weather strip
7 C link and 5th bow weather strip
PIIA7647J
PIIB1168E
Page 117 of 130
SOFT TOP
RF-117
C
D
E
F
G
H
J
K
L
MA
B
RF
Revision: 2006 November2007 350Z
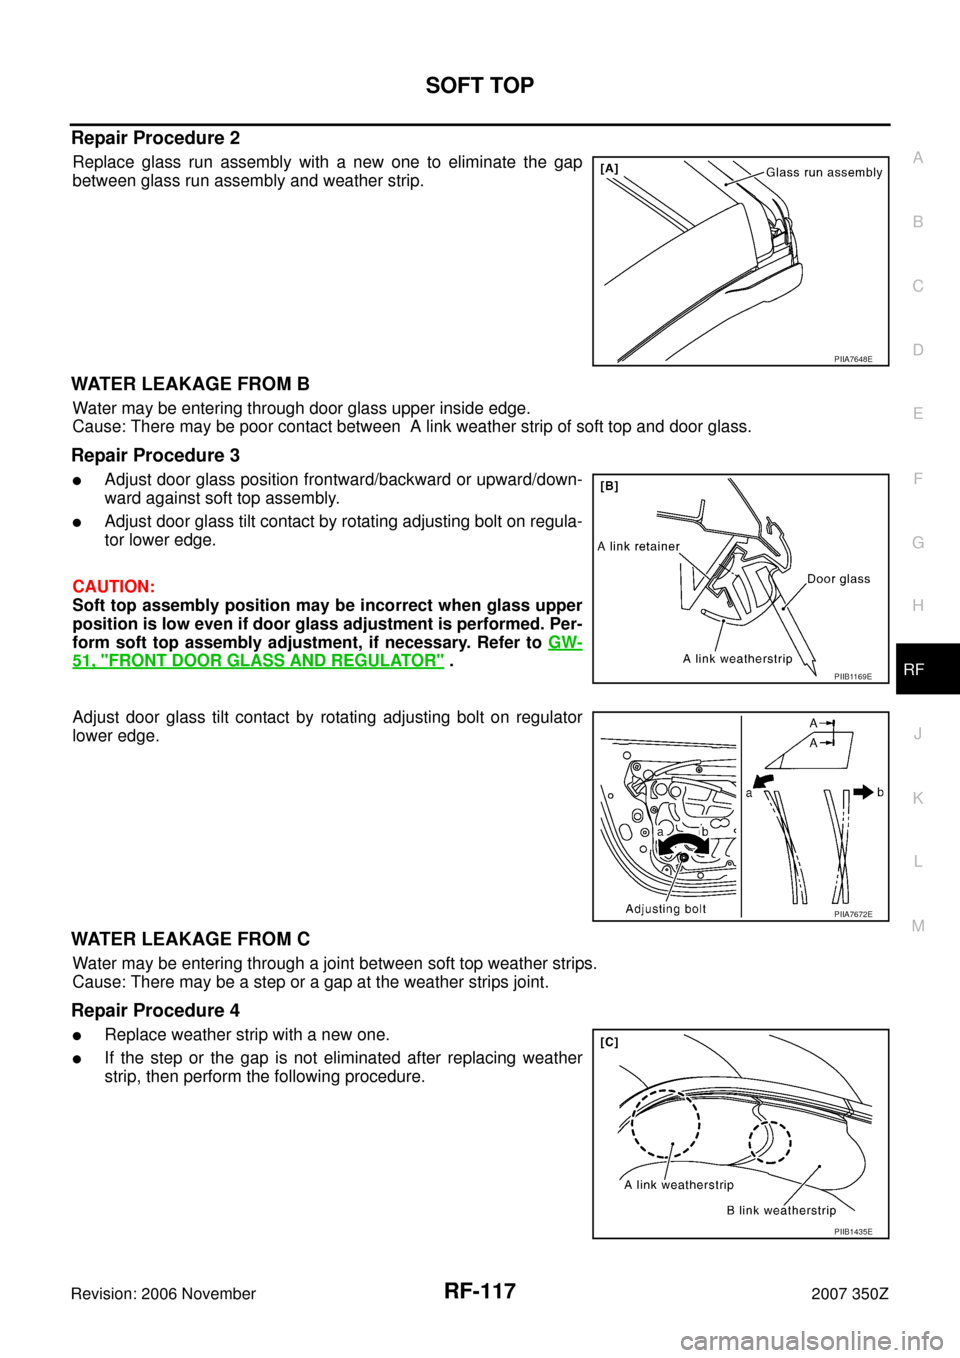
Repair Procedure 2
Replace glass run assembly with a new one to eliminate the gap
between glass run assembly and weather strip.
WATER LEAKAGE FROM B
Water may be entering through door glass upper inside edge.
Cause: There may be poor contact between A link weather strip of soft top and door glass.
Repair Procedure 3
�Adjust door glass position frontward/backward or upward/down-
ward against soft top assembly.
�Adjust door glass tilt contact by rotating adjusting bolt on regula-
tor lower edge.
CAUTION:
Soft top assembly position may be incorrect when glass upper
position is low even if door glass adjustment is performed. Per-
form soft top assembly adjustment, if necessary. Refer to GW-
51, "FRONT DOOR GLASS AND REGULATOR" .
Adjust door glass tilt contact by rotating adjusting bolt on regulator
lower edge.
WATER LEAKAGE FROM C
Water may be entering through a joint between soft top weather strips.
Cause: There may be a step or a gap at the weather strips joint.
Repair Procedure 4
�Replace weather strip with a new one.
�If the step or the gap is not eliminated after replacing weather
strip, then perform the following procedure.
PIIA7648E
PIIB1169E
PIIA7672E
PIIB1435E
Page 118 of 130
RF-118
SOFT TOP
Revision: 2006 November2007 350Z
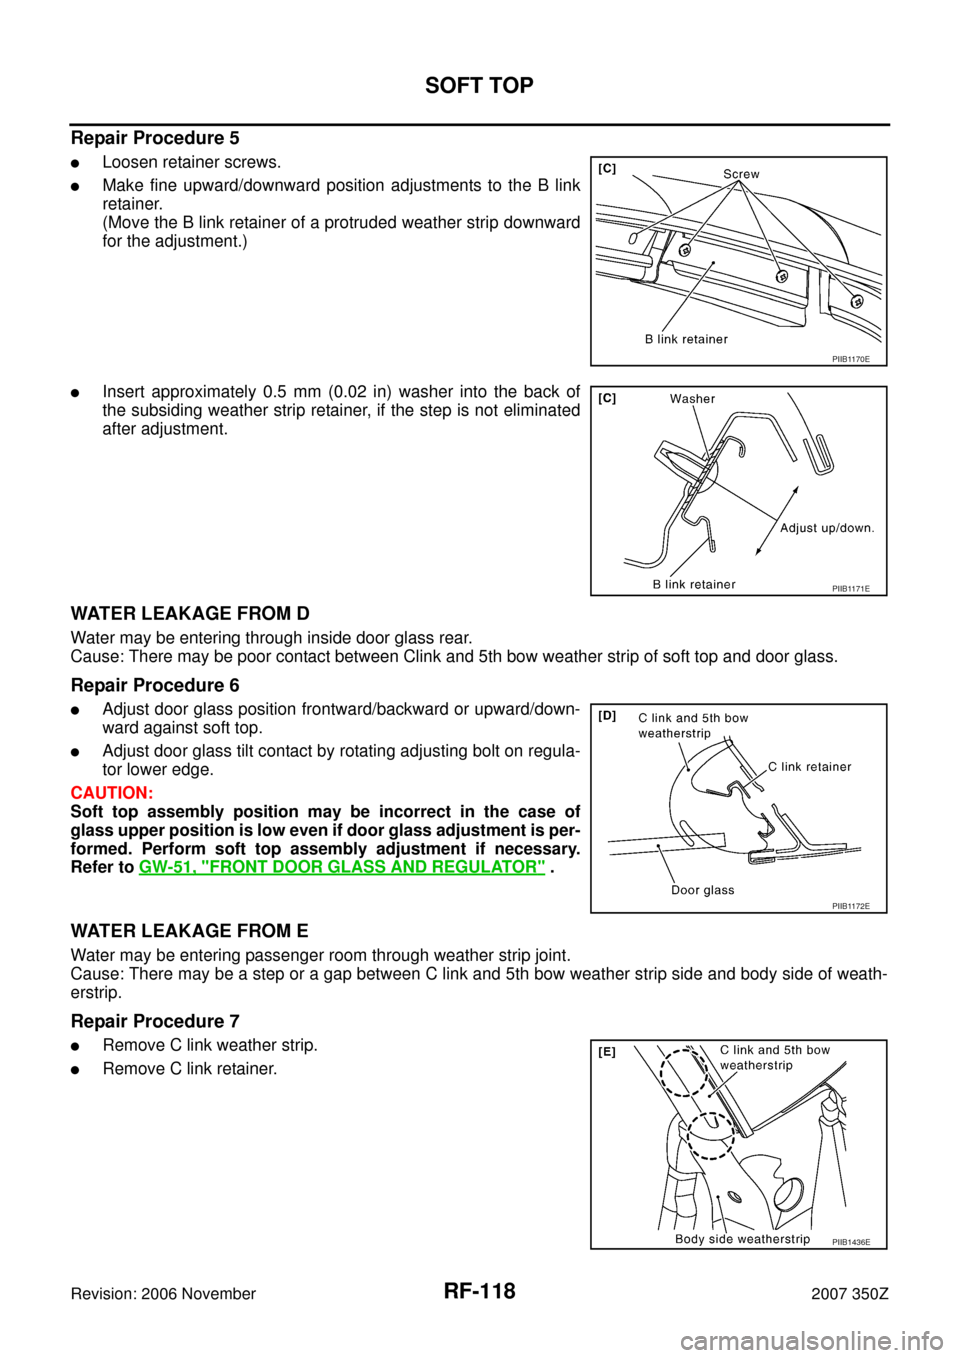
Repair Procedure 5
�Loosen retainer screws.
�Make fine upward/downward position adjustments to the B link
retainer.
(Move the B link retainer of a protruded weather strip downward
for the adjustment.)
�Insert approximately 0.5 mm (0.02 in) washer into the back of
the subsiding weather strip retainer, if the step is not eliminated
after adjustment.
WATER LEAKAGE FROM D
Water may be entering through inside door glass rear.
Cause: There may be poor contact between Clink and 5th bow weather strip of soft top and door glass.
Repair Procedure 6
�Adjust door glass position frontward/backward or upward/down-
ward against soft top.
�Adjust door glass tilt contact by rotating adjusting bolt on regula-
tor lower edge.
CAUTION:
Soft top assembly position may be incorrect in the case of
glass upper position is low even if door glass adjustment is per-
formed. Perform soft top assembly adjustment if necessary.
Refer to GW-51, "
FRONT DOOR GLASS AND REGULATOR" .
WATER LEAKAGE FROM E
Water may be entering passenger room through weather strip joint.
Cause: There may be a step or a gap between C link and 5th bow weather strip side and body side of weath-
erstrip.
Repair Procedure 7
�Remove C link weather strip.
�Remove C link retainer.
PIIB1170E
PIIB1171E
PIIB1172E
PIIB1436E