Page 73 of 130

SOFT TOP
RF-73
C
D
E
F
G
H
J
K
L
MA
B
RF
Revision: 2006 November2007 350Z
3. CHECK 5TH BOW HALF-LATCH SWITCH GROUND CIRCUIT
Check continuity between soft top lock switch connector T205 terminal 6 and ground.
OK or NG
OK >> GO TO 4.
NG >> Repair or replace harness.
4. CHECK SOFT TOP CONTROL UNIT OUTPUT SIGNAL
1. Connect soft top control unit connector.
2. Start engine.
3. Check voltage between soft top control unit connector B67 ter-
minal 31 and ground.
OK or NG
OK >> Replace 5th bow lock assembly in storage lid.
NG >> Replace soft top control unit.
Check 5th Bow Full-Latch SwitchNIS0007B
1. CHECK 5TH BOW FULL-LATCH SWITCH SIGNAL
1. Start engine.
2. Operate soft top switch CLOSE, check voltage between soft top control unit connector and ground.
OK or NG
OK >> Soft top lock switch (5th bow full-latch switch) is OK.
NG >> GO TO 2.6 (B) - Ground : Continuity should exist.
PIIA7899E
31 (L) - Ground : Approx. 5V
PIIA7897E
ConnectorTerminal (Wire color)
Roof conditionVoltage (V)
(Approx.)
(+) (-)
B67 30 (Y/R) Ground CL10 0 → 5
PIIA7933E
Page 74 of 130

RF-74
SOFT TOP
Revision: 2006 November2007 350Z
2. CHECK 5TH BOW FULL-LATCH CIRCUIT
1. Turn ignition switch OFF.
2. Disconnect soft top control unit and soft top lock switch (at 5th bow lock assembly in storage lid) connec-
tor.
3. Check continuity between soft top control unit connector B67
terminal 30 and soft top lock switch connector T205 terminal 3.
4. Check continuity between soft top control unit connector B67
terminal 30 and ground.
OK or NG
OK >> GO TO 3.
NG >> Repair or replace harness.
3. CHECK 5TH BOW HALF-LATCH SWITCH GROUND CIRCUIT
Check continuity between soft top lock switch connector T205 terminal 4 and ground.
OK or NG
OK >> GO TO 4.
NG >> Repair or replace harness.
4. CHECK SOFT TOP CONTROL UNIT OUTPUT SIGNAL
1. Connect soft top control unit connector.
2. Start engine.
3. Check voltage between soft top control unit connector B67 ter-
minal 30 and ground.
OK or NG
OK >> Replace 5th bow assembly in storage lid.
NG >> Replace soft top control unit.30 (Y/R) - 3 (Y) : Continuity should exist.
30 (Y/R) - Ground : Continuity should not exist.
PIIA7934E
4 (B) - Ground : Continuity should exist.
PIIA7935E
30 (Y/R) - Ground : Approx. 5V
PIIA7933E
Page 75 of 130

SOFT TOP
RF-75
C
D
E
F
G
H
J
K
L
MA
B
RF
Revision: 2006 November2007 350Z
Check 5th Bow Ending SwitchNIS0007C
1. CHECK 5TH BOW ENDING SWITCH SIGNAL
1. Start engine.
2. Operate soft top switch CLOSE, check voltage between soft top control unit connector and ground.
OK or NG
OK >> Soft top lock switch (5th bow ending switch) is OK.
NG >> GO TO 2.
2. CHECK 5TH BOW ENDING CIRCUIT
1. Turn ignition switch OFF.
2. Disconnect soft top control unit and soft top lock switch (at 5th bow lock assembly in storage lid) connec-
tor.
3. Check continuity between soft top control unit connector B67
terminal 29 and soft top lock switch connector T205 terminal 1.
4. Check continuity between soft top control unit connector B67
terminal 29 and ground.
OK or NG
OK >> GO TO 3.
NG >> Repair or replace harness.
3. CHECK 5TH BOW ENDING SWITCH GROUND CIRCUIT
Check continuity between soft top lock switch connector T205 terminal 2 and ground.
OK or NG
OK >> GO TO 4.
NG >> Repair or replace harness.
ConnectorTerminal (Wire color)
Roof conditionVoltage (V)
(Approx.)
(+) (-)
B67 29 (R/Y) Ground CL10 0 → 5
PIIA7936E
29 (R/Y) - 1 (R) : Continuity should exist.
29 (R/Y) - Ground : Continuity should not exist.
PIIA7937E
2 (B) - Ground : Continuity should exist.
PIIA7938E
Page 76 of 130

RF-76
SOFT TOP
Revision: 2006 November2007 350Z
4. CHECK SOFT TOP CONTROL UNIT OUTPUT SIGNAL
1. Connect soft top control unit connector.
2. Start engine.
3. Check voltage between soft top control unit connector B67 ter-
minal 29 and ground.
OK or NG
OK >> Replace soft top lock switch (5th bow lock assembly in
storage lid).
NG >> Replace soft top control unit.
Check 5th Bow Closure MotorNIS0007D
1. 5TH BOW CLOSURE MOTOR INPUT SIGNAL
1. Start engine.
2. Operate soft top switch CLOSE, check voltage between 5th bow closure motor connector and ground.
OK or NG
OK >> Replace 5th bow closure motor.
NG >> GO TO 2.
2. CHECK 5TH BOW CLOSURE MOTOR CIRCUIT
1. Turn ignition switch OFF.
2. Disconnect soft top control unit and 5th bow closure motor connector.
3. Check continuity between soft top control unit connector B66
terminal 4, 12 and 5th bow closure motor connector T204 termi-
nal 1, 2.
4. Check continuity between soft top control unit connector B66
terminal 4, 12 and ground.
OK or NG
OK >> Replace soft top control unit.
NG >> Repair or replace harness.29 (R/Y) - Ground : Approx. 5V
PIIA7936E
ConnectorTerminal (Wire color)
Roof conditionVoltage (V)
(Approx.)
(+) (-)
T204 1 (W) Ground CL9 → CL10 0 → Battery voltage → 0
PIIA7939E
4 (G/R) - 1 (W) : Continuity should exist.
12 (G/Y) - 2 (G) : Continuity should exist.
4 (G/R) - Ground : Continuity should not exist.
12 (G/Y) - Ground : Continuity should not exist.
PIIA7940E
Page 88 of 130

RF-88
SOFT TOP
Revision: 2006 November2007 350Z
Removal and Installation of Soft Top AssemblyNIS0007R
CAUTION:
Install fender cover to protect rear fender.
REMOVAL
1. Fully open storage lid with soft top retracting.
2. Remove seat belt sholder bolt. Refer to SB-6, "
REMOVAL OF SEAT BELT RETRACTOR" .
3. Remove rear side finisher. Refer to EI-37, "
REAR SIDE FINISHER" .
4. Remove back panel finisher. Refer to EI-42, "
BACK PANEL FINISHER" .
5. Loosen bolts at soft top mounting bracket (front).
CAUTION:
Do not remove soft top mounting bracket (front) (body
side).
6. Close soft top until 5th bow are raised and folded with C-link.
Loosen nut at soft top mounting bracket (rear). Then fold (open)
soft top assembly completely.
CAUTION:
Do not remove soft top mounting bracket (rear) (body side).
7. Remove back panel bracket.
1. Front lock 2. Front lock finisher 3. TORX bolt (T30)
4. Welt 5. Front center retainer 6. Clip
7. Screw 8. Front lock striker, RH 9. Front lock striker, center
10. Front lock striker, LH 11. Bolt 12. B link retainer
13. A link retainer 14. A link weather strip 15. B link weather-strip
16. C link and 5th bow weather strip 17. Soft top switch bracket 1 18. Soft top switch bracket 2
19. C link retainer 20. Plate rail RR bracket 21. 5th bow operating strut rod
22. Nut 23. Holder 24. Soft top frame
25. Soft top cover 26. 5th bow retainer 27. 1st bow
28. 2nd bow 29. 3rd bow 30. 4th bow
31. 5th bow 32. A link 33. B link
34. C link
Nut: 28.0 N·m (2.9 kg-m, 21 ft-lb)
PIIA7824E
Bolt: 28.0 N·m (2.9 kg-m, 21 ft-lb)
PIIA7877E
Page 89 of 130

SOFT TOP
RF-89
C
D
E
F
G
H
J
K
L
MA
B
RF
Revision: 2006 November2007 350Z
8. Remove bolts, at the soft top mounting plate and shims.
CAUTION:
Do not replace left and right shims with each one with dif-
ferent thickness.
9. Disconnect harness connector.
10. Lift up soft top assembly from left and right, and then remove soft top assembly.
CAUTION:
2 workers are required for the heavy load of approximately 40 kg (89 lb).
INSTALLATION
Install in the reverse order of removal except the order of tightening bolts and nuts. (See note below.)
NOTE:
Before tighten soft top fixing bolts and nuts, make sure that soft top is sat on each pins from soft top mounting
brackets without any gaps.
To sit soft top correctly, follow this order.
1. Push soft top assembly down when nuts at soft top mounting bracket (rear) is tighten.
2. Close soft top until the angle of A-link becomes vertical against ground, then tighten bolts at soft top
mounting bracket (front).
3. Tighten bolts at soft top mounting plate with shims, then attach back panel bracket with bolts. Bolt: 28.0 N·m (2.9 kg-m, 21 ft-lb)
PIIA7863E
PIIA7878E
PIIB1302E
Page 90 of 130
RF-90
SOFT TOP
Revision: 2006 November2007 350Z
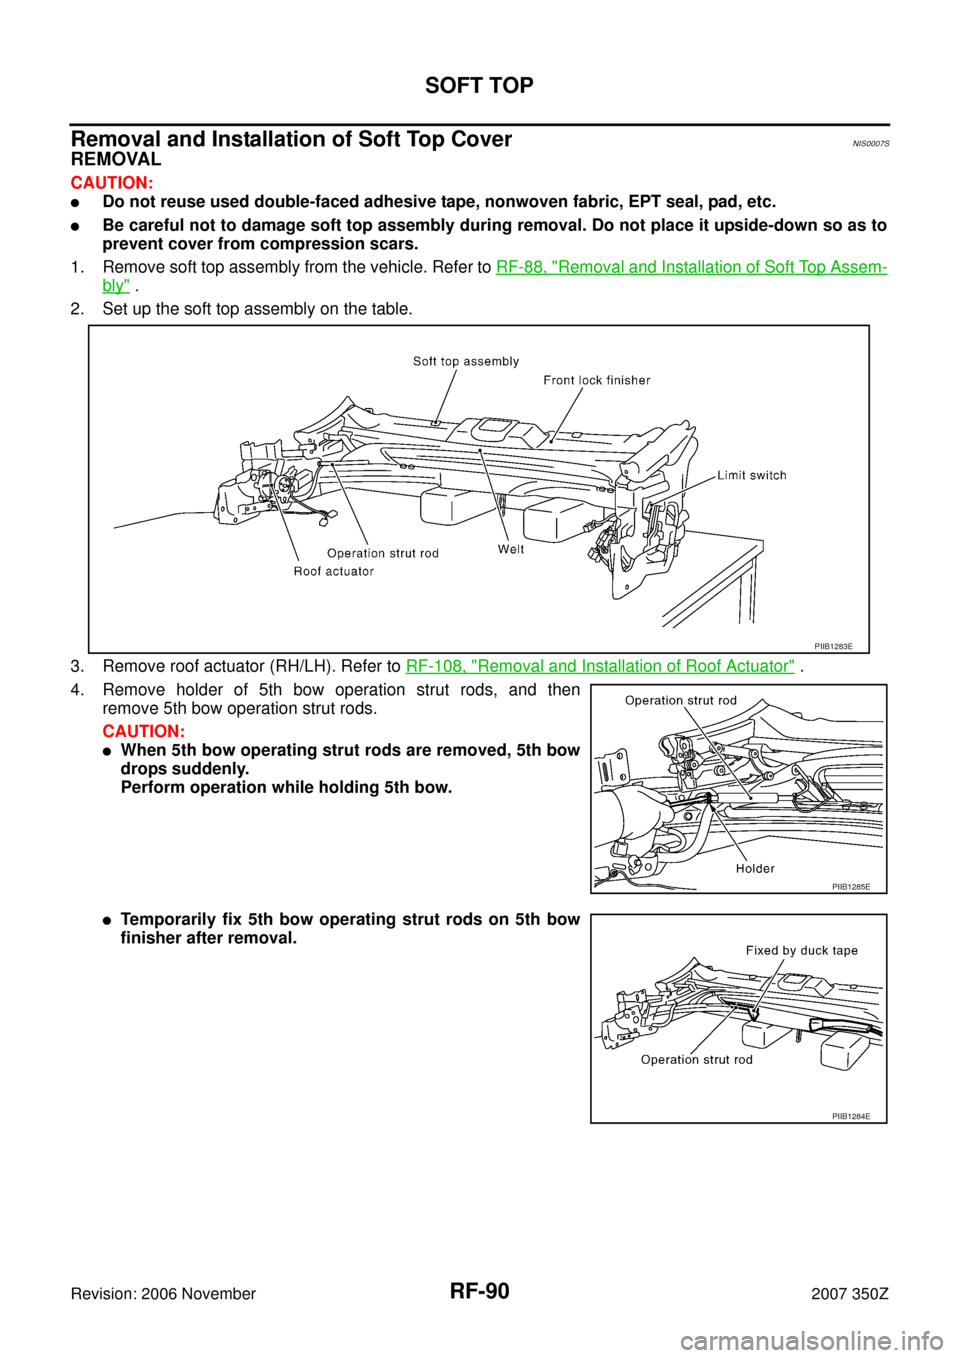
Removal and Installation of Soft Top CoverNIS0007S
REMOVAL
CAUTION:
�Do not reuse used double-faced adhesive tape, nonwoven fabric, EPT seal, pad, etc.
�Be careful not to damage soft top assembly during removal. Do not place it upside-down so as to
prevent cover from compression scars.
1. Remove soft top assembly from the vehicle. Refer to RF-88, "
Removal and Installation of Soft Top Assem-
bly" .
2. Set up the soft top assembly on the table.
3. Remove roof actuator (RH/LH). Refer to RF-108, "
Removal and Installation of Roof Actuator" .
4. Remove holder of 5th bow operation strut rods, and then
remove 5th bow operation strut rods.
CAUTION:
�When 5th bow operating strut rods are removed, 5th bow
drops suddenly.
Perform operation while holding 5th bow.
�Temporarily fix 5th bow operating strut rods on 5th bow
finisher after removal.
PIIB1283E
PIIB1285E
PIIB1284E
Page 91 of 130
SOFT TOP
RF-91
C
D
E
F
G
H
J
K
L
MA
B
RF
Revision: 2006 November2007 350Z
5. Open soft top assembly.
6. Protect the limit switch contact around the rotation axis of the 5th
bow on the left side of soft top with tape.
7. Remove welt on the rear end of front lock finisher.
8. Remove left/right clips on the front end of front lock finisher.
9. Pull up front lock lever, and then disengage clips to remove front
lock finisher.
PIIB1288E
PIIB1286E
PIIA7809E
PIIB1287E
PIIB1303E