EM-26
OIL PAN AND OIL STRAINER
Revision: 2006 November2007 350Z
OIL PAN AND OIL STRAINERP F P : 1111 0
Removal and InstallationNBS0000L
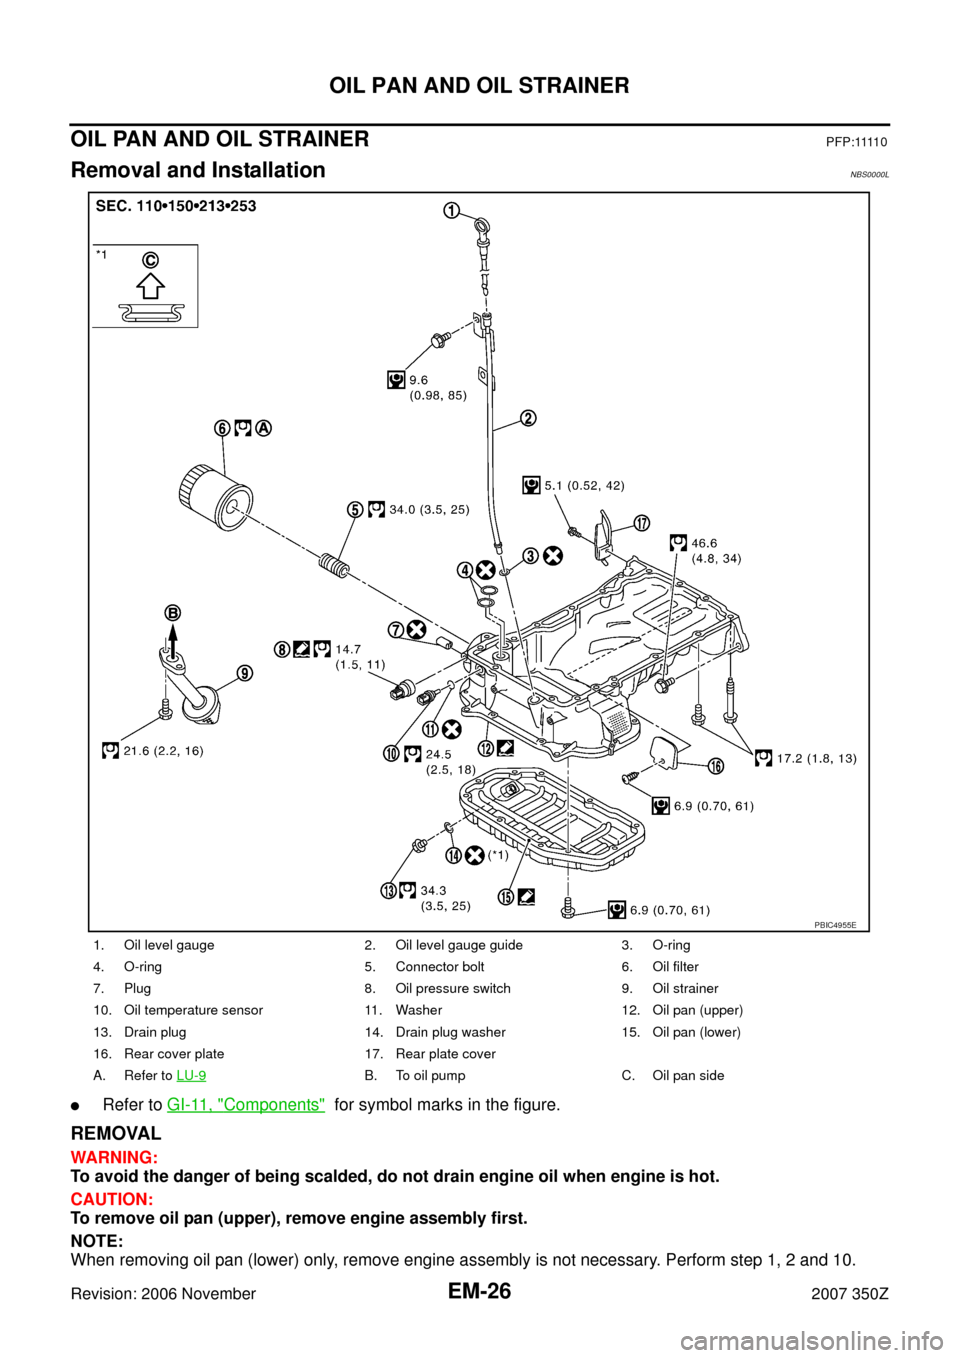
�Refer to GI-11, "Components" for symbol marks in the figure.
REMOVAL
WARNING:
To avoid the danger of being scalded, do not drain engine oil when engine is hot.
CAUTION:
To remove oil pan (upper), remove engine assembly first.
NOTE:
When removing oil pan (lower) only, remove engine assembly is not necessary. Perform step 1, 2 and 10.
1. Oil level gauge 2. Oil level gauge guide 3. O-ring
4. O-ring 5. Connector bolt 6. Oil filter
7. Plug 8. Oil pressure switch 9. Oil strainer
10. Oil temperature sensor 11. Washer 12. Oil pan (upper)
13. Drain plug 14. Drain plug washer 15. Oil pan (lower)
16. Rear cover plate 17. Rear plate cover
A. Refer to LU-9
B. To oil pump C. Oil pan side
PBIC4955E
OIL PAN AND OIL STRAINER
EM-27
C
D
E
F
G
H
I
J
K
L
MA
EM
Revision: 2006 November2007 350Z
1. Drain engine oil. Refer to LU-7, "Changing Engine Oil" .
CAUTION:
�Perform this step when engine is cold.
�Do not spill engine oil on drive belts.
2. Remove undercover with power tool.
3. Remove engine assembly from the vehicle, and separate front suspension member and transmission
from engine. Refer to EM-101, "
ENGINE ASSEMBLY" .
4. Lift the engine with hoist, and mount it onto widely use engine stand. Refer to EM-108, "
DISASSEMBLY" .
5. Remove alternator. Refer to SC-20, "
CHARGING SYSTEM" .
6. Remove starter motor. Refer to SC-8, "
STARTING SYSTEM" .
7. Remove idler pulley and bracket assembly. Refer to EM-53, "
TIMING CHAIN" .
8. Remove oil filter, as necessary. Refer to LU-9, "
OIL FILTER" .
9. Remove oil temperature sensor, as necessary.
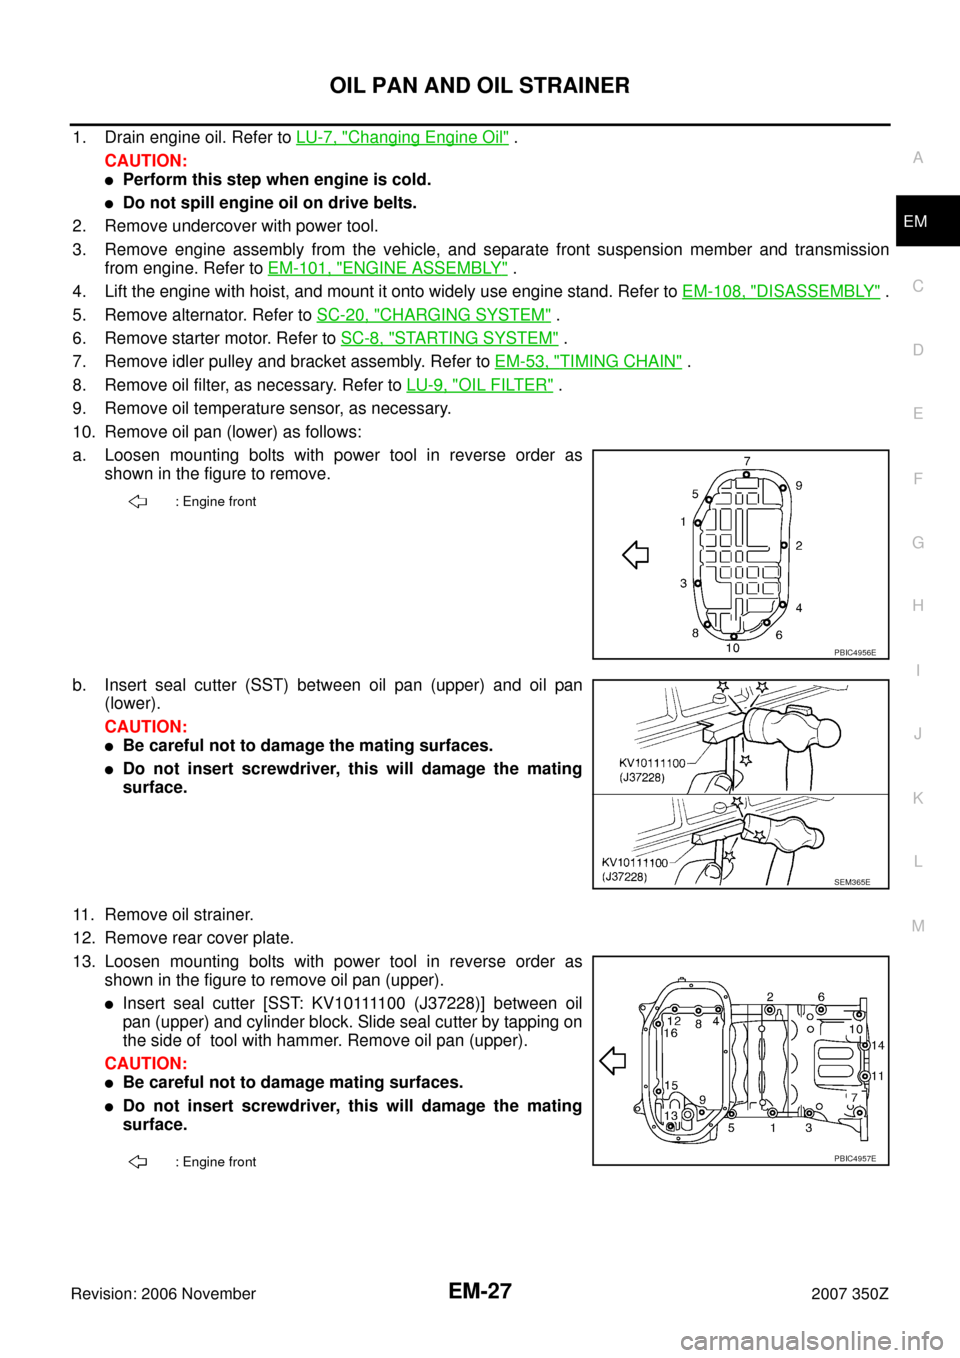
10. Remove oil pan (lower) as follows:
a. Loosen mounting bolts with power tool in reverse order as
shown in the figure to remove.
b. Insert seal cutter (SST) between oil pan (upper) and oil pan
(lower).
CAUTION:
�Be careful not to damage the mating surfaces.
�Do not insert screwdriver, this will damage the mating
surface.
11. Remove oil strainer.
12. Remove rear cover plate.
13. Loosen mounting bolts with power tool in reverse order as
shown in the figure to remove oil pan (upper).
�I n s e r t s e a l c u t t e r [ S S T: K V 1 0 1111 0 0 ( J 3 7 2 2 8 ) ] b e t w e e n o i l
pan (upper) and cylinder block. Slide seal cutter by tapping on
the side of tool with hammer. Remove oil pan (upper).
CAUTION:
�Be careful not to damage mating surfaces.
�Do not insert screwdriver, this will damage the mating
surface.
: Engine front
PBIC4956E
SEM365E
: Engine frontPBIC4957E