Page 80 of 148

EM-80
CAMSHAFT
Revision: 2006 November2007 350Z
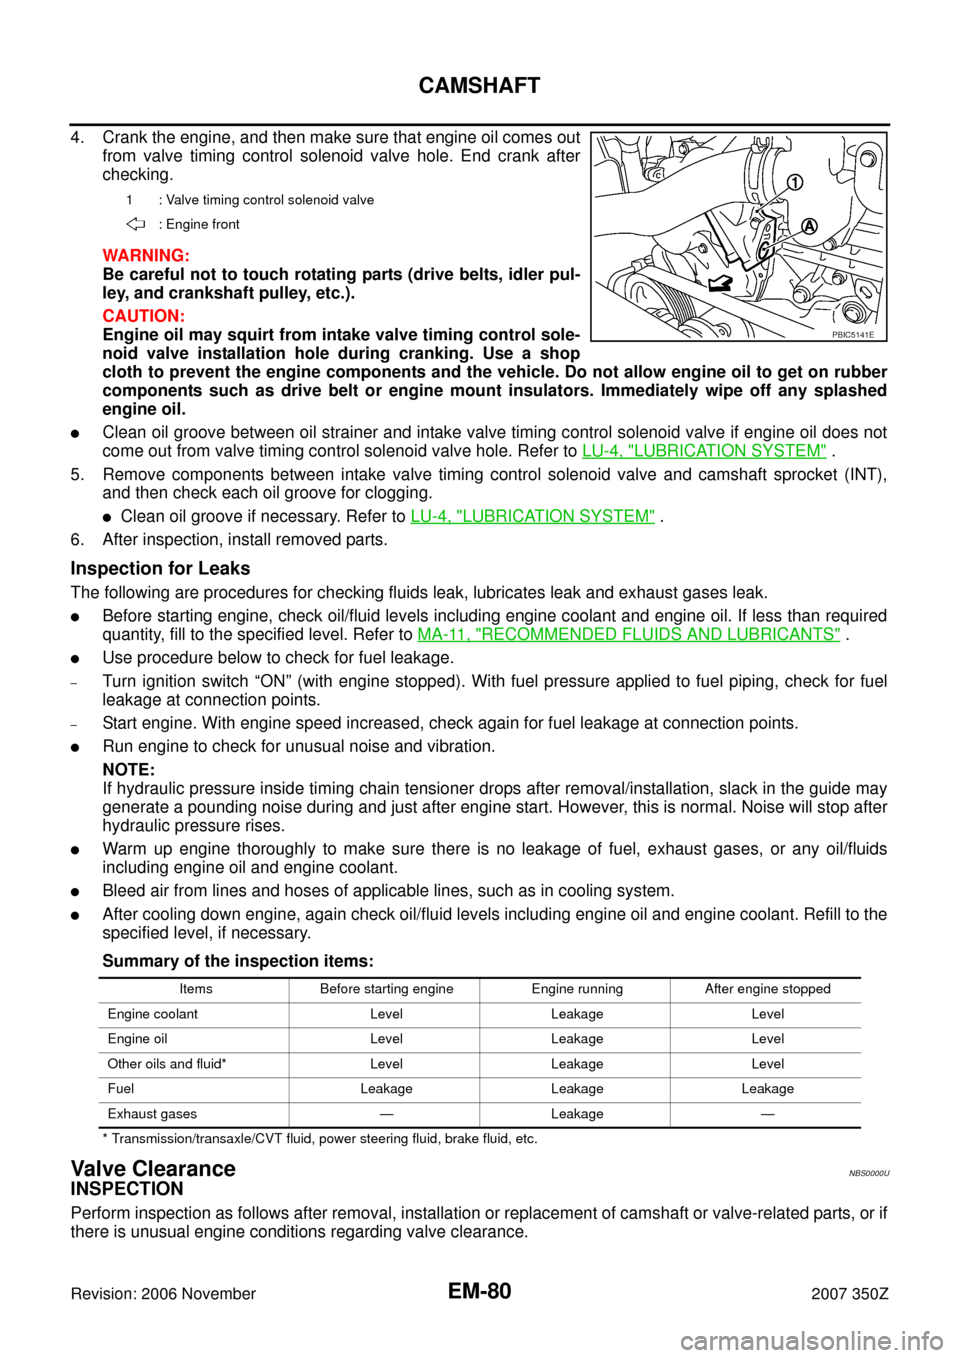
4. Crank the engine, and then make sure that engine oil comes out
from valve timing control solenoid valve hole. End crank after
checking.
WARNING:
Be careful not to touch rotating parts (drive belts, idler pul-
ley, and crankshaft pulley, etc.).
CAUTION:
Engine oil may squirt from intake valve timing control sole-
noid valve installation hole during cranking. Use a shop
cloth to prevent the engine components and the vehicle. Do not allow engine oil to get on rubber
components such as drive belt or engine mount insulators. Immediately wipe off any splashed
engine oil.
�Clean oil groove between oil strainer and intake valve timing control solenoid valve if engine oil does not
come out from valve timing control solenoid valve hole. Refer to LU-4, "
LUBRICATION SYSTEM" .
5. Remove components between intake valve timing control solenoid valve and camshaft sprocket (INT),
and then check each oil groove for clogging.
�Clean oil groove if necessary. Refer to LU-4, "LUBRICATION SYSTEM" .
6. After inspection, install removed parts.
Inspection for Leaks
The following are procedures for checking fluids leak, lubricates leak and exhaust gases leak.
�Before starting engine, check oil/fluid levels including engine coolant and engine oil. If less than required
quantity, fill to the specified level. Refer to MA-11, "
RECOMMENDED FLUIDS AND LUBRICANTS" .
�Use procedure below to check for fuel leakage.
–Turn ignition switch “ON” (with engine stopped). With fuel pressure applied to fuel piping, check for fuel
leakage at connection points.
–Start engine. With engine speed increased, check again for fuel leakage at connection points.
�Run engine to check for unusual noise and vibration.
NOTE:
If hydraulic pressure inside timing chain tensioner drops after removal/installation, slack in the guide may
generate a pounding noise during and just after engine start. However, this is normal. Noise will stop after
hydraulic pressure rises.
�Warm up engine thoroughly to make sure there is no leakage of fuel, exhaust gases, or any oil/fluids
including engine oil and engine coolant.
�Bleed air from lines and hoses of applicable lines, such as in cooling system.
�After cooling down engine, again check oil/fluid levels including engine oil and engine coolant. Refill to the
specified level, if necessary.
Summary of the inspection items:
* Transmission/transaxle/CVT fluid, power steering fluid, brake fluid, etc.
Valve ClearanceNBS0000U
INSPECTION
Perform inspection as follows after removal, installation or replacement of camshaft or valve-related parts, or if
there is unusual engine conditions regarding valve clearance.
1 : Valve timing control solenoid valve
: Engine front
PBIC5141E
Items Before starting engine Engine running After engine stopped
Engine coolant Level Leakage Level
Engine oil Level Leakage Level
Other oils and fluid* Level Leakage Level
Fuel Leakage Leakage Leakage
Exhaust gases — Leakage —
Page 93 of 148

CYLINDER HEAD
EM-93
C
D
E
F
G
H
I
J
K
L
MA
EM
Revision: 2006 November2007 350Z
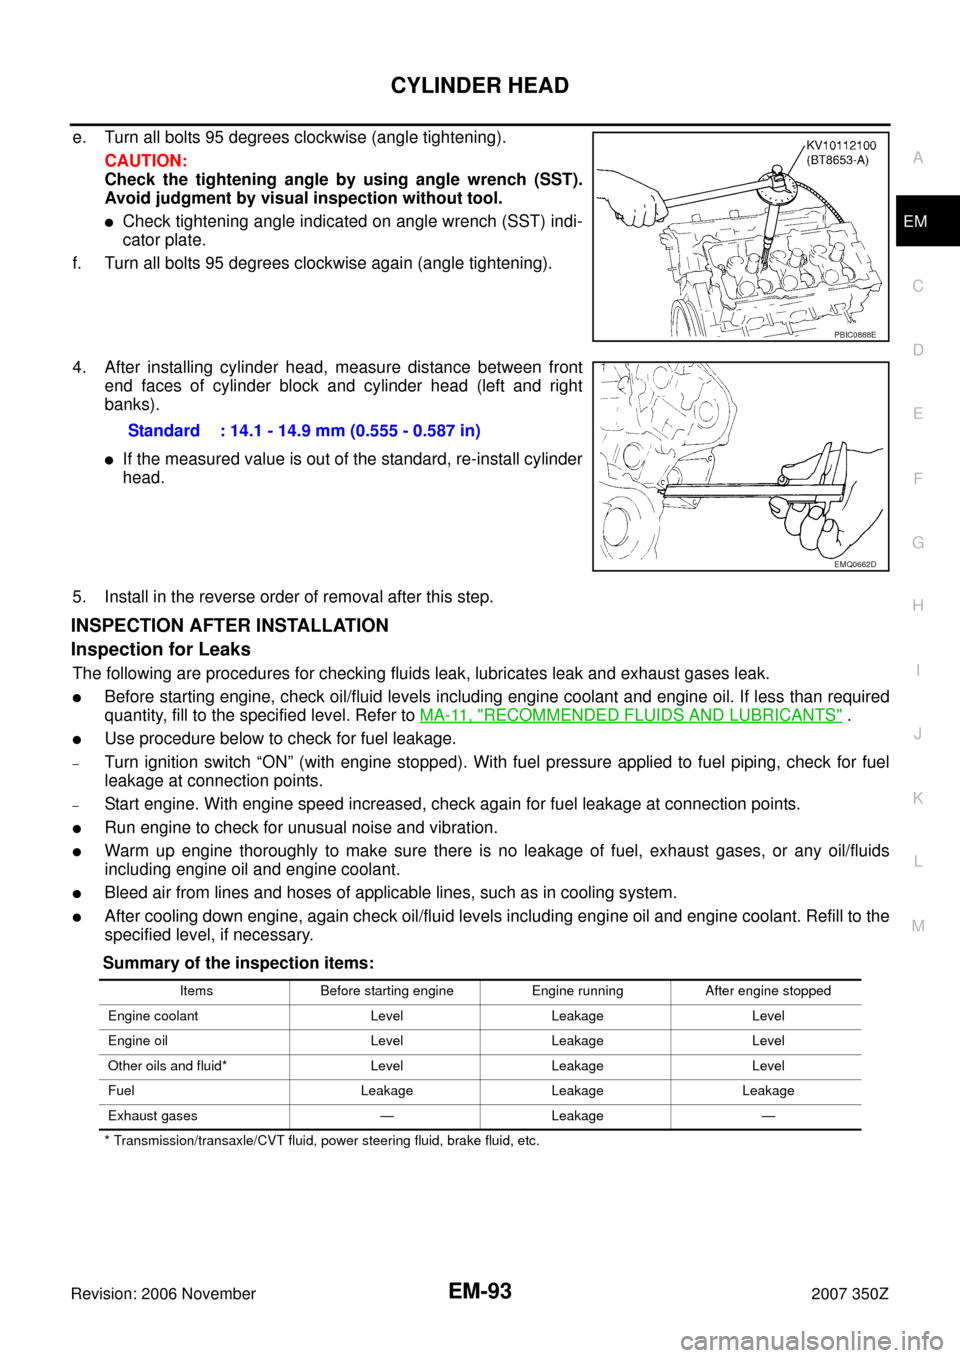
e. Turn all bolts 95 degrees clockwise (angle tightening).
CAUTION:
Check the tightening angle by using angle wrench (SST).
Avoid judgment by visual inspection without tool.
�Check tightening angle indicated on angle wrench (SST) indi-
cator plate.
f. Turn all bolts 95 degrees clockwise again (angle tightening).
4. After installing cylinder head, measure distance between front
end faces of cylinder block and cylinder head (left and right
banks).
�If the measured value is out of the standard, re-install cylinder
head.
5. Install in the reverse order of removal after this step.
INSPECTION AFTER INSTALLATION
Inspection for Leaks
The following are procedures for checking fluids leak, lubricates leak and exhaust gases leak.
�Before starting engine, check oil/fluid levels including engine coolant and engine oil. If less than required
quantity, fill to the specified level. Refer to MA-11, "
RECOMMENDED FLUIDS AND LUBRICANTS" .
�Use procedure below to check for fuel leakage.
–Turn ignition switch “ON” (with engine stopped). With fuel pressure applied to fuel piping, check for fuel
leakage at connection points.
–Start engine. With engine speed increased, check again for fuel leakage at connection points.
�Run engine to check for unusual noise and vibration.
�Warm up engine thoroughly to make sure there is no leakage of fuel, exhaust gases, or any oil/fluids
including engine oil and engine coolant.
�Bleed air from lines and hoses of applicable lines, such as in cooling system.
�After cooling down engine, again check oil/fluid levels including engine oil and engine coolant. Refill to the
specified level, if necessary.
Summary of the inspection items:
* Transmission/transaxle/CVT fluid, power steering fluid, brake fluid, etc.
PBIC0888E
Standard : 14.1 - 14.9 mm (0.555 - 0.587 in)
EMQ0662D
Items Before starting engine Engine running After engine stopped
Engine coolant Level Leakage Level
Engine oil Level Leakage Level
Other oils and fluid* Level Leakage Level
Fuel Leakage Leakage Leakage
Exhaust gases — Leakage —
Page 106 of 148

EM-106
ENGINE ASSEMBLY
Revision: 2006 November2007 350Z
INSPECTION AFTER INSTALLATION
Inspection for Leaks
The following are procedures for checking fluids leak, lubricates leak and exhaust gases leak.
�Before starting engine, check oil/fluid levels including engine coolant and engine oil. If less than required
quantity, fill to the specified level. Refer to MA-11, "
RECOMMENDED FLUIDS AND LUBRICANTS" .
�Use procedure below to check for fuel leakage.
–Turn ignition switch “ON” (with engine stopped). With fuel pressure applied to fuel piping, check for fuel
leakage at connection points.
–Start engine. With engine speed increased, check again for fuel leakage at connection points.
�Run engine to check for unusual noise and vibration.
�Warm up engine thoroughly to make sure there is no leakage of fuel, exhaust gases, or any oil/fluids
including engine oil and engine coolant.
�Bleed air from lines and hoses of applicable lines, such as in cooling system.
�After cooling down engine, again check oil/fluid levels including engine oil and engine coolant. Refill to the
specified level, if necessary.
Summary of the inspection items:
* Transmission/transaxle/CVT fluid, power steering fluid, brake fluid, etc.Items Before starting engine Engine running After engine stopped
Engine coolant Level Leakage Level
Engine oil Level Leakage Level
Other oils and fluid* Level Leakage Level
Fuel Leakage Leakage Leakage
Exhaust gases — Leakage —
Page 112 of 148

EM-112
CYLINDER BLOCK
Revision: 2006 November2007 350Z
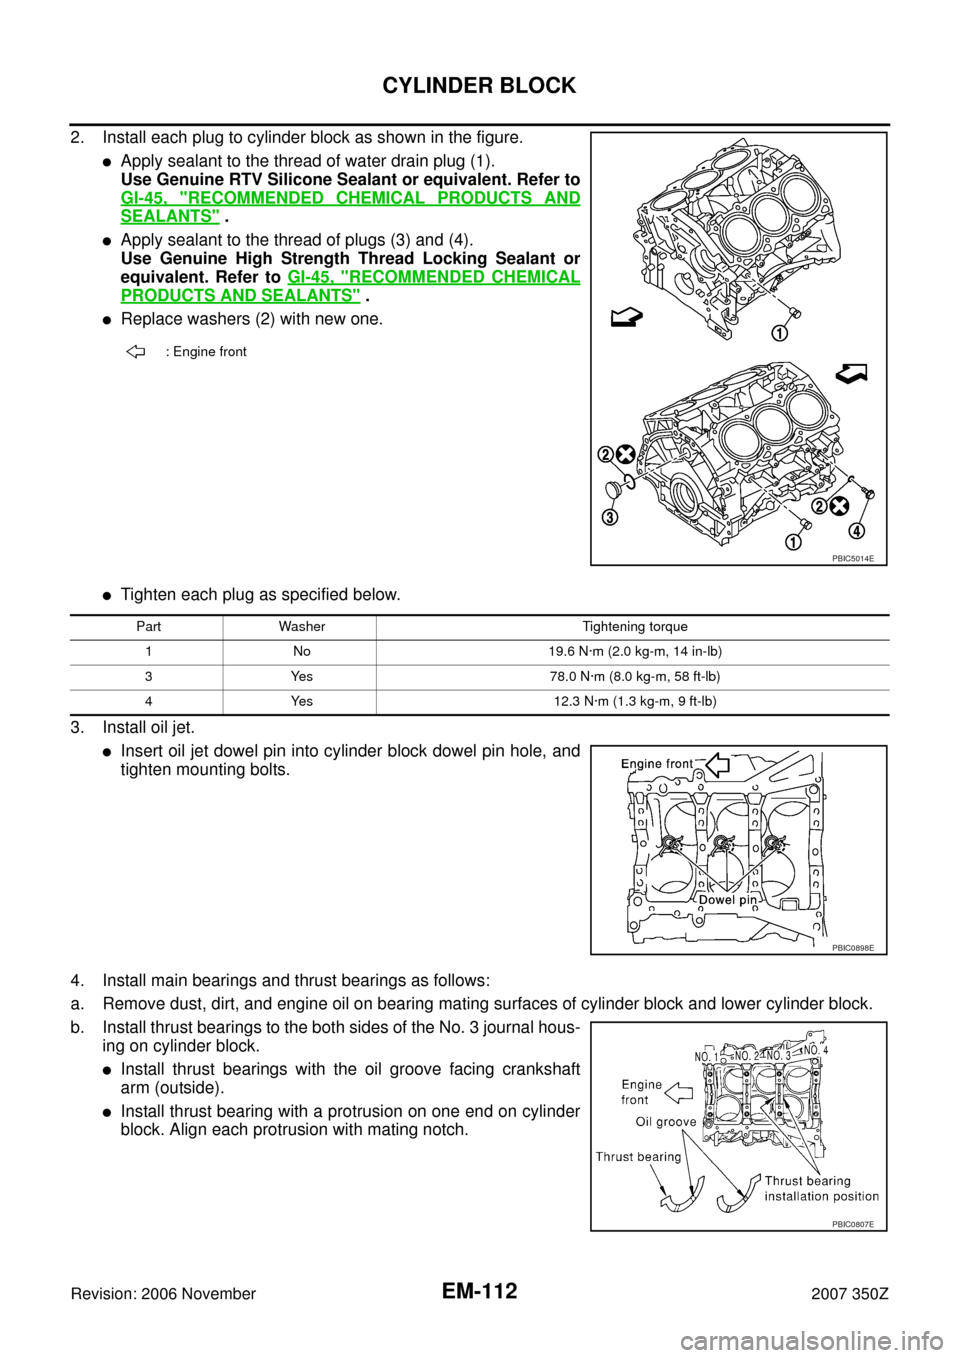
2. Install each plug to cylinder block as shown in the figure.
�Apply sealant to the thread of water drain plug (1).
Use Genuine RTV Silicone Sealant or equivalent. Refer to
GI-45, "
RECOMMENDED CHEMICAL PRODUCTS AND
SEALANTS" .
�Apply sealant to the thread of plugs (3) and (4).
Use Genuine High Strength Thread Locking Sealant or
equivalent. Refer to GI-45, "
RECOMMENDED CHEMICAL
PRODUCTS AND SEALANTS" .
�Replace washers (2) with new one.
�Tighten each plug as specified below.
3. Install oil jet.
�Insert oil jet dowel pin into cylinder block dowel pin hole, and
tighten mounting bolts.
4. Install main bearings and thrust bearings as follows:
a. Remove dust, dirt, and engine oil on bearing mating surfaces of cylinder block and lower cylinder block.
b. Install thrust bearings to the both sides of the No. 3 journal hous-
ing on cylinder block.
�Install thrust bearings with the oil groove facing crankshaft
arm (outside).
�Install thrust bearing with a protrusion on one end on cylinder
block. Align each protrusion with mating notch.
: Engine front
PBIC5014E
Part Washer Tightening torque
1 No 19.6 N·m (2.0 kg-m, 14 in-lb)
3 Yes 78.0 N·m (8.0 kg-m, 58 ft-lb)
4 Yes 12.3 N·m (1.3 kg-m, 9 ft-lb)
PBIC0898E
PBIC0807E