Page 109 of 260

TRUNK LID
BL-109
C
D
E
F
G
H
J
K
L
MA
B
BL
Revision: 2006 November2007 350Z
Removal and Installation of Trunk Lid StayNIS0002F
REMOVAL
1. Screwdriver into the gap and remove holder.
2. Remove trunk lid stay.
INSTALLATION
1. Note the following, and install in the reverse order of removal.
Install holder to trunk lid stay, and then push it into trunk lid hinge (stud ball) when installing trunk lid stay.
2. After installation, check the operation.
Removal and Installation of Trunk Lid Lock Assembly NIS0002G
REMOVAL
1. Remove the trunk lid weatherstrip. Refer to BL-113, "Removal and Installation of Trunk Lid Weatherstrip" .
2. Remove trunk lid release lever. Refer to EI-49, "
Removal and Installation (for Roadstar Models)" .
3. Remove the trunk lid finisher. Refer to EI-49, "
TRUNK ROOM
TRIM & TRUNK LID FINISHER" .
4. Disconnect the release lever cable and trunk lid opener cable
from the clip.
5. After removing the harness connector, remove the mounting
bolts, and remove the trunk lid lock.
INSTALLATION
Install in the reverse order of removal.
CAUTION:
�After installing, close the trunk lid height. Perform the lock and surface height adjustment. Refer
to BL-107, "
Fitting Adjustment" .
�After installing, check the operation.
Removal and Installation of Trunk Lid StrikerNIS0002H
REMOVAL
Remove the mounting bolts, then remove the striker from the trunk
lock support.
PIIA7601E
PIIA7602E
PIIB1179E
Page 110 of 260
BL-110
TRUNK LID
Revision: 2006 November2007 350Z
INSTALLATION
1. Install in the reverse order of removal.
2. After installing, close the trunk lid height. Perform the lock and surface height adjustment. Refer to BL-
107, "Fitting Adjustment" .
3. After installation, check the operation.
Page 111 of 260
TRUNK LID
BL-111
C
D
E
F
G
H
J
K
L
MA
B
BL
Revision: 2006 November2007 350Z
Removal and Installation of Trunk Lid Emergency Opener CableNIS0002I
REMOVAL
1. Remove trunk lid weatherstrip. Refer to BL-113, "Removal and Installation of Trunk Lid Weatherstrip" .
2. Remove trunk floor carpet, spare tire cover, trunk rear finisher, trunk front finisher, and trunk side box.
Refer to EI-49, "
TRUNK ROOM TRIM & TRUNK LID FINISHER" .
3. Remove floor box lid. Refer to EI-41, "
Removal and Installation (for Roadster Models)" .
4. Disconnect trunk lid emergency opener cable from trunk lid lock.
5. Disconnect each clamp of trunk lid emergency opener cable.
INSTALLATION
Install in the reverse order of removal.
1. Trunk lid lock assembly 2. Trunk lid emergency opener cable 3. Trunk lid emergency opener cable
hook
4. Trunk lid emergency opener lever
(secondary)5. Trunk lid emergency opener lever
holder6. Clip
7. Panel 8. Bolt 9. Nut
PIIB1490E
Page 112 of 260

BL-112
TRUNK LID
Revision: 2006 November2007 350Z
Removal and Installation of Trunk Lid HingeNIS0002J
REMOVAL
1. Remove trunk lid stay. Refer to BL-109, "Removal and Installation of Trunk Lid Stay" .
2. Remove trunk lid assembly. Refer to BL-108, "
Removal and Installation of Trunk Lid Assembly" .
3. Remove trunk lid hinge mounting bolts, and then remove trunk
lid hinge.
INSTALLATION
1. Position trunk lid hinge to body side. Temporarily tighten front side bolt and rear side bolt in this order, and
then tighten them to the specified torque.
2. Install trunk lid to trunk lid hinge.
3. Install trunk lid stay.
CAUTION:
�Before installing trunk lid hinge, apply anticorrosive agent onto the mounting surface of the vehi-
cle body.
�After installation, perform trunk lid fitting adjustment. Refer to BL-107, "Fitting Adjustment" .
�Check trunk lid open/close operation after installation.
�Apply sealant and the same body color paint to trunk lid hinge and mounting bolts to cover broken
seal area.
Removal and Installation of Lift SpringNIS0002K
REMOVAL
Rotate lift spring bottom clockwise/counterclockwise by approxi-
mately 90 deg, and then remove lift spring.
INSTALLATION
Install in the reverse order of removal.
PIIB1181E
PIIB1180E
Page 113 of 260
TRUNK LID
BL-113
C
D
E
F
G
H
J
K
L
MA
B
BL
Revision: 2006 November2007 350Z
Removal and Installation of Trunk Lid WeatherstripNIS0002L
REMOVAL
Pull up and remove engagement with body from weatherstrip joint.
CAUTION:
After removal, do not pull strongly on the weatherstrip.
INSTALLATION
Install in the reverse order of removal.
1. Install the weatherstrip from the front with the vehicle center mark aligned to the weatherstrip mark.
2. At rear side, align the weatherstrip seam to the center of the striker.
3. After installing, pull the weatherstrip lightly to check for looseness.
CAUTION:
The weatherstrip should fit tightly onto the corners and trunk lid rear plate.
1. Storage lid 2. Trunk lid assembly 3. Trunk lid weatherstrip
4. Rear bumper fascia
PIIA7604E
Page 114 of 260
BL-114
TRUNK LID OPENER
Revision: 2006 November2007 350Z
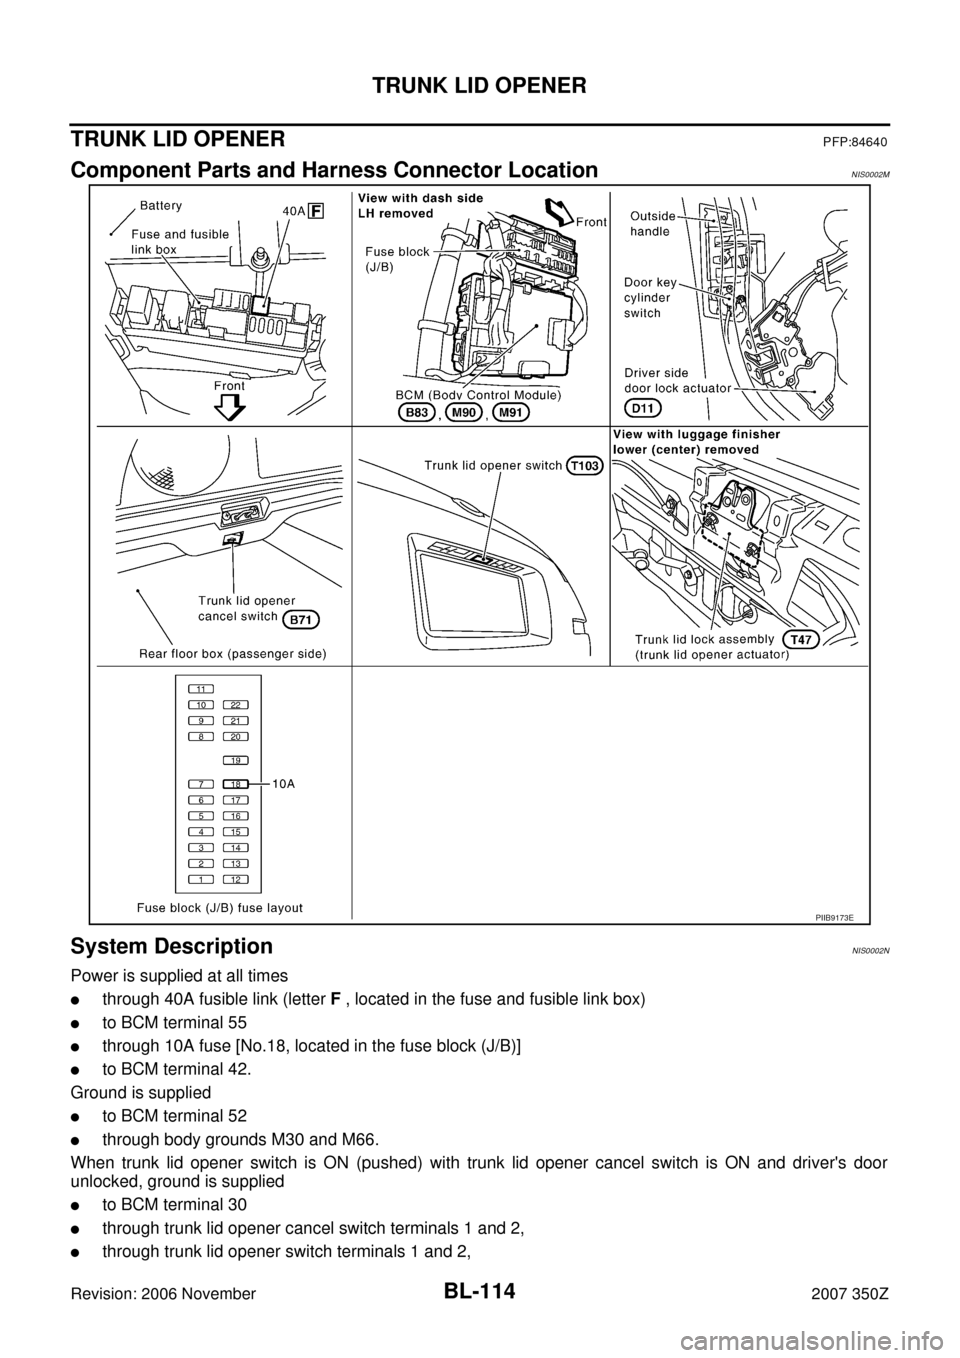
TRUNK LID OPENERPFP:84640
Component Parts and Harness Connector LocationNIS0002M
System DescriptionNIS0002N
Power is supplied at all times
�through 40A fusible link (letter F , located in the fuse and fusible link box)
�to BCM terminal 55
�through 10A fuse [No.18, located in the fuse block (J/B)]
�to BCM terminal 42.
Ground is supplied
�to BCM terminal 52
�through body grounds M30 and M66.
When trunk lid opener switch is ON (pushed) with trunk lid opener cancel switch is ON and driver's door
unlocked, ground is supplied
�to BCM terminal 30
�through trunk lid opener cancel switch terminals 1 and 2,
�through trunk lid opener switch terminals 1 and 2,
PIIB9173E
Page 115 of 260
TRUNK LID OPENER
BL-115
C
D
E
F
G
H
J
K
L
MA
B
BL
Revision: 2006 November2007 350Z
�through driver side door lock actuator (unlock sensor) terminals 2 and 4,
�through grounds M30 and M66.
And power is supplied
�to BCM terminal 68
�through trunk lid lock assembly (trunk lid opener actuator) terminals 2 and 1
�through grounds B5, B6 and T14.
Then trunk lid lock assembly (trunk lid opener actuator) opens trunk.
TRUNK LID OPENER CANCEL OPERATION
When trunk lid opener cancel switch is OFF (CANCEL), it cannot open trunk with trunk lid opener switch.
TRUNK OPENER OPERATION WITH KEY FOB
Open the trunk with key fob. Refer to BL-63, "Trunk Opener Operation/For Roadster" .
Page 116 of 260
BL-116
TRUNK LID OPENER
Revision: 2006 November2007 350Z
Wiring Diagram—T/LID— NIS0002O
TIWT2267E