Page 14 of 260

BL-14
HOOD
Revision: 2006 November2007 350Z
SURFACE HEIGHT ADJUSTMENT
1. Remove hood lock assembly, and adjust the surface height difference of hood and fender according to the
fitting standard dimension, by rotating RH and LH bumper rubbers.
2. Install hood lock temporarily, and move hood lock laterally until the centers of striker and lock become ver-
tical when viewed from the front.
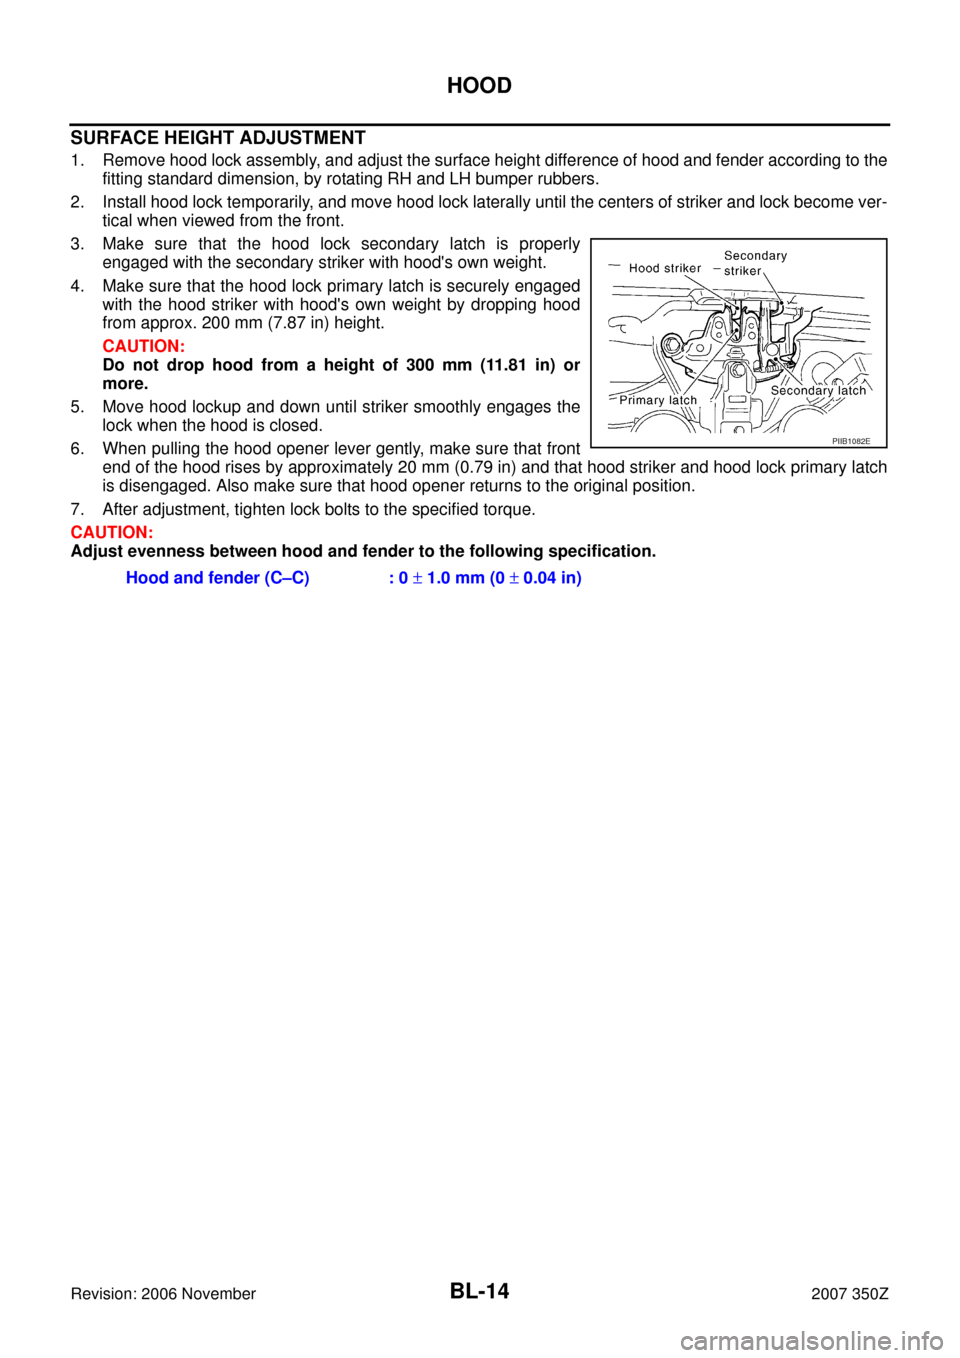
3. Make sure that the hood lock secondary latch is properly
engaged with the secondary striker with hood's own weight.
4. Make sure that the hood lock primary latch is securely engaged
with the hood striker with hood's own weight by dropping hood
from approx. 200 mm (7.87 in) height.
CAUTION:
Do not drop hood from a height of 300 mm (11.81 in) or
more.
5. Move hood lockup and down until striker smoothly engages the
lock when the hood is closed.
6. When pulling the hood opener lever gently, make sure that front
end of the hood rises by approximately 20 mm (0.79 in) and that hood striker and hood lock primary latch
is disengaged. Also make sure that hood opener returns to the original position.
7. After adjustment, tighten lock bolts to the specified torque.
CAUTION:
Adjust evenness between hood and fender to the following specification.
Hood and fender (C–C) : 0 ± 1.0 mm (0 ± 0.04 in)
PIIB1082E
Page 15 of 260
HOOD
BL-15
C
D
E
F
G
H
J
K
L
MA
B
BL
Revision: 2006 November2007 350Z
Removal and Installation of Hood AssemblyNIS0000B
REMOVAL
Remove the hinge mounting nuts on the hood to remove the hood assembly.
CAUTION:
Operate with two workers, because of its heavy weight.
INSTALLATION
Install in the reverse order of removal.
CAUTION:
�Before installing hood hinge, apply anticorrosive agent onto the mounting surface of the vehicle
body.
�After installing, perform hood fitting adjustment. Refer to BL-13, "Fitting Adjustment" .
1. Hood assembly 2. Hood hinge 3. Hood lock assembly
PIIB1388E
Page 17 of 260

HOOD
BL-17
C
D
E
F
G
H
J
K
L
MA
B
BL
Revision: 2006 November2007 350Z
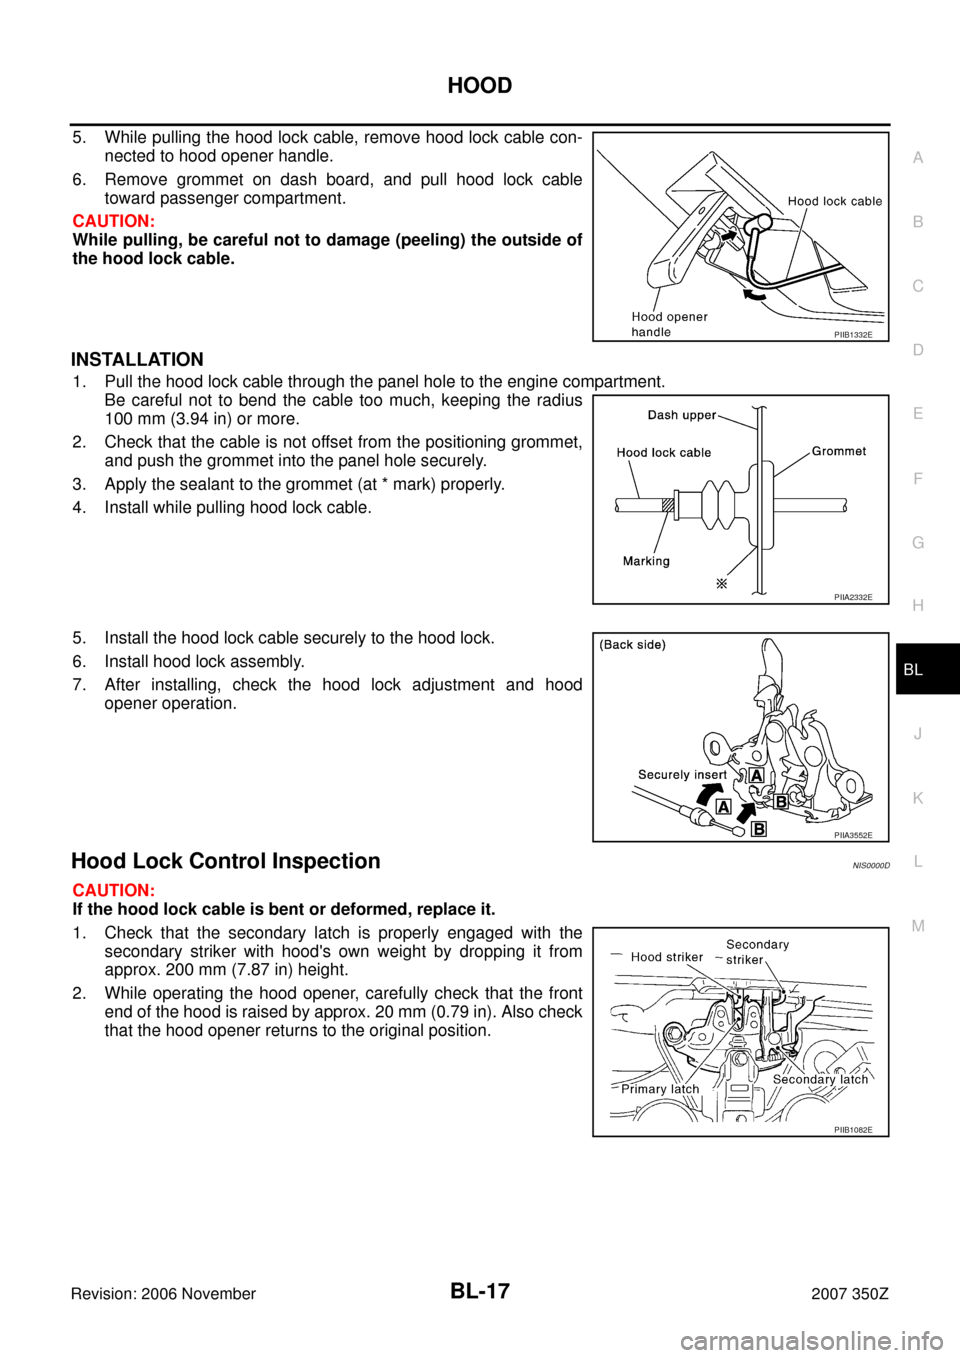
5. While pulling the hood lock cable, remove hood lock cable con-
nected to hood opener handle.
6. Remove grommet on dash board, and pull hood lock cable
toward passenger compartment.
CAUTION:
While pulling, be careful not to damage (peeling) the outside of
the hood lock cable.
INSTALLATION
1. Pull the hood lock cable through the panel hole to the engine compartment.
Be careful not to bend the cable too much, keeping the radius
100 mm (3.94 in) or more.
2. Check that the cable is not offset from the positioning grommet,
and push the grommet into the panel hole securely.
3. Apply the sealant to the grommet (at * mark) properly.
4. Install while pulling hood lock cable.
5. Install the hood lock cable securely to the hood lock.
6. Install hood lock assembly.
7. After installing, check the hood lock adjustment and hood
opener operation.
Hood Lock Control InspectionNIS0000D
CAUTION:
If the hood lock cable is bent or deformed, replace it.
1. Check that the secondary latch is properly engaged with the
secondary striker with hood's own weight by dropping it from
approx. 200 mm (7.87 in) height.
2. While operating the hood opener, carefully check that the front
end of the hood is raised by approx. 20 mm (0.79 in). Also check
that the hood opener returns to the original position.
PIIB1332E
PIIA2332E
PIIA3552E
PIIB1082E
Page 95 of 260
DOOR
BL-95
C
D
E
F
G
H
J
K
L
MA
B
BL
Revision: 2006 November2007 350Z
DOVE TAIL FEMALE ADJUSTMENT (ROADSTER)
Adjust the dove tail female so that it becomes parallel with the lock
insertion direction.
Removal and InstallationNIS0001Y
CAUTION:
�When removing and installing the door assembly, support the door with a jack and cloth to protect
the door and body.
�When removing and installing door assembly, be sure to perform the fitting adjustment Refer to
BL-93, "
Fitting Adjustment" .
�Operate with two workers, because of its heavy weight.
�Check the hinge rotating part for poor lubrication. If necessary, apply “body grease”.
�After installing, check operation.
�Apply sealant and coat with the same body color paint to door hinge installation part and mount-
ing nuts.
REMOVAL
1. Pull the lever and remove the door harness connector while
removing tabs of door harness connector.
2. Remove the mounting bolts of the check link on the vehicle.
PIIA7608E
PIIA2514E
PIIA2515E
Page 108 of 260
BL-108
TRUNK LID
Revision: 2006 November2007 350Z
Removal and Installation of Trunk Lid AssemblyNIS0002E
CAUTION:
Operate with two workers, because of its heavy weight.
REMOVAL
1. Screwdriver into the gap and remove holder.
2. Remove trunk lid stay (gas stay).
3. Remove the trunk lid hinge bolts, trunk lid assembly side and
remove the trunk lid assembly.
INSTALLATION
Note the following, and install in the reverse order of removal.
Install holder to trunk lid stay, and then push it into trunk lid hinge (stud ball) when installing trunk lid stay.
CAUTION:
�Check trunk lid open/close operation after installation
�Apply sealant and coat with the same body color paint to trunk lid hinge installation part and
mounting bolts.Trunk lid and storage lid (A–A) : 0 ± 1.0 mm (0 ± 0.04 in)
Trunk lid and rear bumper fascia (D–D) : 0.85 ± 2.1 mm (0.0335 ± 0.083 in)
1. Trunk lid assembly 2. Trunk lid insulator 3. Trunk lid hinge
4. Trunk lid stay 5. TORX bolt (T30)
PIIA7600E
PIIA7601E
Page 223 of 260
BODY REPAIR
BL-223
C
D
E
F
G
H
J
K
L
MA
B
BL
Revision: 2006 November2007 350Z
Precautions In Repairing High Strength SteelNIS00046
High strength steel is used for body panels in order to reduce vehicle weight.
Accordingly, precautions in repairing automotive bodies made of high strength steel are described below:
HIGH STRENGTH STEEL (HSS) USED IN NISSAN VEHICLES
SP130 is the most commonly used HSS.Tensile strength Nissan/Infiniti designation Major applicable parts
373 N/mm
2
(38kg/mm2 ,54klb/sq in)SP130
�Front & rear side member assembly
�Hoodledge assembly
�Upper dash
�Body side
�Other reinforcements
785-981 N/mm
2
(80-100kg/mm2 ,114-142klb/sq in)SP150�Front door guard beam