2007 MITSUBISHI LANCER EVOLUTION diagram
[x] Cancel search: diagramPage 383 of 1449

GENERAL -How to Use This Manual00-5
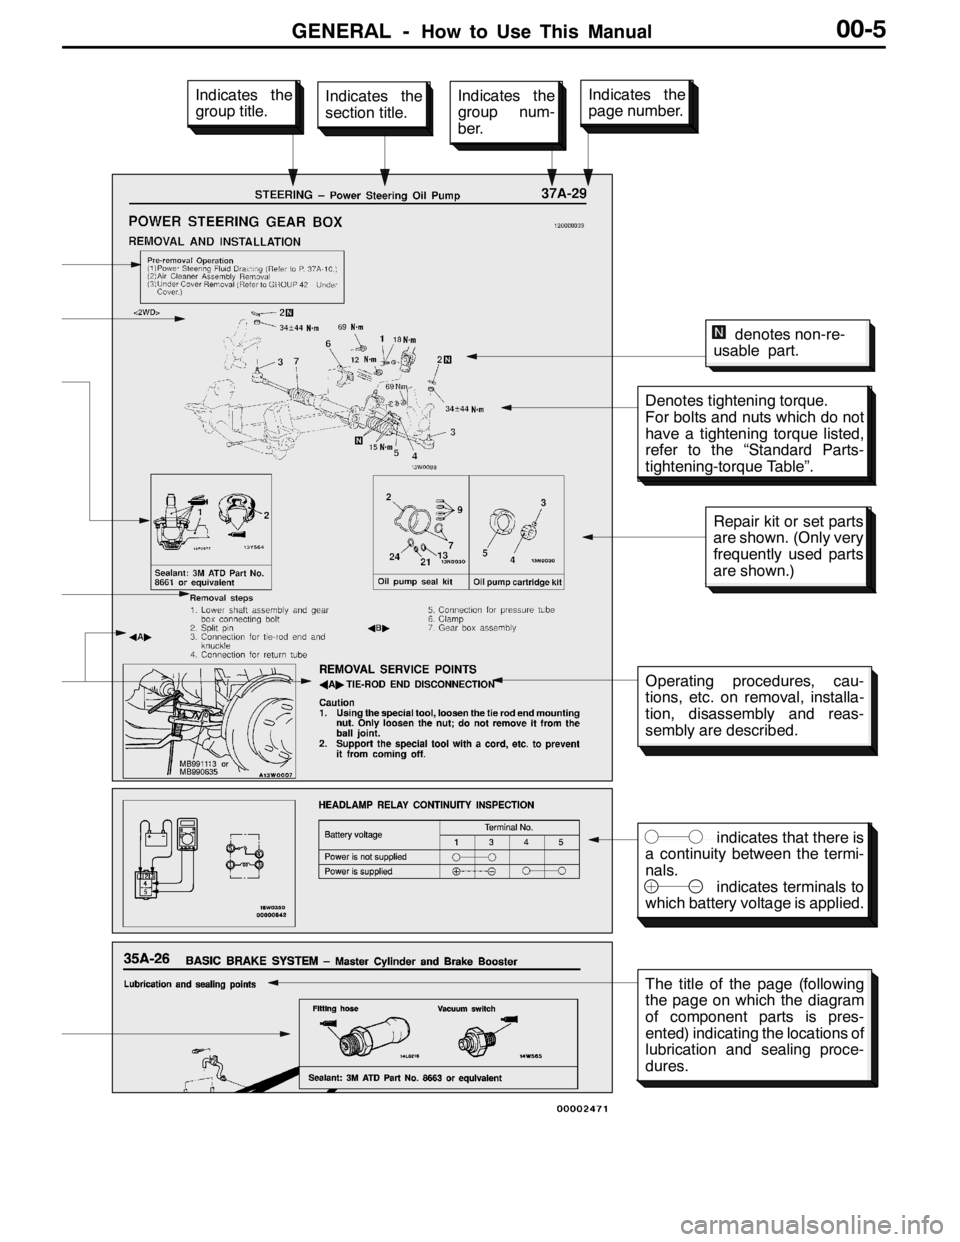
Denotes tightening torque.
For bolts and nuts which do not
have a tightening torque listed,
refer to the “Standard Parts-
tightening-torque Table”.
indicates that there is
a continuity between the termi-
nals.
indicates terminals to
which battery voltage is applied.
Indicates the
section title.Indicates the
group num-
ber.Indicates the
page number.Indicates the
group title.
denotes non-re-
usable part.
Repair kit or set parts
are shown. (Only very
frequently used parts
are shown.)
Operating procedures, cau-
tions, etc. on removal, installa-
tion, disassembly and reas-
sembly are described.
The title of the page (following
the page on which the diagram
of component parts is pres-
ented) indicating the locations of
lubrication and sealing proce-
dures.
Page 388 of 1449

GENERAL -How to Use Troubleshooting/Inspection Service Points00-10
HOW TO USE THE INSPECTION PROCEDURES
The causes of a high frequency of problems occurring in electronic circuitry are generally the connectors,
components, the ECU and the harnesses between connectors, in that order. These inspection procedures
follow this order, and they first try to discover a problem with a connector or a defective component.
DIndicator does not turn on or off even if control
mode switch is pressed.
DIndicator switch should not be illuminated is
illuminated.Probable cause
OK
OK
OK
Measure at switch connector A-44
DDisconnect the connector, and measure at the harness
side.
DVoltage between terminal 6 - earth and terminal 8 -
earth
OK:Approx. 5V
OK
NG
Check the following connector.A-44
Repair
OK
Check trouble symptom.
Replace the ECS-ECU.
In the above cases, the ECS switch circuit is defective or the indicator
circuit is defective.
CHECKING PROCEDURE 4
2. Indicates inspection carried out using the
MUT-II.
Indicates the operation and inspection proce-
dures.
Indicates the OK judgement conditions.
3. Detailed inspection procedures (methods)
such as component inspection and circuit
inspection are listed on a separate page, and
are given here for reference.
5. Inspect the contact condition at each connector terminal.
(Refer to Connector Inspection Service Points.)
The connector position can be located in the wiring diagram in the
electrical wiring manual by means of this symbol.
Caution
After carrying out connector inspection, always be sure to
reconnect the connector as it was before.
6. Confirm that there are trouble symptoms. If trouble symptoms have
disappeared, the connector may have been inserted incorrectly and the
trouble symptom may have disappeared during inspection.
If it seems that trouble symptoms still remain, proceed to the next page of
instructions.
7. If trouble symptoms still remain up to this stage, there is a possibility that there is an
open or short circuit in the harness between the connectors, so check the harness.
Alternatively, the cause may be a defective ECU, so try replacing the ECU and check
if the trouble symptom disappears.
NGECU switch component inspection (Refer to P.33-44.)
NG
1. Comments on the diagnosis code or trouble
symptom above.
MUT-IIData list
17 Control mode selection switch
OK:Voltage changes between approx. 0V→approx.
2.5V→approx. 5V when the switch is operated.
4. Indicates voltage and resistance to be measured at a particular
connector.
(Refer to Connector Measurement Service Points.)
The connector position can be located in the wiring diagram in the
electrical wiring manual by means of this symbol.
Indicates operation and inspection procedures, inspection terminals
and inspection conditions.
Indicates the OK judgement conditions.
HARNESS INSPECTION
Check for an open or short circuit in the harness between the terminals which were defective according
to the connector measurements. Carry out this inspection while referring to the electrical wiring manual.
Here, “Check harness between power supply and terminal xx” also includes checking for blown fuses.
For inspection service points when there is a blown fuse, refer to “Inspection Service Points for a Blown
Fuse.”
MEASURES TO TAKE AFTER REPLACING THE ECU
If the trouble symptoms have not disappeared even after replacing the ECU, repeat the inspection procedure
from the beginning.
Page 537 of 1449

MPI -General Information13A-5
MULTI-POINT FUEL INJECTION SYSTEM DIAGRAM
L1 Oxygen sensor (front)
L2 Oxygen sensor (rear)
L3 Air flow sensor
L4 Intake air temperature sensor
L5 Throttle position sensor
L6 Camshaft position sensor
L7 Crank angle sensor
L8 Barometric pressure sensor
L9 Engine coolant temperature sensor
L10 Detonation sensor
Engine-ECU
l1 Injector
l2 Idle speed control servo
l3 Fuel pressure control solenoid valve
l4 Waste gate solenoid valve
l5 EGR control solenoid valve
l6 Purge control solenoid valve
l7 Secondary air control solenoid valve
DPower supply
DIgnition switch IG
DIgnition switch ST
DVehicle speed sensor
DA/C switch
DA/C load signal
DTachometer
DPower steering fluid pressure switch
DAlternator FR terminal
DDiagnosis control terminal
DIntercooler water spray switch (automatic)
DIntercooler water spray switch (manual)DEngine control relay
DFuel pump relay 2, 3
DA/C relay
DIgnition coil
DFan controller
DCondenser fan relay (HI)
DCondenser fan relay (LOW)
DEngine warning lamp
DDiagnosis output
DAlternator G terminal
DIntercooler water spray relay
DIntercooler water spray lamp
L1 Oxygen
sensor
(front)
L4 Intake air
temperature
sensorL5 Throttle
position
sensor
L6 Camshaft
position sensorl1 Injector l2 Idle
speed
control
servo
l6 Purge
control
solenoid
valve
Three-way
catalytic converter Canister
Air
inletVacuum
tank
Fuel
pressure
reguratorFrom
fuel tank
To fuel tank
PCV valveFrom
fuel pump
Waste gate
actuatorL2 Oxygen sensor (rear) Check
valveBy-pass
valve
l5 EGR control
solenoid valve
l4 Waste gate
solenoid valve L8 Barometric
pressure
sensor
L3 Air flow
sensorl7 Secondary
air control
solenoid
valve
Secondary
air valvel3 Fuel pressure
control
solenoid valve
EGR
valve
L9 Engine coolant
temperature sensor
L7 Crank angle sensor
L10 Detonation sensor
Page 734 of 1449

ENGINE ELECTRICAL -Charging System16-2
CHARGING SYSTEM
GENERAL INFORMATION
The charging system uses the alternator output
to keep the battery charged at a constant level
under various electrical loads.
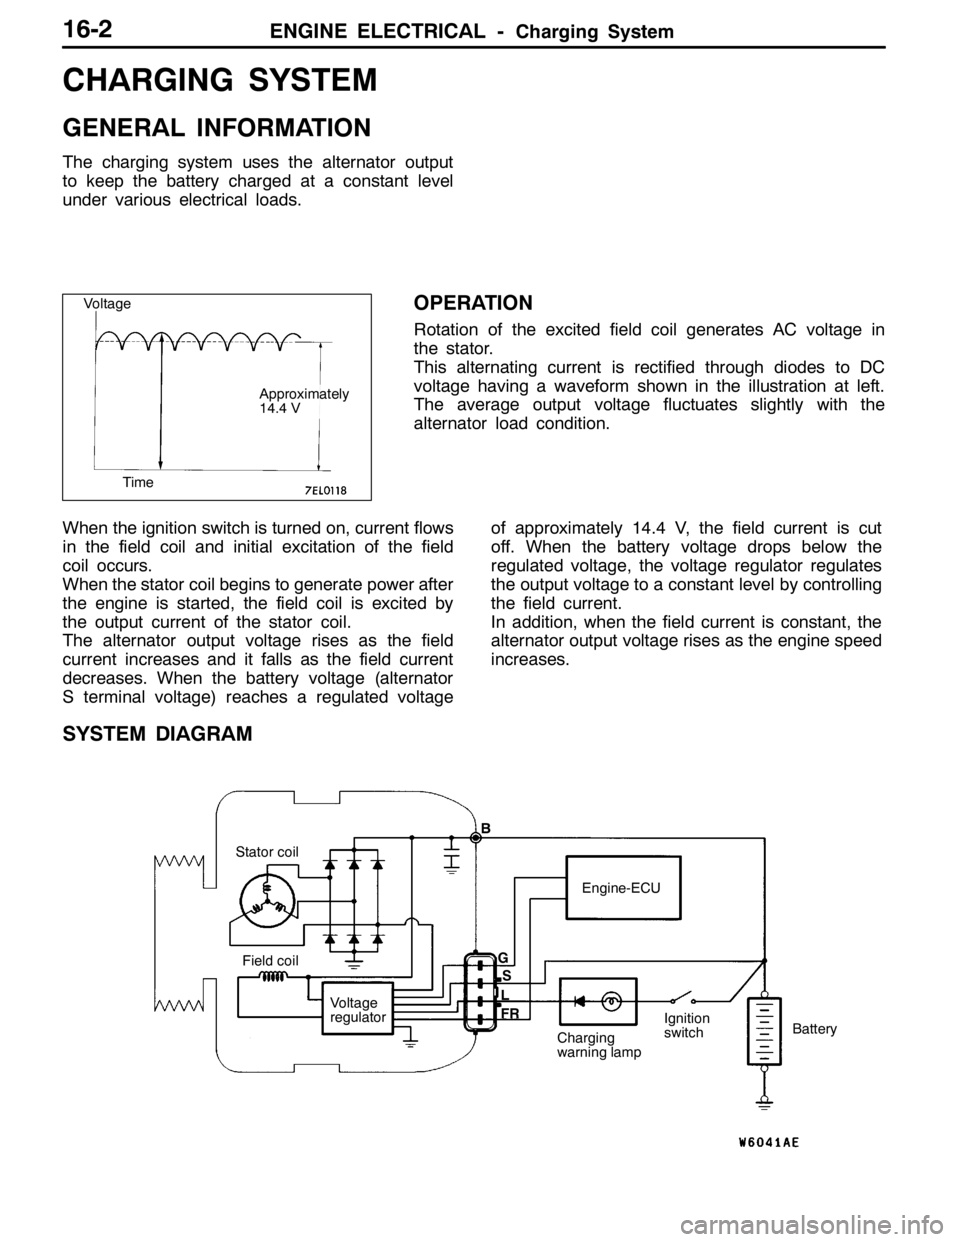
OPERATION
Rotation of the excited field coil generates AC voltage in
the stator.
This alternating current is rectified through diodes to DC
voltage having a waveform shown in the illustration at left.
The average output voltage fluctuates slightly with the
alternator load condition.
When the ignition switch is turned on, current flows
in the field coil and initial excitation of the field
coil occurs.
When the stator coil begins to generate power after
the engine is started, the field coil is excited by
the output current of the stator coil.
The alternator output voltage rises as the field
current increases and it falls as the field current
decreases. When the battery voltage (alternator
S terminal voltage) reaches a regulated voltageof approximately 14.4 V, the field current is cut
off. When the battery voltage drops below the
regulated voltage, the voltage regulator regulates
the output voltage to a constant level by controlling
the field current.
In addition, when the field current is constant, the
alternator output voltage rises as the engine speed
increases.
SYSTEM DIAGRAM
Stator coil
Field coil
Voltage
regulatorEngine-ECU
Charging
warning lampIgnition
switchBattery B
G
L
FRS
Voltage
Time
Approximately
14.4 V
Page 749 of 1449

ENGINE ELECTRICAL -Starting System16-17
STARTING SYSTEM
GENERAL INFORMATION
If the ignition switch is turned to the “START”
position, current flows in the pull-in and holding
coils provided inside magnetic switch, attracting
the plunger. When the plunger is attracted, the
lever connected to the plunger is actuated to
engage the starter clutch.
On the other hand, attracting the plunger will turn
on the magnetic switch, allowing the B terminaland M terminal to conduct. Thus, current flows to
engage the starter motor.
When the ignition switch is returned to the “ON”
position after starting the engine, the starter clutch
is disengaged from the ring gear.
An overrunning clutch is provided between the
pinion and the armature shaft, to prevent damage
to the starter.
SYSTEM DIAGRAM
Pull-in coilHolding coil
Ignition
switch
BatteryArmature
Brush
YokePlunger
Lever
Over-running
clutch
Pinion shaft
STARTER MOTOR SPECIFICATIONS
ItemsSpecifications
TypeReduction drive with planetary gear
Rated output kW/V1.2/12
No. of pinion teeth8
SERVICE SPECIFICATIONS
ItemsStandard valueLimit
Pinion gap mm0.5 - 2.0-
Commutator outer diameter mm29.428.8
Commutator runout mm0.050.1
Commutator undercut mm0.50.2
Brush length mm-7.0
Page 758 of 1449

ENGINE ELECTRICAL -Ignition System16-26
IGNITION SYSTEM
GENERAL INFORMATION
This system is equipped with two ignition coils (A
and B) with built-in power transistors for the No.
1 and No. 4 cylinders and the No. 2 and No. 3
cylinders respectively.
Interruption of the primary current flowing in the
primary side of ignition coil A generates a high
voltage in the secondary side of ignition coil A.
The high voltage thus generated is applied to the
spark plugs of No. 1 and No. 4 cylinders to generate
sparks. At the time that the sparks are generated
at both spark plugs, if one cylinder is at the
compression stroke, the other cylinder is at the
exhaust stroke, so that ignition of the compressed
air/fuel mixture occurs only for the cylinder which
is at the compression stroke.
In the same way, when the primary current flowing
in ignition coil B is interrupted, the high voltage
thus generated is applied to the spark plugs of
No. 2 and No. 3 cylinders.
The Engine-ECU turns the two power transistors
inside the ignition coils alternately on and off. Thiscauses the primary currents in the ignition coils
to be alternately interrupted and allowed to flow
to fire the cylinders in the order 1-3-4-2.
The Engine-ECU determines which ignition coil
should be controlled by means of the signals from
the camshaft position sensor which is incorporated
in the camshaft and from the crank angle sensor
which is incorporated in the crankshaft. It also
detects the crankshaft position in order to provide
ignition at the most appropriate timing in response
to the engine operation conditions. It also detects
the crankshaft position in order to provide ignition
at the most appropriate timing in response to the
engine operation conditions.
When the engine is cold or operated at high
altitudes, the ignition timing is slightly advanced
to provide optimum performance.
When the automatic transmission shifts gears, the
ignition timing is also retarded in order to reduce
output torque, thereby alleviating shifting shocks.
SYSTEM DIAGRAM
Barometric pressure sensor
Intake air temperature sensor
Engine coolant temperature sensor
Camshaft position sensor
Crank angle sensor
Ignition switch - ST
Vehicle speed signalEngine-ECU
Ignition coil A
Ignition coil B Ignition switch
Spark plugBattery
To tachometerCylinder No. Air flow sensor
1 4
23
Detonation sensor
Page 771 of 1449

17-1
ENGINE AND
EMISSION
CONTROL
CONTENTS
ENGINE CONTROL SYSTEM 2.........
GENERAL INFORMATION 2................
SERVICE SPECIFICATIONS 2...............
ON-VEHICLE SERVICE 2...................
Accelerator Cable Check and
Adjustment 2................................
ACCELERATOR CABLE AND PEDAL 3......
EMISSION CONTROL SYSTEM 4......
GENERAL INFORMATION 4................
Emission Control Device Reference
Table 4.....................................
SERVICE SPECIFICATIONS 5..............
VACUUM HOSE 5..........................
Vacuum Hose Piping Diagram 5..............
Vacuum Circuit Diagram 6....................
Vacuum Hose Check 7......................
Vacuum Hose Installation 7..................
CRANKCASE EMISSION CONTROL
SYSTEM 8................................
General Information 8........................
System Diagram 8..........................
Component Location 9.......................
Positive Crankcase Ventilation System Check 9....
PCV Valve Check 9.........................
EVAPORATIVE EMISSION CONTROL
SYSTEM 10...............................
General Information 10.......................
System Diagram 10..........................
Component Location 10......................
Purge Control System Check 11...............
Purge Port Vacuum Check 11.................
Purge Control Solenoid Valve Check 12.........
Check Valve Check 12.......................
EXHAUST GAS RECIRCULATION (EGR)
SYSTEM 13...............................
General Information 13.......................
Operation 13................................
System Diagram 13..........................
Component Location 14......................
Exhaust Gas Recirculation (EGR) Control System
Check 14...................................
EGR Valve Check 15.........................
EGR Port Vacuum Check 15..................
EGR Control Solenoid Valve Check 16..........
EGR VALVE 17............................
CANISTER 18.............................
CATALYTIC CONVERTER 19................
General Information 19.......................
Page 775 of 1449

ENGINE AND EMISSION CONTROL -Emission Control System17-5
SERVICE SPECIFICATIONS
ItemsStandard value
Purge control solenoid valve coil resistance (at 20_C)Ω30 - 34
EGR control solenoid valve coil resistance (at 20_C)Ω29 - 35
VACUUM HOSE
VACUUM HOSE PIPING DIAGRAM
Fuel
pressure
control
solenoid
valve
Oxygen
sensor
(front)
Check
valve
Fuel
pressure
regulator
PCV valve To
fuel tank
Oxygen sensor (rear) From
fuel pump
Air
inletEGR control
solenoid valve
Purge
control
solenoid
valveCanisterFrom
fuel tank
EGR
valve Injector
Three - way
catalytic converter A
P
E