Page 749 of 1449

ENGINE ELECTRICAL -Starting System16-17
STARTING SYSTEM
GENERAL INFORMATION
If the ignition switch is turned to the “START”
position, current flows in the pull-in and holding
coils provided inside magnetic switch, attracting
the plunger. When the plunger is attracted, the
lever connected to the plunger is actuated to
engage the starter clutch.
On the other hand, attracting the plunger will turn
on the magnetic switch, allowing the B terminaland M terminal to conduct. Thus, current flows to
engage the starter motor.
When the ignition switch is returned to the “ON”
position after starting the engine, the starter clutch
is disengaged from the ring gear.
An overrunning clutch is provided between the
pinion and the armature shaft, to prevent damage
to the starter.
SYSTEM DIAGRAM
Pull-in coilHolding coil
Ignition
switch
BatteryArmature
Brush
YokePlunger
Lever
Over-running
clutch
Pinion shaft
STARTER MOTOR SPECIFICATIONS
ItemsSpecifications
TypeReduction drive with planetary gear
Rated output kW/V1.2/12
No. of pinion teeth8
SERVICE SPECIFICATIONS
ItemsStandard valueLimit
Pinion gap mm0.5 - 2.0-
Commutator outer diameter mm29.428.8
Commutator runout mm0.050.1
Commutator undercut mm0.50.2
Brush length mm-7.0
Page 753 of 1449
ENGINE ELECTRICAL -Starting System16-21
DISASSEMBLY AND REASSEMBLY
1 1713
1512
4 3
211
6 1614
1098
7 5
182021
19
22
Disassembly steps
1. Cover
2. Screw
AA"3. Magnetic switch
4. Screw
5. Through
6. Rear bracket
7. Brush holder
8. Rear bearing
AB"9. Armature
10. Yoke assembly
AB"11. Ball12. Packing A
13. Packing B
14. Plate
15. Planetary gear
16. Lever
AC""AA17. Snap ring
AC""AA18. Stop ring
19. Overrunning clutch
20. Internal gear
21. Planetary gear holder
22. Front bracket
Page 754 of 1449

ENGINE ELECTRICAL -Starting System16-22
DISASSEMBLY SERVICE POINTS
AA"MAGNETIC SWITCH REMOVAL
Disconnect field coil wire from “M” terminal of magnetic switch.
AB"ARMATURE/BALL REMOVAL
Caution
When removing the armature, take care not to lose the
ball (which is used as a bearing) in the armature end.
AC"SNAP RING/STOP RING REMOVAL
1. Press stop ring off snap ring with a suitable socket.
2. Remove snap ring with snap ring pliers and then remove
stop ring and overrunning clutch.
STARTER MOTOR PARTS CLEANING
1. Do not immerse parts in cleaning solvent. Immersing the
yoke and field coil assembly and/or armature will damage
insulation. Wipe motor assembly with a cloth only.
2. Do not immerse drive unit in cleaning solvent. Overrunning
clutch is pre-lubricated at the factory and solvent will wash
lubrication from clutch
3. The drive unit may be cleaned with a brush moistened
with cleaning solvent and wiped dry with a cloth.
“B” terminal“S” terminal
“M” terminalField coil
wire
Socket
Overrunning
clutch Stop ring
Pinion gear
Snap ring pliers
Overrunning
clutch Pinion gear Snap ring
Page 755 of 1449
ENGINE ELECTRICAL -Starting System16-23
REASSEMBLY SERVICE POINT
"AASTOP RING/SNAP RING INSTALLATION
Using a suitable pulling tool, pull overrunning clutch stop ring
over snap ring.
INSPECTION
COMMUTATOR CHECK
1. Place the armature in a pair of “V” blocks and check
the runout with a dial indicator.
Standard value: 0.05 mm
Limit: 0.1 mm
2. Measure the commutator outer diameter.
Standard value: 29.4 mm
Limit: 28.8 mm
3. Check the undercut depth between segments.
Standard value: 0.5 mm
Limit: 0.2 mm
BRUSH HOLDER CHECK
Confirm that the spring is activated when the brush is pressed
into the brush holder by hand.
Replace the brush holder if the spring is not activated.
Stop ringOverrunning
clutchStop ring
Snap ring
Undercut
Segment
Mica
Page 756 of 1449

ENGINE ELECTRICAL -Starting System16-24
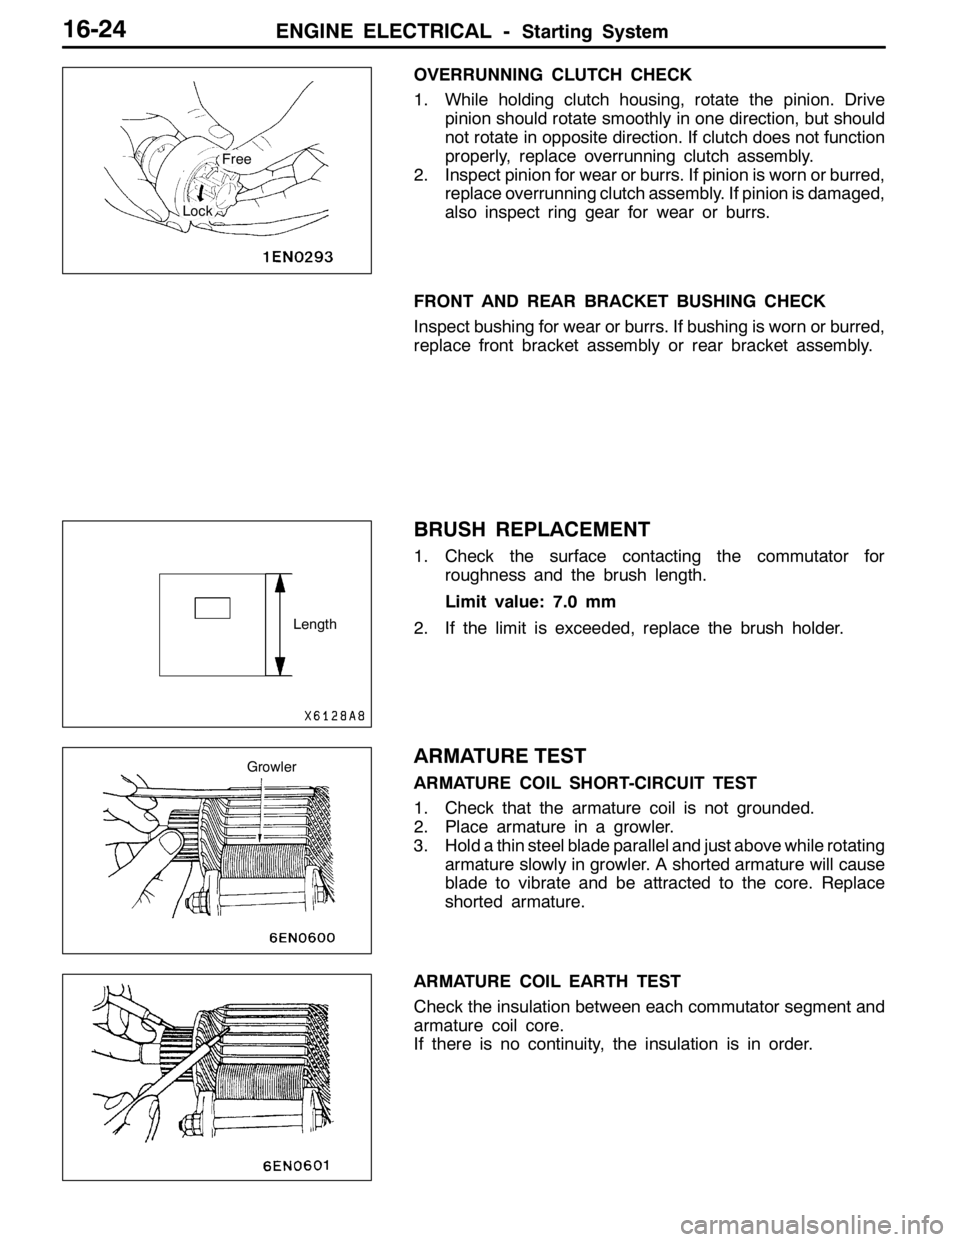
OVERRUNNING CLUTCH CHECK
1. While holding clutch housing, rotate the pinion. Drive
pinion should rotate smoothly in one direction, but should
not rotate in opposite direction. If clutch does not function
properly, replace overrunning clutch assembly.
2. Inspect pinion for wear or burrs. If pinion is worn or burred,
replace overrunning clutch assembly. If pinion is damaged,
also inspect ring gear for wear or burrs.
FRONT AND REAR BRACKET BUSHING CHECK
Inspect bushing for wear or burrs. If bushing is worn or burred,
replace front bracket assembly or rear bracket assembly.
BRUSH REPLACEMENT
1. Check the surface contacting the commutator for
roughness and the brush length.
Limit value: 7.0 mm
2. If the limit is exceeded, replace the brush holder.
ARMATURE TEST
ARMATURE COIL SHORT-CIRCUIT TEST
1. Check that the armature coil is not grounded.
2. Place armature in a growler.
3. Hold a thin steel blade parallel and just above while rotating
armature slowly in growler. A shorted armature will cause
blade to vibrate and be attracted to the core. Replace
shorted armature.
ARMATURE COIL EARTH TEST
Check the insulation between each commutator segment and
armature coil core.
If there is no continuity, the insulation is in order.
Free
Lock
Length
Growler
Page 791 of 1449
CLUTCH 21A........................................................
CLUTCH OVERHAUL 21B............................................
21A-1
CLUTCH
CONTENTS
Page 792 of 1449
21A-2
CLUTCH
CONTENTS
GENERAL INFORMATION 3..................
SERVICE SPECIFICATIONS 3.................
LUBRICANTS 3..............................
ON-VEHICLE SERVICE 3.....................
Clutch Pedal Inspection and Adjustment 3........Bleeding 4.....................................
Clutch Pedal Position Switch Adjustment 4.......
CLUTCH PEDAL 5............................
CLUTCH CONTROL 7........................
Clutch Master Cylinder 9.......................
Page 793 of 1449

CLUTCH -General Information/Service Specifications/Lubricants/On-vehicle Service21A-3
GENERAL INFORMATION
The clutch is a dry single-disc, diaphragm type;
hydraulic pressure is used for the clutch control.
SERVICE SPECIFICATIONS
ItemsStandard value
Clutch pedal height mm202.1 - 206.1
173.5 - 177.5
Clutch pedal clevis pin play mm1-3
Clutch pedal free play mm4-13
Distance between the clutch pedal and the toeboard
when the clutch is disengaged mm114.3 or more
100 or more
LUBRICANTS
ItemsSpecified lubricantsQuantity
Clutch fluidBrake fluid DOT3 or DOT4As required
Push rod assemblyRubber grease
Boot
Release cylinder push rodMITSUBISHI genuine grease Part No.
0101011
ON-VEHICLE SERVICE
CLUTCH PEDAL INSPECTION AND
ADJUSTMENT
1. Turn up the carpet, etc. under the clutch pedal.
2. Measure the clutch pedal height and the clutch pedal
clevis pin play.
Standard value (A):
202.1 - 206.1 mm
173.5 - 177.5 mm
Standard value (B): 1 - 3 mm
Clutch pedal height
A
A
Clutch pedal
stopper
Clutch pedal clevis pin play
B