Page 596 of 705
595 Practical hints
What to do if …?
Display
Possible cause/consequence
Possible solution
Third brake lamp
The high mounted brake lamp is malfunc-
tioning. This message will only appear if all
light emitting diodes have stopped working.
�
Visit an authorized Mercedes-Benz Center as
soon as possible.
Corner. lamp,
Left
The left-hand corner-illuminating lamp is
malfunctioning.
�
Replace the bulb as soon as possible
(�page 621).
Corner. lamp,
Right
The right-hand corner-illuminating lamp is
malfunctioning.
�
Replace the bulb as soon as possible
(�page 621).
Low beam,
Left
The left low beam lamp is malfunctioning.
Bi-Xenon headlamp:�
Visit an authorized Mercedes-Benz Center as
soon as possible.
Page 601 of 705

600 Practical hintsWhat to do if …?Display
Possible cause/consequence
Possible solution
Reverse lamp,
Right
The right reverse lamp is malfunctioning.
�
Visit an authorized Mercedes-Benz Center as
soon as possible.
Tail lamp/
brake lamp, Left
Substitute bulb on
The left tail lamp/brake lamp is malfunc-
tioning.
This message will only appear if all light
emitting diodes have stopped working. A
substitute bulb is being used.
�
Visit an authorized Mercedes-Benz Center as
soon as possible.
Tail lamp/
brake lamp, Left
The left tail lamp/brake lamp is malfunc-
tioning.
This message will only appear if all light
emitting diodes have stopped working.
�
Visit an authorized Mercedes-Benz Center as
soon as possible.
Tail lamp/
brake lamp, Right
Substitute bulb on
The right tail lamp/brake lamp is malfunc-
tioning.
This message will only appear if all light
emitting diodes have stopped working. A
substitute bulb is being used.
�
Visit an authorized Mercedes-Benz Center as
soon as possible.
Tail lamp/
brake lamp, Right
The right tail lamp/brake lamp is malfunc-
tioning.
This message will only appear if all light
emitting diodes have stopped working.
�
Visit an authorized Mercedes-Benz Center as
soon as possible.
Page 622 of 705
621 Practical hints
Replacing bulbs
�Replacing bulbs
Safe vehicle operation depends on proper
exterior lighting and signaling. It is there-
fore essential that all bulbs and lamp as-
semblies are in good working order at all
times.
Correct headlamp adjustment is extremely
important. Have headlamps checked and
readjusted at regular intervals and when a
bulb has been replaced. See an authorized
Mercedes-Benz Center for headlamp ad-
justment.
i
If the headlamps or front fog lamps are
fogged up on the inside as a result of high humid-
ity, driving the vehicle a distance with the lights
on should clear up the fogging.
i
Substitute bulbs will be brought into use
when the following lamps malfunction:
�
Brake lamps
�
Rear fog lamps
�
Front parking lamps
�
Tail lamps
�
Turn signal lamps
Observe the messages in the multifunction dis-
play (�page 557).
Page 624 of 705

623 Practical hints
Replacing bulbs
Notes on bulb replacement
�
Only use 12-volt-bulbs of the same
type and with the specified watt rating.
�
Switch lights off before changing a bulb
to prevent short circuits.
�
Always use a clean lint-free cloth when
handling bulbs.
�
Your hands should be dry and free of oil
and grease.
�
If the newly installed bulb does not
come on, visit an authorized
Mercedes-Benz Center.
Have the LEDs and bulbs for the following
lamps replaced by an authorized
Mercedes-Benz Center.
�
the Bi-Xenon lamps
�
the front turn signal lamps
�
the front fog lamps
�
the additional turn signal lamps in the
exterior rear view mirrors
�
the parking and standing lamps
�
the front side marker lamps
�
the high mounted brake lamps
�
the brake, tail and rear standing lamps
�
the rear side marker lamps
�
the rear fog lamp
�
the rear turn signal lamps
�
the rear side marker lamps
�
the license plate lamps
Replacing bulbs for front lamps
Before you start to replace a bulb for a
front lamp, do the following first:�
Turn the exterior lamp switch to M
(�page 342).
�
Open the hood (
�page 492) (except
for side marker lamps).
Warning!
G
Keep bulbs out of reach of children.
Bulbs and bulb sockets can be very hot. Al-
low the lamp to cool down before changing
a bulb.
Halogen lamps contain pressurized gas. A
bulb can explode if you:�
touch or move it when hot
�
drop the bulb
�
scratch the bulb
Wear eye and hand protection.
Because of high voltage in Xenon lamps, it is
dangerous to replace the bulb or repair the
lamp and its components. We recommend
that you have such work done by a qualified
technician.
i
Have the headlamp adjustment checked
regularly.
Page 633 of 705

632 Practical hintsFlat tire�
Replace this wheel bolt with alignment
bolt1 supplied in the tool kit.
�
Remove the remaining bolts.
�
Remove the wheel.
Mounting the Minispare wheel
1Wheel bolt for light alloy rims
2Wheel bolt for Minispare wheel
(located in trunk with spare wheel)
�
Clean contact surfaces of wheel and
wheel hub.
�
Guide the Minispare wheel onto the
alignment bolt and push it on.
�
Insert wheel bolts2 and tighten them
slightly.
!
Do not place wheel bolts in sand or dirt. This
could result in damage to the bolt and wheel hub
threads.
!
Wheel bolts2 must be used when mount-
ing the Minispare wheel. The use of any wheel
bolts other than wheel bolts2 for the Minispare
wheel will physically damage the vehicle’s
brakes.
Warning!
G
Make sure to use the original length wheel
bolts when remounting the original wheel
after it has been repaired.!
To avoid paint damage, place wheel flat
against hub and hold it there while installing first
wheel bolt.
Warning!
G
Always replace wheel bolts that are dam-
aged or rusted.
Never apply oil or grease to wheel bolts.
Damaged wheel hub threads should be re-
paired immediately. Do not continue to drive
under these circumstances! Contact an au-
thorized Mercedes-Benz Center or call
Roadside Assistance.
Incorrect wheel bolts or improperly tight-
ened wheel bolts can cause the wheel to
come off. This could cause an accident.
Make sure you are using the correct wheel
bolts.
��
Page 641 of 705
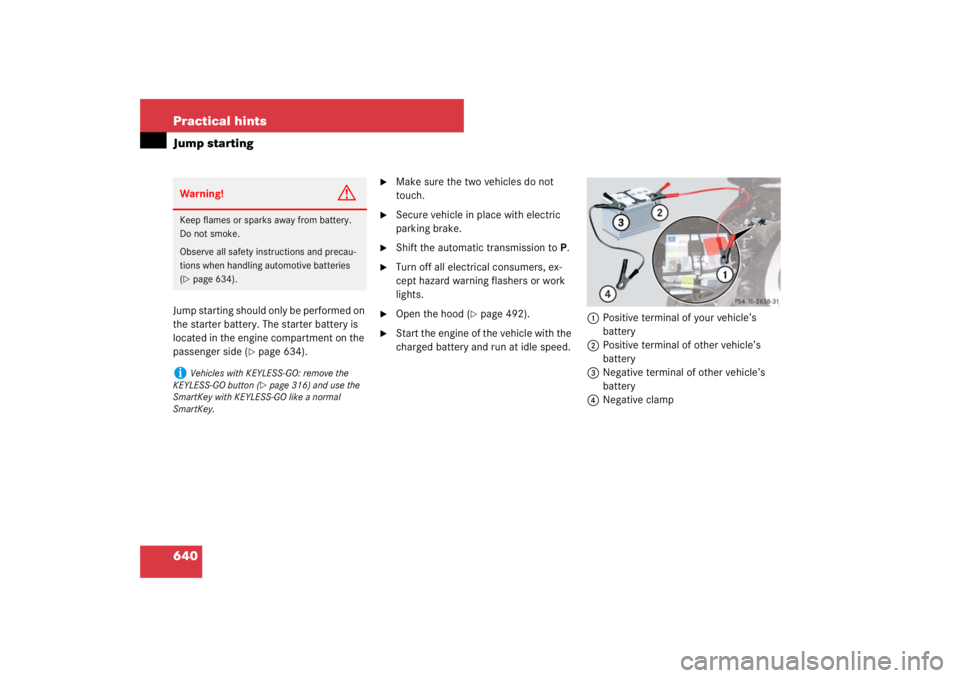
640 Practical hintsJump startingJump starting should only be performed on
the starter battery. The starter battery is
located in the engine compartment on the
passenger side (
�page 634).
�
Make sure the two vehicles do not
touch.
�
Secure vehicle in place with electric
parking brake.
�
Shift the automatic transmission toP.
�
Turn off all electrical consumers, ex-
cept hazard warning flashers or work
lights.
�
Open the hood (
�page 492).
�
Start the engine of the vehicle with the
charged battery and run at idle speed.1Positive terminal of your vehicle’s
battery
2Positive terminal of other vehicle’s
battery
3Negative terminal of other vehicle’s
battery
4Negative clamp
Warning!
G
Keep flames or sparks away from battery.
Do not smoke.
Observe all safety instructions and precau-
tions when handling automotive batteries
(�page 634).
i
Vehicles with KEYLESS-GO: remove the
KEYLESS-GO button (
�page 316) and use the
SmartKey with KEYLESS-GO like a normal
SmartKey.
Page 671 of 705

A system based on radar sensors for
providing brake support in situations
where there is a risk of collision.
BAS Plus is activated in haz")
670 Technical termsBAS Plus*
(B
rake A
ssist S
ystem Plus)
A system based on radar sensors for
providing brake support in situations
where there is a risk of collision.
BAS Plus is activated in hazardous situ-
ations by stepping quickly on the brake
pedal. During the process, the brake
force is adapted depending on the
proximity to the vehicle in front.
Bead
(
�page 526)
Bit
(Binary digit)
The smallest unit of digital information.
Bit rate (MP3)
Measurement of transmission speed.
Indicates the number of ->bits trans-
mitted per time unit.Bi-xenon headlamps
Headlamps which use an electric arc as
the light source and produce a more in-
tense light than filament headlamps.
Bi-xenon headlamps produce low beam
and high beam.
B-pillar
Center connecting pillar between roof
and vehicle body (->A-pillar, ->C-pillar).
Bluetooth
Standard for short-range wireless tech-
nologies, suitable for transmitting
voice and data. It is possible to connect
Bluetooth devices wirelessly.
Bluetooth technology uses the freely
available ISM (Industrial Scientific
Medical) wireless network that works
at 2.45 GHz. Ranges of up to ten
meters are possible with Bluetooth.CAC
(C
ustomer A
ssistance C
enter)
Mercedes-Benz customer service cen-
ter, which can help you with any ques-
tions about your vehicle and provide
assistance in the event of a break-
down.
CAN system
(C
ontroller A
rea N
etwork)
Data bus network serving to control ve-
hicle functions such as door locking or
windshield wiping.
CD
(C
ompact D
isc)
Digital storage medium in disc form.
CD-R
(C
ompact D
isc R
ecordable)
->CD which can be written to once and
read many times.
CD-RW
(C
ompact D
isc R
ew
ritable)
->CD which be read and written to
many times.
Page 674 of 705

Automatically brakes spinning wheels,
thus ensuring
optimal ->traction at all times.
FAT
(F
ile A
llocation T
able)
A table used to locate fil")
673 Technical terms
ETS
(E
lectronic T
raction S
ystem)
Automatically brakes spinning wheels,
thus ensuring
optimal ->traction at all times.
FAT
(F
ile A
llocation T
able)
A table used to locate files on a disk or
memory device.
FSS PLUS (Canada vehicles)
(F
lexible S
ervice S
ystem PLUS)
Maintenance service indicator in the
->multifunction display that informs the
driver when the next vehicle mainte-
nance service is due. FSS evaluates en-
gine temperature, oil level, vehicle
speed, engine speed, distance driven
and the time elapsed since your last
service, and calls for the next mainte-
nance service accordingly.GAWR
(G
ross A
xle W
eight R
ating)
(
�page 526)
Gear range
Number of gears which are available to
the automatic transmission for shifting.
The automatic gear shifting process
can be adapted to specific operating
conditions using the selector lever.
GPS
(Global P
ositioning S
ystem)
Satellite-based system for relaying
geographic location information to and
from vehicles equipped with special re-
ceivers. Employs DVD digital maps for
navigation.
GSM
(G
lobal S
ystem for M
obile Communica-
tion)
A standard network protocol used
throughout the world for digital cellular
communication.GVW
(G
ross V
ehicle W
eight)
(
�page 526)
GVWR
(Gross V
ehicle W
eight R
ating)
(
�page 527)
HiP
(High P
erformance light bulbs)
Light bulbs filled with xenon which are
used in rear lamps.
ID3 tag
Additional information which may be
included in MP3 files (e.g. title, artist,
album).
Instrument cluster control system
The Instrument cluster control system
is used to call up vehicle information
and to change component settings. In-
formation and messages appear in the
->multifunction display. The driver uses
the buttons on the ->multifunction
steering wheel to navigate through the
system and to adjust settings.