Page 319 of 570
318 Controls in detail
Useful features
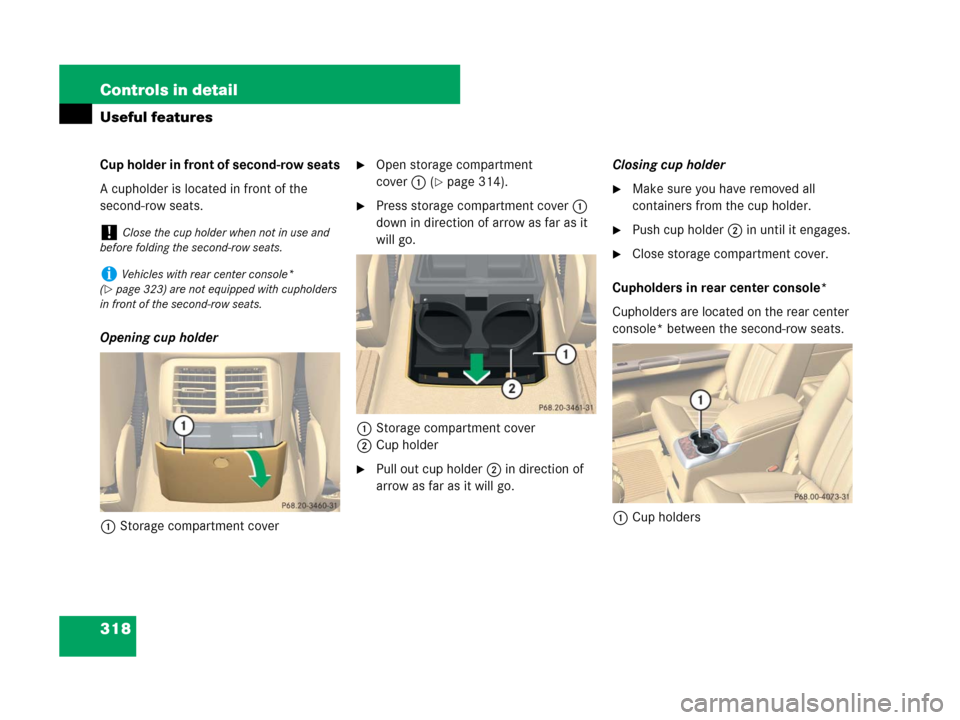
Cup holder in front of second-row seats
A cupholder is located in front of the
second-row seats.
Opening cup holder
1Storage compartment cover�Open storage compartment
cover1(
�page 314).
�Press storage compartment cover 1
down in direction of arrow as far as it
will go.
1Storage compartment cover
2Cup holder
�Pull out cup holder 2 in direction of
arrow as far as it will go.Closing cup holder
�Make sure you have removed all
containers from the cup holder.
�Push cup holder 2 in until it engages.
�Close storage compartment cover.
Cupholders in rear center console*
Cupholders are located on the rear center
console* between the second-row seats.
1Cup holders
!Close the cup holder when not in use and
before folding the second-row seats.
iVehicles with rear center console*
(
�page 323) are not equipped with cupholders
in front of the second-row seats.
Page 320 of 570
319 Controls in detail
Useful features
Cupholders in third-row side trim
Cupholders are located in the side trims of
the third-row seats.
1Cup holderAshtrays*
Your vehicle is equipped with an ashtray
and a cigarette lighter (
�page 321)
located in the front center console and an
ashtray located in front of the second-row
seats (
�page 320).Ashtray in the front center console
Opening the ashtray
�Open cover1 (�page 312).
1Cover plate
2Ashtray insert
iIf your vehicle is not equipped with a
smoking package*, it has a storage
compartment (
�page 312) with a power outlet
(
�page 322) instead.
Page 321 of 570

320 Controls in detail
Useful features
Removing ashtray insert
�Grip ashtray insert 2 on the sides and
pull it out upwards.
Reinstalling ashtray insert
�Insert ashtray insert 2 and push down
until the ball catch engages.
�Close ashtray cover plate 1.Rear seat ashtray (second row)
Opening the ashtray
1Ashtray cover
2Ashtray insert
�Open ashtray cover 1 (�page 312).
�Press ashtray cover 1 down in
direction of arrow as far as it will go.Removing ashtray insert
�Open ashtray cover 1.
�Press ashtray cover 1 down in
direction of arrow as far as it will go.
1Ashtray cover
2Ashtray insert
�Push on ashtray insert 2 and pull it
out upwards.
Reinstalling ashtray insert
�Insert ashtray insert 2 into opening.
�Push down ashtray insert 2 until it
engages.
�Close ashtray cover 1.
Warning!G
Remove ashtray insert only with vehicle
standing still. Set the parking brake to
secure vehicle from movement. Set auto-
matic transmission toP. With the automatic
transmission set toP, turn off the engine.
iVehicles with rear center console*
(
�page 323) are not equipped with an ashtray
in front of the second-row seats.
!Close the ashtray when not in use and be-
fore folding the second-row seats.
Page 324 of 570
323 Controls in detail
Useful features
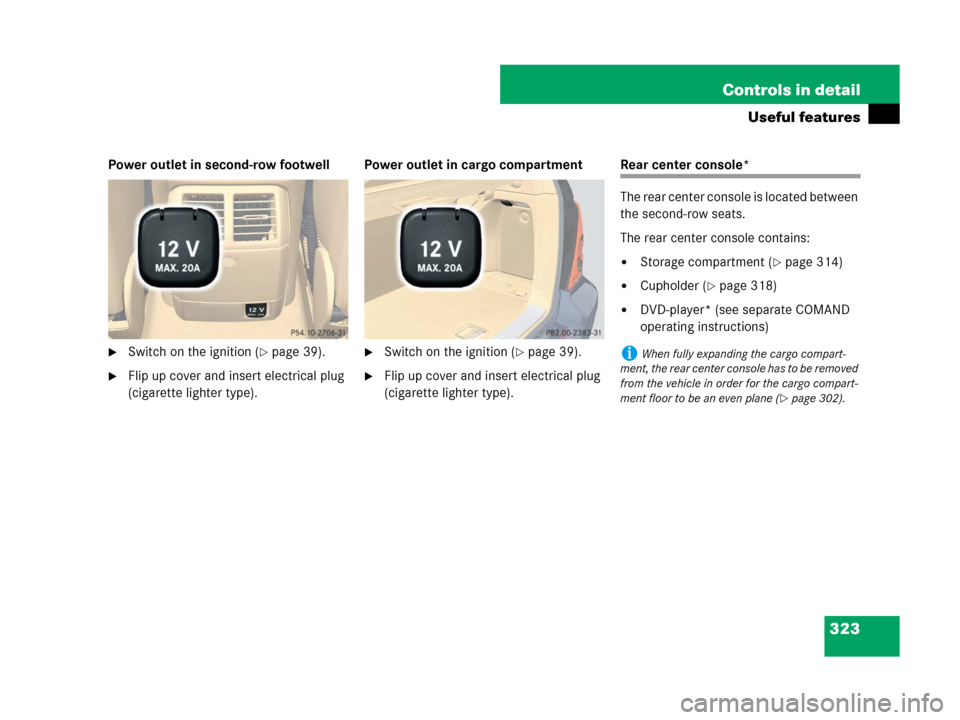
Power outlet in second-row footwell
�Switch on the ignition (�page 39).
�Flip up cover and insert electrical plug
(cigarette lighter type).Power outlet in cargo compartment
�Switch on the ignition (�page 39).
�Flip up cover and insert electrical plug
(cigarette lighter type).
Rear center console*
The rear center console is located between
the second-row seats.
The rear center console contains:
�Storage compartment (�page 314)
�Cupholder (�page 318)
�DVD-player* (see separate COMAND
operating instructions)
iWhen fully expanding the cargo compart-
ment, the rear center console has to be removed
from the vehicle in order for the cargo compart-
ment floor to be an even plane (
�page 302).
Page 402 of 570
 of
automatic transmission, power steering,")
401 Operation
Tires and wheels
Tire and loading terminology
Accessory weight
The combined weight (in excess of those
standard items which may be replaced) of
automatic transmission, power steering,
power brakes, power windows, power
seats, radio, and heater, to the extent that
these items are available as
factory-installed equipment (whether
installed or not).
Air pressure
The amount of air inside the tire pressing
outward on each square inch of the tire.
Air pressure is expressed in pounds per
square inch (psi), or kilopascal (kPa) or
bars.
Aspect ratio
Dimensional relationship between tire
section height and section width
expressed in percentage.Bar
Another metric unit for air pressure. There
are 14.5038 pounds per square inch (psi)
to 1 bar; there are 100 kilopascals (kPa)
to 1 bar.
Bead
The tire bead contains steel wires wrapped
by steel cords that hold the tire onto the
rim.
Cold tire inflation pressure
Tire inflation pressure when your vehicle
has been sitting for at least 3 hours or
driven no more than 1 mile (1.6 km).
Curb weight
The weight of a motor vehicle with stan-
dard equipment including the maximum
capacity of fuel, oil, and coolant, and, if so
equipped, air conditioning and additional
optional equipment, but without passen-
gers and cargo.DOT (Department of Transportation)
A tire branding symbol which denotes the
tire meets requirements of the
U.S. Department of Transportation.
GAWR (G
ross Axle Weight Rating)
The GAWR is the maximum permissible
axle weight. The gross vehicle weight on
each axle must never exceed the GAWR for
the front and rear axle indicated on the
certification label located on the driver’s
door B-pillar.
GTW (G
ross Trailer Weight)
The GTW is the weight of the trailer plus
the weight of all cargo, equipment, luggage
etc. loaded on the trailer.
Page 418 of 570

417 Operation
Vehicle care
Hard plastic trim items
�Use Mercedes-Benz approved Interior
Care, a soft, lint-free cloth and apply
with light pressure.
Steering wheel
�Wipe with a damp cloth and dry thor-
oughly or clean with Mercedes-Benz
approved Leather Care.
Carpets
�Use Mercedes-Benz approved Carpet
and Fabric Care for cleaning the
carpets.Headliner
�Use a soft bristle brush or a
dry-shampoo cleaner in case of
excessive dirt.
Seat belts
�Only use clear, lukewarm water and
soap.Upholstery
Using aftermarket seat covers or wearing
clothing that have the tendency to give off
coloring (e.g. when wet, etc.) may cause
the upholstery to become permanently dis-
colored. By lining the seats with a proper
intermediate cover, contact-discoloration
will be prevented.
!Never apply strong force and only use a soft,
non-scratching cloth when cleaning the surface.
Do not attempt to wipe the surface with a dry
cloth or sponge.
Otherwise you may scratch or damage the
surface.
!The seat belts must not be treated with
chemical cleaning agents. Do not dry the seat
belts at temperatures above 176°F (80°C) or in
direct sunlight.
Warning!G
Do not bleach or dye seat belts as this may
severely weaken them. In a crash they may
not be able to provide adequate protection.
Warning!G
Only use seat or head restraint covers which
have been tested and approved by
Mercedes-Benz for your vehicle model.
Using other seat or head restraint covers
may interfere with or prevent the activation
of the active head restraints. Contact an
authorized Mercedes-Benz Light Truck
Center for availability.
Page 428 of 570

427 Practical hints
What to do if …
ProblemPossible cause/consequenceSuggested solution
telltale flashes and you addition-
ally hear an intermittent warning
chime with increasing intensity.The vehicle’s speed once exceeded
15 mph (25 km/h) and you and/or your
front passenger have forgotten to fasten your
seat belts.�Fasten your seat belts.
The seat belt telltale goes out and the
warning chime stops sounding.
There are items placed on the front passen-
ger seat and therefore the system senses the
front passenger seat as being occupied.�Remove the items from the front
passenger seat and put them in a safe
place.
The seat belt telltale goes out and the
warning chime stops sounding.
iAfter 60 seconds with an unfastened seat
belt on one of the front seats, the warning chime
stops sounding and the seat belt telltale illumi-
nates continuously. The seat belt telltale will only
go out if both the driver and front passenger’s
seat belt are fastened, or the vehicle is standing
still and a front door is opened.
Page 474 of 570
473 Practical hints
Where will I find ...?
3Securing hook
�Release securing hook 3 (located be-
low the floor handle) from holder.3Securing hook
4Cargo compartment floor, raised
5Upper cargo compartment lip
�Engage securing hook 3 on upper
cargo compartment lip 5.
You can now access the vehicle tool kit.
To remove the vehicle tool kit storage
well casing, proceed as described
on (
�page 476).6Wheel bolt wrench
7Electric air pump
8Jack
9Spare fuses, fuse extractor, fuse chart
aSpare wheel (collapsible tire)
bAlignment bolt
cTowing eye bolt
dCollapsible wheel chock
eSpare wheel bolts
fVehicle tool kit storage well casing
�To remove jack8, loosen the hook
and loop fastener.
!With the cargo compartment cover blind*
installed behind the third-row seats
(
�page 306), disengage cargo compartment
cover blind* and flip it forward. Otherwise the
strap of the securing hook could damage the
cargo compartment cover blind*.