Page 304 of 570
.
�Remove the rear center console*, if so
equipped (
�page 323).
�Remove the")
303 Controls in detail
Loading
Folding second-row seats
�Move the seat to be folded to its rear-
most position (
�page 138).
�Remove the rear center console*, if so
equipped (
�page 323).
�Remove the head restraint from the
respective second-row seat
(
�page 141).
1Seat backrest
2Seat cushion
3Release lever
�Place the head restraint on the seat
cushion.
�Relieve the load on seat backrest 1
and pull release lever 3 past the
resistance point in direction of arrow
as far as it will go.
Seat and seat backrest are unlocked.
�Fold seat backrest 1 forward until it
fully rests on seat cushion 2 in a
horizontal position.
1Seat backrest
2Seat cushion
�Push down on folded seat backrest 1
until seat cushion 2 engages in seat
base.
!When the second-row seats are folded
forward, the front seats may not be moved to the
rearmost position. Otherwise you could damage
the front and second-row seats.
iThe rear center console* can remain
installed, if installed in the most forward position
(
�page 325). However, the cargo compartment
floor will then not be an even plane.
The storage compartment and the cupholders in
the rear center console* are only illuminated,
when the rear center console* is installed in the
most rearward position (position 0)
(
�page 325).
Page 305 of 570

304 Controls in detail
Loading
Folding third-row seats
�Completely lower the head restraints of
the third-row seats.
1Seat belt holder
2Release handle
3Seat backrest
�Place seat belt in seat belt holder 1.
�Pull release handle 2 on seat
backrest3 in direction of arrow.
Seat backrest 3 is released.
�Slowly move seat backrest 3 forward.
Seat cushion 7 is released and folds
forward automatically.
3Seat backrest (third-row seat)
4Recess (on second-row seat backrest)
5Guide pin (on third-row seat cushion)
6Seat backrest (second-row seat)
7Seat cushion (third-row seat)
8Strap
�Fold seat cushion 7 to a horizontal
position.
Guide pin 5 must engage in recess 4
of seat backrest 6.
�Fold seat backrest 3 to a horizontal
position.
Returning seats to their original position
�Carry out the steps described on
(
�page 301) to (�page 304) in
reverse order.
�Make sure all seats are properly locked
in position.
iThe third-row head restraints are adjusted in
the same manner as the head restraints of the
second-row seats (
�page 139).
iStrap 8 serves to pull up the seat backrest
when bringing the third-row seats back to their
original position (
�page 304).
iThe second-row seats must be in their
rearmost position (
�page 138).
Page 306 of 570

305 Controls in detail
Loading
Second-row seat unlocked
1Lock status indicator
2Red marking
When the seat is unlocked
�lock status indicator 1 is extended
�red marking 2 is clearly visible
�When the seat is unlocked, push seat
backrest back until the seat audibly
engages.
Second-row seat locked
1Lock status indicator
2Red marking
When the seat is locked
�lock status indicator 1 is in hinged
position
�red marking 2 is barely visible
Warning!G
Make sure
�the seats are properly locked
�the seat backrests are in an upright po-
sition and are properly locked
A second-row seat is properly locked only
when lock status indicator 1 is in hinged
position and red marking 2 is barely
visible.
If a seat and seat backrest are not properly
locked, the seat could move forward and the
seat backrest could fold. You could slide un-
der the seat belt during braking, vehicle ma-
neuvers, or in an accident. If you slide under
it, the belt would apply force at the abdomen
or neck. That could cause serious or even fa-
tal injuries.
Page 307 of 570

306 Controls in detail
Loading
Cargo compartment cover blind*
The cargo compartment cover blind can be
installed behind the third-row seats or the
second-row seats.
Blind installed behind third-row seats
1Handle
2Mount
Rolling out blind
�Pull blind on handle1 across the
cargo compartment.
�Guide blind into mounts2 and
release.
Rolling up blind
�Disengage blind and guide retraction
by its handle1.Removing blind
Blind installed behind second-row seats
1Release button
2Blind
�Roll the blind up.
�Push release button1.
�Pull blind 2 to the left against the
spring pressure until the spring in the
blind audibly engages.
�Remove the blind.
!With the cargo compartment cover blind
installed, do not pile luggage higher than the
lower edges of the rear side windows.
iThe cargo compartment cover blind has two
extensions which are connected to the cargo
compartment cover blind by cords.
The cargo compartment cover blind must be
extended for installation behind the second-row
seats (
�page 306).
Page 308 of 570
.
�Remove the covers from the mounts in
side trim.
�Press on cove")
307 Controls in detail
Loading
Installing blind
�For installation behind second-row
seats, install the blind extensions
(
�page 307).
�Remove the covers from the mounts in
side trim.
�Press on cover at its lower edge as
indicated by arrow.
The mount cover’s upper edge flips
up.
�Remove mount cover by pulling
its upper edge out of side trim in
direction of arrow.
�Place left side of blind 2 (�page 306)
in left mount.
�Position right side of blind 2
(
�page 306) over right mount.
�Press release button1 (�page 306)
and guide blind 2 (
�page 306) into
mount.
Extending blind1Blind
2Extension
3Guidings
4Guide pins
�Position extension 2 over blind 1.
Guide pins 4 must point directly at
guidings 3.
�Turn extension2 and blind 1 in op-
posite directions as indicated by the ar-
rows.
Guide pins 4 must engage in
guidings3.
!For installation behind third-row seats,
the blind extensions must not be installed.
Otherwise, the blind could be damaged.
iTo avoid loss of the mount covers, keep
them in a safe place while not in use, e.g. the
glove box.
iThe cargo compartment cover blind has two
extensions which are connected to the cargo
compartment cover blind by cords.
The cargo compartment cover blind must be
extended for installation behind the second-row
seats.
��
Page 309 of 570

308 Controls in detail
Loading
When not in use, you can attach the cover
blind extensions to the cover blind.
5Extension guide rail
6Mounting
�With the cargo compartment cover
installed behind third-row seats, insert
extension guide rail 5 into
mounting6.
�Push extension into mounting6 as far
as it will go.
Partition net*Use of the partition net is a particularly
important safety factor when the vehicle is
loaded higher than the top of the seat
backrests with smaller objects. For your
safety, always use the partition net when
transporting cargo.
The partition net can be installed in two lo-
cations:
1Holder behind B-pillar
2Holder behind C-pillar
Warning!G
Make sure the partition net is properly
engaged at top and bottom position and the
tightening belts are securely fastened.
Never use a damaged partition net.
To help avoid personal injury from smaller
objects being thrown around in the occu-
pant compartment during a collision or
sudden maneuver, always use partition net
when transporting cargo.
The partition net cannot prevent the move-
ment of large, heavier objects into the pas-
senger compartment in an accident. Such
items must be properly secured using the
cargo tie-down rings in the cargo compart-
ment floor (
�page 299).
Passenger use of seats behind installed
partition net is restricted because of the
footwell being taken up by the net.
��
Page 315 of 570
314 Controls in detail
Useful features
Rear armrest storage compartment*
A storage compartment is located in the
armrest of the rear center console*
between the second-row seats.
�Press button under armrest and lift up
armrest.Rear storage compartments
Two storage compartments are located in
front of the second-row seats.
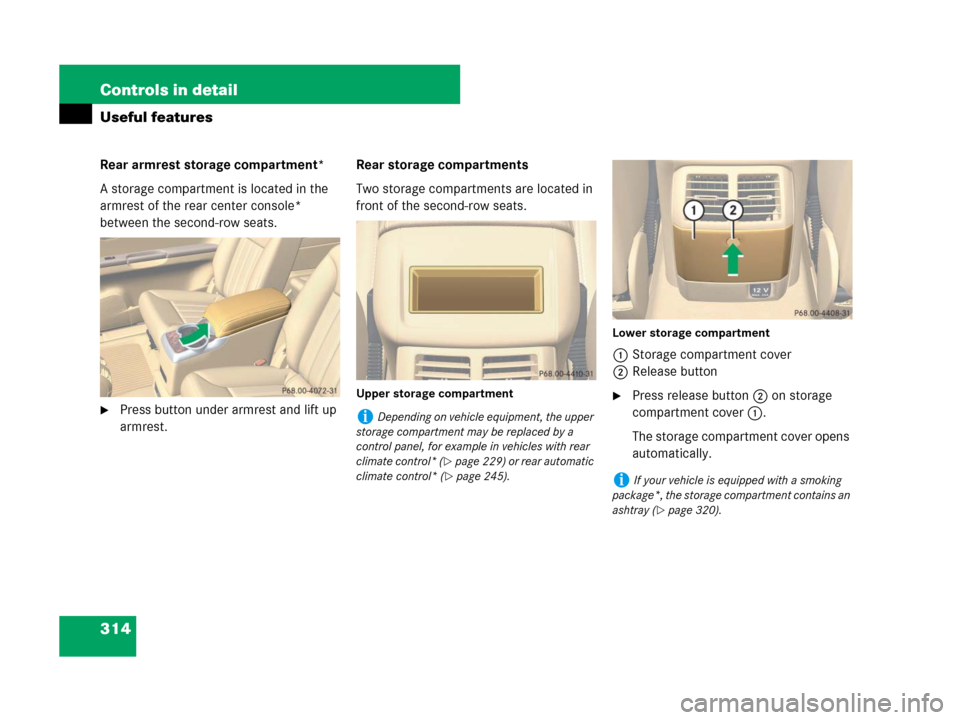
Upper storage compartmentLower storage compartment
1Storage compartment cover
2Release button
�Press release button 2 on storage
compartment cover 1.
The storage compartment cover opens
automatically.
iDepending on vehicle equipment, the upper
storage compartment may be replaced by a
control panel, for example in vehicles with rear
climate control* (
�page 229) or rear automatic
climate control* (
�page 245).iIf your vehicle is equipped with a smoking
package*, the storage compartment contains an
ashtray (
�page 320).
Page 316 of 570

315 Controls in detail
Useful features
Third-row storage compartment
Storage compartments are located on the
side trims of the third-row seats.
1Storage compartmentParcel nets Parcel net in front passenger footwell
1Parcel net
Parcel nets on front seat backrests
1Parcel net
iIf your vehicle is equipped with a
3-zone automatic climate control*, the storage
compartment is replaced by an adjustable air
vent (
�page 249).
Warning!G
Do not place objects with a combined
weight of more than 4.4 lbs (2 kg) into the
parcel net on the back of the front passen-
ger seat. Otherwise, the Occupant
Classification System OCS (
�page 88) may
not be able to properly approximate the
occupant weight category.
Parcel nets are intended for storing
light-weight items only.
Heavy objects, objects with sharp edges, or
fragile objects may not be transported in the
parcel nets. In an accident, during hard
braking, or sudden maneuvers, they could
be thrown around inside the vehicle and
cause injury to vehicle occupants.
Parcel nets cannot protect transported
goods in the event of an accident.