Page 94 of 570
93 Safety and Security
Occupant safety
Self-test Occupant Classification Sys-
tem
After turning the SmartKey in the starter
switch to position1or2or pressing the
KEYLESS-GO* start/stop button once or
twice, the59indicator lamp
(
�page 92) located in the center console
illuminates. If an adult occupant is properly
sitting on the front passenger seat and the
system senses the occupant as being an
adult, the59indicator lamp
will illuminate and go out after approxi-
mately 6 seconds.
If the seat is not occupied and the system
senses the front passenger seat as being
empty, the59indicator lamp
will illuminate and not go out.For more information, see the “Practical
hints” section (
�page 431).Child seat anchors – LATCH type
This vehicle is equipped with two LATCH
(L
ower Anchors and Tethers for CHildren)
type anchors (at each of the second and
third-row seats) for the installation of a
LATCH child seat with matching mounting
fittings.
Warning!G
If the 59 indicator lamp should
not illuminate, the system is not functioning.
You must see an authorized Mercedes-Benz
Light Truck Center before seating any child
on the front passenger seat.
Warning!G
Never place anything between seat cushion
and child seat (e.g. pillow), since it reduces
the effectiveness of the Occupant
Classification System. The bottom of the
child seat must make full contact with the
passenger seat cushion. An incorrectly
mounted child seat could cause injuries to
the child in case of an accident, instead of
increasing protection for the child.
Follow the manufacturer’s instructions for
installation of child seats.
Warning!G
Children too big for a toddler restraint must
ride in seats using regular seat belts. Posi-
tion shoulder belt across chest and shoul-
der, not face or neck.
A booster seat may be necessary to achieve
proper belt positioning for children over
41 lbs until they reach a height where a
lap/shoulder belt fits properly without a
booster.
Install child seat according to manufactu-
rer’s instructions.
The child seat must be firmly attached to the
right and left side anchors.
��
Page 95 of 570
94 Safety and Security
Occupant safety
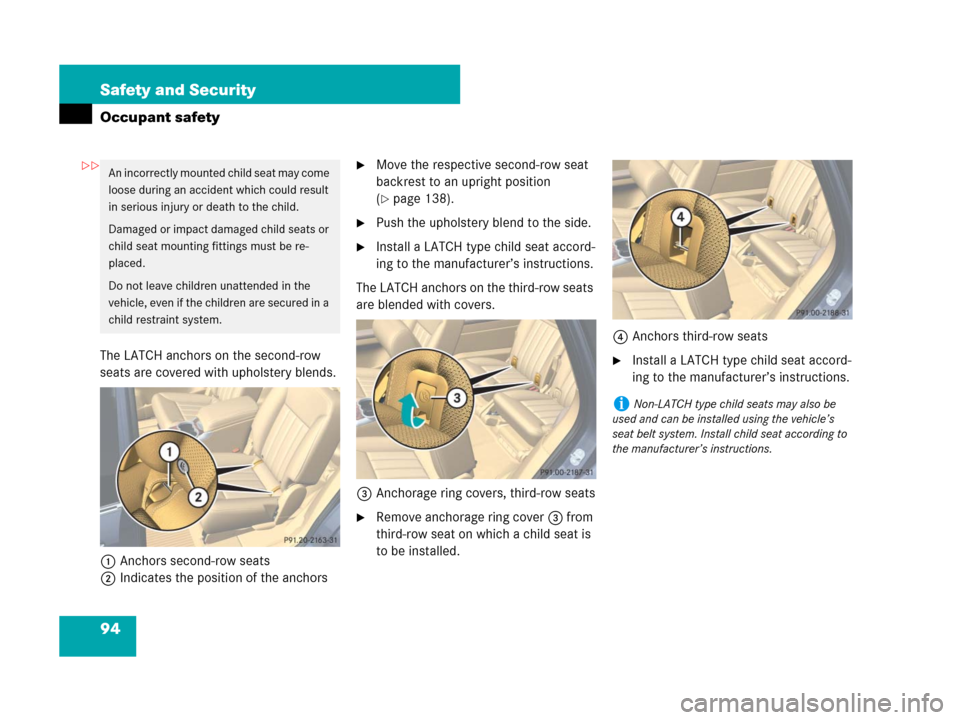
The LATCH anchors on the second-row
seats are covered with upholstery blends.
1Anchors second-row seats
2Indicates the position of the anchors
�Move the respective second-row seat
backrest to an upright position
(
�page 138).
�Push the upholstery blend to the side.
�Install a LATCH type child seat accord-
ing to the manufacturer’s instructions.
The LATCH anchors on the third-row seats
are blended with covers.
3Anchorage ring covers, third-row seats
�Remove anchorage ring cover3 from
third-row seat on which a child seat is
to be installed.4Anchors third-row seats
�Install a LATCH type child seat accord-
ing to the manufacturer’s instructions.
An incorrectly mounted child seat may come
loose during an accident which could result
in serious injury or death to the child.
Damaged or impact damaged child seats or
child seat mounting fittings must be re-
placed.
Do not leave children unattended in the
vehicle, even if the children are secured in a
child restraint system.
iNon-LATCH type child seats may also be
used and can be installed using the vehicle’s
seat belt system. Install child seat according to
the manufacturer’s instructions.
��
Page 97 of 570
96 Safety and Security
Occupant safety
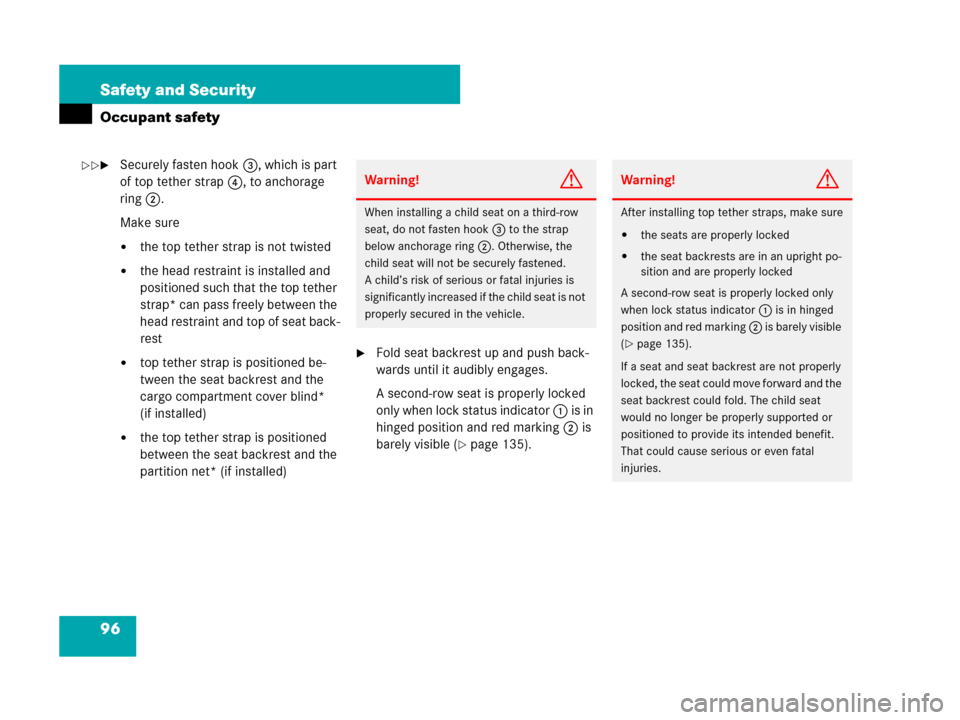
�Securely fasten hook3, which is part
of top tether strap4, to anchorage
ring2.
Make sure
�the top tether strap is not twisted
�the head restraint is installed and
positioned such that the top tether
strap* can pass freely between the
head restraint and top of seat back-
rest
�top tether strap is positioned be-
tween the seat backrest and the
cargo compartment cover blind*
(if installed)
�the top tether strap is positioned
between the seat backrest and the
partition net* (if installed)
�Fold seat backrest up and push back-
wards until it audibly engages.
A second-row seat is properly locked
only when lock status indicator 1 is in
hinged position and red marking 2 is
barely visible (
�page 135).
Warning!G
When installing a child seat on a third-row
seat, do not fasten hook 3 to the strap
below anchorage ring 2. Otherwise, the
child seat will not be securely fastened.
A child’s risk of serious or fatal injuries is
significantly increased if the child seat is not
properly secured in the vehicle.
Warning!G
After installing top tether straps, make sure
�the seats are properly locked
�the seat backrests are in an upright po-
sition and are properly locked
A second-row seat is properly locked only
when lock status indicator 1 is in hinged
position and red marking 2 is barely visible
(
�page 135).
If a seat and seat backrest are not properly
locked, the seat could move forward and the
seat backrest could fold. The child seat
would no longer be properly supported or
positioned to provide its intended benefit.
That could cause serious or even fatal
injuries.
��
Page 98 of 570
97 Safety and Security
Occupant safety
�Lower the head restraint if necessary
(
�page 139).
Make sure the top tether strap can
pass freely between the head restraint
and top of seat backrest.
�Install the child restraint system and
tighten the top tether strap according
to the child restraint manufacturer’s
instructions.
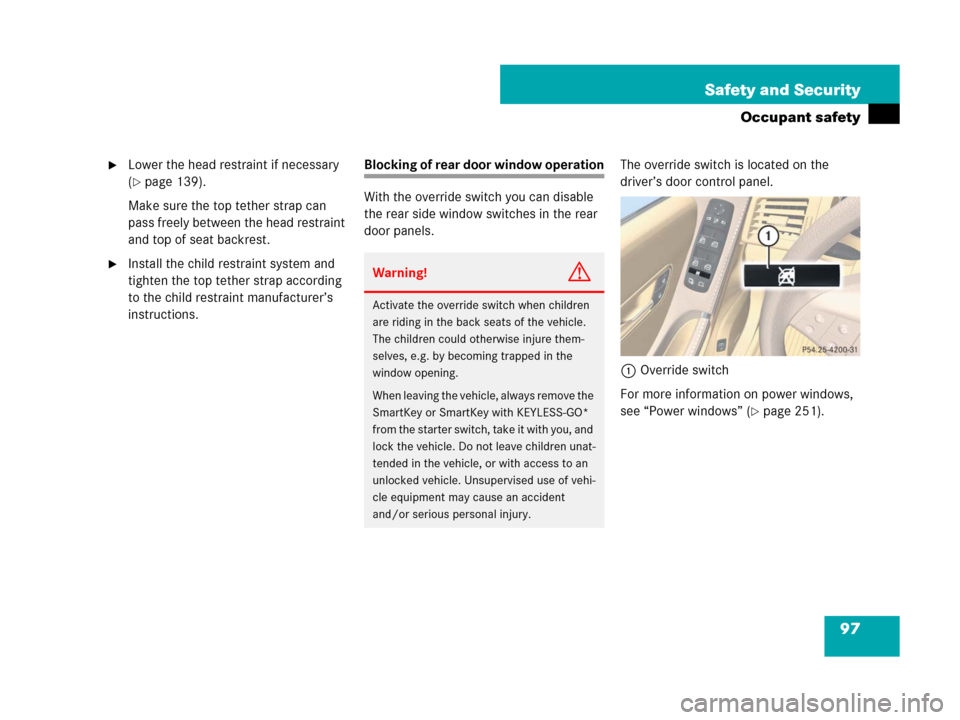
Blocking of rear door window operation
With the override switch you can disable
the rear side window switches in the rear
door panels.The override switch is located on the
driver’s door control panel.
1Override switch
For more information on power windows,
see “Power windows” (
�page 251).
Warning!G
Activate the override switch when children
are riding in the back seats of the vehicle.
The children could otherwise injure them-
selves, e.g. by becoming trapped in the
window opening.
When leaving the vehicle, always remove the
SmartKey or SmartKey with KEYLESS-GO*
from the starter switch, take it with you, and
lock the vehicle. Do not leave children unat-
tended in the vehicle, or with access to an
unlocked vehicle. Unsupervised use of vehi-
cle equipment may cause an accident
and/or serious personal injury.
Page 112 of 570
111 Controls in detail
Locking and unlocking
Seats
Memory function*
Lighting
Instrument cluster
Control system
Automatic transmission
Good visibility
Climate control
3-zone automatic climate control*
Power windows
Power tilt/sliding sunroof*
Panorama roof with power tilt/slid-
ing panel*
Driving systems
Loading
Useful features
Page 124 of 570
123 Controls in detail
Locking and unlocking
Opening the tailgate
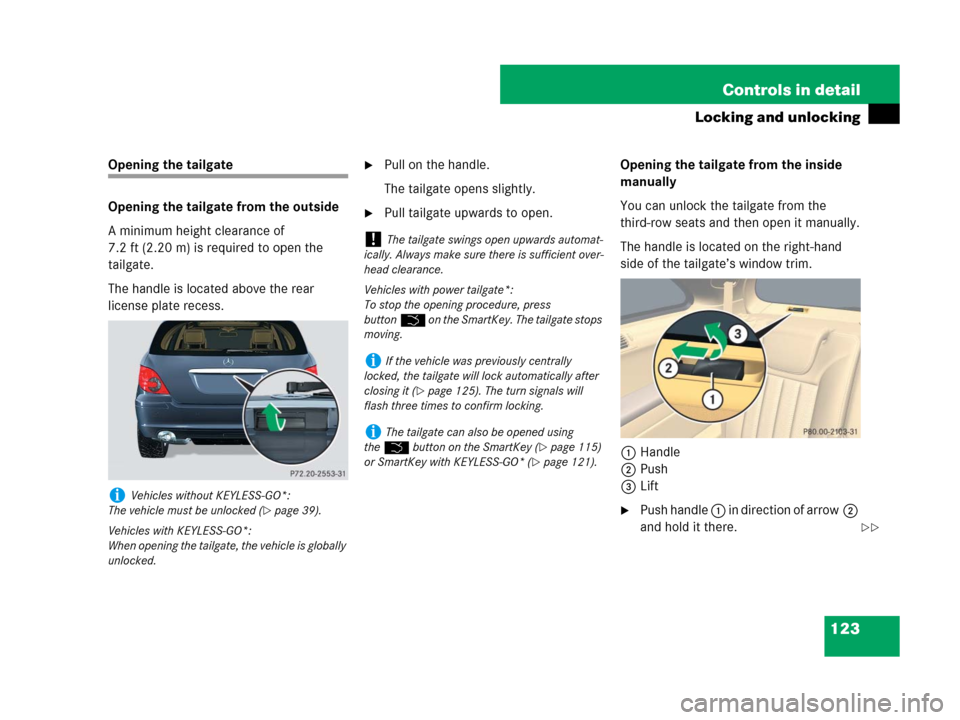
Opening the tailgate from the outside
A minimum height clearance of
7.2 ft (2.20 m) is required to open the
tailgate.
The handle is located above the rear
license plate recess.�Pull on the handle.
The tailgate opens slightly.
�Pull tailgate upwards to open.Opening the tailgate from the inside
manually
You can unlock the tailgate from the
third-row seats and then open it manually.
The handle is located on the right-hand
side of the tailgate’s window trim.
1Handle
2Push
3Lift
�Push handle 1 in direction of arrow2
and hold it there.iVehicles without KEYLESS-GO*:
The vehicle must be unlocked (
�page 39).
Vehicles with KEYLESS-GO*:
When opening the tailgate, the vehicle is globally
unlocked.
!The tailgate swings open upwards automat-
ically. Always make sure there is sufficient over-
head clearance.
Vehicles with power tailgate*:
To stop the opening procedure, press
buttonŠ on the SmartKey. The tailgate stops
moving.
iIf the vehicle was previously centrally
locked, the tailgate will lock automatically after
closing it (
�page 125). The turn signals will
flash three times to confirm locking.
iThe tailgate can also be opened using
theŠ button on the SmartKey (
�page 115)
or SmartKey with KEYLESS-GO* (
�page 121).
��
Page 133 of 570
132 Controls in detail
Seats
For information on seat adjustment, see
the “Getting started” section (
�page 44).
For more information on folding the seats,
see “Loading” (
�page 297).
Easy-entry/exit feature
Easy-entry/exit feature for driver’s
seat*
This feature allows for easier entry into and
exit from the vehicle. When entering and
exiting the vehicle, the steering wheel is in
its uppermost position.
The easy-entry/exit feature can be
activated or deactivated in the
Comfort
submenu of the control system
(
�page 190).With the easy-entry/exit feature activated,
the steering wheel will return to the last set
position when you
�close the driver’s door with the ignition
switched on
or
�insert the SmartKey into the starter
switch or press the KEYLESS-GO*
start/stop button (
�page 41) once
with the driver’s door closed
Warning!G
You must make sure no one can become
trapped or injured by the moving steering
wheel when the easy-entry/exit feature is
activated.
To stop steering wheel movement, do one of
the following:
�Move steering wheel adjustment stalk*
(
�page 47).
�Press one of the memory position
buttons or memory buttonM*
(
�page 145).
Do not leave children unattended in the ve-
hicle, or with access to an unlocked vehicle.
Children could open the driver’s door and
unintentionally activate the easy-entry/exit
feature, which could result in an accident
and/or serious personal injury.
iThe last set steering wheel position is
stored when
�the ignition is switched off(�page 39)
�the position is stored into memory
(
�page 145)
Page 134 of 570
133 Controls in detail
Seats
With the easy-entry/exit feature activated,
the steering wheel tilts upwards when you
�remove the SmartKey from the starter
switch
or
�open the driver’s door with the
SmartKey in starter switch position
0or1(
�page 39) or the
KEYLESS-GO* start/stop button in
position1 (
�page 41)
Easy-entry/exit feature for third-row
seats
This feature allows for easier access to and
exit from the vehicle’s third-row seats.Easy-entry feature for third-row seats
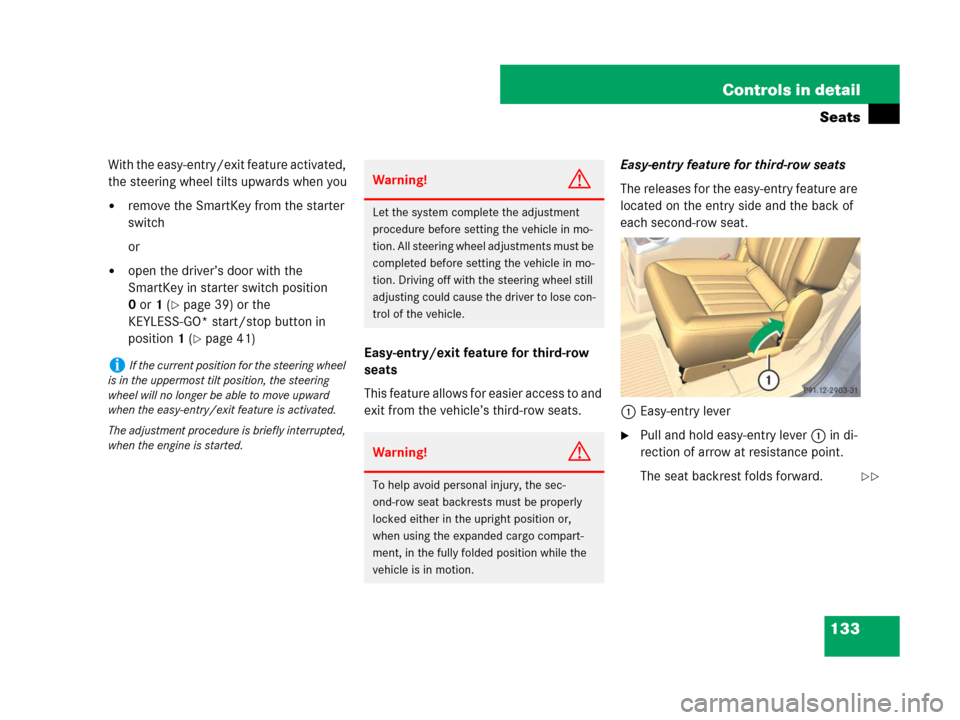
The releases for the easy-entry feature are
located on the entry side and the back of
each second-row seat.
1Easy-entry lever
�Pull and hold easy-entry lever 1 in di-
rection of arrow at resistance point.
The seat backrest folds forward.
iIf the current position for the steering wheel
is in the uppermost tilt position, the steering
wheel will no longer be able to move upward
when the easy-entry/exit feature is activated.
The adjustment procedure is briefly interrupted,
when the engine is started.
Warning!G
Let the system complete the adjustment
procedure before setting the vehicle in mo-
tion. All steering wheel adjustments must be
completed before setting the vehicle in mo-
tion. Driving off with the steering wheel still
adjusting could cause the driver to lose con-
trol of the vehicle.
Warning!G
To help avoid personal injury, the sec-
ond-row seat backrests must be properly
locked either in the upright position or,
when using the expanded cargo compart-
ment, in the fully folded position while the
vehicle is in motion.��