Page 197 of 242
195 Navigation*
During route guidance
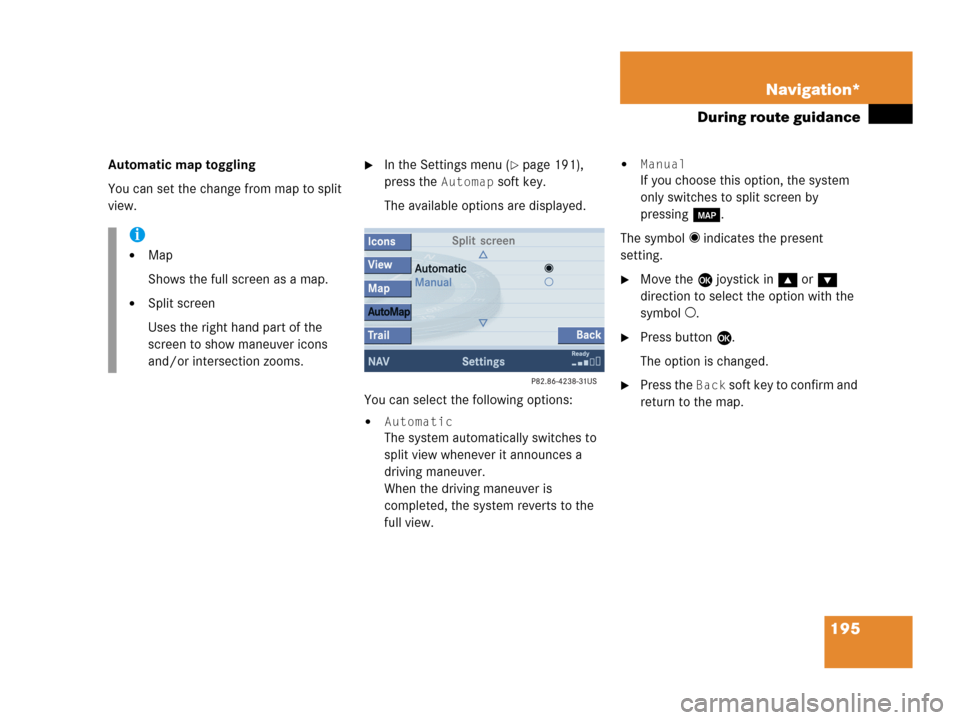
Automatic map toggling
You can set the change from map to split
view.�In the Settings menu (�page 191),
press the
Automap soft key.
The available options are displayed.
You can select the following options:
�Automatic
The system automatically switches to
split view whenever it announces a
driving maneuver.
When the driving maneuver is
completed, the system reverts to the
full view.
�Manual
If you choose this option, the system
only switches to split screen by
pressing c.
The symbol _ indicates the present
setting.
�Move the E joystick in g or G
direction to select the option with the
symbol -.
�Press button E.
The option is changed.
�Press the Back soft key to confirm and
return to the map.
i
�Map
Shows the full screen as a map.
�Split screen
Uses the right hand part of the
screen to show maneuver icons
and/or intersection zooms.
Page 198 of 242
196 Navigation*
During route guidance
Trail settings
With this function is active, the COMAND
records a trail every time the vehicle is in
an OFF ROAD area (more than 0.25 miles
away from a digitized road).
The system places trail dots on the screen
until it matches to a digitized road again.
�In the Settings menu (�page 191),
press the
Trail soft key.
The options
On and Off are displayed.
1Percentage of used memoryThe symbol _ indicates the present
setting.
�Move the E joystick in g or G
direction to select the option with the
symbol -.
�Press E.
Depending on the previous setting, the
Trail is switched on or off.
�Press the Back soft key to confirm and
return to the map.
Delete a trail
If there is a trail in memory, you can delete
it.
�Press the Clear soft key.
The message
Are you sure you
want to clear all trails?
will
appear in a window.
�Push the joystick to H to select Yes.
�Press E.
The trail is deleted.
If you don’t want to delete a trail
�Press E to confirm No.
Page 216 of 242
214 Service
Service main menu
� Service main menu
�Press C.
The Service main menu will appear.
Service main menu
You can use the soft keys to open other
menus
�SMS soft key*:
Opens the SMS Inbox Folder
(
�page 215).
�Scr.off soft key:
�Press the Scr.Off soft key.
The screen is switched off.
�Press any soft key or button.
The screen is switched on again.
�System soft key:
Switches to the system settings
(
�page 220).
Activating the Service main menu
i
If a service submenu is displayed, you
need to press the
Back soft key.i
The SMS soft key is visible if vehicle is
equipped for phone operation and
Mercedes-Benz specified mobile
telephone* is inserted in phone
cradle*.
Page 221 of 242
219 System settings
System settings
Page 222 of 242
220 System settings
System settings
� System settings
�Press C.
�In the Service main menu
(
�page 214), press the System soft
key.
System settings menu
In the System settings menu you can:
�select the time zone and daylight
savings time settings
�select the language (�page 221)
�switch verification and notification
tones on and off (
�page 222)
�adjust display settings (�page 223)
�activate and deactivate the Voice
control system* help window
(
�page 224)
�start Voice control system*
individualization (
�page 225)
�reset all settings to the factory settings
(
�page 227)You can select the applicable time zone
and daylight saving time settings.
�In the System settings menu, press the
Time soft key.
The available time zones are shown.
�Push the joystick to g or G to
select the time zone.
�Press E.
You can now select the daylight saving
time settings.
Activating the System settings
menu Selecting the time zone
Page 223 of 242
221 System settings
System settings
�Push the joystick to g or G to
select the desired entry.
Daylight Savings Time:
Changes from summer to winter time.
Standard Time:
Changes from winter to summer time.
�Press E.
The System settings menu will appear.
The setting is saved.The language affects the menu text
displays and the voice output during route
guidance.
�In the System settings menu
(
�page 220), press the Lang. soft
key.
The languages list will appear.
OptionSymbol
Time change selected_
Time change not
selected-
Selecting the language
Page 224 of 242
222 System settings
System settings
�Select Instr. cluster setting.
COMAND will use the same language
as is set in instrument cluster.
or
�Push the joystick to g or G to
select the desired language.
�Press E.
The System settings menu will appear
with the display text in the language
selected.
�In the System settings menu, press the
Tones soft key.
The Tones menu will appear.
�Push the joystick to g or G to
select an entry.
�Press E.
The respective tones are activated or
deactivated. You hear the tone when
you activate it.
�Press the Back soft key.
The System settings menu will appear.
The setting is saved.
Switching verification and
notification tones on and off
OptionSymbol
Tone activatedQ
Tone deactivatedq
Page 225 of 242
223 System settings
System settings
�In the System settings menu, press the
Display soft key.You can use the following functions:
�set the display dimming characteristics
�adjust the display brightness
Setting the display dimming
characteristics
�Push the joystick to G or g to
select an entry.
Day mode
The display is continuously set to
daylight design.
Night mode
The display is continuously set to night-
time design.
Automatic
The display changes depending on the
ambient light sensor in the vehicle.
�Press E.
The setting is applied. The System
settings menu will appear.
Adjusting the display brightness
�Press the Bright. soft key.
�Push the joystick to H or h
direction to adjust the brightness.
Selecting display settings
OptionSymbol
Display mode selected_
Display mode not
selected-