Page 60 of 242

58 Audio
CD changer* operation
�Insert an audio CD or a MP3 CD into
the CD slot 2 within approx. 15
seconds. Insert the CD face up.
The CD is pulled in. The red LED in the
corresponding magazine compartment
button 3 lights up continuously. The
system starts playing the CD.
The loading procedure is completed.
�Retract the CD changer* (�page 56).
Loading all six magazine
compartments
1CD changer* release button
2CD slot
3Magazine compartement buttonsInitial situation: all magazine compart-
ments empty.
The CD changer* loads all magazine
compartments beginning with
compartment 1.
�Access the CD changer* (�page 56).
�Press and hold the button 3 of an
empty magazine compartment for
more than 2 seconds.
The LEDs of all magazine compartment
buttons 3 briefly light up green
several times.
�Wait until the LED in the first magazine
compartment button 3 flashes green.
This indicates that the CD changer*
requests a CD.
�Insert an audio CD or a MP3 CD into
the CD slot 2 within approx. 15
seconds. Insert the CD face up.
The CD is pulled in. The magazine
compartment is loaded.
The red LED in the corresponding
magazine compartment button 3
lights up continuously.
The CD changer* then requests
insertion of the next CD. The LED in the
corresponding magazine compartment
button 3 flashes green.
�Repeat the last step until all six
magazine compartments are loaded.
The system plays the sixth CD. The
LEDs in all magazine compartment
buttons 3 light up red continously.
The loading procedure is completed.
�Retract the CD changer* (�page 56).
Page 66 of 242
64 Audio
CD operation
�Press a number key, e.g. 2 to select
the corresponding CD.
Loading CD 2 is displayed.
The CD is changed. The selected CD is
played back.
The message
No CD will
appear if a selected slot is empty.
In the Magazine menu
�Press the Magaz. soft key.
The Magazine menu is displayed.
�Push the joystick to g or G to
select a CD.
�Press E.
or
�Press one of the number keys 1 to
6.
The CD is changed. The message
Loading CD will appear.You can select a track:
�with g or h (�page 64)
�with the joystick (�page 65)
�with the number keypad (�page 65)
�with CD track scan (�page 66)
With g or h
�Activate the main CD menu
(
�page 61).
Next track
�Press h.
The next track is played.
i
The name of the CD instead of e.g. CD1
is displayed if the information is
available.
Track select
Page 67 of 242
65 Audio
CD operation
Previous track or start of title (if more
than 10 seconds of playing time has
elapsed)
�Press g.
Playback begins.
Select any desired track
�Press g or h as many times as
necessary.
With the joystick
�Push the joystick to g or G to play
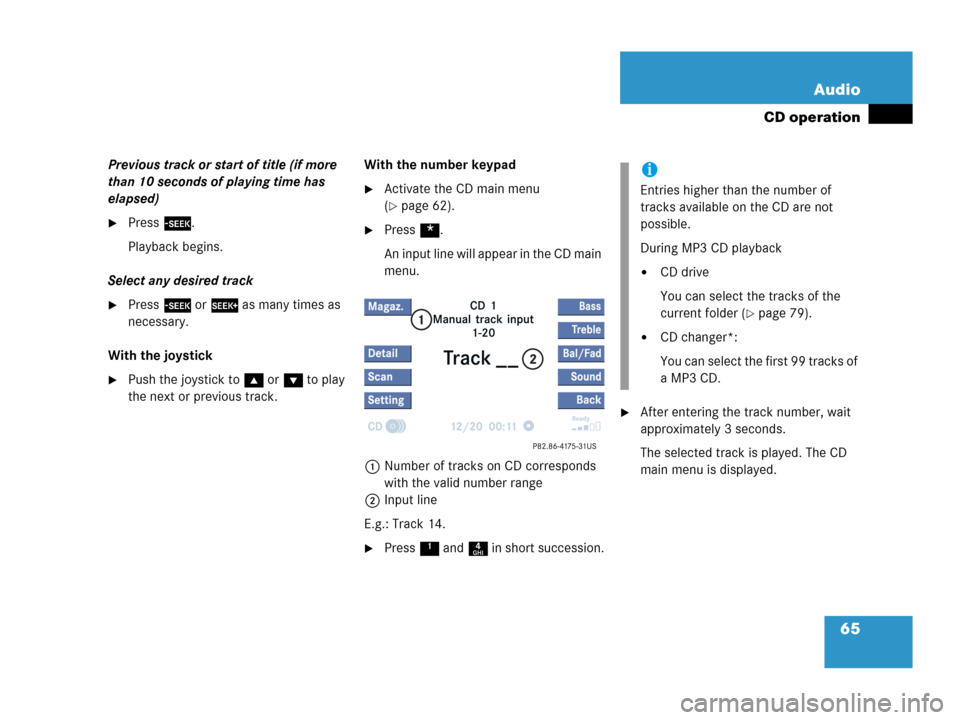
the next or previous track.With the number keypad
�Activate the CD main menu
(
�page 62).
�Press *.
An input line will appear in the CD main
menu.
1Number of tracks on CD corresponds
with the valid number range
2Input line
E.g.: Track 14.
�Press 1 and 4 in short succession.
�After entering the track number, wait
approximately 3 seconds.
The selected track is played. The CD
main menu is displayed.
i
Entries higher than the number of
tracks available on the CD are not
possible.
During MP3 CD playback
�CD drive
You can select the tracks of the
current folder (
�page 79).
�CD changer*:
You can select the first 99 tracks of
a MP3 CD.
Page 72 of 242

70 Audio
MP3 CD operation
� MP3 CD operation
Safety instructions
WarningG
In order to avoid distraction which could
lead to an accident, the driver should insert
CDs with the vehicle at a standstill and
operate the audio system only if permitted
by road, weather and traffic conditions.
Bear in mind that at a speed of just 30 mph
(approximately 50 km/h), your car covers a
distance of 44 feet (approximately 14 m)
every second.
WarningG
The CD drive is a Class 1 laser products.
There is a danger of invisible laser radiation
when you open or damage the cover.
Do not remove the cover. The CD drive does
not contain any parts which can be serviced
by the user. For safety reasons, have any ne-
cessary service work performed by qualified
personnel.
Tips on data storage media
!
Do not attach labels of any type to the
CD. They may become detached and
damage the drive.
!
Your CD drive has been designed to
play CDs which correspond to the IEC
60908 standard. Therefore only CDs
not exceeeding a thickness of 1.3 mm
can be used.
If you insert thicker data carriers, e.g.
ones that have data on both sides (one
side with DVD data, the other side with
audio data), they will become stuck and
damage the drive.
Do not play single CDs (80mm) with an
adapter. An adapter could become
stuck and damage the drive. Only use
12 cm diameter CDs.
Page 74 of 242

72 Audio
MP3 CD operation
File structure
When creating a MP3 CD, you can organize
MP3 tracks into folders. A folder can also
contain additional folders.
A CD may have a maximum of 255 folders
in total.
A maximum of 255 tracks are permissible
per folder.
Mathematically a maximum of 65025
tracks would result. However, this amount
is usually not reached since MP3 requires
approx. 1 MB storage per minute recorded.Track names and folder names
When creating an MP3 CD, you can assign
names to the MP3 tracks and folders.
COMAND uses these names in MP3 mode
for the corresponding display.
Please note the following when assigning
folder and track names:
�Track and folder names must contain
at least 1 character.
�Track names may contain up to fifty
characters. If a name exceeds this
character limit, COMAND will not be
able to display it in full.
�Track names must have the extension
“mp3”.
�A period must appear between the
track name and the file extension.
Example of a correct track name:
Track1.mp3
In the example, the track name con-
tains six characters, followed by a peri-
od and the file extension “mp3”.
Empty folders or folders containing data
other than MP3 tracks will not be dis-
played by COMAND.
Page 91 of 242
 operation*
You can operate the RSE via
�the Remote control and
�the button panel at the front on the two
rear monitors.
�Point the remote control")
89 Rear Audio/Video*
Rear Seat Entertainment (RSE) operation*
You can operate the RSE via
�the Remote control and
�the button panel at the front on the two
rear monitors.
�Point the remote control with the
infrared transmitter 1 at the receiver
diode l on one of the two rear
monitors.
Switching between the rear monitors
�Move the left/right monitor switch 3
on the right side of the remote control
to switch between the left monitor and
the right monitor.Soft key selection via remote control
�Turn the thumb wheel up or down.
You navigate through the soft keys. The
corresponding soft key on the selected
rear monitor changes its color.
�Press the thumb wheel.
The function is selected.
DVD playback requirements
i
Some DVDs may not comply with the
NTSC or PAL TV playback standards.
Sound, picture and other playback
problems may occur when you play
such DVDs.
The RSE CD/DVD player can playback
video DVDs meeting the following
requirements:
�Correct regional code
�NTSC or PAL TV standard
The appropriate information is usually
given either on the DVD or the DVD
box. The factory setting of the RSE CD/
DVD player is regional code 1. The
setting can be changed at an
authorized Mercedes-Benz Center. This
will allow you to playback video DVDs
with other regional codes, as long as
they comply with the NTSC or PAL TV
standard.
Operating the Rear Seat
Entertainment* (RSE)
Page 93 of 242
 operation*
FunctionPage
1
Remote control
Infrared transmitter
2Thumb wheel. Turn to
select a soft key and press
to confirm
96
3Left/right monitor s")
91 Rear Audio/Video*
Rear Seat Entertainment (RSE) operation*
FunctionPage
1
Remote control
Infrared transmitter
2Thumb wheel. Turn to
select a soft key and press
to confirm
96
3Left/right monitor switch
4H,h,g,G
Function selection
Press E to confirm
5
Muting
111
6
Not available. Message No
TV
7or
Switching to the external
video source, if connected
or
AUX menu
108
108
8
System menu109
FunctionPage
9
Switching on and off92
a
Switching to the mode
corresponding to the
inserted CD
b Monitor off/on112
cLED113
dGH
Track select
(CD, MP3 CD)
Fast forward/reverse
(CD, MP3 CD, DVD)
Scene/chapter skip (DVD)
97, 101
98, 101,
107
107
eAdjusting the headset
volume
ç Volume down
æ Volume up
96
fBattery compartment
gRetainer clip
hCover
FunctionPage
jLocating lugs
kBatteries - 2 Type AAA 1.5 V
l
Rear monitor
Infrared receiver diode
m
Switching monitor on and
off
92
n
Adjusting the display
brightness
96
o
Adjusting the headset
volume
96
pHeadset connector socket92
q
RSE CD/DVD player
CD/DVD slot
94
rVideo socket and two audio
(L - left, R - right) sockets
95
s Eject button94
Page 95 of 242
 operation*
In all cases, one of the following
messages will appear on the monitor
Please wait, loading disc...
The RSE CD/DVD player will load the")
93 Rear Audio/Video*
Rear Seat Entertainment (RSE) operation*
In all cases, one of the following
messages will appear on the monitor
Please wait, loading disc...
The RSE CD/DVD player will load the
CD which was in the drive when the
system was switched off. The
corresponding menu will appear on the
rear monitors and playback will begin.
Drive empty
�Load a CD into the RSE CD/DVD
player.Switching off
�Press on the rear monitor or press
on the remote control again.
or
�Turn the key in the starter switch to
position 0 and pull the key out.
The message
Vehicle key remo-
ved. Please confirm by pres-
sing OK so that the device
continues operating.
will appear
for approx. 10 seconds. If no action is
taken the system will turn off. If
OK is
selected via the remote the system will
continue to operate for approx. 30 mi-
nutes.ML and GL class
The RSE CD/DVD player is located under
the right rear seat.
R class
The RSE CD/DVD player is located at the
front of the middle row console.
R class illustrated
1RSE CD/DVD player
i
If the system is being used while the
key is out or inserted in position 0, the
system will switch off after approx. 30
minutes.
Loading/ejecting CDs