Page 206 of 723
205 Control systems
COMAND navigation system (during route guidance)
Detour function
�Select “Route” � “Detour” in map view
with the menu system displayed
(
�page 157).
The detour function display appears.
�Setting length of the blockage:
Select “More” or “Less” until the de-
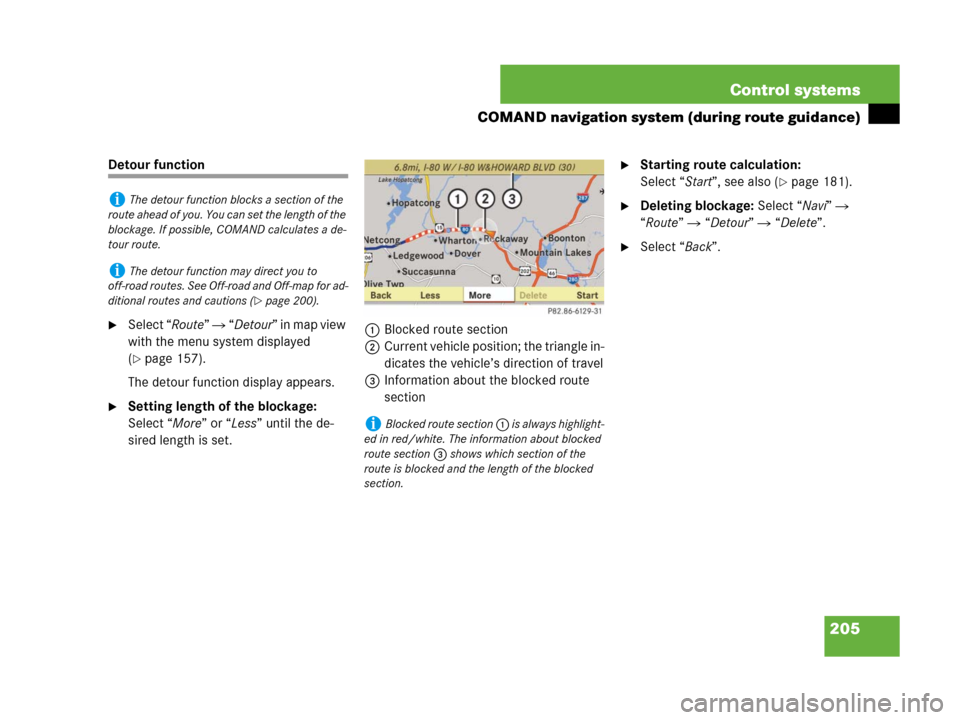
sired length is set.1Blocked route section
2Current vehicle position; the triangle in-
dicates the vehicle’s direction of travel
3Information about the blocked route
section
�Starting route calculation:
Select “Start”, see also (
�page 181).
�Deleting blockage: Select “Navi” �
“Route” � “Detour” � “Delete”.
�Select “Back”.
iThe detour function blocks a section of the
route ahead of you. You can set the length of the
blockage. If possible, COMAND calculates a de-
tour route.
iThe detour function may direct you to
off-road routes. See Off-road and Off-map for ad-
ditional routes and cautions (
�page 200).
iBlocked route section 1 is always highlight-
ed in red/white. The information about blocked
route section 3 shows which section of the
route is blocked and the length of the blocked
section.
Page 217 of 723
216 Control systems
COMAND address book
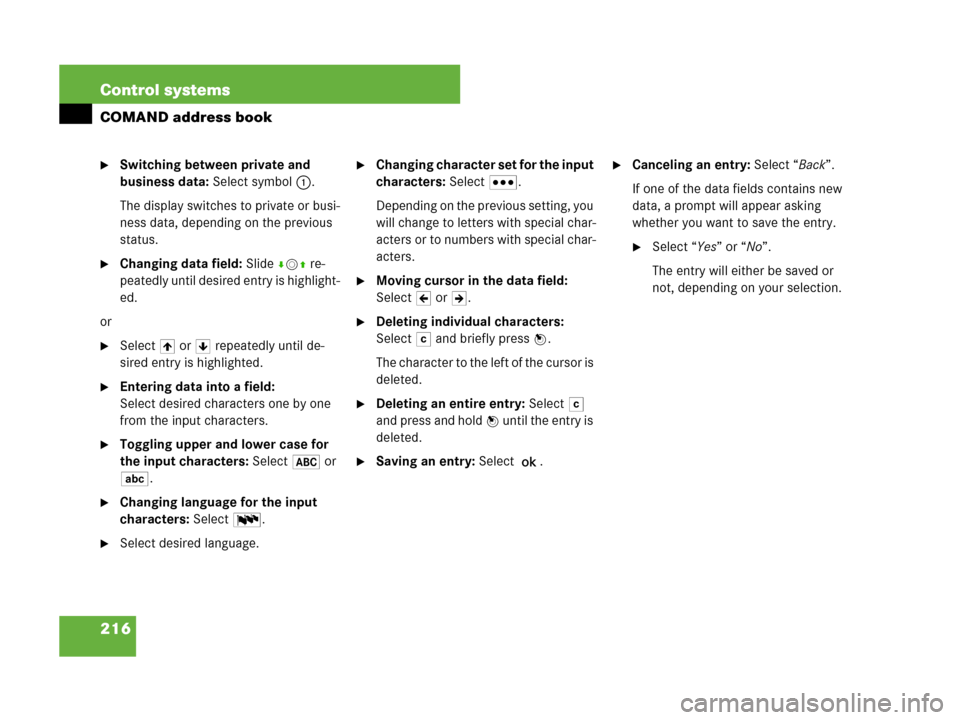
�Switching between private and
business data: Select symbol 1.
The display switches to private or busi-
ness data, depending on the previous
status.
�Changing data field: Slide rmq re-
peatedly until desired entry is highlight-
ed.
or
�Select [ or ] repeatedly until de-
sired entry is highlighted.
�Entering data into a field:
Select desired characters one by one
from the input characters.
�Toggling upper and lower case for
the input characters: Select& or
(.
�Changing language for the input
characters: Select!.
�Select desired language.
�Changing character set for the input
characters: Select#.
Depending on the previous setting, you
will change to letters with special char-
acters or to numbers with special char-
acters.
�Moving cursor in the data field:
SelectY or Z.
�Deleting individual characters:
Select) and briefly press n.
The character to the left of the cursor is
deleted.
�Deleting an entire entry: Select)
and press and hold n until the entry is
deleted.
�Saving an entry: Select?.
�Canceling an entry: Select “Back”.
If one of the data fields contains new
data, a prompt will appear asking
whether you want to save the entry.
�Select “Yes” or “No”.
The entry will either be saved or
not, depending on your selection.
Page 219 of 723
218 Control systems
COMAND address book
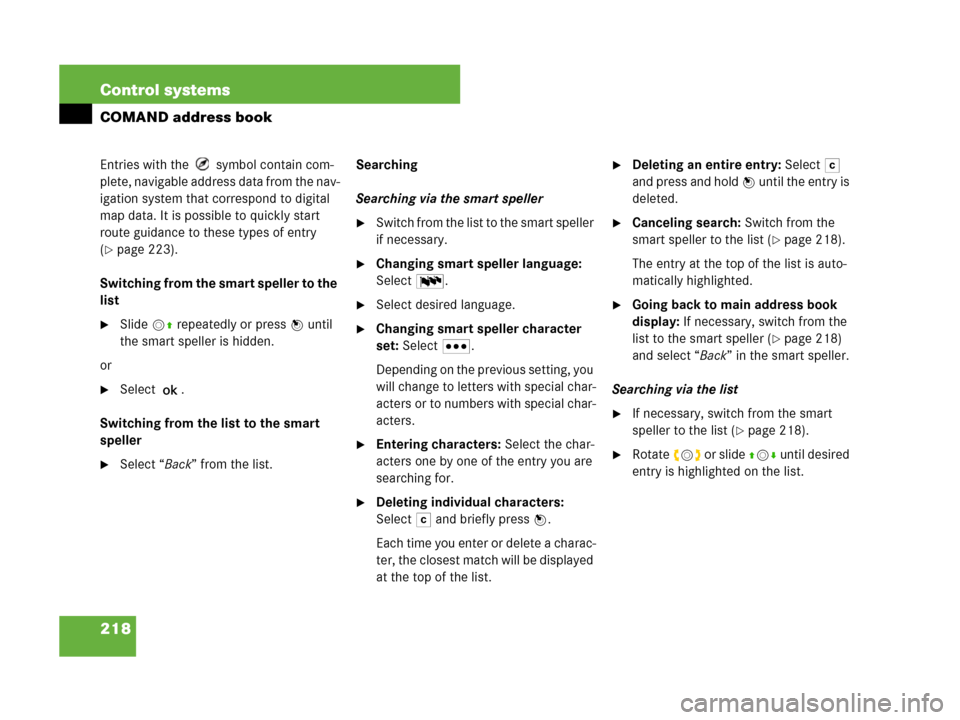
Entries with the symbol contain com-
plete, navigable address data from the nav-
igation system that correspond to digital
map data. It is possible to quickly start
route guidance to these types of entry
(
�page 223).
Switching from the smart speller to the
list
�Slide mq repeatedly or press n until
the smart speller is hidden.
or
�Select ?.
Switching from the list to the smart
speller
�Select “Back” from the list.Searching
Searching via the smart speller
�Switch from the list to the smart speller
if necessary.
�Changing smart speller language:
Select!.
�Select desired language.
�Changing smart speller character
set: Select#.
Depending on the previous setting, you
will change to letters with special char-
acters or to numbers with special char-
acters.
�Entering characters: Select the char-
acters one by one of the entry you are
searching for.
�Deleting individual characters:
Select) and briefly press n.
Each time you enter or delete a charac-
ter, the closest match will be displayed
at the top of the list.
�Deleting an entire entry: Select)
and press and hold n until the entry is
deleted.
�Canceling search: Switch from the
smart speller to the list (
�page 218).
The entry at the top of the list is auto-
matically highlighted.
�Going back to main address book
display: If necessary, switch from the
list to the smart speller (
�page 218)
and select “Back” in the smart speller.
Searching via the list
�If necessary, switch from the smart
speller to the list (
�page 218).
�Rotate ymz or slide qmr until desired
entry is highlighted on the list.
Page 228 of 723
227 Control systems
COMAND system settings
�COMAND system settings
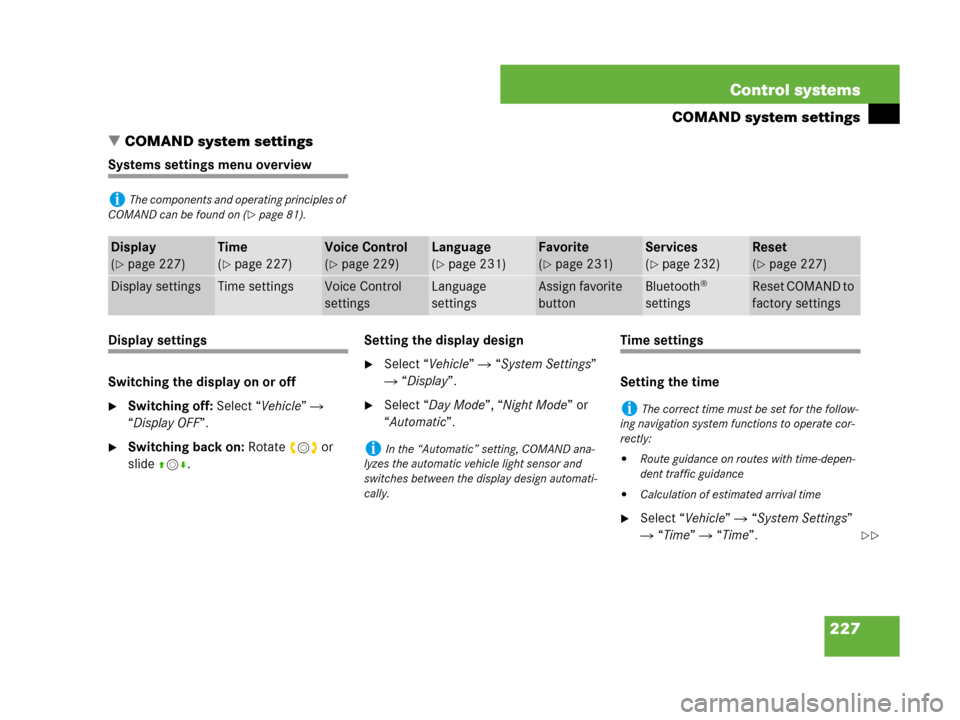
Systems settings menu overview
Display settings
Switching the display on or off
�Switching off: Select “Vehicle” �
“Display OFF”.
�Switching back on: Rotate ymz or
slideqmr.Setting the display design
�Select “Vehicle” � “System Settings”
� “Display”.
�Select “Day Mode”, “Night Mode” or
“Automatic”.
Time settings
Setting the time
�Select “Vehicle” � “System Settings”
� “Time” � “Time”.
iThe components and operating principles of
COMAND can be found on (
�page 81).
Display
(
�page 227)
Time
(
�page 227)
Voice Control
(
�page 229)
Language
(
�page 231)
Favorite
(
�page 231)
Services
(
�page 232)
Reset
(
�page 227)
Display settingsTime settingsVoice Control
settingsLanguage
settingsAssign favorite
buttonBluetooth®
settingsReset COMAND to
factory settings
iIn the “Automatic” setting, COMAND ana-
lyzes the automatic vehicle light sensor and
switches between the display design automati-
cally.
iThe correct time must be set for the follow-
ing navigation system functions to operate cor-
rectly:
�Route guidance on routes with time-depen-
dent traffic guidance
�Calculation of estimated arrival time
��
Page 229 of 723
228 Control systems
COMAND system settings
�Selecting hour or minute(s):
Slideomp.
�Setting value: Rotate ymz or
slideqmr.
�Saving setting: Press n.Setting the time zone and switching be-
tween Daylight Saving Time and stan-
dard time
�Setting time zone: Select “Vehicle” �
“System Settings” � “Time” � “Time
Zone”.
The country list appears. The dot R in
front of a list entry indicates the cur-
rent setting.
�Select the country in which you are cur-
rently driving.
A time zone list may also be displayed,
depending on the country selected.
�Select desired time zone.Subsequent operation depends on:
�whether your navigation system has
GPS reception
�which country you have previously set
You may either:
�manually switch between “Daylight
Savings Time (Summer)” and “Standard
time (Winter)” in a list
or
�switch automatic Daylight Saving Time
to standard time changeover (and vice
versa) on or off
�Switching manually: Select “Daylight
Savings Time (Summer)” or “Standard
time (Winter)”.
The dot R in front of a list entry indi-
cates the current setting.
iThe increment value for setting the minutes
depends on the situation. If GPS reception is
available, it is 30 minutes. If GPS reception is not
available, it is one minute.
iThe correct time zone and Daylight Saving
Time/standard time must be set for the follow-
ing navigation system functions to operate cor-
rectly:
�Route guidance on routes with time-depen-
dent traffic guidance
�Calculation of estimated arrival time
��
Page 230 of 723
229 Control systems
COMAND system settings
�Switching automatic changeover on
or off: Select “Automatic Daylight Sav-
ings Time”.
You have switched the function on or
off. A checkmark appears when the
function is switched on.
�Saving setting and exit the menu:
Slide omp.Setting the date
�Select “Vehicle” � “System Settings”
� “Time” � “Date”.
�Selecting month, day or year:
Slideomp.
�Setting value: Rotate ymz or
slideqmr.
�Saving setting: Press n.
Setting the time/date format
�Select “Vehicle” � “System Settings”
� “Time” � “Format”.
The format list appears. The dots R in
front of the list entries indicate the cur-
rent setting.
�Changing format setting:
Select desired format.
�Saving setting and exit the menu:
Slide omp.
Voice Control settings
Switching help window on or off
�Select “Vehicle”� “System Settings”
� “Voice Control”.
�Select “Help Window”.
You can switch the help window on or
off. A checkmark appears when the
help window is switched on.
Individualization
Using individualization, you can fine-tune
Voice Control to your own voice and thus
improve voice recognition. The ability of
the system to recognize the commands of
other users does not deteriorate as a re-
sult.
Individualization consists of two parts. You
train the system to recognize digits in the
first part and specific commands in the
second part.
iIf you have switched off the automatic
changeover function, you must change Daylight
Saving Time to standard time and vice versa
yourself.
Page 231 of 723
230 Control systems
COMAND system settings
Starting new individualization
�Select “Vehicle” � “System Settings”
� “Voice Control” � “Start new indi-
vidualization”.
A prompt appears asking whether you
would like further information.
�Select “Yes” or “No”.
If you select “No”, the first part of indi-
vidualization begins.
If you select “Yes”, an information dis-
play will be shown with audio instruc-
tion.
�Closing display: Select “OK”.
The first part of individualization be-
gins.
At the end of the first part, you will see
a prompt asking whether you want to
begin the second part.
�Select “Yes” or “No”.
If you select “No”, individualization will
be canceled. The data from the first
part is saved automatically.
If you select “Yes”, the second part be-
gins.
Individualization is completed at the end of
the second part. You will see a message to
this effect. The data from the second part
is saved automatically.
Canceling during the first or second part
of individualization
�Select “Cancel”.
A prompt appears asking whether you
really do want to cancel.
�Select “Yes” or “No”.
If you select “Yes”, individualization will
be canceled. The data from the part at
which you exited is not saved.
If you select “No”, the part at which you
stopped begins again.Deleting existing individualization data
�Select “Vehicle” � “System Settings”
� “Voice Control” � “Delete individu-
alization”.
A prompt appears asking whether you
really do want to delete.
�Select “Yes” or “No”.
The individualization data will either be
deleted or not, depending on your se-
lection.
iIt is only possible to start individualization
with the vehicle stationary. After starting the
session, the system will guide you through the in-
dividualization by means of acoustic instruc-
tions.
Page 232 of 723
231 Control systems
COMAND system settings
Setting the system language
�Select “Vehicle” � “System Settings”
� “Language”.
The language list appears. A dot R in-
dicates the current setting.
�Changing setting: Select desired lan-
guage.
The language is set.
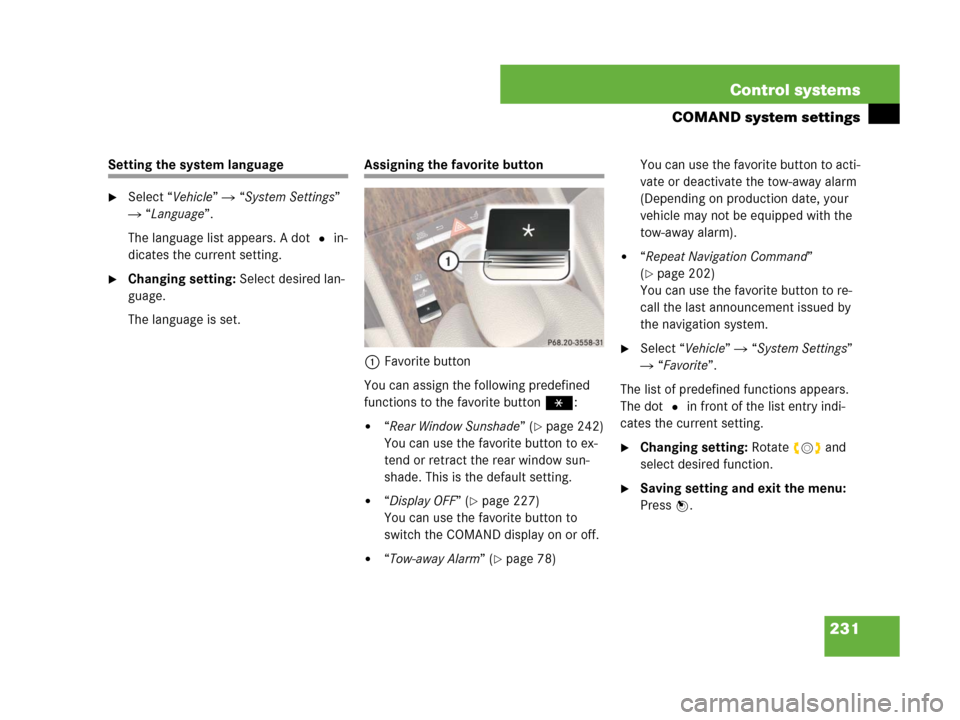
Assigning the favorite button
1Favorite button
You can assign the following predefined
functions to the favorite buttonP:
�“Rear Window Sunshade” (�page 242)
You can use the favorite button to ex-
tend or retract the rear window sun-
shade. This is the default setting.
�“Display OFF” (�page 227)
You can use the favorite button to
switch the COMAND display on or off.
�“Tow-away Alarm” (�page 78)You can use the favorite button to acti-
vate or deactivate the tow-away alarm
(Depending on production date, your
vehicle may not be equipped with the
tow-away alarm).
�“Repeat Navigation Command”
(
�page 202)
You can use the favorite button to re-
call the last announcement issued by
the navigation system.
�Select “Vehicle” � “System Settings”
� “Favorite”.
The list of predefined functions appears.
The dot R in front of the list entry indi-
cates the current setting.
�Changing setting: Rotate ymz and
select desired function.
�Saving setting and exit the menu:
Press n.