Page 73 of 90
 73
Audio Operation
nManual tuning
Pressing the seek tuning button will change the frequency higher or lower.
nSeek tuning
Pressing and holding the seek tuning button ( , ) will cause the tuner to seek")
73
Audio Operation
nManual tuning
Pressing the seek tuning button will change the frequency higher or lower.
nSeek tuning
Pressing and holding the seek tuning button ( , ) will cause the tuner to seek a higher
or lower frequency automatically.
Note
If you continue to press and hold the button, the frequency will continue changing without
stopping.
nScan tuning
Press the (SCAN) button to automatically sample strong stations.
Scanning stops at each station for about 5 seconds. To hold a station, press the (SCAN)
button again during this interval.
nPreset channel tuning
The 8 preset channels can be used to store 8 AM and 16 FM stations.
1. To set a channel first select AM, FM1, or FM2. Tune to the desired station.
2.Select any channel preset on-screen button for about 2 seconds until a beep sound is heard. The selected preset channel number and station frequency will be displayed. The
station is now held in the memory.
3.Repeat this operation for the other stations and bands you want to store. To tune one in the memory, select AM, FM1, or FM2 and then press its channel preset button. The station
frequency and the channel number will be displayed.
Note
If the power supply is interrupted (fuse blows or the battery is disconnected), the preset
channels will be canceled.
nAuto memory tuning
This is especially useful when driving in an area where the local stations are not known. Addi-
tional AM/FM stations can be stored without disturbing the previously set channels.
Select and hold the on-screen button for about 2 seconds until a beep sound is heard;
the system will automatically scan and temporarily store up to 8 stations with the strongest
frequencies in each selected band in that area.
nAudio Sound Adjustment
Refer to “Power/Volume/Sound Controls”.
�%�:�����A�'�#���D�Q�Q�M�����2�C�I�G�����������6�W�G�U�F�C�[�����5�G�R�V�G�O�D�G�T�������������������������������2�/
Page 74 of 90
 74
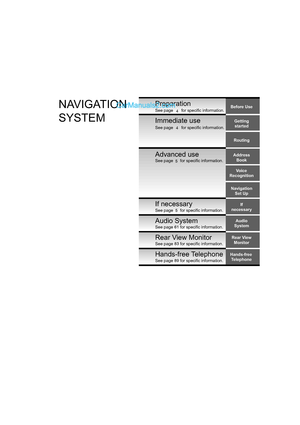
Before
UseGetting
started
RoutingAddress
Book
Vo i c e Recognition
Navigation
Set Up
RDM-TMC
Audio Operation
Navigation
Set Up
nSatellite Radio (SAT)
Vehicles equipped with the separately purc")
74
Before
UseGetting
started
RoutingAddress
Book
Vo i c e Recognition
Navigation
Set Up
RDM-TMC
Audio Operation
Navigation
Set Up
nSatellite Radio (SAT)
Vehicles equipped with the separately purchased SIRIUS digital satellite radio unit have the
ability to receive up to 100 channels of digital quality programming coast to coast via satellite.
For information on use, read the Satellite Radio Kit manual accompanying the SIRIUS digital
satellite radio unit. A subscription to SIRIUS digital satellite radio service is required (available
in the U.S. - Except Alaska and Hawaii) to enable this feature once the separately purchased
SIRIUS digital satellite radio unit has been installed. For subscription information or digital
satellite radio technical issues contact SIRIUS directly at:
-Web: www.siriusradio.com
-Phone (24 hrs/day, 7 days/week): 888-539-SIRI (7474)
-E-mail: [email protected]
-Mailing Address: Sirius Satellite Radio
1221 Avenue Of The Americas
New York, NY 10020
Attention: Customer Care
Include your Sirius Radio ESN (Electronic Serial Number) when subscribing or requesting
technical assistance. See the Satellite Radio Kit manual accompanying the SIRIUS unit for
complete satellite radio activation procedures and information on how to display the ESN#.
�%�:�����A�'�#���D�Q�Q�M�����2�C�I�G�����������6�W�G�U�F�C�[�����5�G�R�V�G�O�D�G�T�������������������������������2�/
Page 75 of 90
 75
Audio Operation
nInserting the CD
The display must be open (lowered) to insert the CD.
The CD must be label-side up when inserting. The auto-loading mechanism will set the CD
and begin play. There")
75
Audio Operation
nInserting the CD
The display must be open (lowered) to insert the CD.
The CD must be label-side up when inserting. The auto-loading mechanism will set the CD
and begin play. There will be a short lapse before play begins while the player reads the digi-
tal signals on the CD.
Note
"IN" is displayed on the tray number for a CD that is inserted.
nDuring CD playback
The disc title, the track title, and the artist name will be displayed.
nDuring MP3 CD playback
The album title, the track title, the folder name, the file number, and the artist name will be dis-
played.
Note
The CD will begin playback automatically after insertion. A CD cannot be inserted while the
display reads "WAIT".
Operating the In-Dash CD Changer
Track down button Track up button
on-screen button
on-screen button
Disc on-screen button
Scan button
Folder search on-screen button
�%�:�����A�'�#���D�Q�Q�M�����2�C�I�G�����������6�W�G�U�F�C�[�����5�G�R�V�G�O�D�G�T�������������������������������2�/
Page 76 of 90
 76
Before
UseGetting
started
RoutingAddress
Book
Vo i c e Recognition
Navigation
Set Up
RDM-TMC
Audio Operation
Navigation
Set Up
nNormal insertion
1.Press the (LOAD/EJECT) button.
2.Press the")
76
Before
UseGetting
started
RoutingAddress
Book
Vo i c e Recognition
Navigation
Set Up
RDM-TMC
Audio Operation
Navigation
Set Up
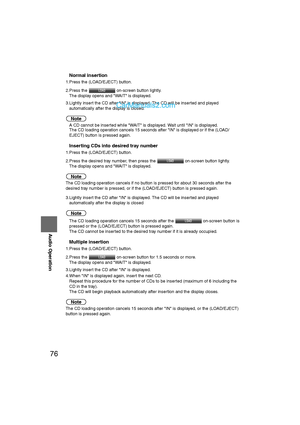
nNormal insertion
1.Press the (LOAD/EJECT) button.
2.Press the
on-screen button lightly.
The display opens and "WAIT" is displayed.
3.Lightly insert the CD after "IN" is displayed. The CD will be inserted and played automatically after the display is closed.
Note
lA CD cannot be inserted while "WAIT" is displayed. Wait until "IN" is displayed.
l The CD loading operation cancels 15 seconds after "IN" is displayed or if the (LOAD/
EJECT) button is pressed again.
nInserting CDs into desired tray number
1.Press the (LOAD/EJECT) button.
2.Press the desired tray number, then press the on-screen button lightly.
The display opens and "WAIT" is displayed.
Note
The CD loading operation cancels if no button is pressed for about 30 seconds after the
desired tray number is pressed, or if the (LOAD/EJECT) button is pressed again.
3.Lightly insert the CD after "IN" is displayed. The CD will be inserted and played automatically after the display is closed
Note
lThe CD loading operation cancels 15 seconds after the on-screen button is
pressed or the (LOAD/EJECT) button is pressed again.
l The CD cannot be inserted to the desired tray number if it is already occupied.
nMultiple insertion
1.Press the (LOAD/EJECT) button.
2.Press the on-screen button for 1.5 seconds or more.
The display opens and "WAIT" is displayed.
3.Lightly insert the CD after "IN" is displayed.
4.When "IN" is displayed again, insert the next CD. Repeat this procedure for the number of CDs to be inserted (maximum of 6 including the
CD in the tray).
The CD will begin playback automatically after insertion and the display closes.
Note
The CD loading operation cancels 15 seconds after "IN" is displayed, or the (LOAD/EJECT)
button is pressed again.
�%�:�����A�'�#���D�Q�Q�M�����2�C�I�G�����������6�W�G�U�F�C�[�����5�G�R�V�G�O�D�G�T�������������������������������2�/
Page 77 of 90
 77
Audio Operation
nNormal ejection
1.Press the (LOAD/EJECT) button.
2.Press the on-screen button lightly.
3.The CD ejects after the display is opened and the desired tray number flashes.
4.The displ")
77
Audio Operation
nNormal ejection
1.Press the (LOAD/EJECT) button.
2.Press the on-screen button lightly.
3.The CD ejects after the display is opened and the desired tray number flashes.
4.The display closes automatically after the ejection is fully completed.
Note
If the CD is not removed from the slot within 15 seconds, it will be re-inserted. When this
happens, or if the (LOAD/EJECT) button is pressed again, the CD ejecting operation will be
canceled.
nEjecting CDs from desired tray number
1.Press the (LOAD/EJECT) button.
2.Press the desired CD tray number, then press on-screen button lightly.
Note
The CD ejecting operation cancels if the on-screen button is not pressed for
about 30 seconds after the desired tray number is pressed, or if the (LOAD/EJECT) button is
pressed again.
3.The CD will be ejected automatically after the display is opened and the desired tray number flashes.
Note
lIf only one CD is inserted in the tray, the display opens and the CD is ejected without
pressing on-screen button.
l If the CD is not removed from the slot within 15 seconds or if the (LOAD/EJECT) button is
pressed, the CD ejecting operation will be canceled.
4.The display closes after the CD is ejected.
nMultiple ejection
1.Press the (LOAD/EJECT) button.
2.Press the on-screen button for 1.5 seconds or more. The CD ejects after the display is opened and the desired tray number flashes
3.Pull out the CD.
4.The next CD will be ejected automatically. This operation repeats until all the CDs are taken out.
Note
If the CD is not removed from the slot within 15 seconds or if the (LOAD/EJECT) button is
pressed, the CD ejecting operation will be canceled.
�%�:�����A�'�#���D�Q�Q�M�����2�C�I�G�����������6�W�G�U�F�C�[�����5�G�R�V�G�O�D�G�T�������������������������������2�/
Page 78 of 90
 78
Before
UseGetting
started
RoutingAddress
Book
Vo i c e Recognition
Navigation
Set Up
RDM-TMC
Audio Operation
Navigation
Set Up
nPlaying
Press the (CD) button to start play when a CD is in the")
78
Before
UseGetting
started
RoutingAddress
Book
Vo i c e Recognition
Navigation
Set Up
RDM-TMC
Audio Operation
Navigation
Set Up
nPlaying
Press the (CD) button to start play when a CD is in the unit.
If there is no CD in the unit when the (CD) button is pressed, “NO DISC”
will flash on and off.
The song information will be displayed during playback.
Music CD
MP3 CD
Note
l
"-------" will be displayed for files without a file, track or other name input.
l This unit can read English (including numerals), French, and Spanish one-byte characters.
l The displayable number of characters on each title is a maximum of 64.
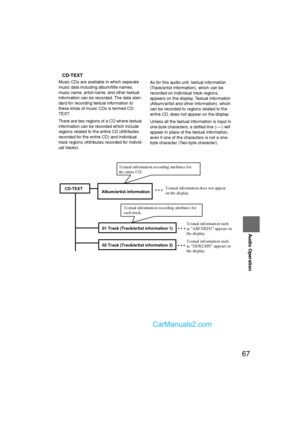
(Music CDs)
l Although textual information (Track/artist information) recorded to each track appears in the
display, textual information (Album/artist information) recorded for the entire CD does not
appear in the display.
For details, refer to "CD-TEXT" ( page 62).
Select the on-screen button if the whole title cannot be displayed at one time. The
screen changes to display the rest of the characters.
�%�:�����A�'�#���D�Q�Q�M�����2�C�I�G�����������6�W�G�U�F�C�[�����5�G�R�V�G�O�D�G�T�������������������������������2�/
Page 79 of 90
 79
Audio Operation
nFast-forward/Reverse
Press the track up button ( ) to advance through a track at high speed until a beep sound
is heard.
Press the track down button ( ) to reverse through a track")
79
Audio Operation
nFast-forward/Reverse
Press the track up button ( ) to advance through a track at high speed until a beep sound
is heard.
Press the track down button ( ) to reverse through a track at high speed until a beep sound
is heard.
nTrack search
Press the track up button ( ) once to skip forward to the beginning of the next track.
Press the track down button ( ) once to skip back to the beginning of the current track.
Press the track down button ( ) during track search to skip back to the beginning of the
previous track.
nDisc search
To change the disc, press any DISC on-screen button during playback.
nFolder search (during MP3 CD playback)
To change to the previous folder, select the on-screen button, or select the on-screen
button to advance to the next folder.
nMusic scan
This feature helps to find a program by playing about the first 10 seconds of each track.
Press the (SCAN) button during play to start scan play operation (the track number will flash).
Press the (SCAN) button once again to cancel scan play.
Note
If the unit is left in scan, normal play will resume where scan was selected.
�%�:�����A�'�#���D�Q�Q�M�����2�C�I�G�����������6�W�G�U�F�C�[�����5�G�R�V�G�O�D�G�T�������������������������������2�/
Page 80 of 90
 80
Before
UseGetting
started
RoutingAddress
Book
Vo i c e Recognition
Navigation
Set Up
RDM-TMC
Audio Operation
Navigation
Set Up
nRepeat play
During music CD playback
1.Select the on-screen bu")
80
Before
UseGetting
started
RoutingAddress
Book
Vo i c e Recognition
Navigation
Set Up
RDM-TMC
Audio Operation
Navigation
Set Up
nRepeat play
During music CD playback
1.Select the on-screen button during playback to play the current track repeatedly.
2.Select the button again to cancel the repeat play.
During MP3 CD playback
(Track repeat)
1.Select the on-screen button during playback to play the current track repeatedly.
2.To cancel the repeat play, select the button again after 3 seconds.
(Folder repeat)
1.Select the on-screen button during playback, and then select the button again within 3 seconds to play the tracks in the current folder repeatedly.
2.Select the button again to cancel the repeat play.
Random play
Tracks are randomly selected and played.
During music CD playback
1.Select the on-screen button during playback to play the tracks on the CD randomly.
2.Select the button again to cancel the random play.
During MP3 CD playback
(Folder random)
1.Select the on-screen button during playback to play the tracks in the folder randomly.
2.To cancel the random play, press the button again after 3 seconds.
(CD random)
1.Select the on-screen button during playback, and then select the button again within 3 seconds to play the tracks on the CD randomly.
2.Select the button again to cancel the random play.
nAudio sound adjustment
Refer to “Power/Volume/Sound Controls”.
nOperating tips for audio control switch
VOICE switch
Refer to “Voice Recognition” ( page 40).
�%�:�����A�'�#���D�Q�Q�M�����2�C�I�G�����������6�W�G�U�F�C�[�����5�G�R�V�G�O�D�G�T�������������������������������2�/